Updated 9 Apr 2020
We have a FAQ on Understanding User Accounts explaing how account on Glow Blog are linked to your Glow account.
The Add users process has been enhanced. You can now find teaching sets and add groups of pupil at once.
Users can have different roles on a blog, these will come with different permissions:
Administrator – somebody who has access to all the administration features within a single site.
Editor – somebody who can publish and manage posts including the posts of other users.
Author – somebody who can publish and manage their own posts.
Contributor (+ Upload) – like Contributors (see below) but with the ability to upload files. (This is not a standard WordPress role but one developed for Glow. It allows pupils or staff who have the role to create posts with images and other media and save them as pending. Editors or Admins can them publish.
Contributor – somebody who can write and manage their own posts but cannot publish them.
Subscriber – somebody who can only manage their profile.
The Subscriber role can be used to allow Glow users to see a private blog. It will also allow the recording of subscribers’ scores when using quizzes and activities created with the H5P plugin.
The roles of Administrator and Author are the most commonly used roles.
As of January 2016 we have extended the Add users screen so that it can use information from SEEMIS that has been passed to RM Unify. In particular Teaching Groups. This allows the selection and bulk addition of users.
Add Users Dashboard
On the Dashboard the Add Users screen is accessed from the Users section of the left hand navigation, you may have to expand the Users section by clicking on the drop down arrow [1] before clicking Add Users [2].There are now two sections to the Add Users Screen: Add Curricular Groups and Add Users. the screen defaults to Add Curricular Groups.
Teachers can select Local Authority and the Establishment, Pupils can only select groups from their own Establishment [3].
Adding Curricular Groups 1: Local Authority
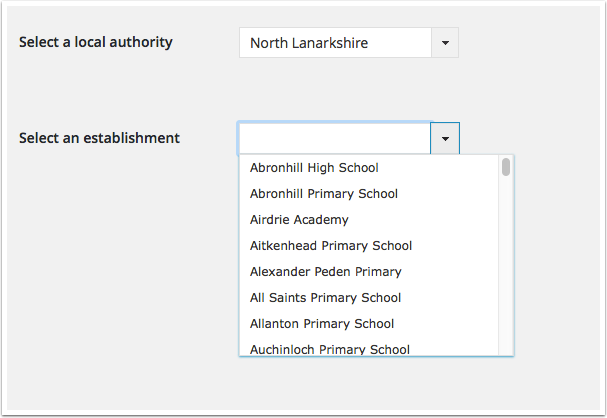
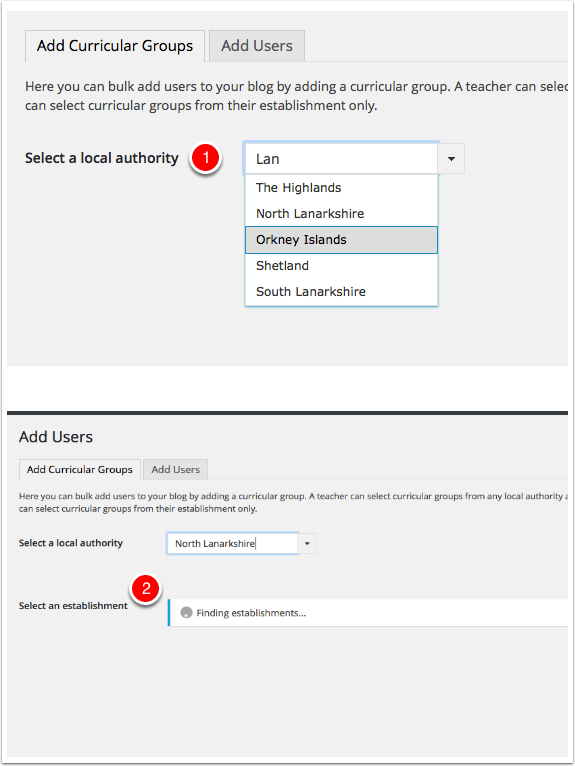
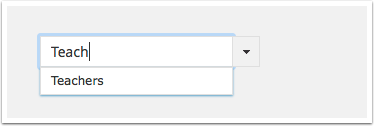
Teachers are Presented with a Popup list to select the Local Authority They want. They can either select from the list manually or filter it by typing [1].
Once they have selected a Local Authority the page will ‘pull in a list of establishments’[2].
Adding Curricular Groups 2: Establishments
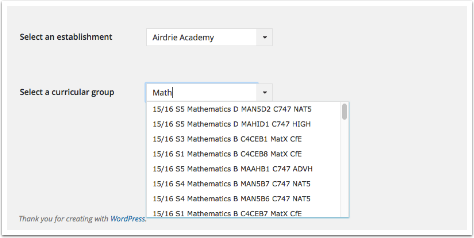
Once the Establishment Menu has loaded you can select form the list in the same way as above, either by filtering or selecting from the drop down menu. Once a selection has been made the curricular groups menu will load.
Adding Curricular Groups 3
Once the Curricular groups are added these can be selected from the drop down or via filtering in the same manner.
Adding Users from a Curricular Group
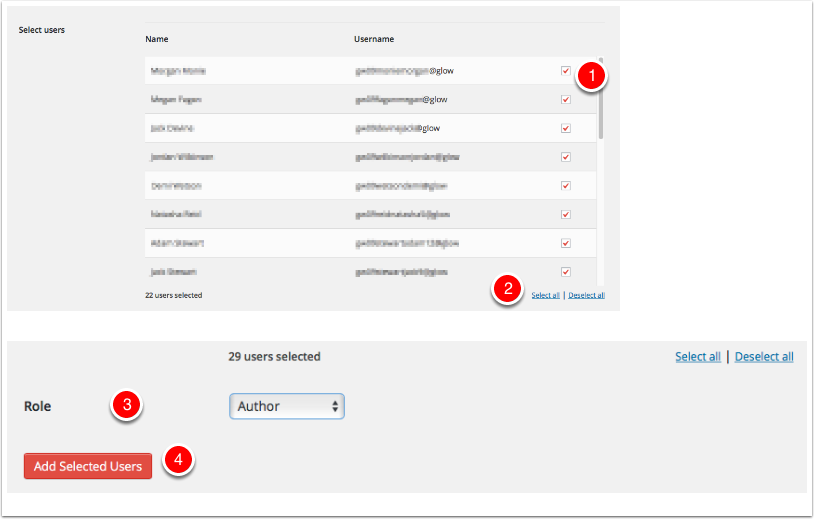
After the Curricular Group is selected the list of pupils in that group is displayed. All pupils in the list are selected ready to be given a role in the blog. The selection can be changed by checking the checkboxes[1] (or choosing Selet All | Deselect All [2]).
Once the selection is finished you need to give the pupils a Role[3] and click Add Selected Users[4].
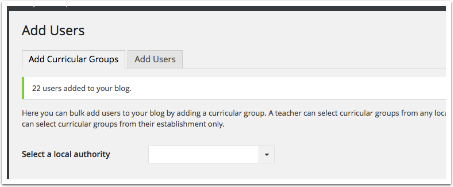
The Users are Added to the site
Adding Teachers
In addition to the Teaching Groups, there is a Group of all Teachers in the School. This can be found quickly by Typing teachers into the filter box.
Adding Curricular Groups Notes
The curricular groups functionality is brought into the blogs service via the RM Unify Graph API. This is in turn populated by a schools SEEMIS records. The groups are the Teaching Groups. If a schools SEEMIS records are not up to date and they have not been sent to SEEMIS via Click + Go pupils may not appear in the lists.
Primary School pupils do not seem to be in Teaching groups , but are in Registration Groups which are currently not supplied via the API. Hopefully the Teachers list will be of use in primary classrooms. In may be possible that RM will ad Registration groups in the future, if so the blog service could be altered to use that data.
Bonus Copy List of Usernames
In most browsers you can copy the list of username selected as a semicolon delimitated list, by clicking the link below the list. The link will not appear in unsupported Browsers [1].
<
Add Users
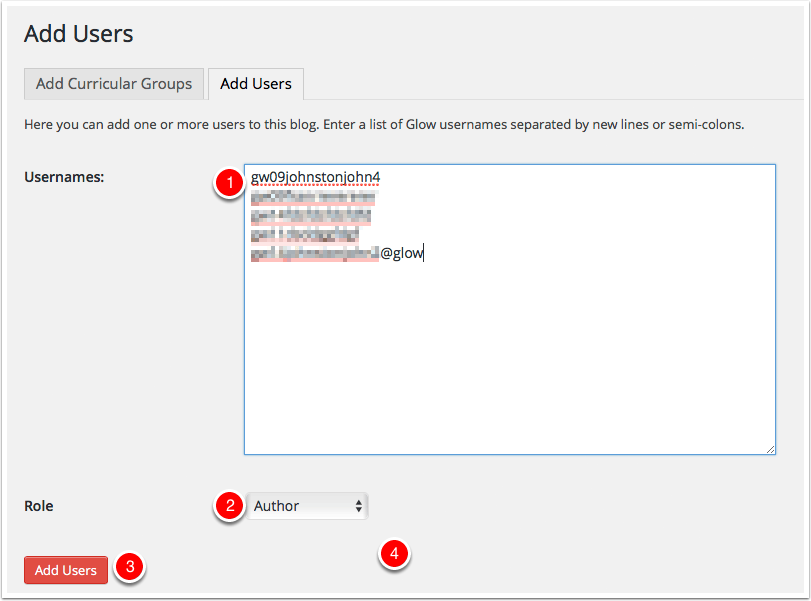
You can also add users via users names on the Second Tab of the Add Users page in the Dashboard.
To add users you
- Type or paste the list of users you want to add to the blog ino the username fields.
- Choose the WordPress role you want those users to have from the popup.
- Click Add Users
You will see a message at the top of the Add Users screen, to tell you the additon was successful.
Username optionally can have the @glow at the end of them. @glow will be added to any usernames without it automatically.
Usernames that are full email addresses will have everything after the @sign replaced with glow. It is possible to add any username, but only real accounts that can be logged on to Glow via RM Unify will allow users to log on.
All Users
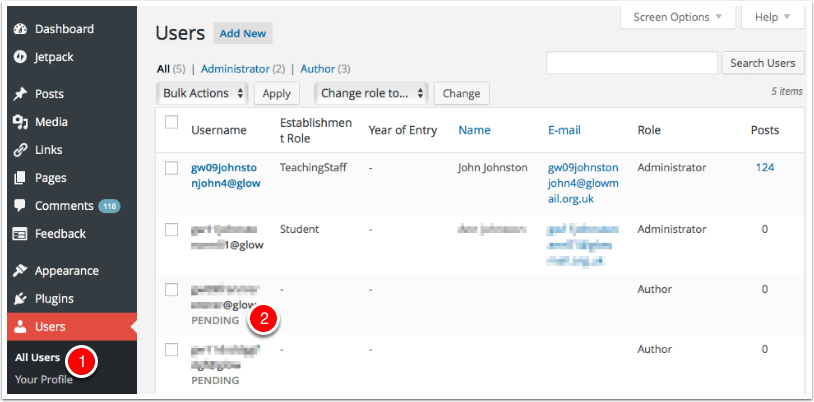
After users have been added to the blog they can be managed from the All Users screen [1].
You can view information about the users and change or remove their role on the blog.
Users that have been added who have not visited and logged into the blogs are added as NOT LOGGED IN YET (Previously marked Pending) [2]. Glow users will have the account on the blogs service created when they visit the blog home page for their LA after clicking the tile in RM Unify or by logging on by click site admin on a blog or visiting a page on a Glow only or privated blog.
Administrators can remove users from their blog or change their roles on this screen.
Removing a User
To remove a user:
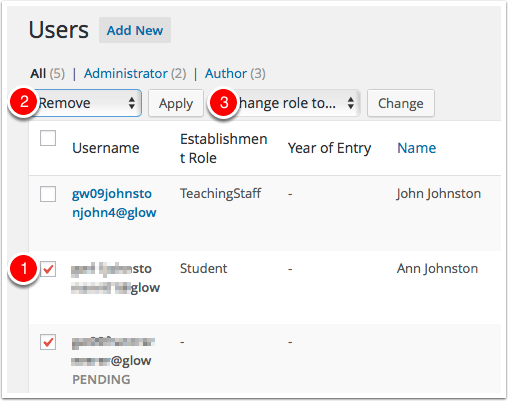
- Check the box beside their name (you can delete multiple users at once)
- Select Remove from the Bulk Actions pop up.
- Click Apply.
You will be taken to the Delete Users screen where you can make decisions to delete the posts from the user or attribute then to another user.
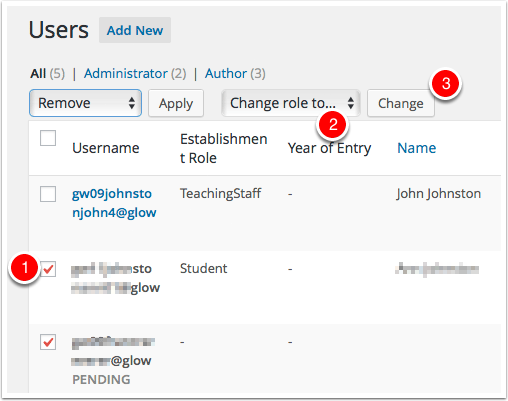
Changing a Users Role
To change a users role
- Check the box beside their name (you can change multiple users at once)
- Select a new role from the Change role to… pop up.
- Click Change.
Roles are the top of the Author & Users Dashboard page.
Removing yourself from a site (Teachers only)
There is not a native WordPress way to take yourself out of the users list on a site.
This can be inconvenient for staff who may be members of many ex-pupil’s portfolios. We have now developed a way of doing this.
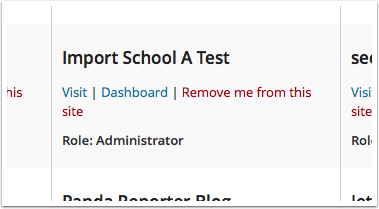
It is carried out from the My Sites page. Each site now has a Remove me from this site link.
If a user in having difficulty getting acess to your blog please check the Sorting Out Access Problems – Users Pending page.




Hi folks,
I’ve set up e-portfolios for my secondary pupils. I’ve set them up so that teachers can post comments but I would really like parents to be allowed to visit their children’s e-portfolios. Is there any permissions I could set up to allow this to happen?
Thanks
Hi Antoine,
The only set of permissions on Glow Blogs are private (limited to a set of signed on users), glow only and public. So the blogs would have to be public for parents to see.
For my own classes e-Portfolios I ask them to make them Glow Only. This means any teacher or pupil can sign in, see and comment. the pupils logon at home and show their parents. Quite a few parent mentioned looking at them at a recent parent’s night.