Category Archives: Collaborative tools

School websites with Glow blogs

Can you build our website for us?

In short, no! But we can help. One of the most common requests we get is that we can help schools build new websites in Glow and it is something that requires a sustainable and online support, rather than schools being reliant on someone from ECS . Here is the sustainable and online support!

Getting started

This site is a good place to start. It provides some rationale about why you want to use Glow blogs for a school website and contains help guides and working examples. It is an old site and hasn’t been updated in a long while, but still relevant as an overview of where to start.

A great guide from City of Edinburgh

Kate Farrell and Marco Capriglione of City of Edinburgh Council have written this superb guide: Glow-Blogs-guide-v1-2 (3) for their authority when using Glow Blogs.  Katie and Marco consented to this document being shared nationally. Our thanks to them for allowing this.

Look at other sites as you go

There are some really great school websites around Scotland, the majority of which have been created by schools themselves using just the online support that is available for Glow blogs and WordPress. There is a lot of that, right enough…

Here are some we recommend looking at:

https://blogs.glowscotland.org.uk/wl/harrysmuirps/

https://blogs.glowscotland.org.uk/st/FallinPrimary/

https://blogs.glowscotland.org.uk/pk/perthcitycampus/

https://blogs.glowscotland.org.uk/pk/AbernytePrimarySchool/

https://blogs.glowscotland.org.uk/pk/PitcairnWebsite/

https://blogs.glowscotland.org.uk/pk/Forgandenny/

Plan your layout and keep it fresh

The most successful school websites are active and updated regularly, thereby conveying something of the life of the school. For this reason, Glow blogs are great because they can be updated at any point, by anyone who is made admin of the Glow group that hosts the blog web part and the update posts automatically filter to the most recent content first. This is called ‘dynamic’ content, rather than ‘static’ because it works from a database filtered into categories that will always display content allocated to that category.

It’s all about posts and categories, NOT pages!

To further explain the point above, each bit of content is called a post and that post needs to be added to a category in order that it will appear on your site under your chosen menu categories. For example, this post here will be added to the categories ‘Glow help’ and ‘school websites’ so you should be able to click on either of those categories on this site’s menus and see this post there. Easy!

Categories are what should be used for web content that will be updated regularly and, remember, it’s good practice to have content like this. Why not have each class in your primary school provide weekly update posts of what they have been doing? Or how about having a category for each department in a secondary school, so that they can add departmental news and updates that will filter to their menu category.

When would you use pages?

Pages do not update like categories of posts do, so they should be used for content that will not need to be changed too often. This might be a school ‘About Us’ page or maybe a ‘Contact Us’ page because you will create those pages once and not need to update them again.

What about tags?

Tags are like labels. Let’s use a supermarket analogy to help you understand all of this better. Tesco has aisles of content with big banner headings above each aisle, explaining what is in that aisle: fruit and veg, for example. Think of those as the categories in your main menu. They are filled with products (posts) and those products (posts) are also given a label to explain, specifically what it is. The labels are your tags and users of your site can use them to click and find all posts labelled in the same way. Tesco might tag its tomatoes with the following labels: ‘tomatoes’, ‘Spain’, and add it to the category Fruit and Vegetables.

All modern websites work like this

In fact, if you look at any website you should be able to see it working exactly like Glow blogs do, with regularly updated content (posts) being added to categories so that the website can display them in the correct place. Try Amazon as another example. It has hundreds of categories with other categories underneath them, almost like generations in a family. This is useful to think of as you can, again, have multiple levels of categories in your blogs. Keeping the family analogy going this time, the main, top-leve categories are called ‘Parent’ categories and any sub-categories underneath that are called ‘child’ categories. Get it?

Video help for this

More help here specific to Glow

https://blogs.glowscotland.org.uk/glowblogs/GlowingHelp/?tag=basic-blogging

Click the icon to download the full guide from City of Edinburgh

User roles and wikis

Glow Wikis have to be created in a Glow group or school site, they cannot be placed on role based sites (e.g. Staff Home, Pupil Home)

The role a user has in a wiki is defined by their role in the area of Glow that is hosting the wiki, most commonly their role in the Glow group to which the wiki web part was added.

Glow Group Role Wiki Rights
Administrator Edit existing pages, add new pages, delete pages, rename pages, view page history
Web Designer Edit existing pages, add new pages, rename pages
Contributor Edit existing pages, add new pages, rename pages
Reader with Discussions Read only access
Reader Read only access

Glow wikis support wiki

Getting started with wikis: try one!

Glow wikis use a very popular open source platform called Mindtouch and a web search for ‘mindtouch wikis’ will reveal lots of help articles.

The best way to learn about wikis is actually to use one and, to this end, a sample Glow Wiki has been created.

You can access this here.

It covers areas such as:

Creating a page

Navigating around wikis

Levels of Access

Adding images and videos to wikis

Adding further content to a wiki page

How wikis link to Glow groups

Viewing a wiki page history

Web header change in Suffusion

You should probably not be using Suffusion theme unless you are a fairly confident web/Glow user!

There are lots and lots of customisable options within the Suffusion theme and it is one of the most respected WordPress themes out there for that very reason. It would be very confusing for you unless you are comfortable playing around with settings and not afraid to experiment.There is no way we could cover all its settings and provide support for all the options.

In saying that, the following tips are courtesy of the Aquoid themes site, which has lots of Suffusion help. Click the logo above or anywhere in this text to go there.

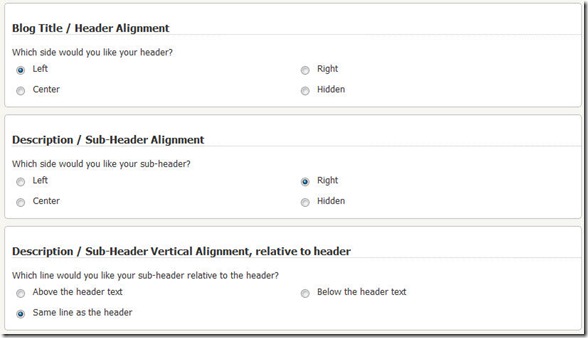
The Header Customization options can be accessed by clicking on the “Header Customization” tab in the Options page:

suf-tut-header-customization-1

The Header Customization can be split into 3 different parts:

  1. Header Image Setup
  2. Header Text Color
    1. Blog Title
    2. Blog Description
  3. Header Text Layout
    1. Horizontal positioning of Title and Description
    2. Relative vertical positioning of Title and Description

As is the case with a lot of the settings in Suffusion, you have a control setting for this page. You can choose to use the header styles as defined by the theme, or those that you have custom-defined. Unless you select “Custom Styles” the theme’s settings will take precedence

Header Image Setup

Suffusion lets you use your own header images. Not only that, you can also use a custom color gradient, if you don’t want to use a header image, but don’t want a plain header either.

suf-tut-header-customization-2

The default is an image, and the default image is blank! So in effect your default is “No image”. This is one of those mathematician-physicist-engineer examples, where I did not have a “gradient” option initially.

Anyway, if you plan to use a custom image, you can do two things with it:

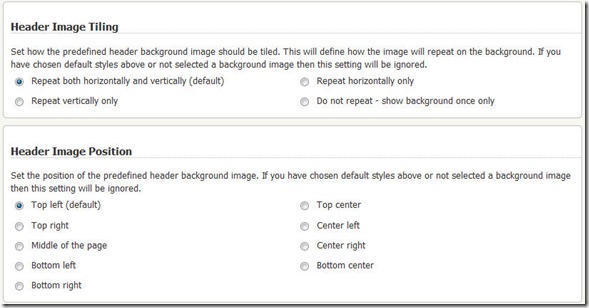
  1. Tile / Repeat – Repeat the header image either vertically or horizontally or both or not at all.
  2. Position it – top left, top right etc.

suf-tut-header-customization-3

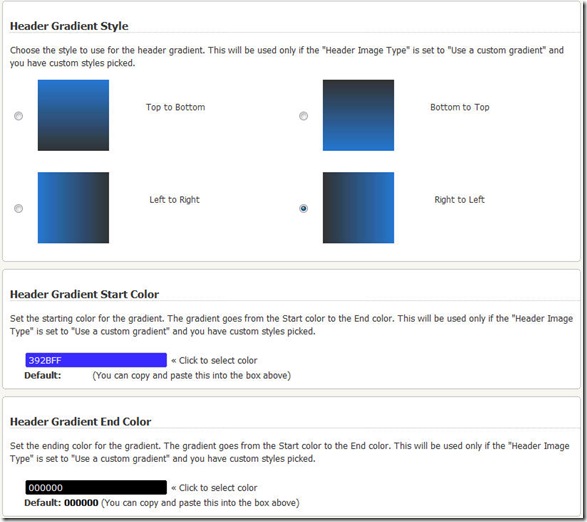
The second option is to use a custom gradient. If you choose this option, you get to pick the starting color and the ending color of the gradient. You can also select the direction of your gradient:

suf-tut-header-customization-4

The gradient will span the entire length and width of the header.

Depending on the colors or the header image you have chosen, you may be required to tweak the colors of the text. This brings us to our next section.

Header Text Color

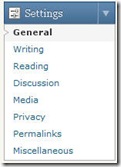
Before we get started here, what exactly are the Blog Title and the Blog Description. They are whatever you define in the Settings –> General section of the admin page:

suf-tut-header-customization-6 suf-tut-header-customization-7

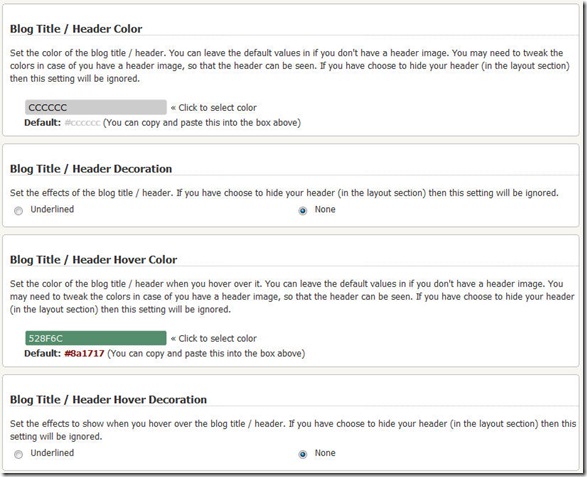
Text color can be set for the blog title. You can also set the colors for the hyperlink and the effects of hovering over a hyperlink:

suf-tut-header-customization-5

Colors can also be set for the blog description / sub-header:

suf-tut-header-customization-8

Header Text Layout

You can choose to have your title and description appear at the opposite ends on the header, or together, with one just above the other. This may be a general preference, or necessitated by a header image that demands the text to be moved for better readability.

suf-tut-header-customization-9

Web header change in K2 theme

Change your banner/header in K2

On some blogs the top image is fixed but in K2 you can set your own image for the header. When you choose the K2 theme from within the web part, the background image is a blue square but in this theme you can change your background to make your blog more personal.

You can also do this in Spectrum and Suffusion but it is more complex

space

space

To change your header you must have the K2 theme selected. Once it is selected:

  1. Go to the Dashboard
  2. Click on the K2 link
  3. Click on the link Configure K2
  4. Scroll down the page that appears until you find the section entitled Header
  5. Click on the Custom Image Header link
  6. From here you can select an image from your desktop (do follow the size guidelines of 780 * 220)
  7. You can also change the text colour by choosing the approx colour from the circle and then the exact colour from the square shown

Your blog will now have changed

Blogs- resize images at upload plugin

Using up Blog storage with massive files?

Often, especially when using digital camera images straight from the camera, the file sizes of images are quite simply massive and completely unsuitable for web use. Websites need small images that can load quickly on a page. Ever seen a web page take an age to display? It’s probably because an image has not yet loaded.

There is a blog plug in called “Resize At Upload Plus” available which you can choose to add to your blog.

This plug in will automatically resize all larger images you upload to a predefined size. This means that if you upload a lot of images from a digital camera for example, you can choose to have them all automatically altered to a predefined size such as 600 pixels by 400 pixels.

  1. In the Plug Ins menu in your blog dashboard on the left hand side menu click on Installed
  2. Click on Activate under the “Resize At Upload Plus” entry in the plug in list
  3. Click on the Resize At Upload Plus option in the Settings menu on the left hand side of your dashboard
  4. Enter the maximum width and height of the image, in this blog we have kept it to the default of 600 * 600
  5. Click on Update Options

The image below originally was 2.6MB large and had a size of 4000 * 3000 pixels

On uploading to this blog using the usual method it is automatically set to have a size of 600 * 450 – it takes the maximum height but keeps the image scaled. Instead of being 2.6MB large it is now 76K and therefore a lot easier for your viewers to download and view and leaves you more space in your blog.


NB the above is a thumbnail, to see the full picture that is 600 * 450 you would click on the image above

No copies of images are taken, the original image on your own machine is, of course, unaltered.

NB!

Please be aware that, if you install this plugin, all images you upload from then on will be resized. You may not want this for all images, particularly banner images which need to be a certain size. If you need to upload a specific size and you have already installed this plugin, just deactivate it and then reactivate after you upload the image concerned

Forum moderation

Moderation may be needed from time to time

Glow Forums are linked to Glow groups. The administrator of a Glow group is also the moderator of Glow forums which allow them to make changes to posts made by other people.

It is always wise to reinforce the expectations you have of anyone using a forum, mainly to use appropriate language and be respectful to others.

space

The video below shows an introduction to the moderation options available to you:

Remember:

  • Lock topic – keep the topic there but stop any changes to it
  • Delete topic – remove the topic and all its associated posts
  • Move topic – move the topic and its posts to another board that I administer
  • Split topic – instead of one topic, create two and then decide which posts should go in each
  • Merge posts – take 2 posts from the topic and merge them in to one
  • Merge topic – take the posts in this topic and put them in to another topic
  • Copy topic – take this topic and its associated post and put them in another board but leave the original in place (live move but it leaves the original in place)
  • Change to sticky – this topic will always appear at the top of the lists of posts, regardless of activity (normally the topic at the top of the list is the one with the most recent post)
  • Change to announcement – this will take the topic and take it out of the topic section and move it to the higher Announcements section
  • View logs – this allows me to see activity in the topic and the overall board

Forum profile avatars

You can change your own profile in Glow Forums so that other people seeing your posts can know a little more about you

forumsignature

In the post above you can see an avatar – this is the image on the left hand side (in some Glow Forum themes it can appear on the right hand side).  You can also see a signature (this is the text under the post text (name and role in this case))

If you change this then it will change in every post you have made including all the ones you have already done.

Watch the video below to see how to set up your own avatar and signature

*Remember, this will be seen by everyone who shares a Forum with you, on some forums this could be hundreds of thousands of users so keep both things appropriate!

Why use a forum?

And if you prefer to read, here’s an outline of what a forum is and how it can be used:

This article provides an overview of Glow Forums, further posts provide more detail in how to create a forum, post entries in to a forum and moderate other users.

Key points about a Glow Forum are:

A Glow Forum has to be linked to either a site (local authority or school) or a Glow group. They are created by adding a web part to the relevant page and then using the functionality of the web part to create the forum. The web part is called Glow Forum.

A Glow Forum can also be called a discussion board. A discussion board is made up of one or many topics.

A topic can be started by anyone. To start a topic the user creates a new post in a new topic. Other users can then join in the topic by making their own posts and replying to existing posts.

When viewing a discussion board the user is shown all the topics. The order in which the topics are displayed depends on when a user last posted – the topic with the most recent post will be at the top of the list. Shown against each topic is the number of times anyone has looked at it and the number of posts in the topic.

Some topics can be given a special status by the moderator – perhaps the topic is an announcement(so it is shown above all the other topics) or it is a sticky (it is shown with the other posts however it will always be returned at the top of the list, regardless of when last posted to)

A moderator of a board is the administrator of the Glow group.

One last thing is that it is possible for any user to view all the boards they are active in by using the Board Index link. This shows only those boards the user has ever accessed, not all the ones they are a member of by virtue of being a member of the Glow group.

What does all this mean in real life?  This scenario attempts to clarify

An English teacher in a school may wish to set up a Glow Forum to allow his pupils to discuss the current class text.  The web part is added to the class Glow group by the teacher and he creates the Forum.

The teacher writes the first post telling the class what the point of the Forum is – he writes a post and because he always wants everyone to see it, he sets that post to be an Announcement – he can do this because he is the Glow group administrator.

The pupils then use the Glow Forum – a first post is entered by one pupil asking for help on one question – this pupil is creating a new topic. Those that can help post replies to this post, all these replies are in the one topic.  At the same time, a different pupil may ask a different question and so they write a new post in a new topic – a separate discussion is underway but all in the same Glow Forum.

One pupil asks a particularly important question about exam technique, the teacher wants this discussion to continue but wants to make sure everyone sees it – the teacher sets this topic to be a Sticky – it is always at the top.

The teacher is interested in this Glow Forum along with others such as in his school’s staff Glow group, in an authority All English teachers group and also a CPD group at national level – by going to the board index he will see all these forums listed along with the recent activity.

Twitter for Education

Maybe it’s time you took a look at Twitter…

Twitter can be an excellent tool to help us improve our teaching and learning experiences. The amount of ‘stuff’ that is shared through Twitter every second is simply mind-boggling. The beauty of Twitter is that you only need to see that stuff that is of interest to you. By using ‘hashtags’ and ‘following’ you only see who and what you are interested in.
This, of course, has massive benefits both for CPD and teaching topics where certain hashtags will reveal all associated tweets and certain followers will only Tweet about things they are interested in. You can begin to connect with educators and learners across the world and your learning will benefit hugely.

‘Follow’ people

By following certain likeminded people who share the same areas of interest, you can begin to filter Tweets to your preferences. Here at Our Cloud, we ‘follow’ fellow educators with an interest in technology and the document we recommend here was found through Twitter. Great stuff! We see updates and sharing every second from people who are all passionate about technology in learning and that’s why Twitter is such a powerful tool for sharing.

A great guide to Twitter for Education

This is a fantastic and great-looking guide to Twitter especially with Education in mind. Thanks to Amber Coggin for an amazing piece of work.

Click HERE or on the image above to download the guide.

Here is a snapshot of its table of contents:

And here’s a great video on how Twitter can benefit the classroom:

New Glow

Glow e-portfolios

Tens of thousands of pupils are currently using Glow Blogs as their e-portfolio solution.
If this is the case for your school, you will be keen to know if pupils and staff will still have access to these once your Local Authority’s Glow content is migrated into Microsoft Office 365 and the current Glow becomes read-only.

The timetable for migration is currently being negotiated with Local Authorities, but it is hoped that the transfer of the Glow content which has been identified as being possible to move, will be migrated over to Microsoft Office 365 between January and August 2013. After migration, the current version of Glow will be read-only, until it is finally switched off in December 2013.

It is worth noting that My Glow content will not be migrated to Office 365 and that content held there can continue to be accessed, used and edited until current Glow ceases. Equally, it should be noted that Glow Blogs will not be migrated at this stage and a decision on the long term future of the blogs is still to be made, as can be seen below in the statement from Craig Munro.

The future for e-portfolios in Glow

Many people have been keen to know whether the WordPress Blogs, which Glow Blogs are built on, will continue to be available within Glow after current Glow ceases.

On 19th December 2012, Craig Munro, Strategic Director for Strategy, Performance and Corporate Resources at Education Scotland, made the following announcement regarding the future of Glow Blogs:

Stakeholders raised concerns about the plan to migrate away from the current WordPress implementation of Glow Blogs. In response to this, and to increase user choice, we continue to seek clarification on the feasibility of making available a new installation of WordPress that will be available in parallel with SharePoint Online. In the meantime you have my assurance that the data sitting in the current version of WordPress will continue to be available to you while we consider the next steps.
A working group made up of representatives from Local Authorities and SQA continues to develop the user requirements for a new Glow e-portfolio solution. We will continue to keep you updated as we work towards the final solution.”

This should reassure schools that they will continue to have use of the Glow Blogs for at least the duration of current Glow.

However, there are still some limitations of access that are important to be aware of.

Creating and accessing e-portfolios during 2013

As mentioned above, over the coming months each Local Authority will have its migratable Glow content moved over to Microsoft Office 365. This will be done on an Authority by Authority basis, with each Local Authority being given its date for migration well in advance of it happening. Until that point, there will be no change in the functionality of current Glow.

After the content which is possible to migrate from Glow Groups, school and Local Authority sites is moved to O365, these areas of current Glow will become read-only. Again, note that not all content can be migrated. You may wish to read the post Migration of existing Glow content to Microsoft O365 for further information.

So, what will all of this mean for e-portfolios?

Existing e-portfolios

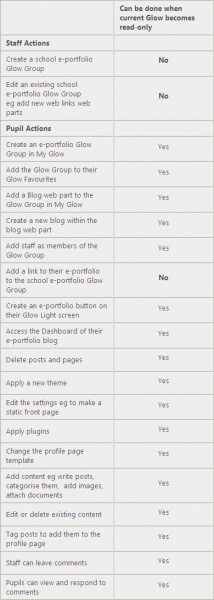
The good news is that Glow blogs will continue to work as they currently do once current Glow becomes read-only.

A pupil’s e-portfolio can still be accessed via any appropriate links, such as the View link in the Glow Blogs web part in their My e-portfolio Glow Group, by a button they created on their Glow Light screen, or, for both staff and pupils, via the links added to a school e-portfolio Glow Group.

Content can be added to e-portfolios as at present, as all Dashboard functionality will remain unchanged. Also, existing content can be edited or deleted. Access to the Dashboard will still be possible from the link in the Glow blogs web part or via the Edit links in the e-portfolio itself. Staff can continue to leave comments and, where appropriate, posts can still be included in the Profile page, for e-portfolio themes which include that.

Pupils will still be able to create a button on their Glow Light screen to take them straight to their e-portfolio.

So, as long as a school Glow Group has already been set up housing the links to the pupils e-portfolios, there will be no change to the access to or use of e-portfolios that have already been created, once current Glow becomes read-only.

New e-portfolio creation

If pupils are following the guidance in the National e-portfolio Glow Group to create their e-portfolio, they will still be able to do this even after current Glow becomes read-only. This is because pupils create their e-portfolio in a Glow Group within their My Glow area, and since My Glows will not be migrated to Microsoft Office 365, they will never become read-only and therefore can continue to be used, edited or added to as at present until current Glow ceases.

There is however a limitation regarding staff access to a pupil’s e-portfolio if it is created during read-only period, or, if a new pupil joins the school with an existing e-portfolio and staff need to gain access to it.

So, what can be done in these situations? Read on to find out!

Staff access

Once current Glow becomes read-only it will not be possible to create any new Glow Groups on the school site, create new web parts, add new web parts to a page, add new items to a web part, edit existing items or customise a web part.

This means that once current Glow becomes read-only it will not be possible to create a school e-portfolio Glow Group to house the links to pupil e-portfolios, as is currently the advised method.  If a school e-portfolio Glow Group does already exist, it will not be possible to add any new content to the web links web parts in it. So, effectively, it will not be possible to house the links to new pupil e-portfolios within current Glow. This would mean that staff would not have any access to the pupil e-portfolios.

So, another method will have to be employed to give staff access to the link to a pupil’s e-portfolio.
It may be that you choose to place the link within the migrated web links web parts within Microsoft Office 365. It will be possible to edit these and add new content, so would be a feasible solution.
Or, the pupil could email the link to their e-portfolio to all staff who could then use the link from their email, or store it in their own My Glow in a web links web part, as My Glow areas will not become read-only. This would mean that each member of staff would have to save each link for themselves, so this option would have to be carefully considered.

Remember, this will only affect e-portfolios created after current Glow becomes read-only.
There will be no impact on existing e-portfolios.

Summary

Glow Blogs will remain active and usable until at least the end of current Glow, in December 2013.
– Existing e-portfolios can still be used and staff can still access pupil e-portfolios from the existing links in a school Glow Group
– Pupils will continue to be able to create new e-portfolios
– The main limitation once current Glow becomes read only is that new school e-portfolio Glow Groups can’t be created and new links can’t be added to an exising Group (or existing links  edited). Schools will have to use a different way of giving staff access to the pupil e-portfolios, such as using the migrated e-portfolio Glow Group within O365.

Click to Enlarge

Blogs/e-portfolios troubeshooting

No matter how detailed the notes are for pupils to create their e-portfolio using a Glow Blog, inevitably, some pupils will make mistakes when following them.

The attached helpsheet is designed to help troubleshoot and resolve the key errors that can typically happen when pupils are creating their e-portfolios.

Helpsheet:

Key troubleshooting tips for Glow e-portfolios

E-portfolios

Background

Many schools and LA’s are looking to use learning logs, or e-portfolios, to record pupil assessment and attainment (Visit the e-portfolio Glow group).

This post explains how to set up a simple e-portfolio using a pupil’s My Glow area and the Glow Blogs webpart.  It uses the K2 blog theme (What is a blog theme?) and is considered by us to be an informal e-portfolio.

Other set ups will be available shortly, including a more structured template and one using a different blog theme.

Process

In this post you will be shown how to:

  • Create a new blog
  • Import a template
  • Add widgets to your blog
  • Change the page settings for the blog

To begin, get your pupils to create a new Glow Blog.

Instructions for creating a Glow blog can be found here (8 mins 55 sec)

space

We have created a simple template including an ‘about me’ page and categories.  You can view the template here or have a look at how it might progress here.

This template can be imported straight into the newly created blog, or modified and exported again before putting it in a shared folder where pupils can access.

Templates are imported/exported by visiting the dashboard, clicking Tools on the left hand navigation and then either import or export.  The sample exported file can be found here.  Import it onto your blog to see what is available.

Instructions for importing a template can be found here (2 mins 5 sec)

space

Widgets do not automatically appear when blogs are imported from a template.  Widgets are additional boxes of information that can be added to a blog to give the reader more information, such as a calendar, a feed from another website or a list of recent posts. Asking a pupil to put a widget on their blog provides a good opportunity  to discuss with pupils what widgets are and how they are used.  If you are using this template you will want to add on the categories widget and the pages widget.

It may also be a good idea to change the front page to a static page, rather than the latest posts, which is the default setting.

Instructions for widgets and static pages can be found here (3 mins 46 sec)

space

It is possible to export a Glow blog too.  You may want to use our template to get you started, modify it, and then export it to share with pupils.  If you choose to do this it would be great if you could share your new template with us.

Glow Meet PODS

Using Adobe Connect for the Glow Meet, you have a selection of pods to use in your meeting room. A pod is similar to a window, it is an area for a specific function that can be moved or resized on the screen.

This help guide aims to give an overview of the functionality of each pod and some tips for their effective use.

For every pod, you can rename them, this might be useful for example if you have a number of chat pods each with a specific purpose, by renaming them you can make their purpose clear to end users.  Double click on the pod title to edit.

Share


A share pod can be used to either share a whiteboard, documents or computer screens.  You need to have the Adobe Connect plug in to be able to do this.  Each share pod can either be a new share pod or a share pod could be reused in multiple room layouts.  More information on sharing is available here.

Attendee List

This pod’s functonality is constant in that it lists everyone who is present in a meeting room. It is a very useful pod for a number of reasons.  If you select someone in the pod you can then alter their role in the room (icon in the bottom left). You can also mute their microphone if they have left it on by mistake (menu appears to the side once they are selected).
The users are listed in order of their role in the room, however if a user raises their hand they will go to the top of the list.
As with other pods, there are further options for the pod available by clicking on the icon at the bottom right of the pod on the cog wheel.

Camera and Voice
This allows users to turn on their camera and voice (hosts and presenters only).  Hosts can switch other people’s cameras off too if they wish.  If you move from one room layout to another and the latter does not have the camera and voice pod then the cameras will be switched off.  If a user switches on their camera then their microphone will also be switched on but this can be controlled separately using the Talk button in the bottom left of the screen.  The cog at the bottom right of the pod will offer further options.


Chat


The chat pod allows text communication between users.  You can either add a new chat pod on a room layout or you can copy an existing chat pod – the latter may be useful if you wish to maintain chat over a number of room layouts.

As with other pods, the cog in the bottom right of the pod gives further options such as the ability to disable private chat between participants and also whether or not a time stamp should appear next to each entry.

Note

This pod allows set text to be shown on a room layout, useful for giving guidance to end users.  You can choose a new Note pod each time or reuse Note pods in different room layouts if required.

Poll

You can run polls during your Glow Meet.  You can have multiple poll pods and in each one, once created you can prepare the poll (one question per poll, answers are either multiple choice or multiple answers) and then open the poll in the meeting.  The cog icon offers a number of further options such as whether results should be shown as numbers or percentages or both.

Q & A

If you have multiple presenters and a few participants, it is possible to set up one chat pod to be treated as a Q and A pod.  Perhaps the most complex of pods, this would be useful if you were having lots of questions coming from participants. The host can decide which presenter will answer which question and then when the question is answered by a presenter the question and answer are shown in together in the relevant chat pod.

The Q & A pod can only be seen in the presenter only area.  (see here for more information on this).  Once seen, there is the option of linking a chat pod to the Q & A, the chat pod for this must be visible on the selected page layout.  Once linked, the chat pod will change appearance where participants can only now submit questions where as hosts and presenters can also chat with everyone or each other.  When someone submits a question the question appears in the Q & A pod, the host can select the question, choose a presenter or host from the drop down and choose to forward the question.  When the chosen host or presenter answers the question the question and answer will appear together for all in the room to see.

If no answer is required the host can choose to show the text entered to everyone by clicking on the text and clicking on the Answer Everyone icon.

This pod is the most complex one to use and it may be rare that it will be required by Glow users however the option is there for all hosts to use this if appropriate.

Breakout Pods

These are not a different kind of pod but instead the menu option allows you to bring in pods from those created in break out rooms.  For more information on break out rooms go to this help guide.

Recording a Glow meet

It is possible for recordings to be made of your Glow Meet session.  You activate the recording within Glow Meet and the recording is made and stored on the Glow servers.  You then have the option of viewing the recordig directly from the server or you could download a copy of the recording on your own local machine.

In Glow Meet a meeting can be recorded by a person who has the role of Host. To be a Host you either have to be an administrator of the Glow group in which the Glow Meet web part is located or you have to be made a Host by someone who already has the Host role.

The document available below gives you full details of how to make a recording and also on how to view it online or download a local copy.

Breakout rooms in Glow Meet

The Host in the meeting room can create breakout rooms for the attendees. You might want to do this if the main meeting room has too many attendees to allow good collaboration or if you want different groups of attendees to consider different issues at a point in the meeting. Breakout rooms are separate from the main room and have their own selection of pods to work in. The Host can visit the breakout rooms during the session to facilitate activities.

The document above will give you the details of how to create, start and end the break out rooms.  Some other key points are:

Breakout Room Layout
The layout of the breakout room will take the format of the selected room layout in the parent room at the time of the breakout room being created.  Therefore, if you are going to create a number of breakout rooms that you wish to all look the same, the quickest way would be to create that layout in the parent room, open up the break out room section, delete any rooms that are there then create new break out rooms (Add Breakout)

Breakout Room Number Limitations
There are limitations within Adobe Connect which result in 5 breakout rooms being possible and 50people can be assigned to any/all breakout rooms at the one time.

Reviewing Breakout Room Outputs
If you have people in a number of breakout rooms, once they all come back to the main room, you may wish everyone to see what went on in each breakout room.  You can do this by adding a new pod to the main room, from the pod menu you will see a sub menu to the pods from each break out room which you can now add like you would any other pod.

Hosting a Glow Meet

The Host role in Glow Meet is assigned automatically to Administrators of the Glow group where the Glow Meet room is situated. It is

the key role in any meeting room as the Host controls how the room operates for everyone else attending.  To find out more about being a host then you have 2 options:

A video available on the URL below will show you in more detail how to be a host

Use the document available below to find out some tips on how to be an effective host:

Video available here

Sharing in a Glow Meet

In many Glow Meets, people share content which could be documents or powerpoints, computer screens or whiteboards.  The Share pod in Adobe Connect allows you do to this if you are the Host or the Presenter.

In a Glow Meet room you could have one share pod to share all content or you could have multiple different Share pods each sharing its own content e.g. if you have 2 presenters you may wish to have 2 room layouts each with their own share pod.

The document available below shows you the various options available for sharing content between users.

Glow Meet

Why Use Glow Meet?

Glow Meet is Glow’s web conferencing tool. It has been upgraded and now uses a globally-popular software- Adobe Connect. The tool allows you to share documents, talk to a presentation and has collaborative tools like polls, surveys and chat. Glow TV uses Adobe connect, so a good start would be to watch one of the many recordings in Glow TV and see how it is used.

Here’s a video guide to Adobe Connect for e-learning from Adobe themselves:

And here are some help guides, specifically for Glow:

This help guide assumes you are joining a Glow Meet that someone else has set up and you are joining to take part without worrying about how to set the room up.

If you are setting up a Glow Meet room for others to join then this guide will help you with that.

The role you have in a Glow Meet is determined by the permissions you have in the Glow group where the Glow Meet room is situated. Users with Reader or Readers with Discussions permissions in the group will be Participants in the Glow Meet room.

The meeting will be managed by a user with Administrator permissions in the Glow group. They will have the role of Host in the meeting room.

The document below outlines how to join the Glow Meet and get yourself set up and ready to work with others.

If you want to find out more about the room layout and how the Glow Meet links in to the Glow Group then the document below will assist with that.

Pinterest for learning and teaching

‘Curate’ the best bits of the web

Content curation is big news. There is simply too much information on the web and we need tools to break it down into manageable and useful chunks. Like a museum curator would collect the best pieces to show off in a collection, we are starting to want to do that with the information available on the web and Pinterest has certainly proved popular.

Pinterest has created a bit of a storm since it launched and has millions of enthusiastic users who like its simplicity in gathering nice images from all over the web and arranging them onto virtual boards.

In the Classroom?

We see great potential in using Pinterest in the classroom: to arrange images into topic boards, it has the potential to replace the topic box and gather together image links to content from all over the web into nicely-organised topics.

Getting started

Check out this video introduction to Pinterest for teachers:

http://www.youtube.com/watch?v=iRPNEA3WhKA