It’s rare that I actually get excited about an iOS update. Sure, performance is introduced, and new features are added – but it’s rare that those new features excite me. iOS12 is the exception to that rule. As an educator, it is a gift. Of course, there is still so much more that can come – there always will be, but my lord this is a step in the right direction. And not just for educators; for parents who want a little more control of their children’s use of tech and want to be able to monitor it more effectively, iOS12 really goes a long way in a very positive direction.
This post is a little different; but as a teacher in Glasgow, where children are receiving iPads on a 1-1 basis as part of our digital transformation, it is something that I really want to look at. For parents of children with iPads, I think aspects of this blog will also be really helpful.
Let’s look at some of the features that have been introduced and can have a really positive impact in the classroom:
Screen time
This is mostly beneficial for parents, but for schools would be a great thing to share with parents and implement, especially if we are encouraging children to use devices at home.
This is a huge move in the battle to cut down on ‘screen time’ for our younger users – but to fully appreciate this, we need to think about what ‘screen time’ actually is. Screen time can be both a positive and negative experience. Negative screen time, is time where children are not interacting or engaging with cognitive benefits – for example, playing games that have no depth of learning behind them. There are many games that can be beneficial – ones that encourage problem solving and critical thinking for example, but in excess even these can be addictive. For younger children especially, excessive individual screen time should be discouraged, but time with parents using a screen for play, learning or reading (in my opinion) can be just as positive an experience as reading a book or playing a board game as it is the collaborative aspect in these scenarios that is the beneficial experience.
The ‘screen time’ controls that come as part of the iOS update monitor usage in this way, and can even be programmed to limit it. Let’s look more closely at them:

‘Screen time’ can be found in the settings menu on your iOS 12 enabled device. Once activated, it automatically tracks usage and categorises it into ‘types’ of screen time – e.g. productivity, creativity, games, social media etc. In the image below, I had only just enabled screen time for the purpose of this blog, so it is showing my screen time in seconds and uncategorised, but you will find many examples of more active screen time online. Frankly, I have mine turned off as I know that I spend far too much time on Twitter and don’t want to see just how much!
 Below the daily usage bar, there are four controls that can be activated. In setting up screen time, you are asked if this is your device or your child’s. If you select that it’s your child’s you will be automatically taken through each of these controls by default.
Downtime is just what you would imagine. You get to choose times that the user is away from the screen. The only things that the user will be able to use during this time are apps that you have set as being ‘always allowed’ e.g. the phone (in case of emergency for example) or the alarm/clock. All other apps would be disabled during this time.
App limits even during enabled screen time, you can set a limit to apps. If there’s a category of apps, for example games or social media, that you feel your child uses far to much, you can limit it to a set amount of time per day. For example, I might feel that as I use twitter and facebook too much, I need to set a limit of one hour per day on social media. If there are apps within the category that you don’t feel should be included in the limit, or you’d like to add other apps, simply click ‘edit apps’ after choosing and adding the category. Here you can select and deselect the apps that you want/don’t want to include in the time limit. This is such a powerful way of restricting access to apps that you want to limit.
Always allowed as noted previously, there are some apps that you may wish to always allow. For example, you might always want to allow your child to make a phone call if they need to, or to access the camera or clock. You can select/deselect these apps within this menu.
Content and Privacy Restrictions previously called ‘restrictions’ this section allows you to determine which apps and settings the user can change and edit. Maybe you don’t want them having the ability to purchase apps – you can block that on here. You can add content restrictions, e.g. no films aged 15 or 18, no explicit books. As with all web filters, it is not perfect and there may be occasions where your child will come across inappropriate material. This will always be the case so we do need to teach children to be good digital citizens, and how to deal with that if it does occur (by reporting it). Again though, this full tool is a very powerful way to restrict and monitor screen time, and make the iPad a versatile tool for learning and entertainment, but not one that ‘takes over’ a child’s life.
Additional features you do also have the option to add a screen time passcode to secure all of these settings so that your child can’t change them. The passcode can also be used to extend time if, say, for a reward one day you want to allow your child an extra 15 minutes on their games. You can also share all of these features across all devices (associated with the apple ID) to save having to input the same data on each of your child(ren)’s devices. You can also set it up for your family if your children have different apple IDs.
All in all, this change is very powerful and truly excellent. I think it will help a lot of families control the ‘addiction’ that some people report their children as having.
Augmented Reality
Augmented reality has been with us for some time now, and can be experienced well through a whole host of applications such as Goggle Expeditions and Quiver. I was actually using AR with P4 this week to let them look at aspects of Ancient Rome in more detail:
AR is continually getting better and better. iOS 12 promises to integrate AR into many new apps and really build its profile. It truly can be used well in education too. Twinkl have recently released a free coding app for teaching basic coding skills. The app is different to the many others as it uses AR for the game place – the game comes to life in front of you! I have only just started using it and look forward to trying it out with the Tech Team to see what they think of it.
See my short clip about it in my tweet below:
AR ‘Measure’ app
I think that this application excited me more than any other part of the iOS12 update when I first saw it. I had seen adverts for AR measuring apps on TV but hadn’t got round to purchasing one – fortunately, I now no longer need to as we have an AR measure app built in to our iOS12 devices!
Here’s a very quick clip of how it works:
In an educational context, measure is often something that can be tricky to teach, but this app can be very useful. I would encourage a diversity of tools for teaching measure though and am not suggesting to ditch traditional measuring tools, such as rulers, as using and reading these is a skill. The way I would see this tool being used would be for comparisons and gathering data quickly. I also think it would be great to ‘test how good the app is’ by asking children to use the app to measure a surface, and then using a ruler to measure it and compare the results.
Voice memos
Voice memos have been around for a long time on iPhones, but until this update were clunky and you couldn’t really do anything with them. That has all changed now. Firstly, voice memos are no longer restricted to iPhones – you can access and create them on iPads and macs. Secondly, it is so much easier to use and share your memos – even directly into apps such as notes. Here’s a quick demonstration:
Whilst I used the app ‘notes’ in this tutorial, it works with loads of apps, including book creator! Simply share your audio to book creator instead of notes, then, in book creator click on the + symbol within the book that you want to add the media, and select ‘shared’. Choose the audio file that you want and then select whether you want it to appear as a button (clickable) or soundtrack (plays in the background).
I hope that this has been helpful and has given you an insight into some of the features within iOS12. Please do also share with parents as I think it is vital that we equip parents with the tools to better protect their children online and monitor/limit non-beneficial screen time.
Have a great week!





 Since November 2016 the ‘Read to Me’ tool has been one of the most powerful features (in my opinion) of this fantastic app. When it was launched, I had a new EAL learner with an ASD who was struggling to settle into the class. Her language barrier was a huge issue, and her ASD caused great anxiety in the mornings and after break/lunch. She didn’t want to have to try and speak to anyone as she became very anxious that she wouldn’t understand or be able to respond.
 This then became her routine – come into class before the line, get her designated iPad, put on her headphones, listen to the previous words and add new ones.
 Creativity is a huge aspect of learning, and applications that are fairly static and don’t allow much creativity really don’t engage our learners as much as those that do. Book creator allows children to design every page as they want; from the background colour, to the positioning and size of text boxes, to adding their own drawings, or inserting media it really is powerful, and children want to create their own books using it – I’m yet to find a child that hasn’t engaged with it.

 Below the daily usage bar, there are four controls that can be activated. In setting up screen time, you are asked if this is your device or your child’s. If you select that it’s your child’s you will be automatically taken through each of these controls by default.
 Monday’s challenge was an introduction to coding. This lesson has been tried and tested hundreds of time, and even formed part of
  Tuesday was my first example of how coding can be taught across the curriculum. Digital skills are officially becoming ‘core skills’ in the next update, and so will be a responsibility for all. I have long believed that computer science should not be taught as a discrete subject, as the skills developed are transferrable to almost every aspect of the curriculum and life. This set of resources were aimed at giving ideas for ways to teach aspects of music through computer science. The featured resource was ‘Code your own musical instrument in scratch’, but I also published a breakdown of composition in Scratch and a ‘name that tune’ challenge card. You can find all of the resources from day 2
  Day three was my maths day (although, I did post an additional maths resource for #MathsWeekScotland on Twitter prior to coding week – you can find that resource
  Whilst lots of my learners like creating their own games, many just want to allow their creativity to shine as they bring their stories and scripts to life. You can do that in Scratch! I used to love, as part of the children’s learning in literacy, to have the children write their own stories, establishing characterisation, and then bring scenes from their stories to life in Scratch. The power of Scratch in creating animations is only limited by the children’s own imagination and their understanding of code – you literally can make anything happen, from characters teleporting, to animated talking, to importing your own drawings and bringing them to life. Whilst they could have filmed each other acting out scenes, this can be limiting and also isn’t always inclusive as there are children who find that situation intimidating. With scratch, everyone has a chance to create fantastic animations. Day 4’s resource is a quick guide to creating a simple animation that includes dialogue. The full resource can be found
  Variables are a tricky concept to get to grips with. Scratch does make them fairly easy to work with, however, learners need a lot of exposure to them in order to fully grasp how and when to use them. By taking the maze game – a game that the children are already familiar with (from lesson one) we can extend the game and add challenge to it by using the variable ‘time’. This is a great way to introduce the concept of a variable as ‘time’ (in addition to score) are the most commonly used ‘visible’ variables in gaming, and the children will be used to seeing them in the games that they play.
 I have published a blog article recently about the power and importance of a
  Often the thing that holds schools back the most in the deployment and effective use of digital technologies is staff confidence and knowledge about what is available. Many schools, including ours, are now encouraging their staff to use twitter as a PLN as part of their CPD. I couldn’t recommend it highly enough as since being on twitter my own practice has improved so much, as I am continually inspired by colleagues from across the world and get ideas every time I go online. There are of course many other PLNs including Facebook groups, but Twitter is the one that I get the most out of.
 I love exit tickets and collecting feedback and data from plenaries. What I didn’t love was the sheer volume of paper / photocopying that I used to use to do them. Snap assessments to see how well my class had understood a topic, exit ticket post-its to give quick feedback about a lesson, plenaries to gauge understanding – SO MUCH PAPER! Sure, there are ways to gather the same information without using loads of paper – thumbs for feedback for starters – but often I can’t track changes in understanding over a period of time for more than just a handful of children as it requires remembering who said what.
 Despite being new to Plickers myself, it is definitely the app that I want to start with when looking at fantastic ways to go paperless when using exit tickets or giving plenaries. It does even work for assessments. Truthfully, their own description on
  Truly one of my, and my class’, favourite tools. Furthermore, with the iPad rollout across Glasgow City Council and similar initiatives for 1-1 device access within schools, this will almost certainly become a tool used on an almost daily basis by many classes. Powerful and easy to use, this does require children to have their own devices in order to take part in quizzes / assessments etc, however, it can easily be done that children are timetabled to access a smaller number of devices and work their way through the assessment/quiz etc in a more flexible time period.
 There are many other applications, tools and websites out there that give you as much power and flexibility as the above, however not all of them are free. Many educators will swear by
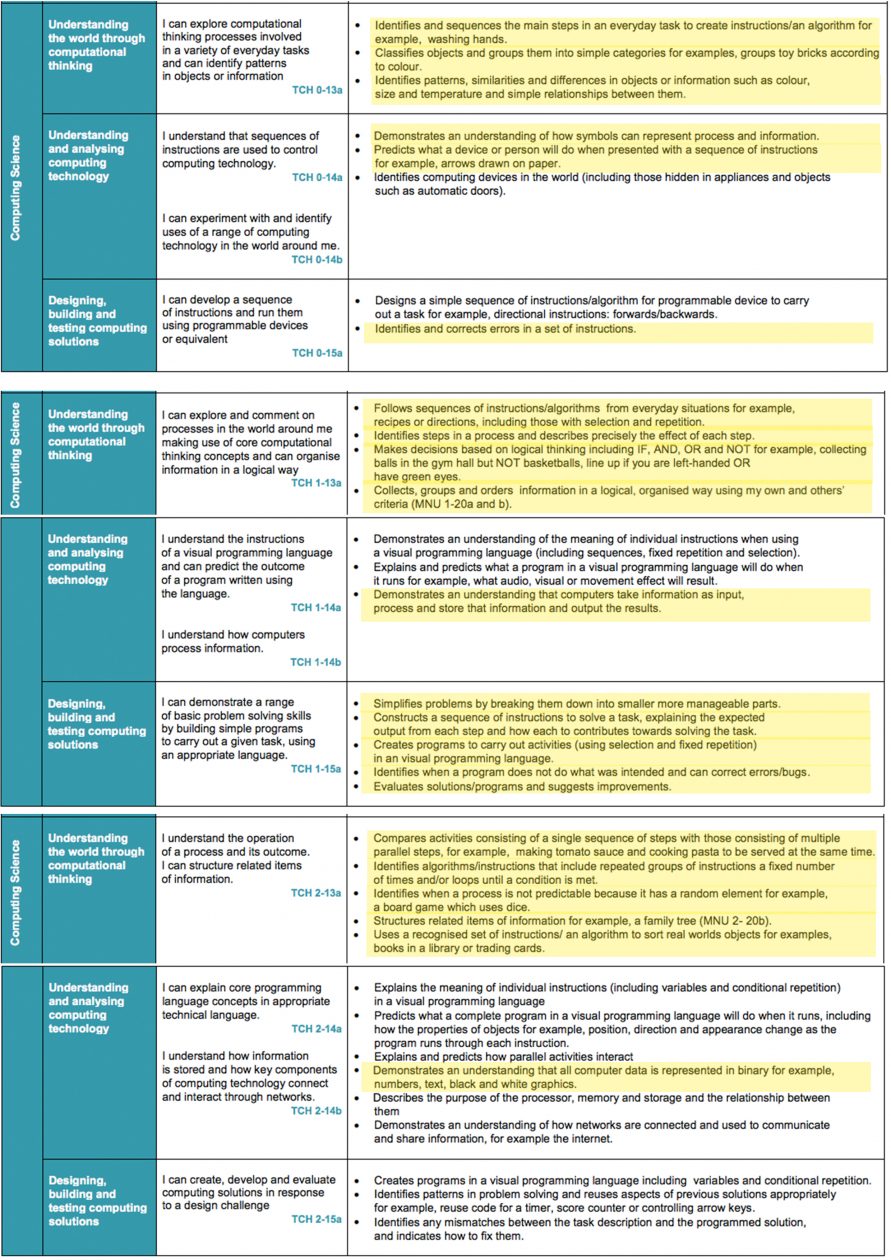
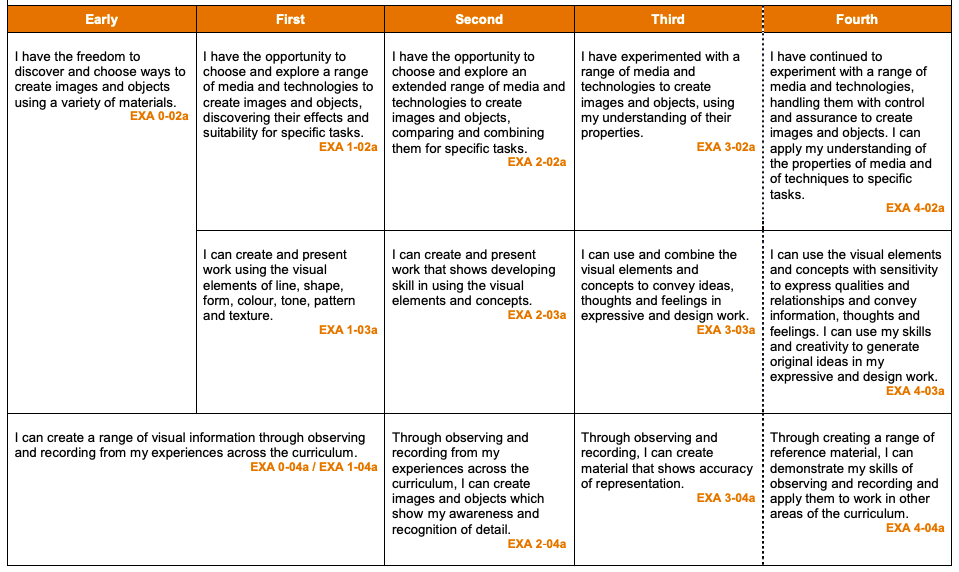
 Many people see ‘coding’ as something that only older children / adults can accomplish. This is simply not true. Teaching computational thinking can start as early as you like and a lot sooner than you realise. Even sorting shapes – an activity my sister has been doing with her son since he was just over a year old – is a form of computational thinking. Looking at the benchmarks for early years, teaching coding is truly a vast and rich way for children to learn.
 Whilst children in Early Years can achieve the majority of their benchmarks without touching a computer, it is important in first level that there is a good balance between on and offline coding activities. Reinforcement of skills in different learning environments is vital in developing the logical thinking and problem solving elements required in computer programming. Simply letting your children only do code courses online will not fully develop their thinking, in the same way that solely doing offline tasks will not let them experience the problem solving aspects of actually using a programming language to solve tasks and create games of their own.
 By second level, most of the coding experience should be ‘plugged in’, however, there is always time to develop offline coding alongside it. Instructional writing is a big part of the literacy input in second level, and can be done well as a coding task. Using