
This guide shows you how to bring learner’s digital drawings into the playroom or classroom using augmented reality technology. Boost your learner’s creativity, storytelling and digital skills with this activity that is just magic!
Bringing drawings into the room
Using a combination of Keynote and AR Makr we can turn a simple drawing activity into something that encourages storytelling, creativity, imagination and digital skills. Let learner’s display their work in the room and interact with their drawings, take photographs and videos which capture learning conversations and can be easily shared with families and the learning community.
How does it work?
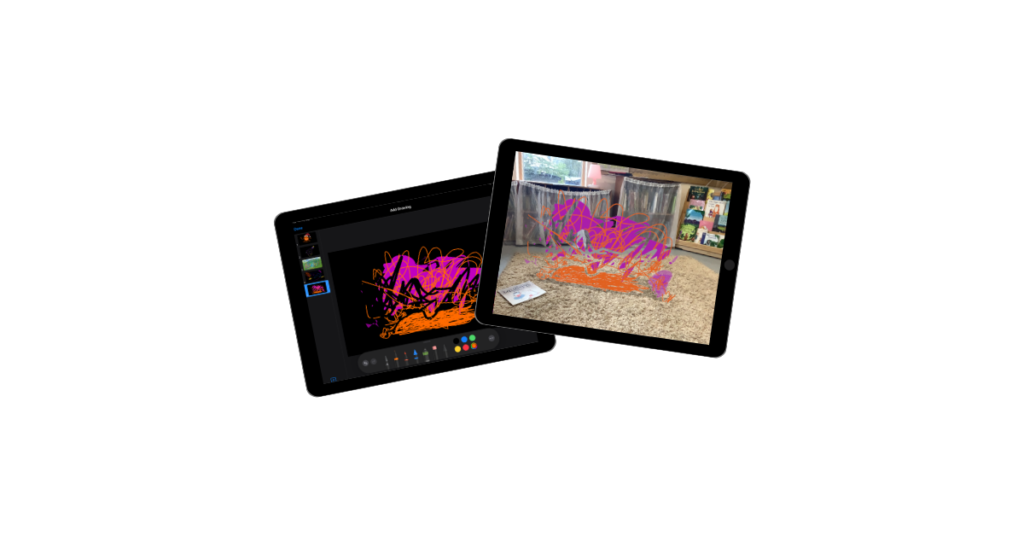
Learners draw digitally in Keynote using their finger or a stylus. The drawing is then exported (supported by an adult because that is the tricky step) and taken into AR Makr. Once in AR Makr, learners and practitioners use the app to scan the room for a flat surface and add their drawing. Learners can then use the iPad to move around their drawing in real time, take photographs of or with it, and record video all from within the app.
What do I need?
Before you begin you need the Keynote and AR Makr apps on your iPad (please follow whatever usual process your establishment use for getting apps onto devices). It should be noted that this guide uses the most up to date version of Keynote, if yours looks different you may need to request an update to your app or redownload Keynote from the app portal (if you have a 1:1 device) to get the most recent version.
How do I do it?
The activity involves three key steps drawing in Keynote, exporting those drawings and getting them in to AR Makr.
1. Drawing in Keynote
The Keynote has to be set up in a specific way before the learners begin drawing. The steps are as follows:
- Open Keynote and create a new deck by pressing + at the top of the screen.
- Select ‘Choose a Theme’ and then ‘Basic White’
- Tap on each text box and select ‘Delete’ from the options ribbon until you have a blank slide
- Tap on the Paintbrush button and select ‘Background’ and change this to ‘No Fill’ (the screen will look black but it’s actually transparent, if you don’t do this your drawing will include the background when taken into AR Makr and it’s less effective)
- Tap on the Media button (the little photograph) and choose ‘Drawing’ (older versions of Keynote tap on the + button to find ‘Drawing’) this will bring up a row of drawing tools.
Once the drawing tools are their learners can draw with their finger or a stylus. There are two common niggles to note that confuse younger learners – they won’t be able to use black (it will be there but they can’t see it when drawing because the background looks black) and sometimes they try to select a colour when on the eraser tool (which doesn’t use colour) just guide them to tap the pen, pencil, crayon or paint tool.
2. Exporting from Keynote
To get the drawing into AR Makr we have to export it to our Photos first. This is best done by a supporting adult when working with younger learners. Here is how:
- Tap the Share button (a rectangle with an arrow pointing upwards) and select ‘Export and Send’
- Choose ‘Images’
- If there is more than one slide and you only want one drawing tap on ‘Slide Range’ and set it to the correct number (for example if you only want slide 3 it should read ‘3 to 3’) then tap ‘Image Options’ to go back
- Under Format choose ‘PNG’
- At the bottom toggle ‘Transparent Backgrounds’ ON
- Tap ‘Export’ in the top right and wait
- On the pop up pane tap ‘Save Image’, this will save the drawing to your Photos
3. Bringing your drawing into AR Makr
Next you have to bring the drawing into AR Makr. This is best done by a supporting adult when working with younger learners. Use the following steps:
- Open AR Makr and tap ‘Start’ (the first time you use the app you might have lots of introduction screens, you can tap ‘Skip’ in the bottom right)
- Tap + to ‘Create Your Own Scene’ and then tap ‘Start’
- You will be prompted to ‘Move your iPad around to detect flat surfaces in your environment’, move the iPad around the room slowly until you see a grid appear, this grid indicates that an item can be placed
- When the grid appears tap anywhere on the screen to secure it in place
- On the left a grey bar will appear, tap ‘New’ to add the learner’s drawing
- On the left tap the bottom icon with the file to open your photo library
- Select the drawing
- Adjust the position if you wish (it’s a good idea to have the bottom of the drawing flush to the bottom of the square to avoid it looking like it’s floating), when you’re happy tap the tick on the right hand side
- Tap the tick on the left hand side and you’ll get a ‘Save Success’ message, tap ‘OK’
- The drawing will now appear in the bar on the left, tap on it and move your iPad back to where you placed your grid, you’ll see the drawing appear in the grid (you can move around to position it and use your fingers to pinch to make it smaller or larger)
- When you’re happy tap ‘Place’ on the right.
- On the left tap on the backwards arrow and the grey bar will disappear and you’ll see the photograph and video controls, pupils can now move around their drawing and any photos or videos they record will be automatically saved to your Photos app
