We are using Microsoft Teams as a school for our distance learning. Being in Scotland we have access to Teams through Glow Scotland a Scottish wide Microsoft tenancy I believe it is the 2nd largest tenancy in the world.
Teams Settings
Within Teams there are some setting for your Team that you might want to turn on or off. GIFS, memes etc. Although I have GIFS and memes turned on in my senior channels as they are good fun. Here is a video about using stickers and memes from Microsoft.
Particularly the rights to delete and edit messages.
Here is a Microsoft video on Team settings. My own video is below:
Channels
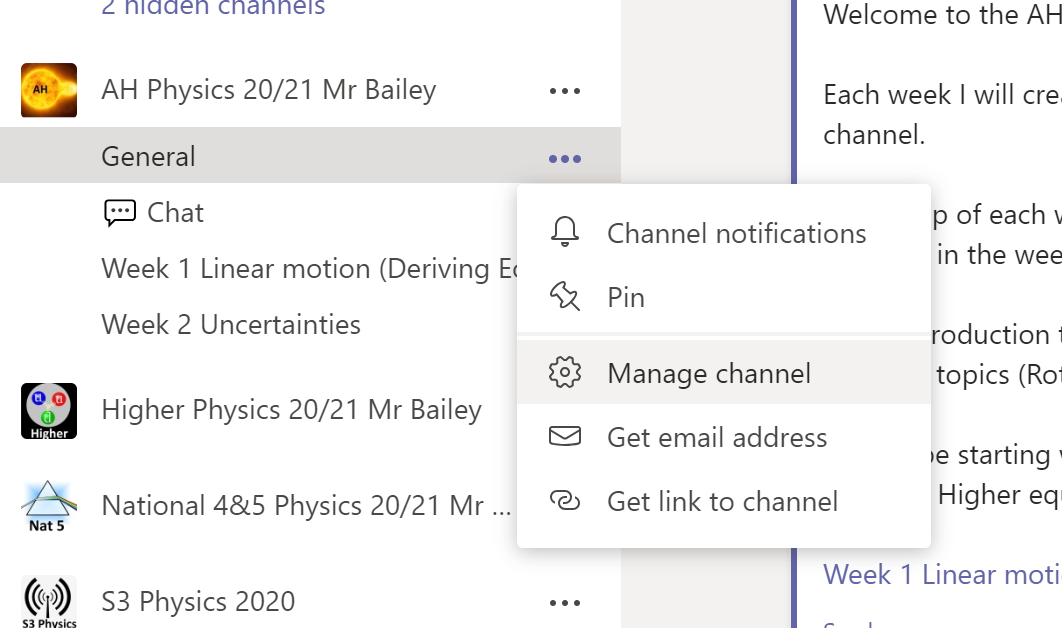
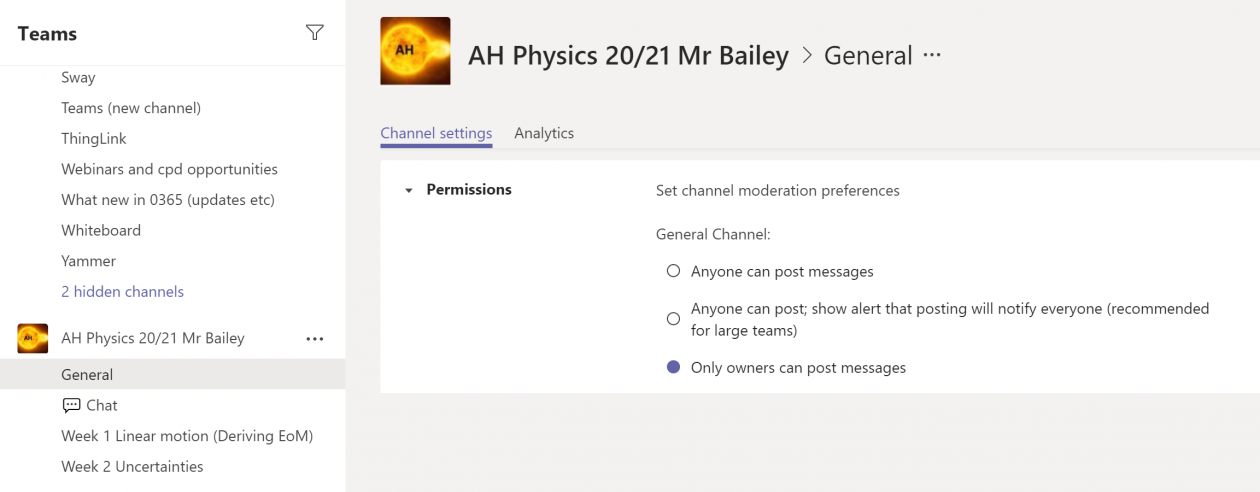
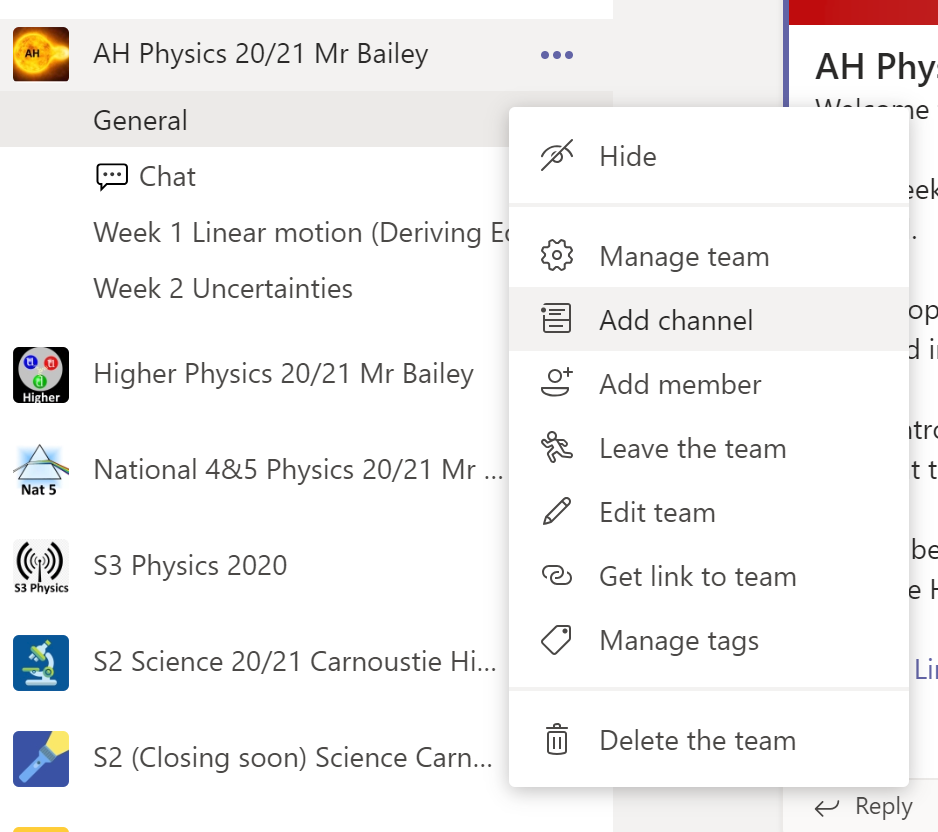
I have set up my Teams with a general channel that can only be posted to by the Owner/teacher. This is set in the manage channel setting click on the three dots to the right of it.
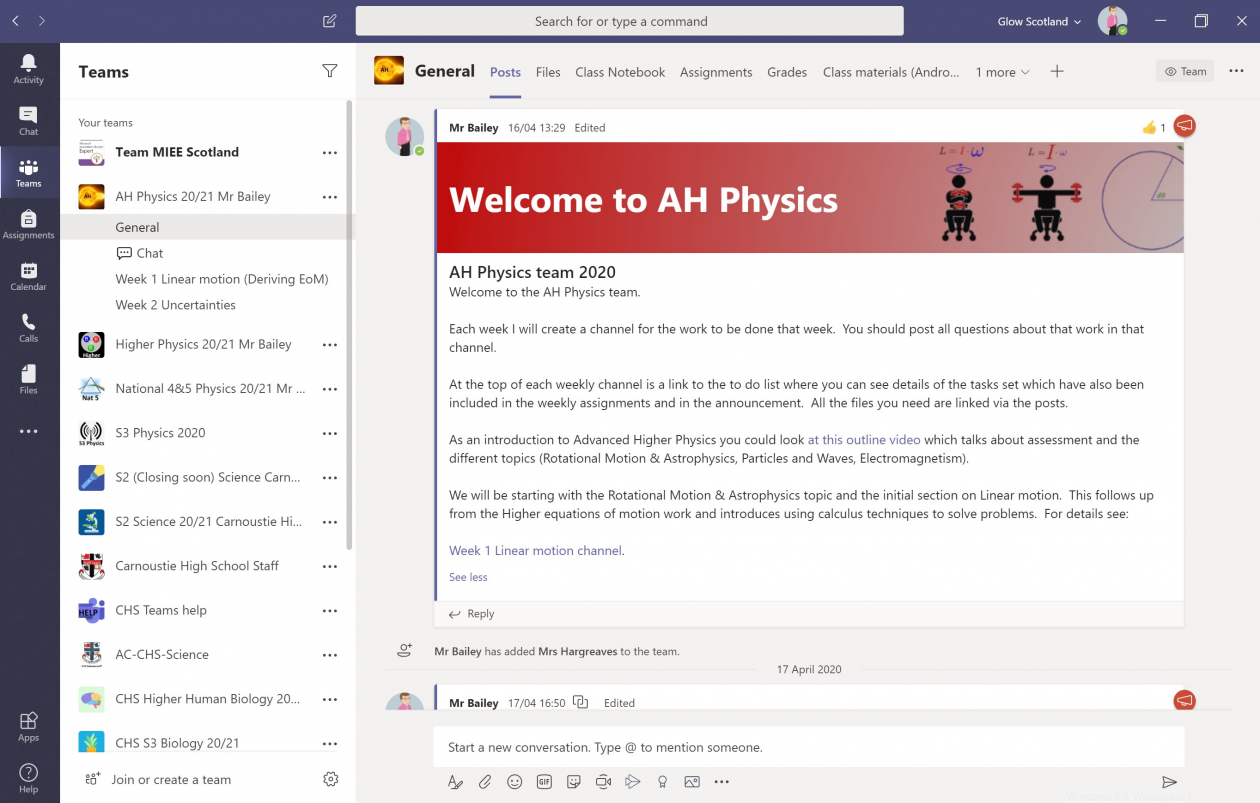
In the general channel I make announcements rather than posts and have some custom backgrounds for each Team. Here is a Microsoft video on announcements and messages.
Each channel also has a tab that links to the Class Materials document library in SharePoint for those on Android devices that cannot currently access the files on the Android app.
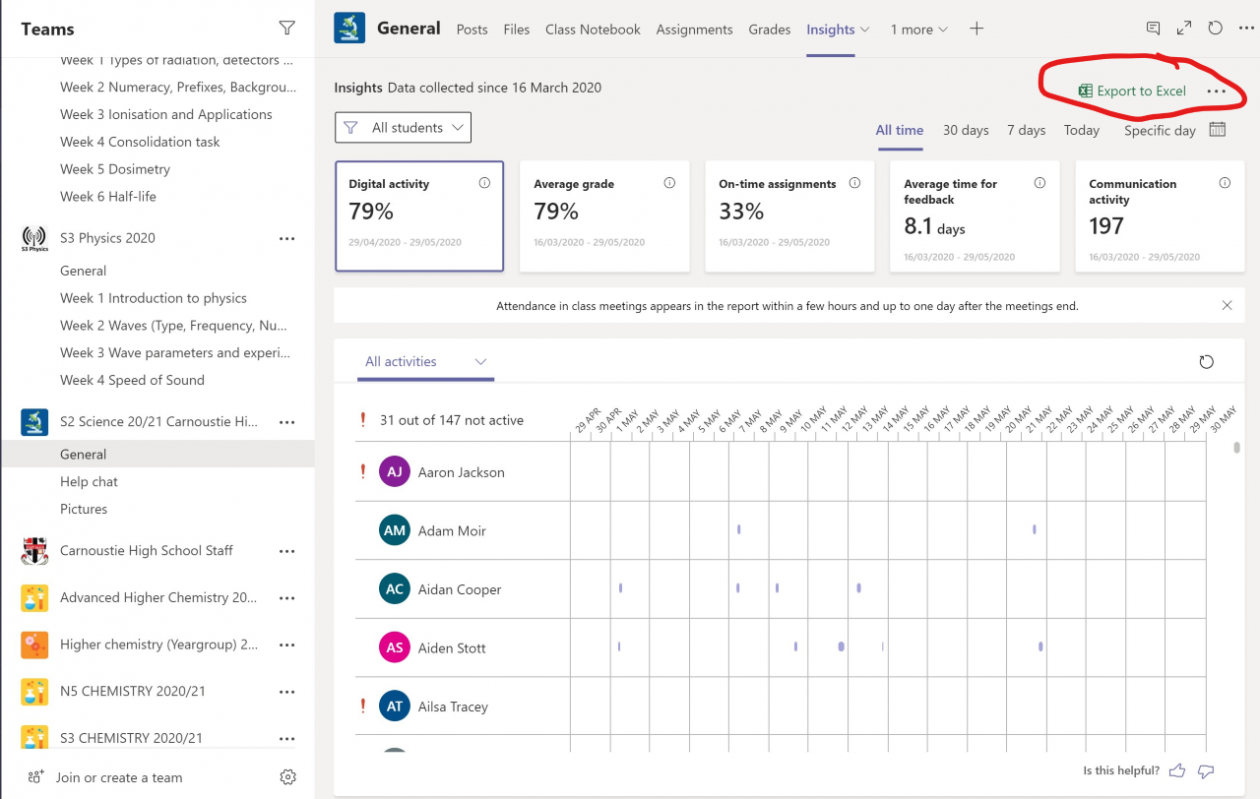
Insights
I have also added the Insights app to the Team. Here is a video from Microsoft showing how the data from Insights can be used. You only need to add this to one channel within your Team. Microsoft are planning to increase the features including one that allows owners to see student activity across a number of teams.
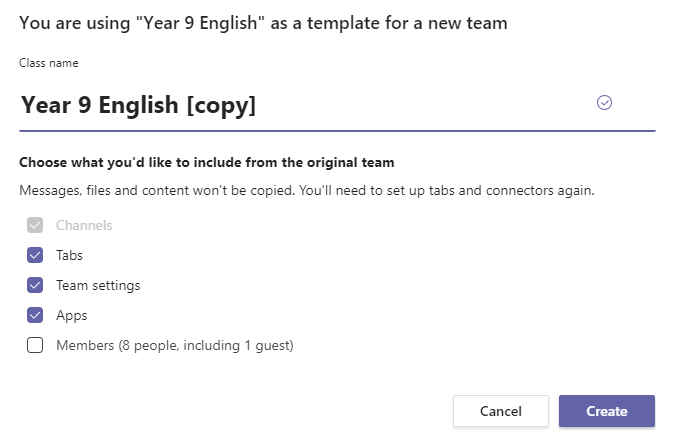
Creating a Team from an existing team as a template
This can be selected in the creation process.
Announcements and custom backgrounds
I like to use announcements for my posts and have created custom backgrounds for them that I uploaded to the post. These were created in PowerPoint where I shaded a rectangle and added some background images appropriate to the topic being learnt.
 snup
snup
The Team has a chat channel where students are allowed to informally chat and post anything they like as long as it is appropriate.
Add channels by clicking on the three dots to the right of the Team name.
The chat channel is to encourage some socialisation and the more informal conversations that happen in class. You might notice I have used an Emoji 💬 in the channel name this is a fun way to get visual engagement. It is recommended that you name the channel with normal characters first for Team stability in underlying SharePoint then you can edit the channel name to the right of the channel. Remember you can’t rename the general channel. On Windows devices pressing windows key and . together get you the emoji keyboard. Teams channels are ordered alphabetically and by unicode number for emoji.
Whilst on the subject of keyboard shortcuts, make sure you know windows-shift-S for snipping things using the Snip and Sketch tool which is how I collected the images in this blog .
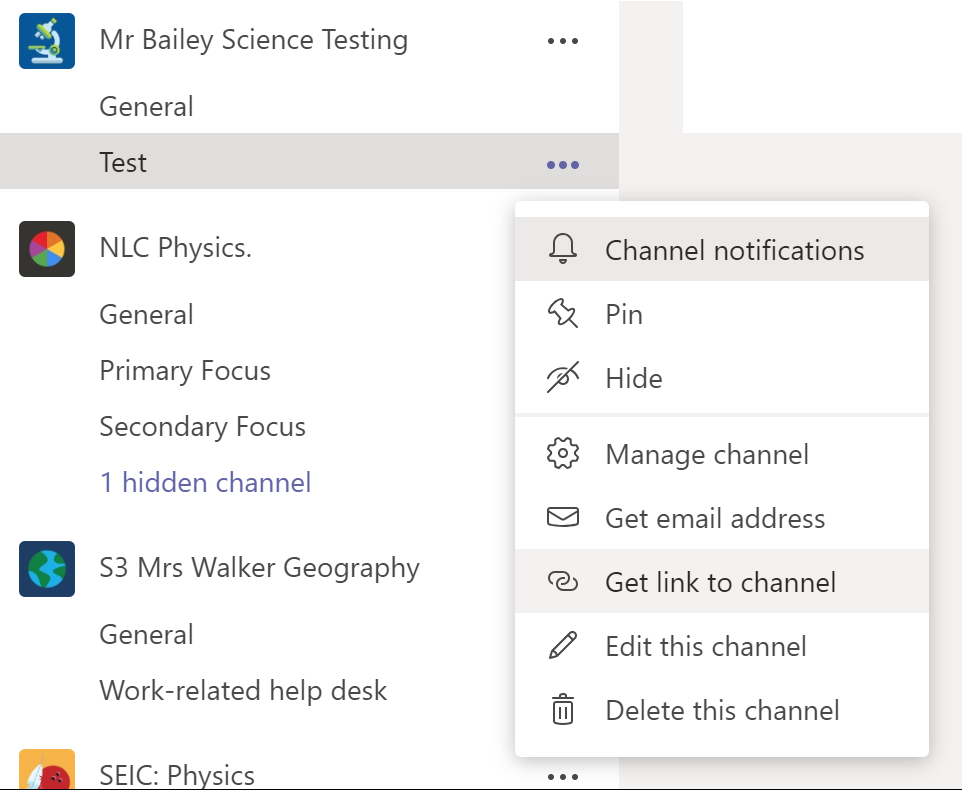
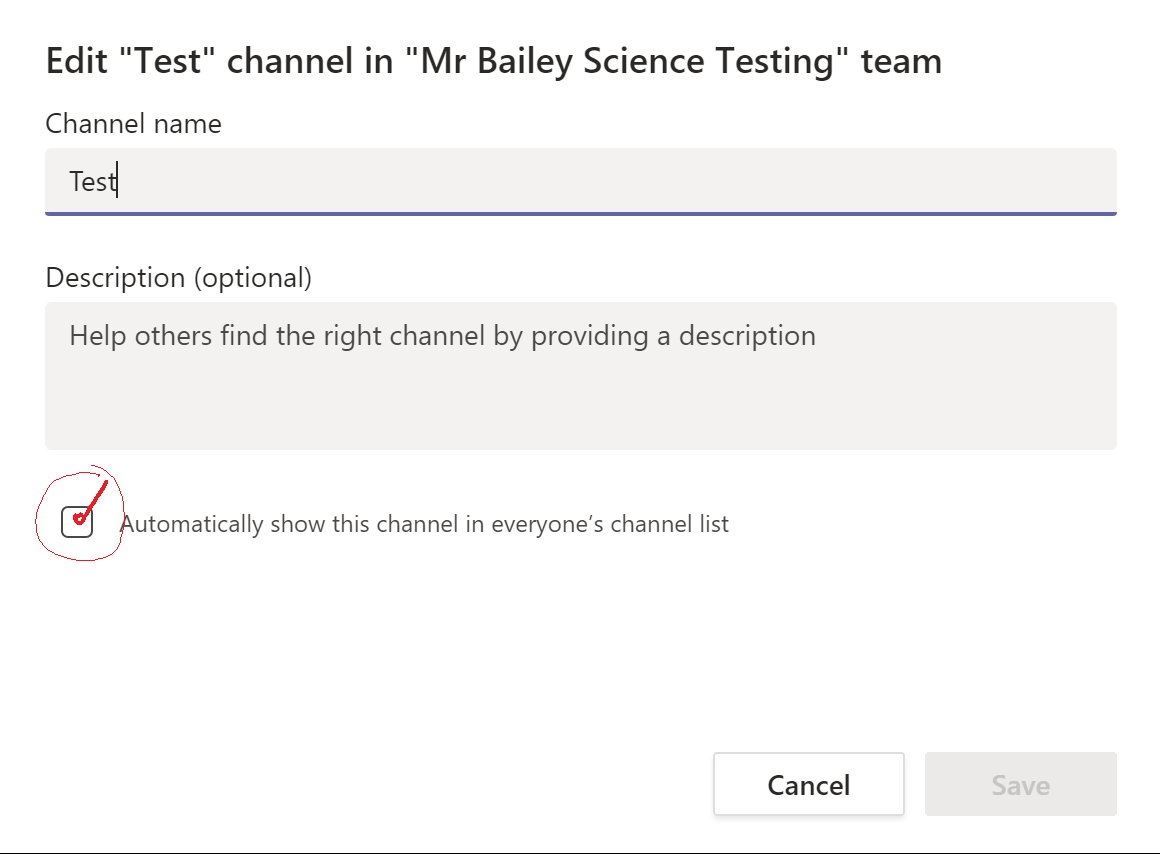
Each week I create a new channel. I start off creating this new Weekly channel as it hidden from the members, but unhide it when I want it to go live. Remember to do this otherwise pupils can’t see it. You unhide the menu in the edit this channel menu and click the box.
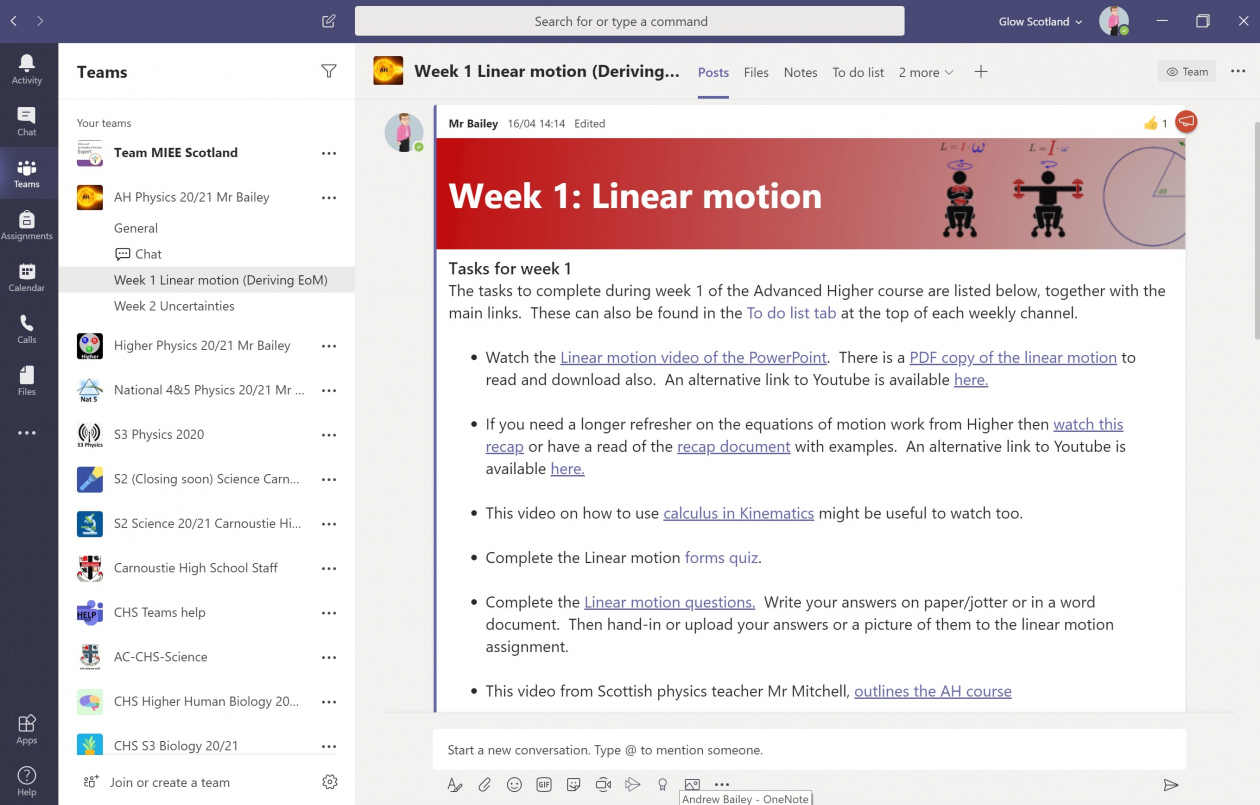
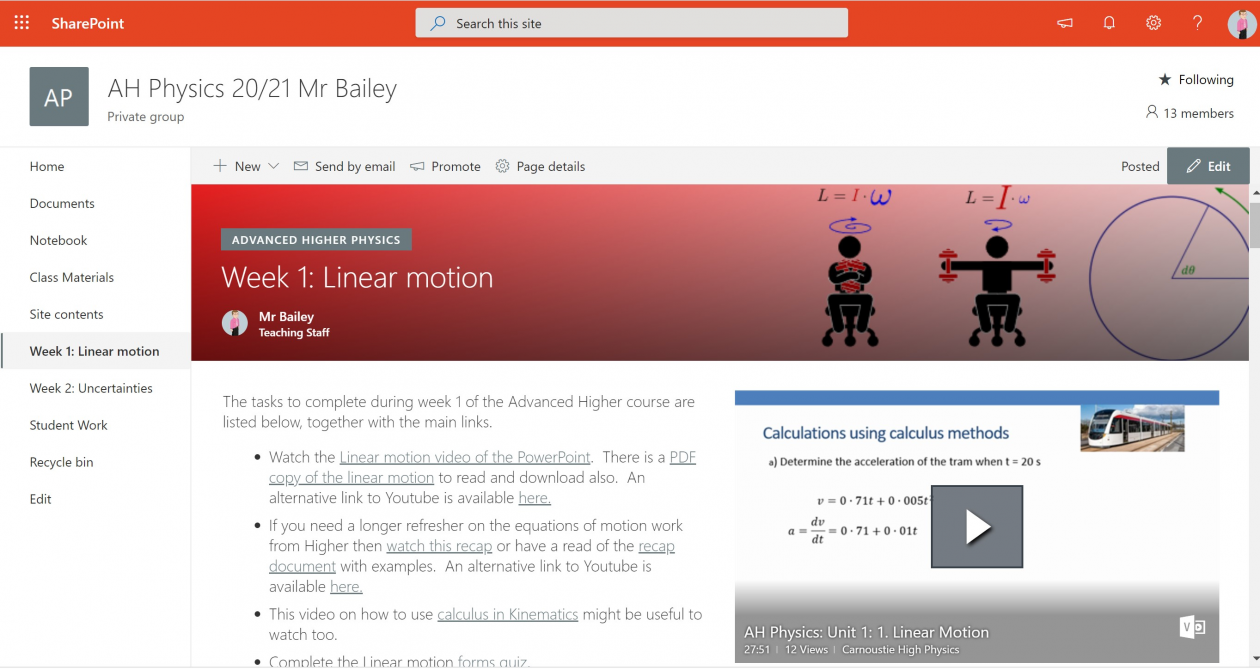
Within the weekly channel I start with an announcement with the work that is set for that week. This information can be copied directly the Team assignments set for that work often about 4 per week.
The announcement includes hyperlinks to all of the resources that are loaded into the Class Materials folder in folder created for Week 1 linear motion (in this case).
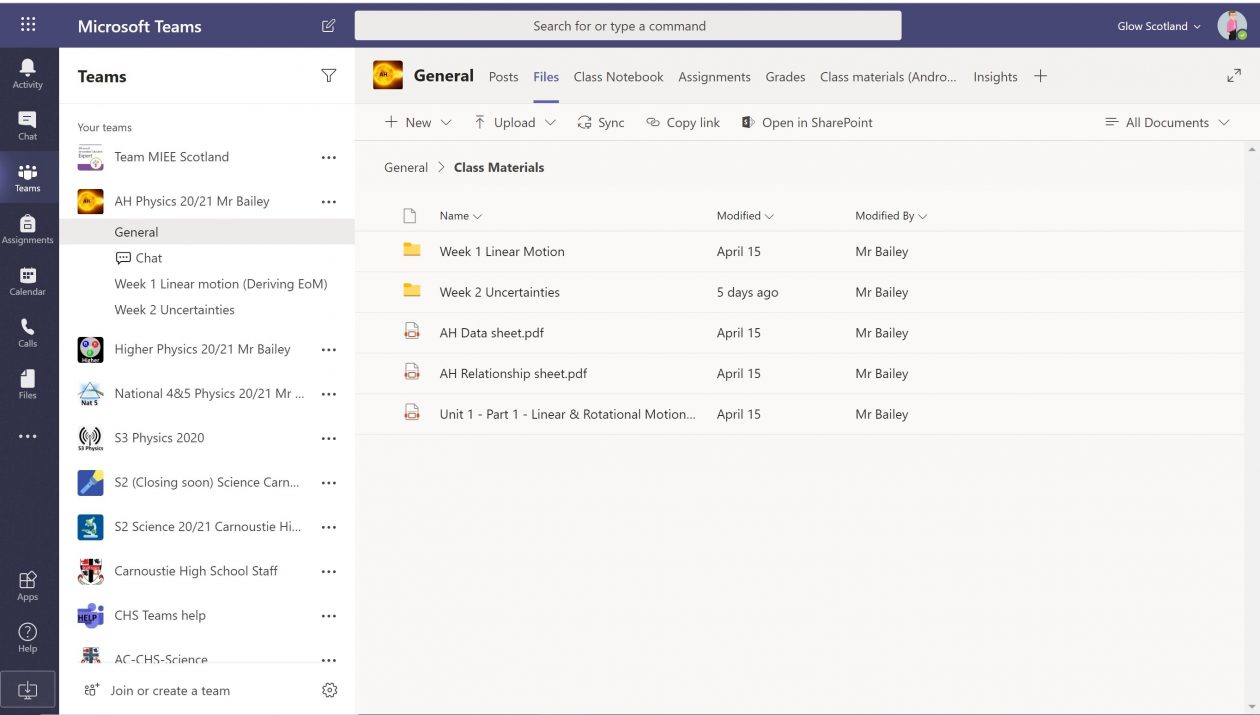
The same files are duplicated into the file tab within the week 1 channel. Unless changed this folder is not read only. To do that click on the three dots and select open in SharePoint.
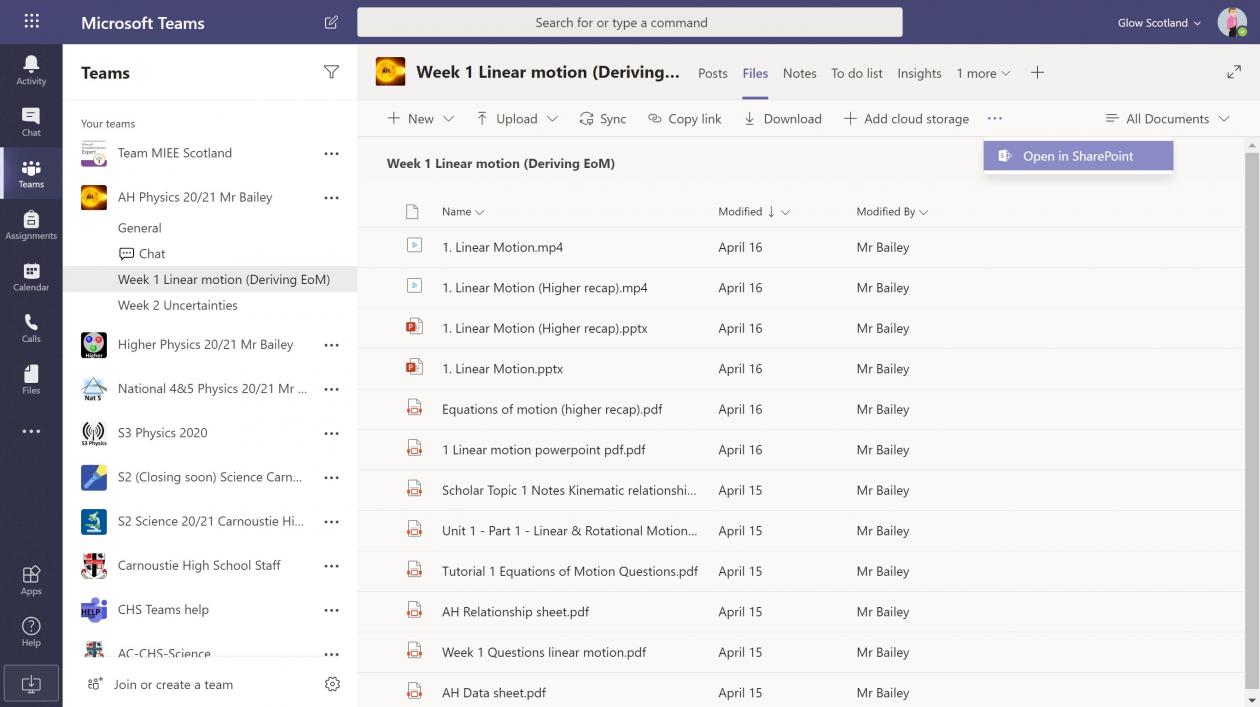
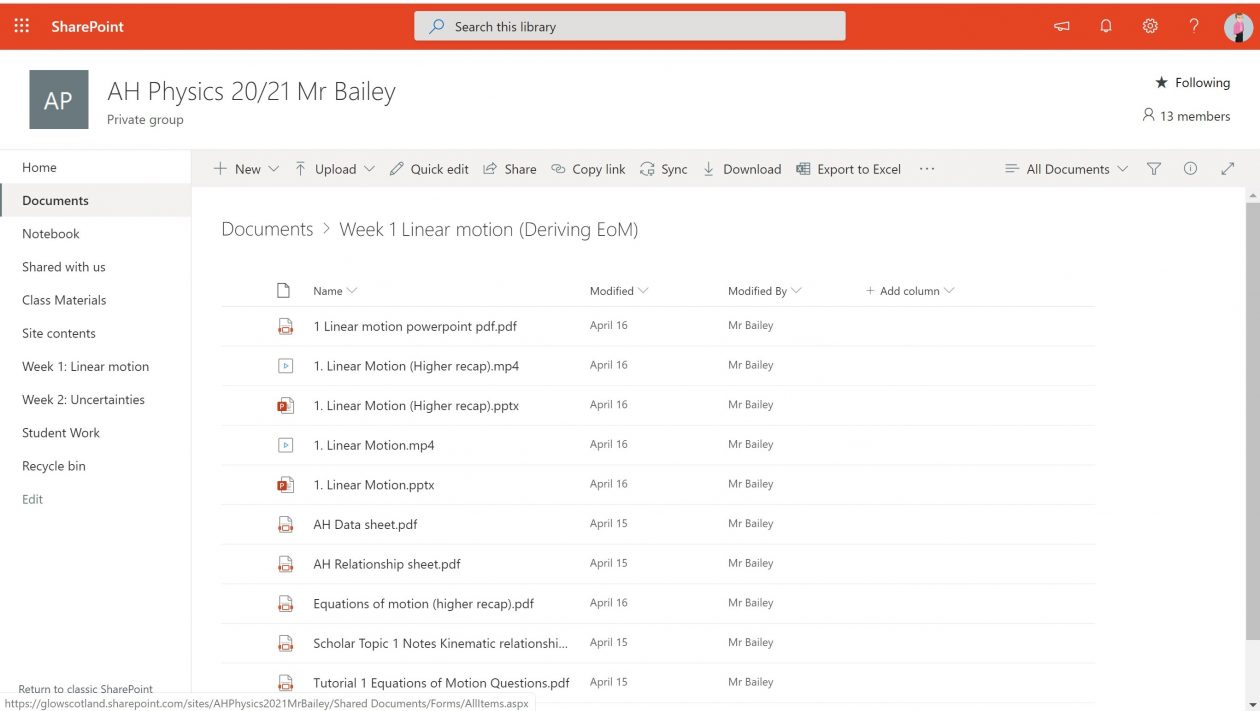
On SharePoint the library click the documents menu at the side.
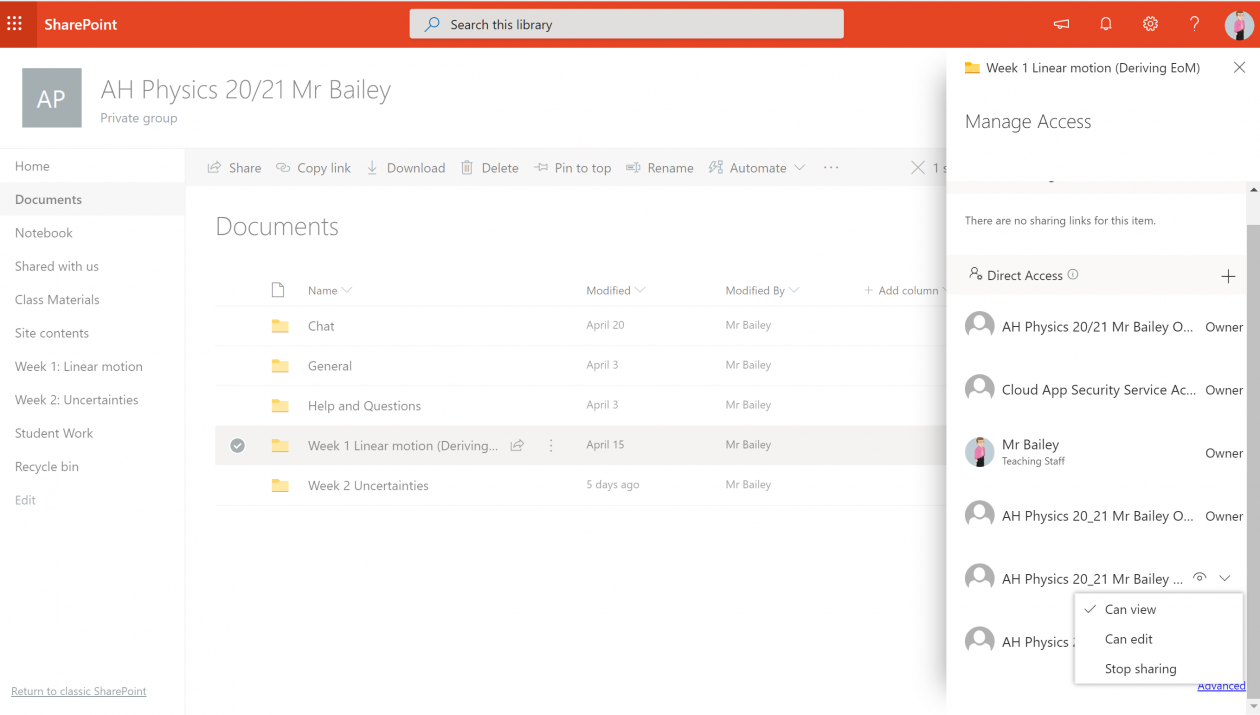
On the right of the folder click the three dots and manage access.
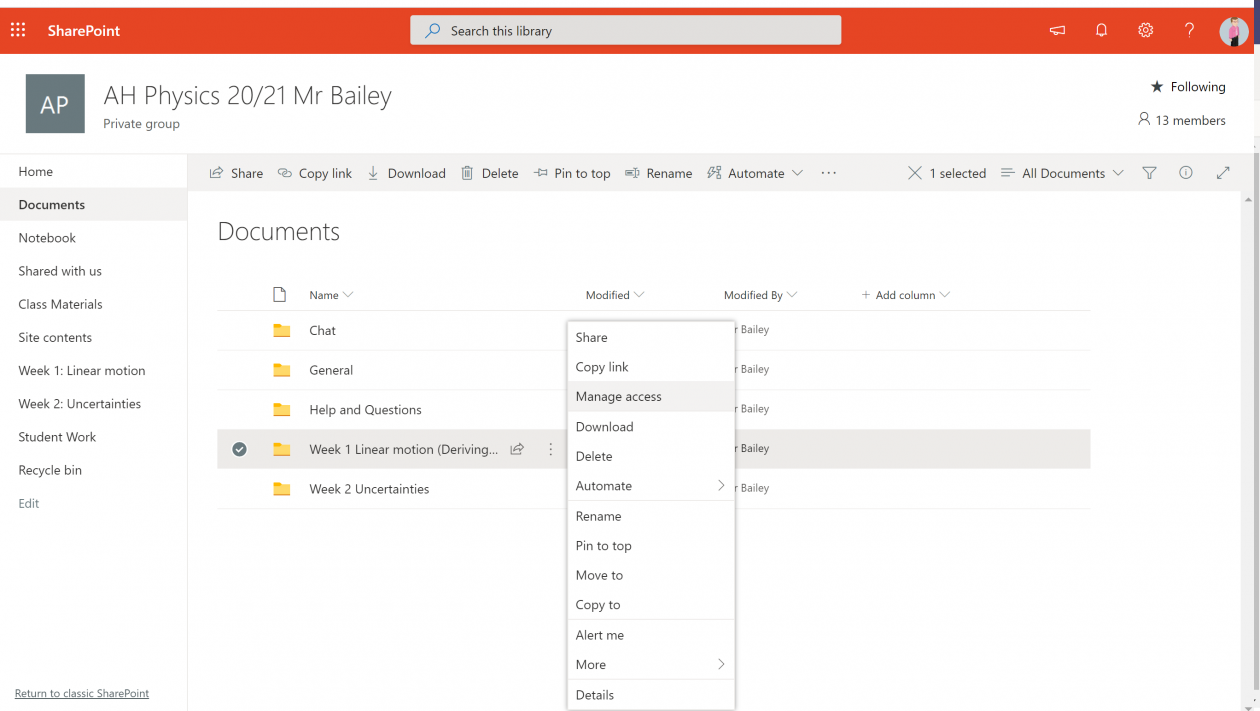
The panel on the right is then shown and change from can edit to can view.
Although this blog has a lot of digital specific details, the most important part of distance learning is the pedagogy. The work I am doing is almost entirely asynchronous so that it can be done at any time. There are some live chats or voice calls to check up on pupils and answer questions.
The Education Endowment Fund have published a research evaluation about digital learning. The key findings from their rapid research review are:
- Teaching quality is more important than how lessons are delivered
- Ensuring access to technology is key, especially for disadvantaged pupils
- Peer interactions can provide motivation and improve learning outcomes
- Supporting pupils to work independently can improve learning outcomes
- Different approaches to remote learning suit different types of content and pupils
The structure I have for most of the lessons or tasks are:
- Recall quiz from previous week or prior knowledge
- Introduction video
- Activity
- Questions
- Diagnostic assessment
- Consolidation
Some quizzes and assessments are reissued to pupils to do again if understanding is not shown or I can see they were completed in a very short time.
Videos are hosted on Office Videos as we don’t have Stream on in our Glow Scotland tenancy. I also have the videos uploaded in my Mr Bailey YouTube channel as some pupils find this easier to access.
I have been making videos for a number of years so am able to reuse some from the past and also the experience of making them.
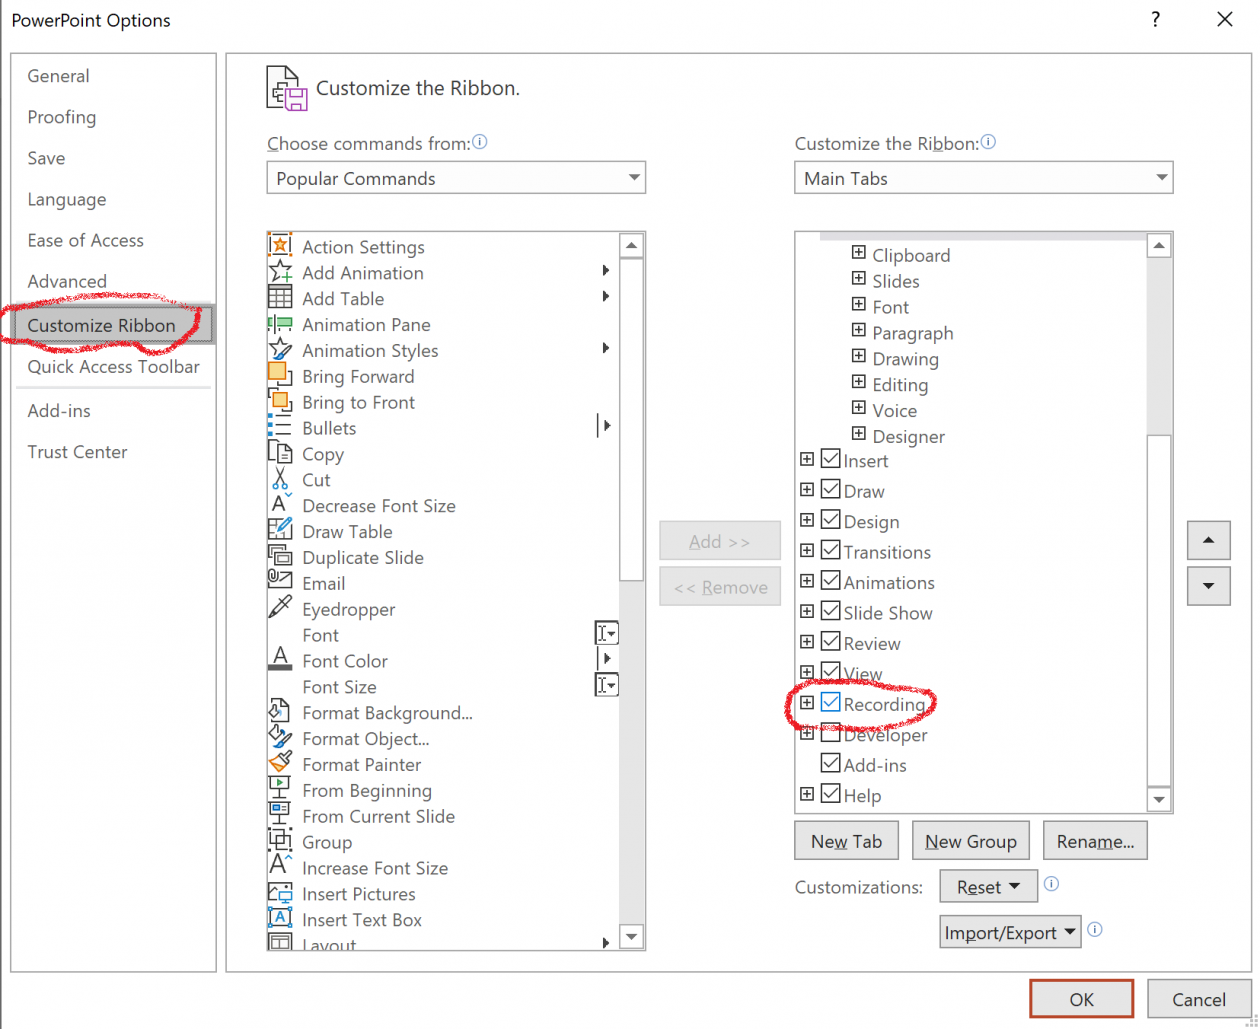
Most of the videos are recorded using Microsoft PowerPoint recorder where I narrate over slides, sometimes incorporating animations and short online videos.
Here is a Microsoft video on using PowerPoint recorder. This includes some feature not available in Glow.
All Glow users can download Microsoft Office on their PC for free. If you log into Glow and go to www.office.com there is then an option on the top right to download. Many LA also have a tile on the launchpad to download Glow as shown in this video which you can on 15 devices.
The PowerPoint recording menu is switch off, go to File menu then Options and customise ribbon. On the right side click recording.
Here is a video on that from Mrs Clarke.
Mrs Phillips a Scottish #MIEExpert shows how to use PowerPoint Screen Recorder.
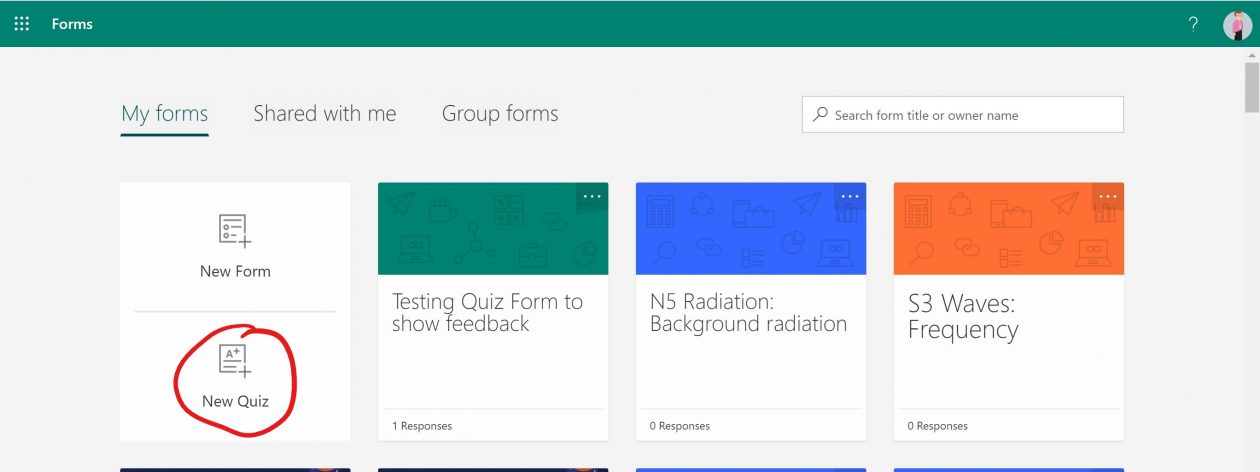
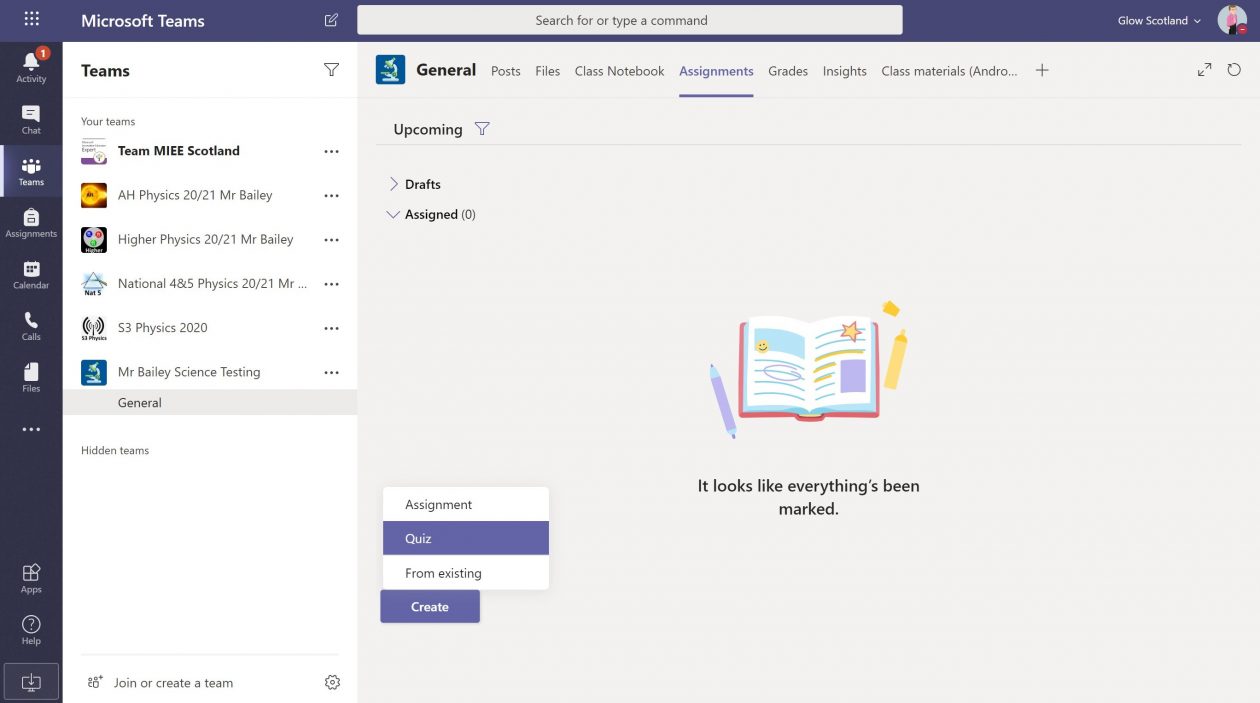
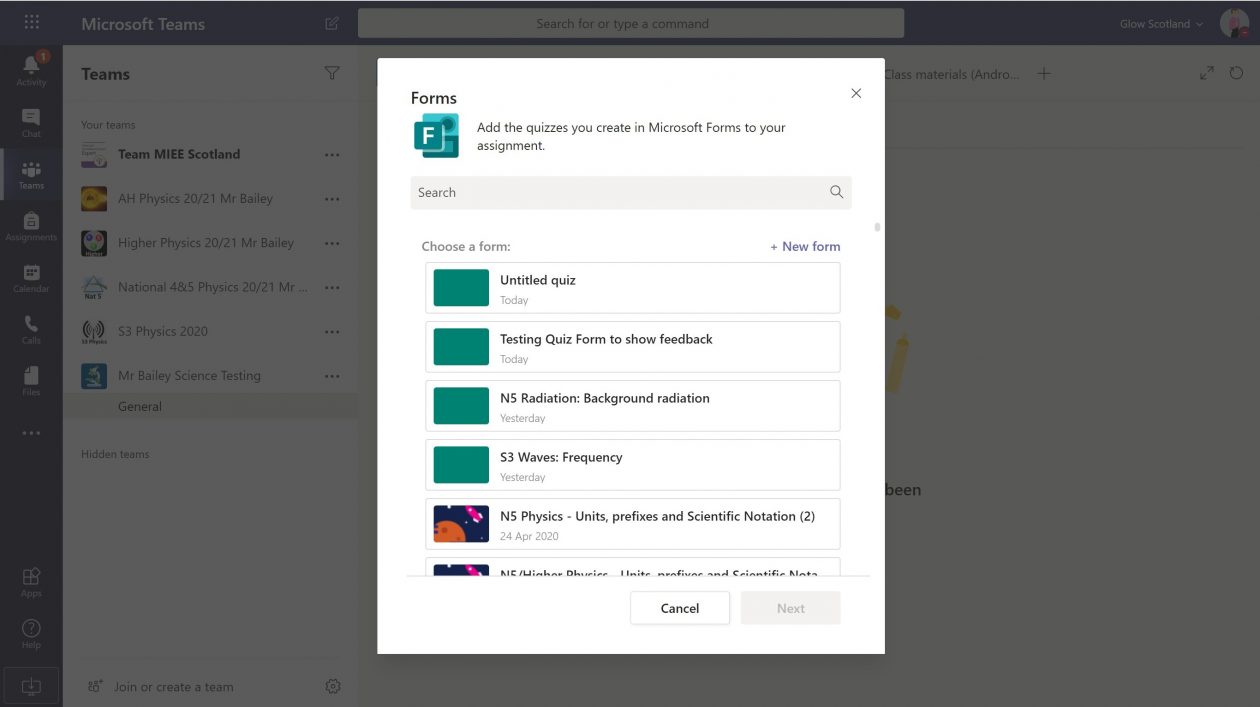
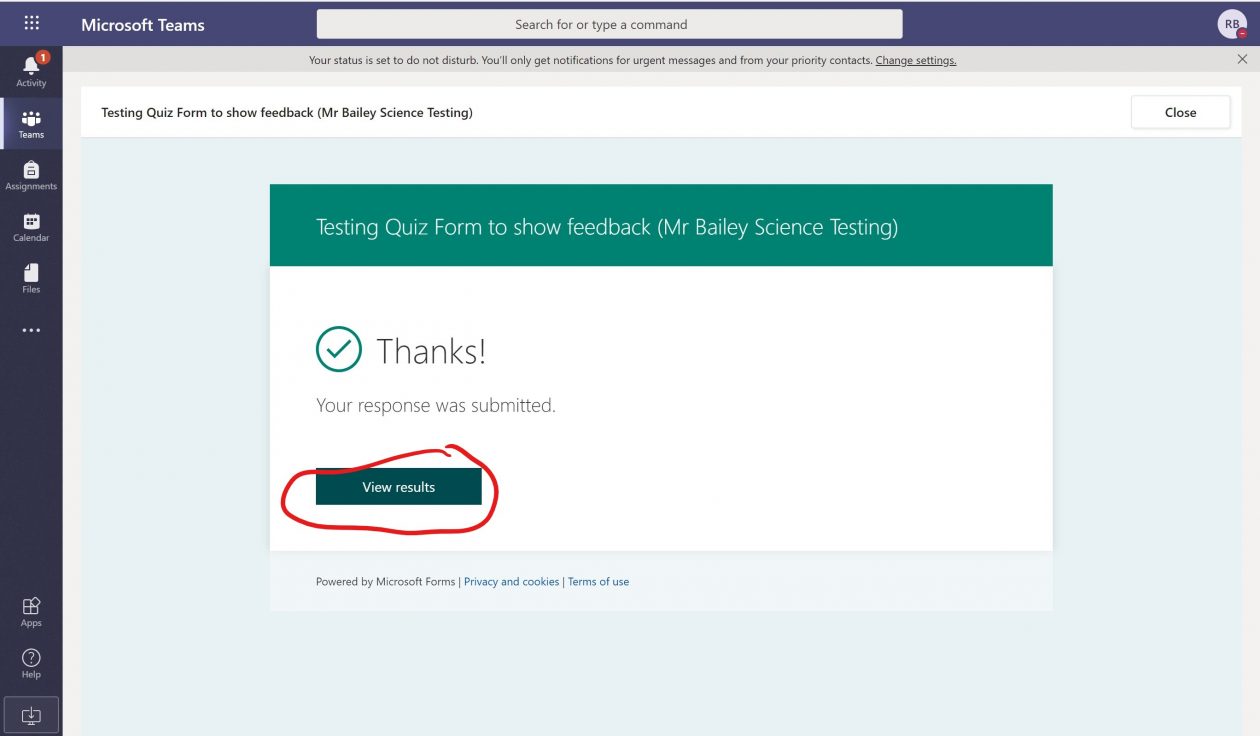
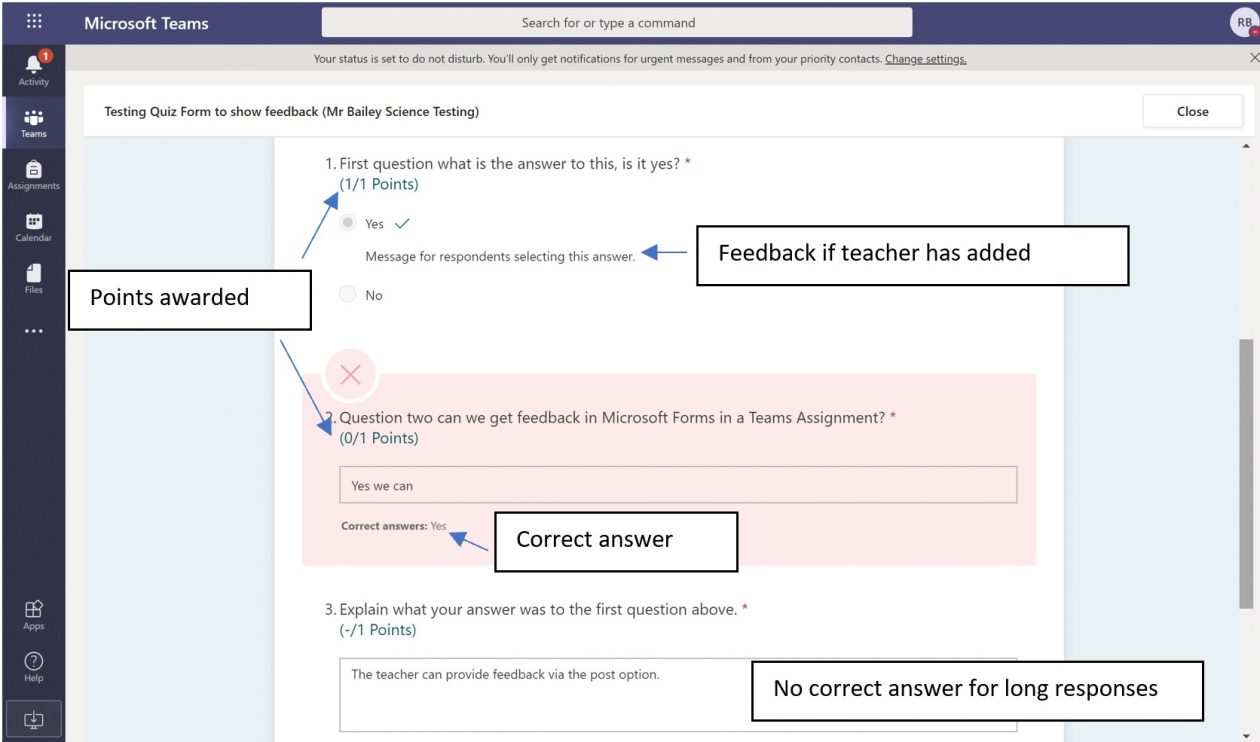
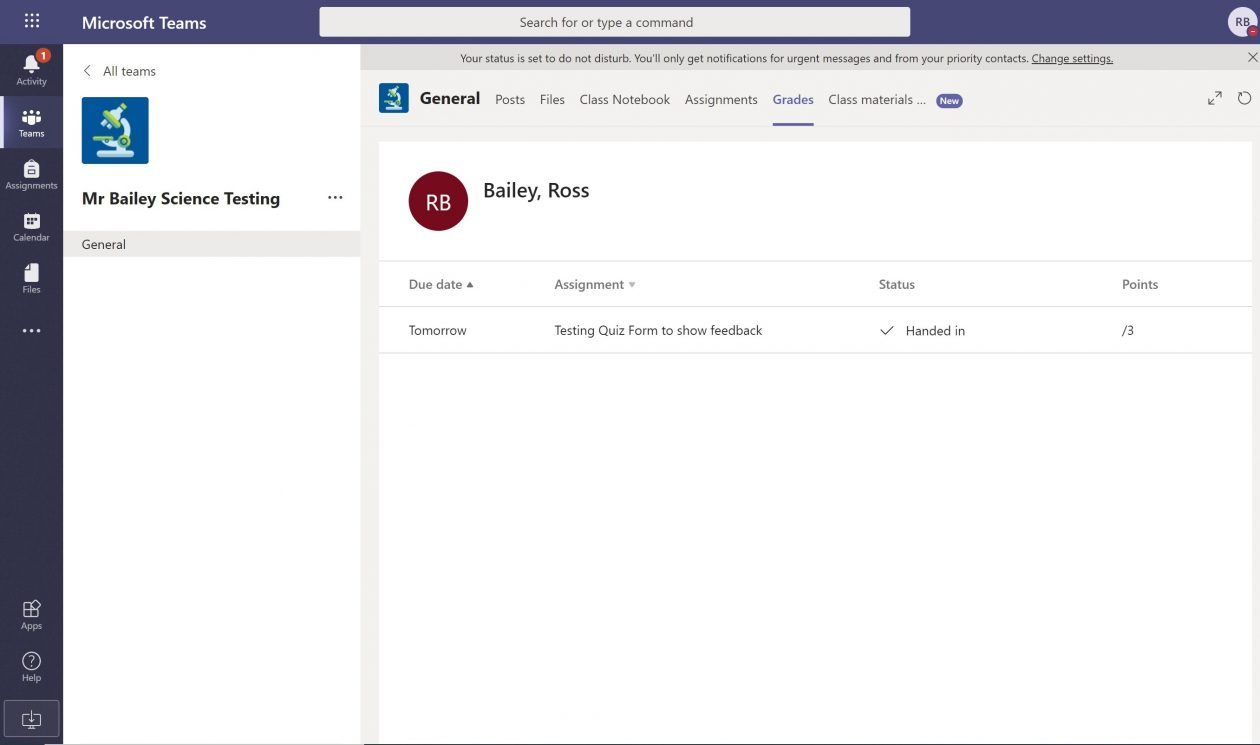
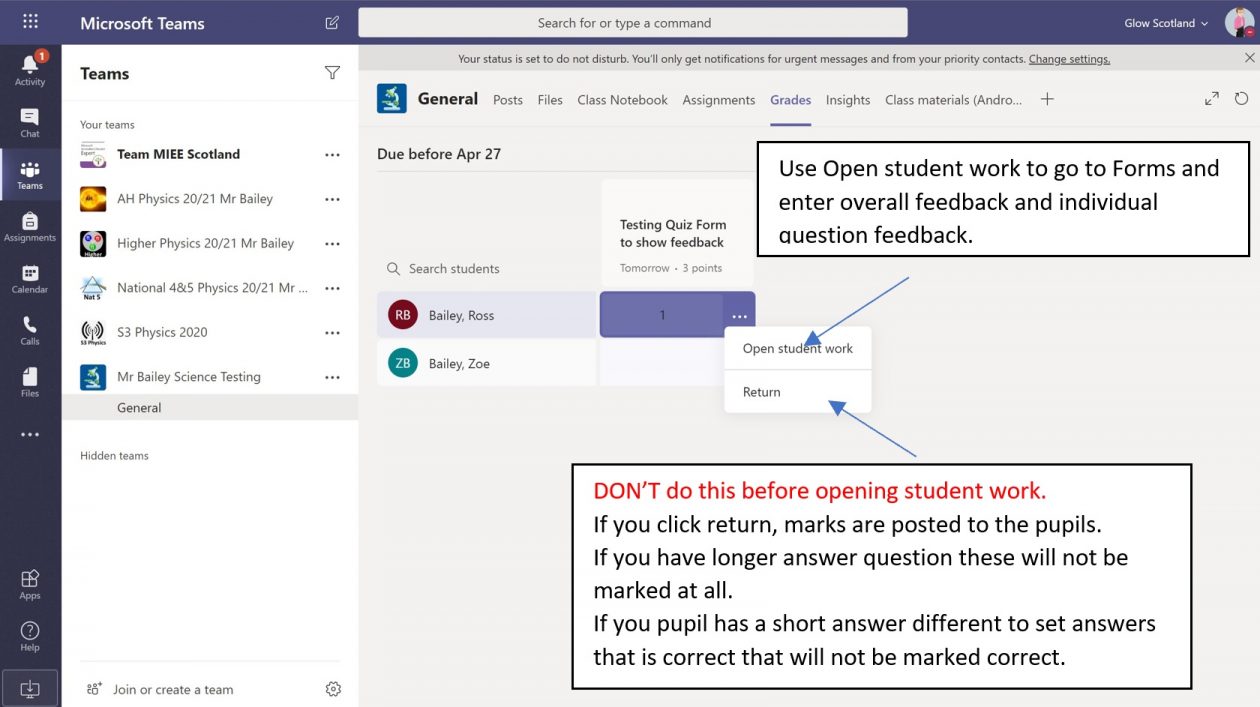
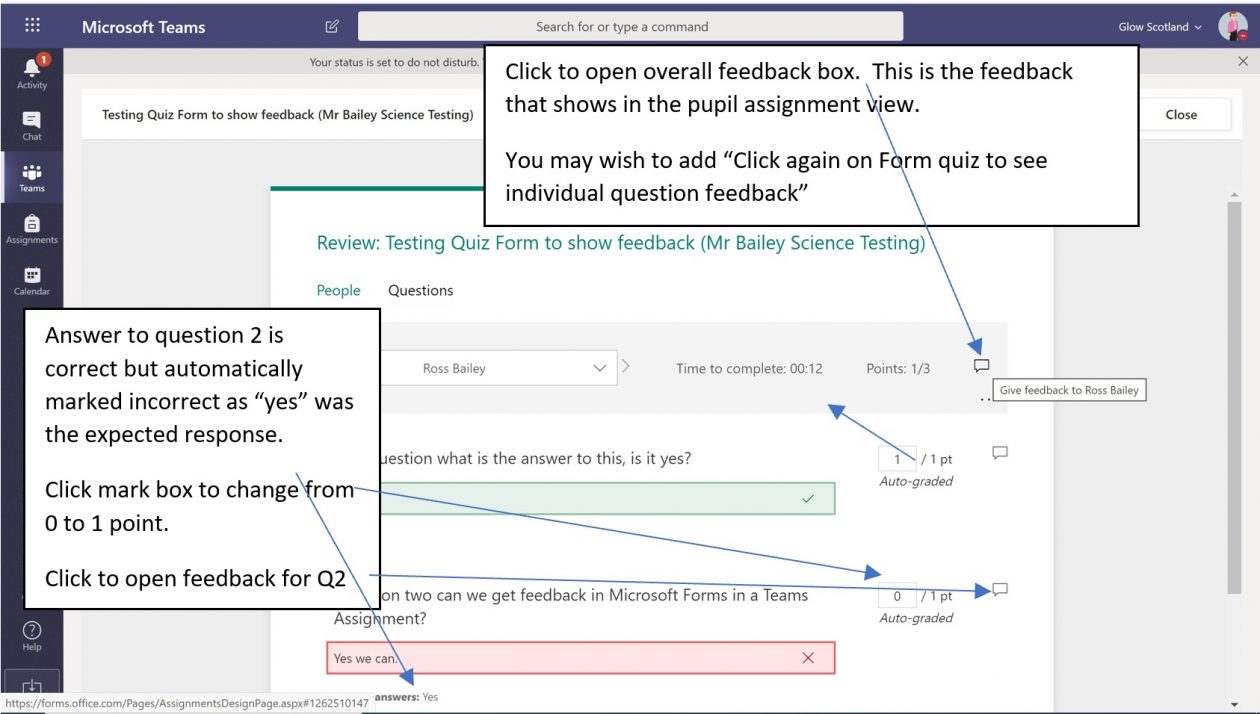
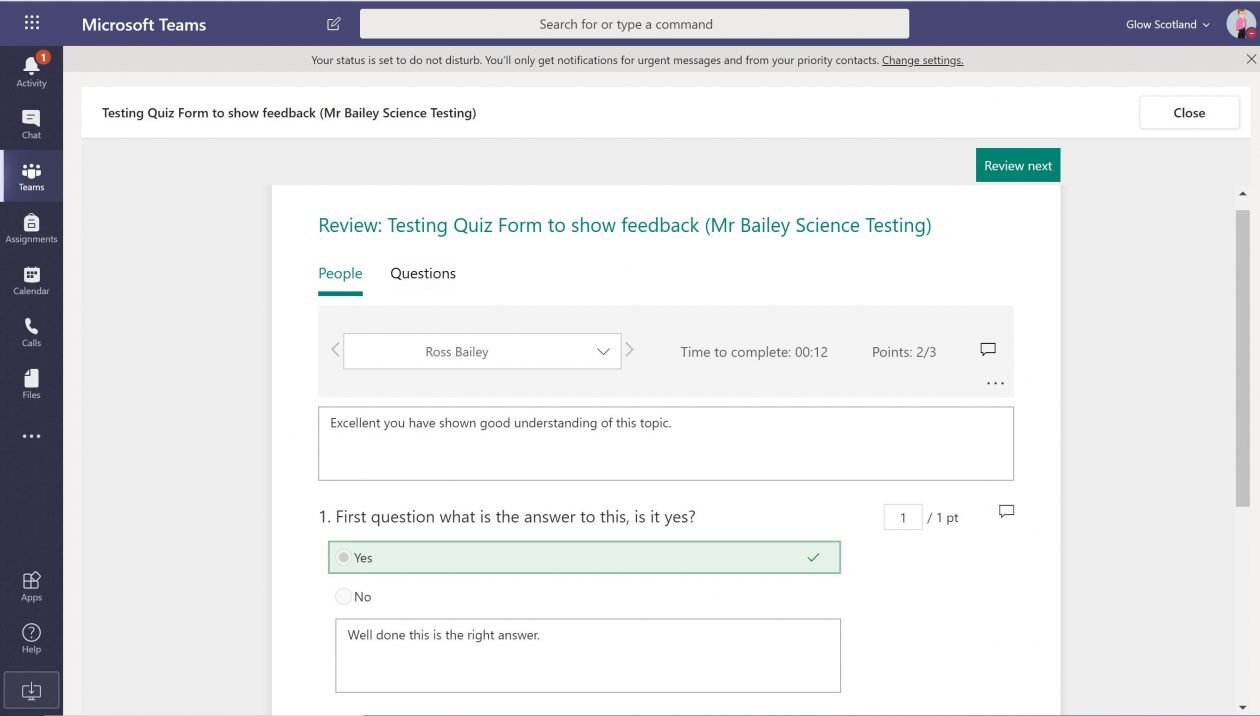
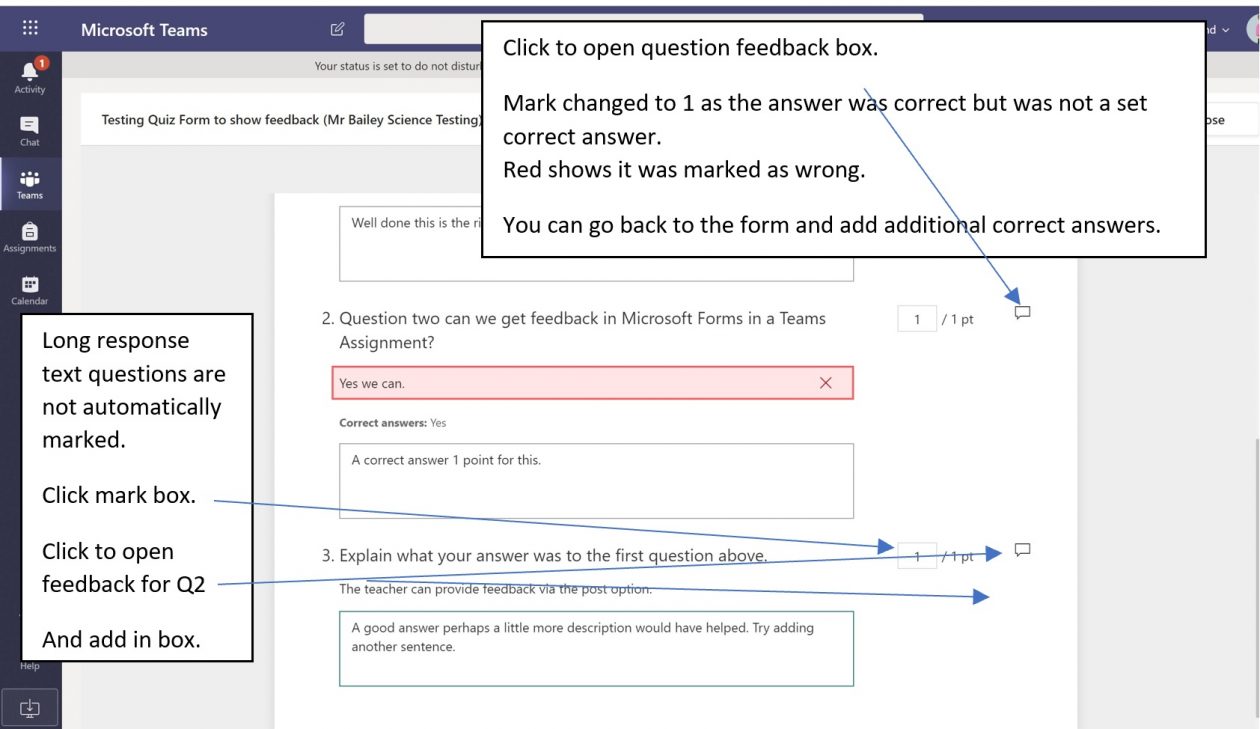
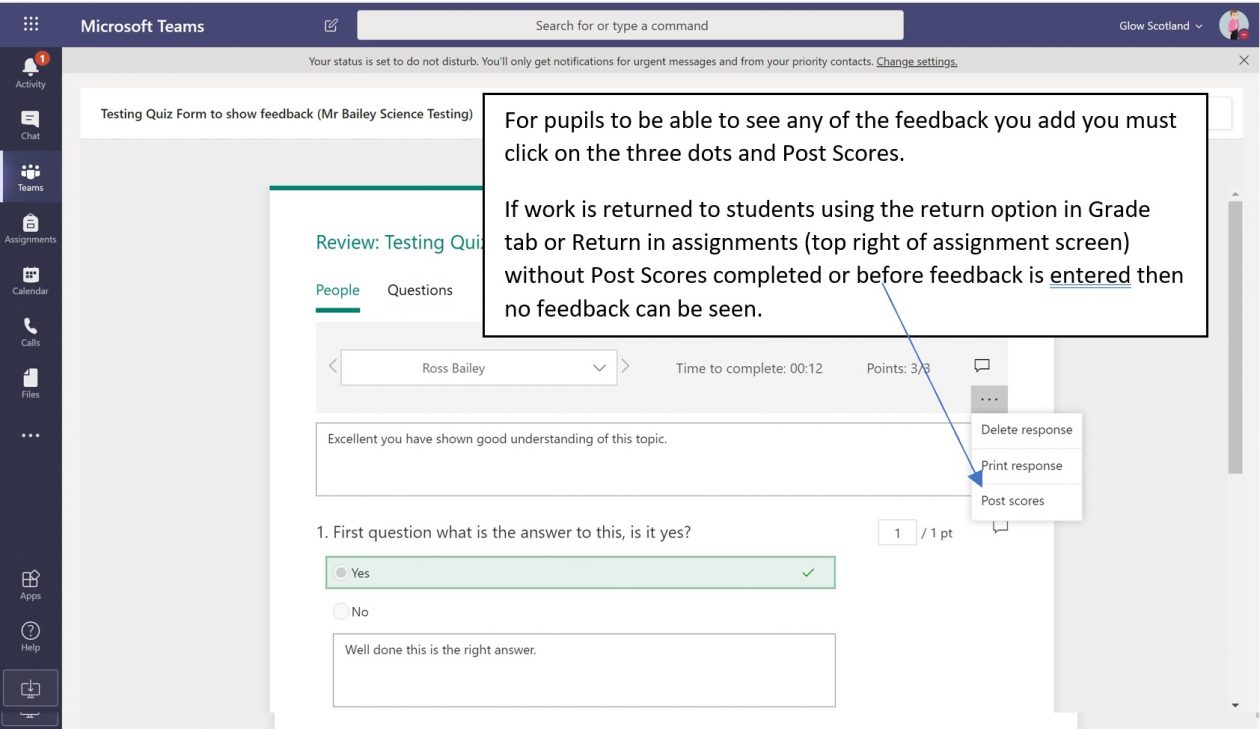
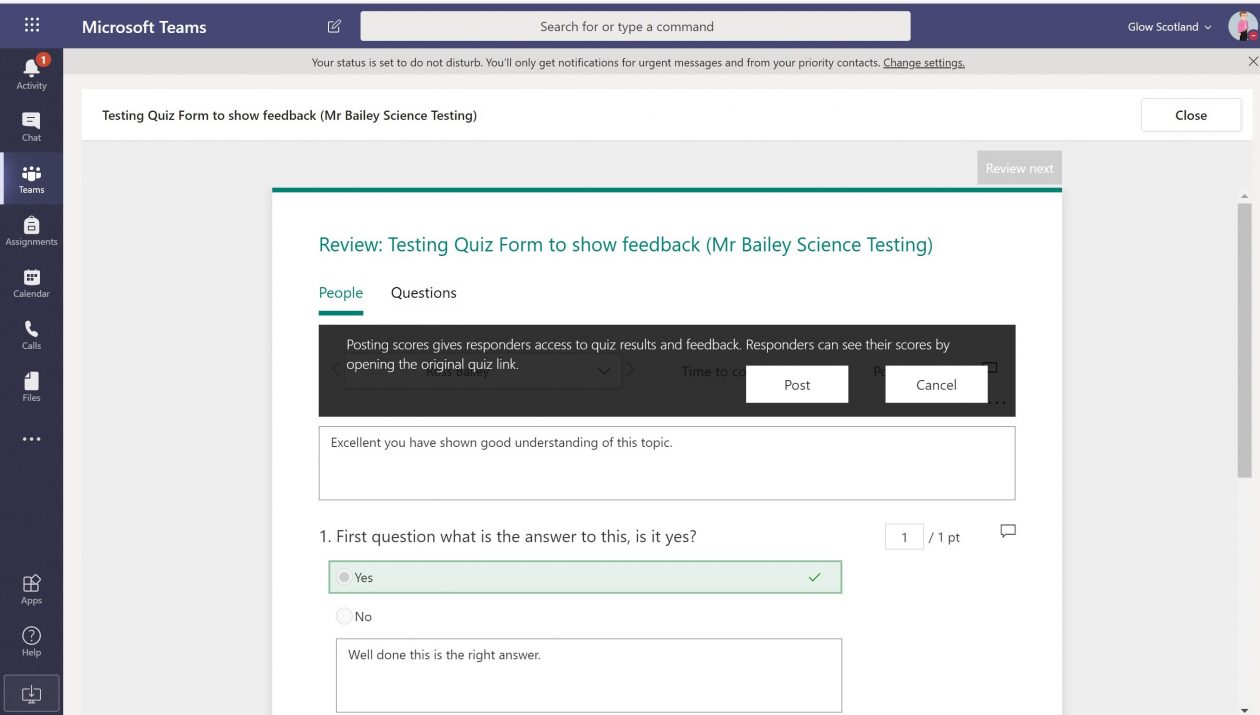
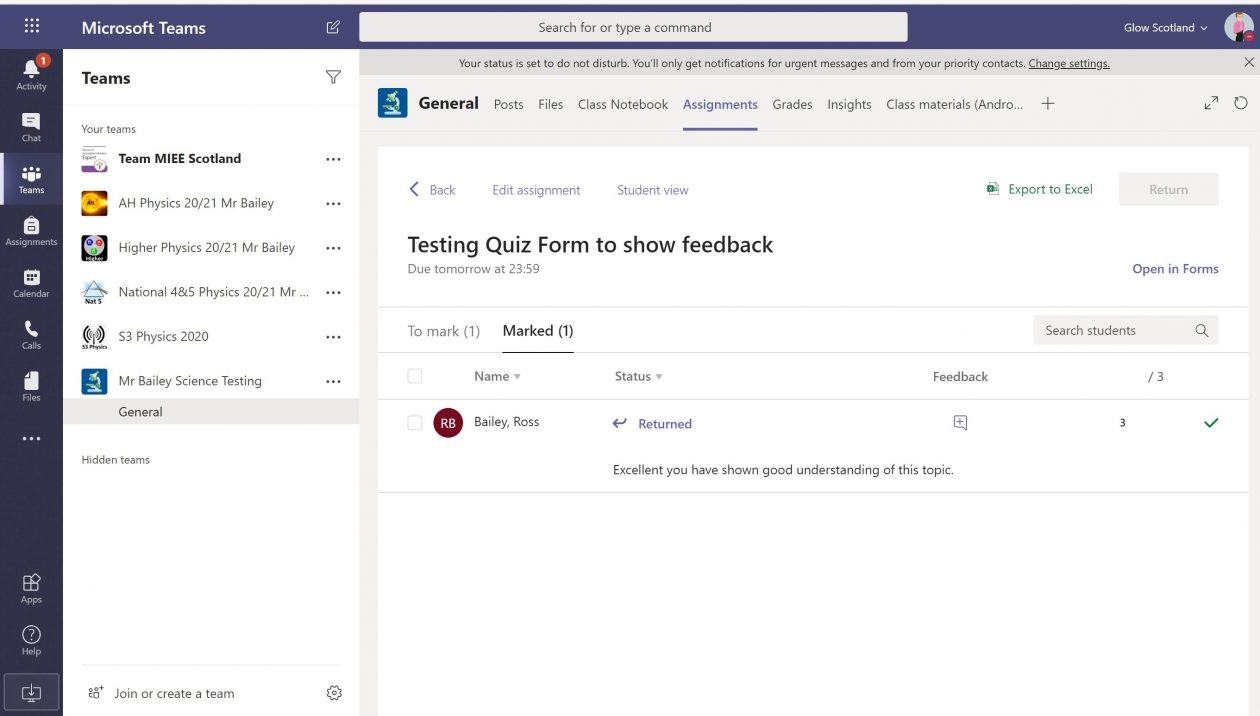
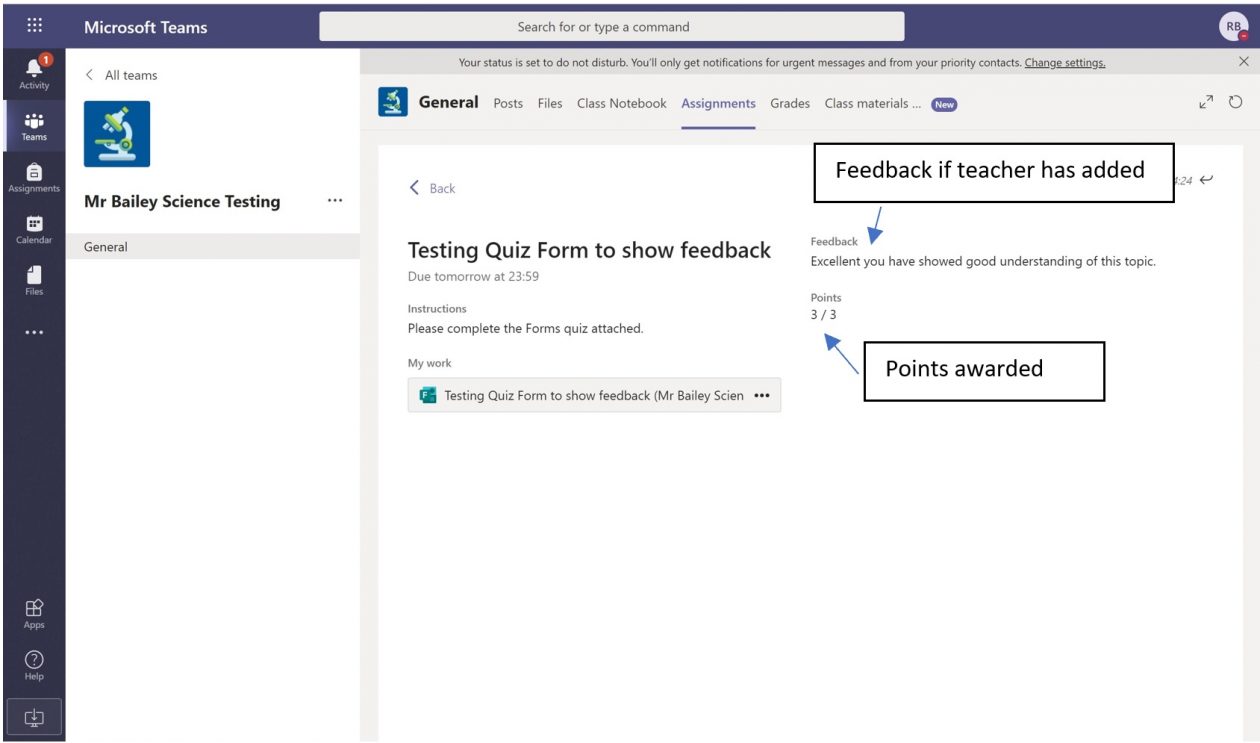
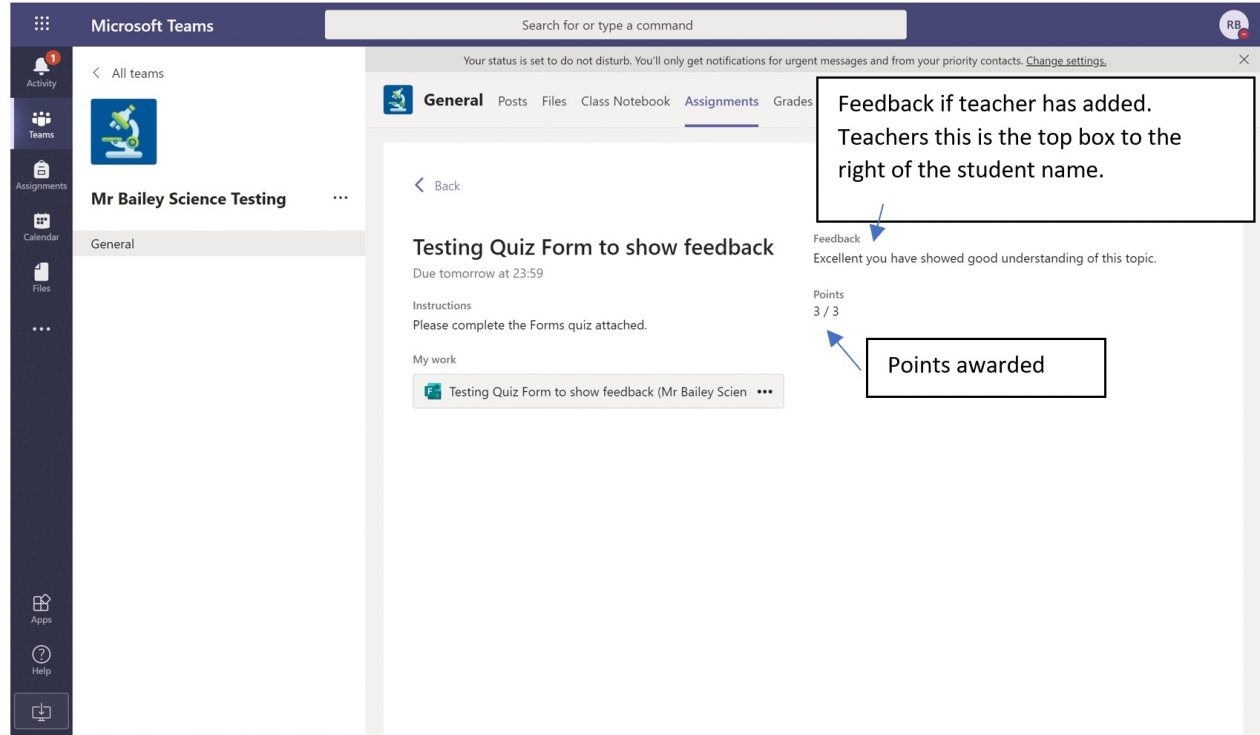
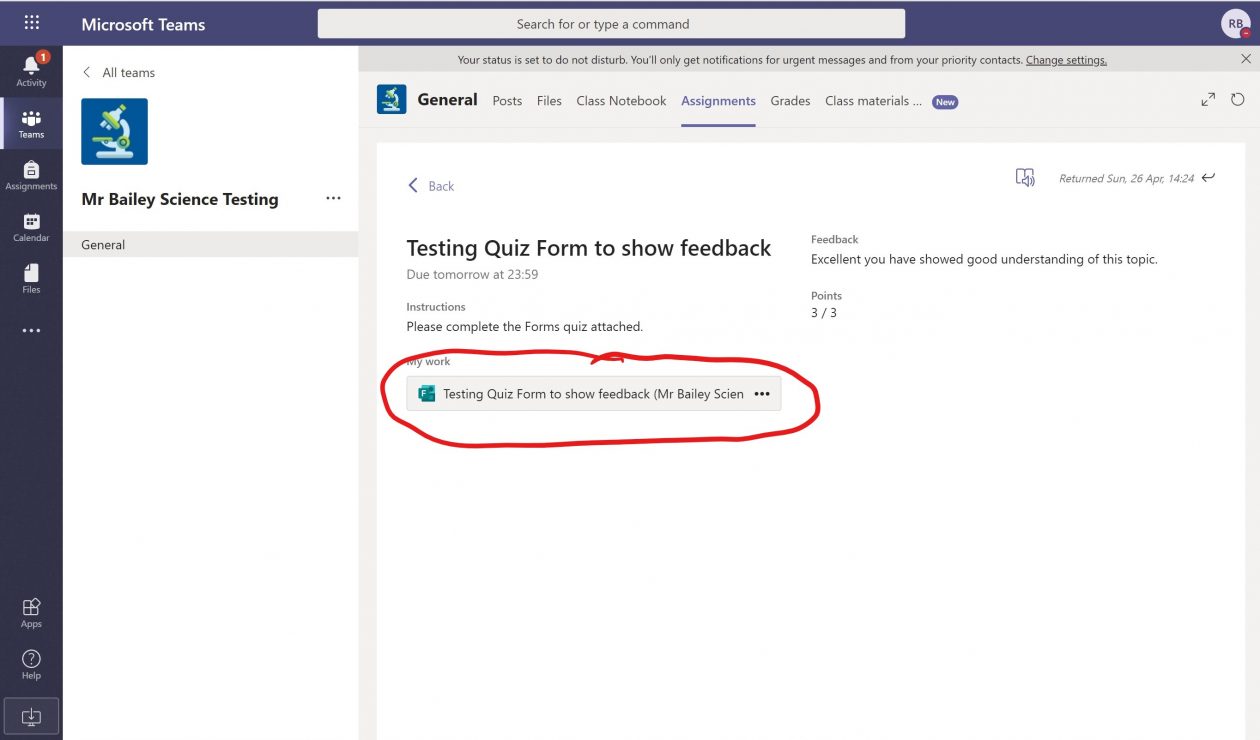
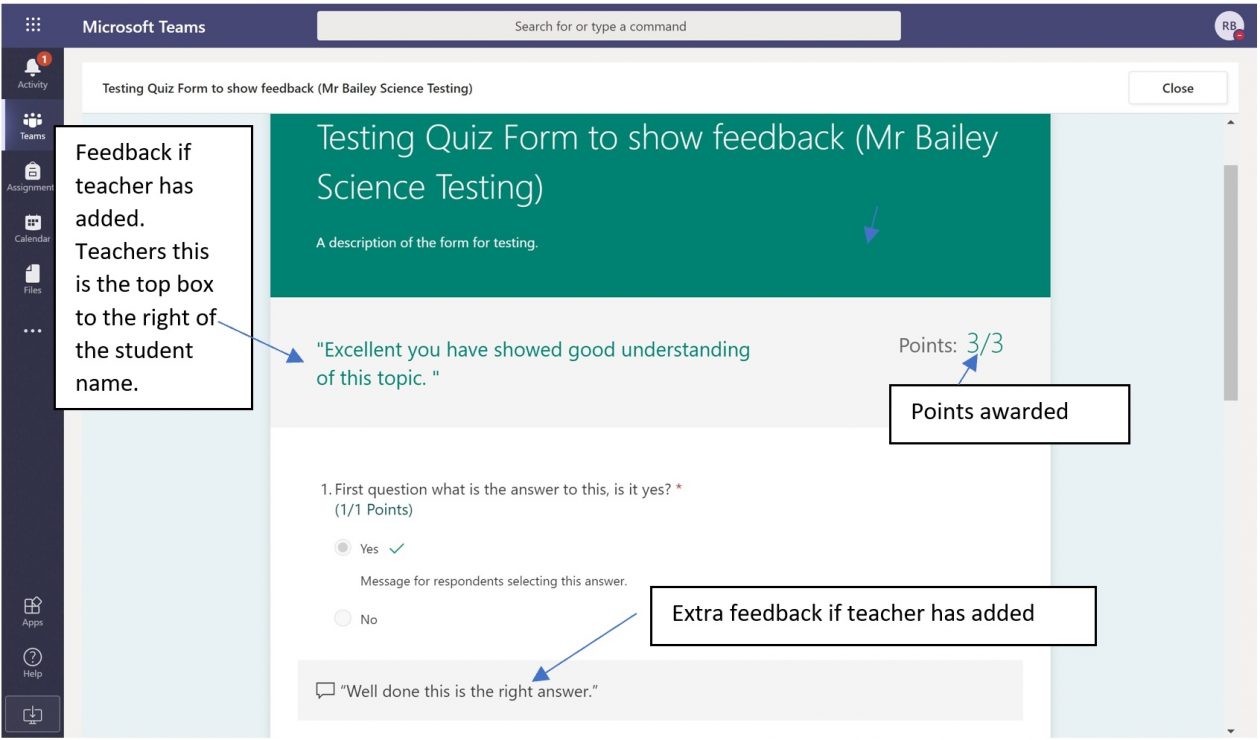
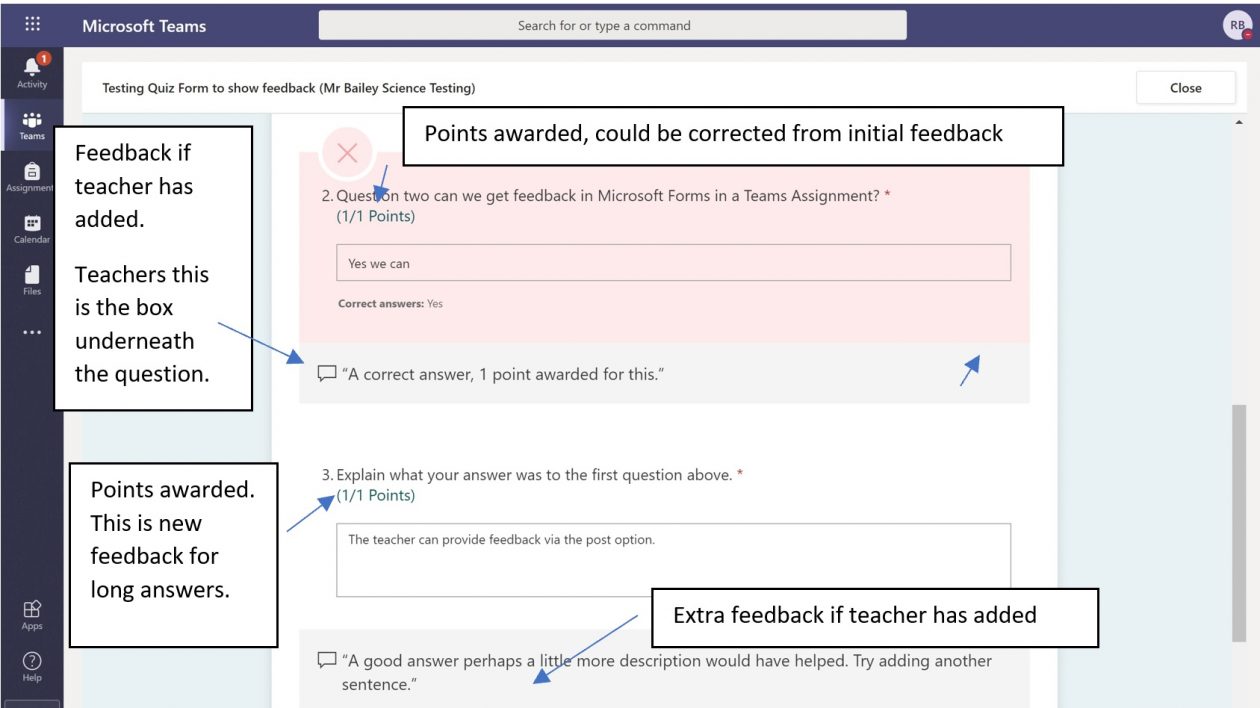
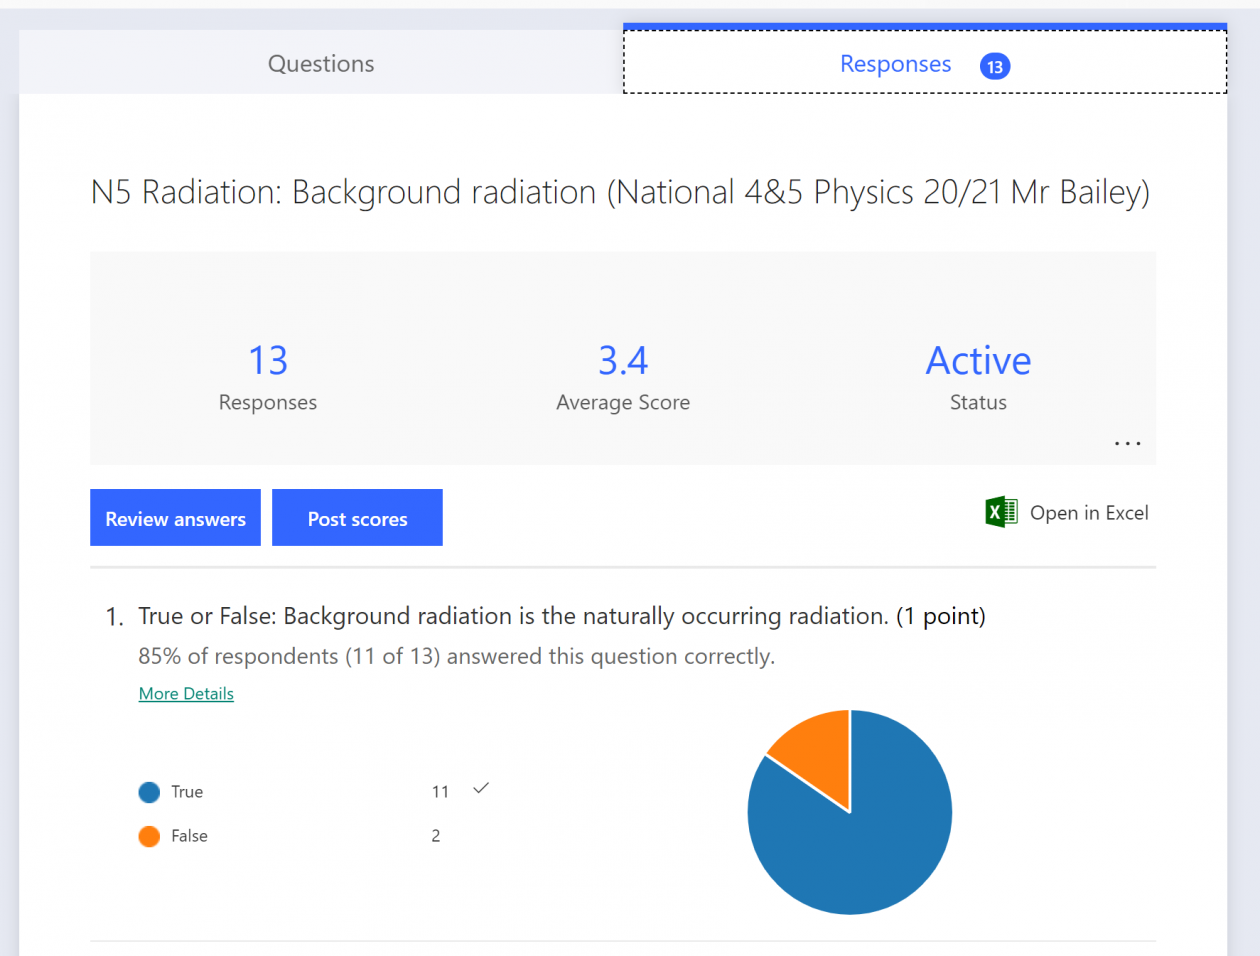
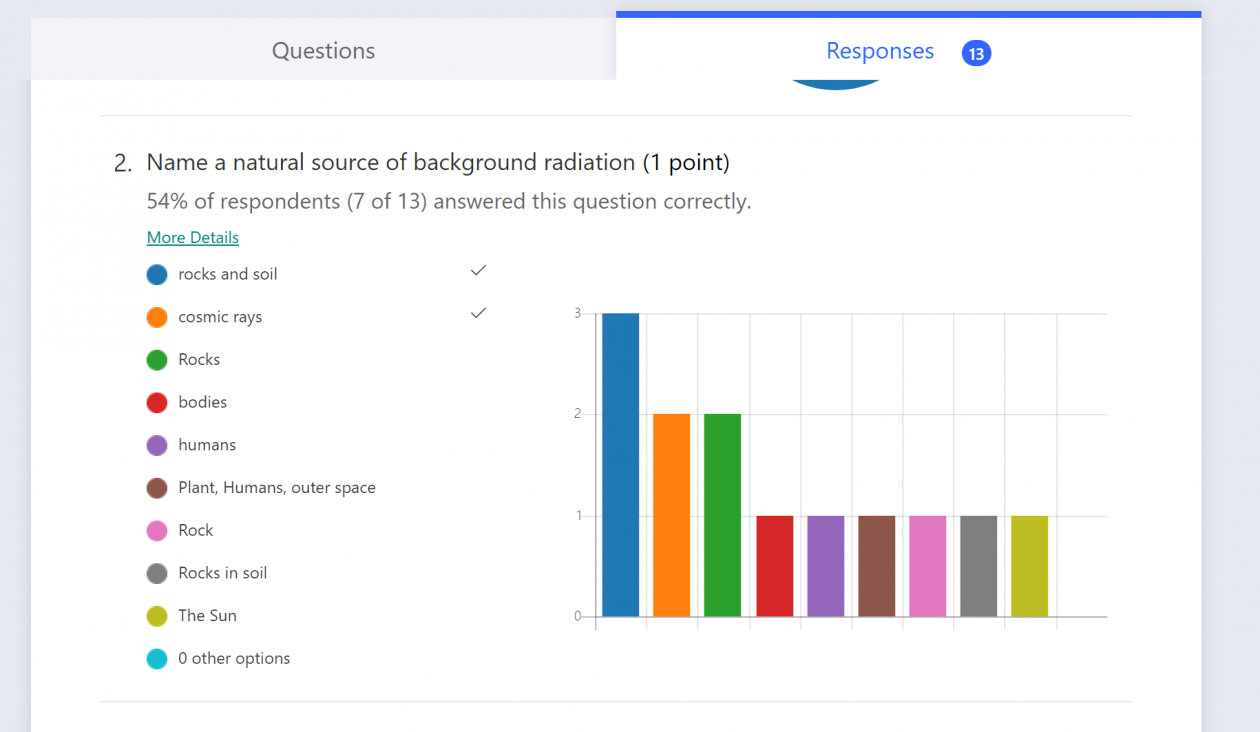
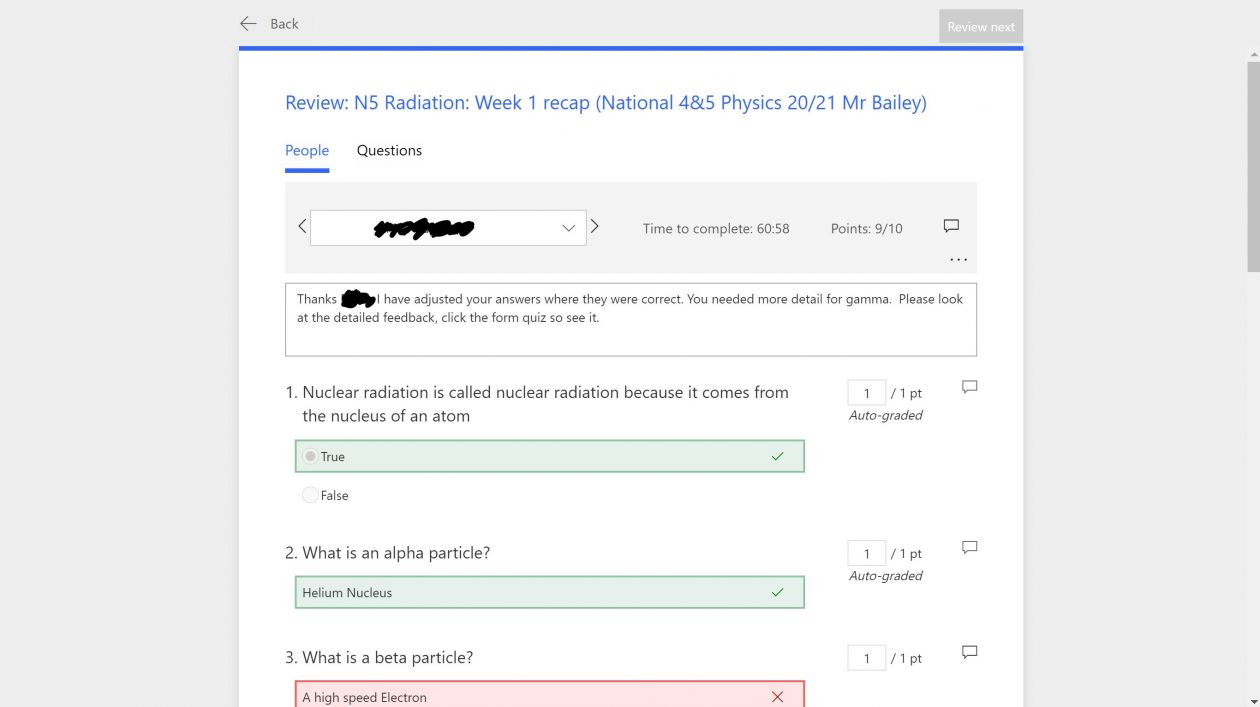
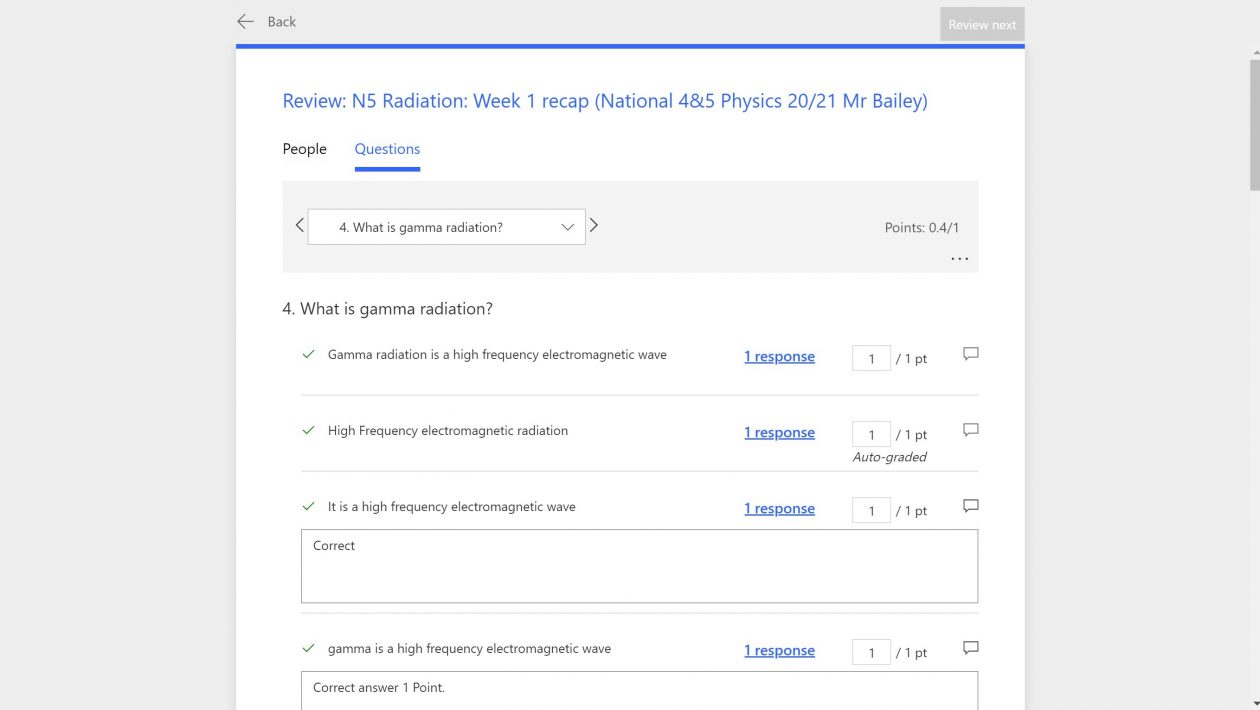
I use Forms quizzes in a number of ways in my Teams. The majority of these are set as Teams assignments.
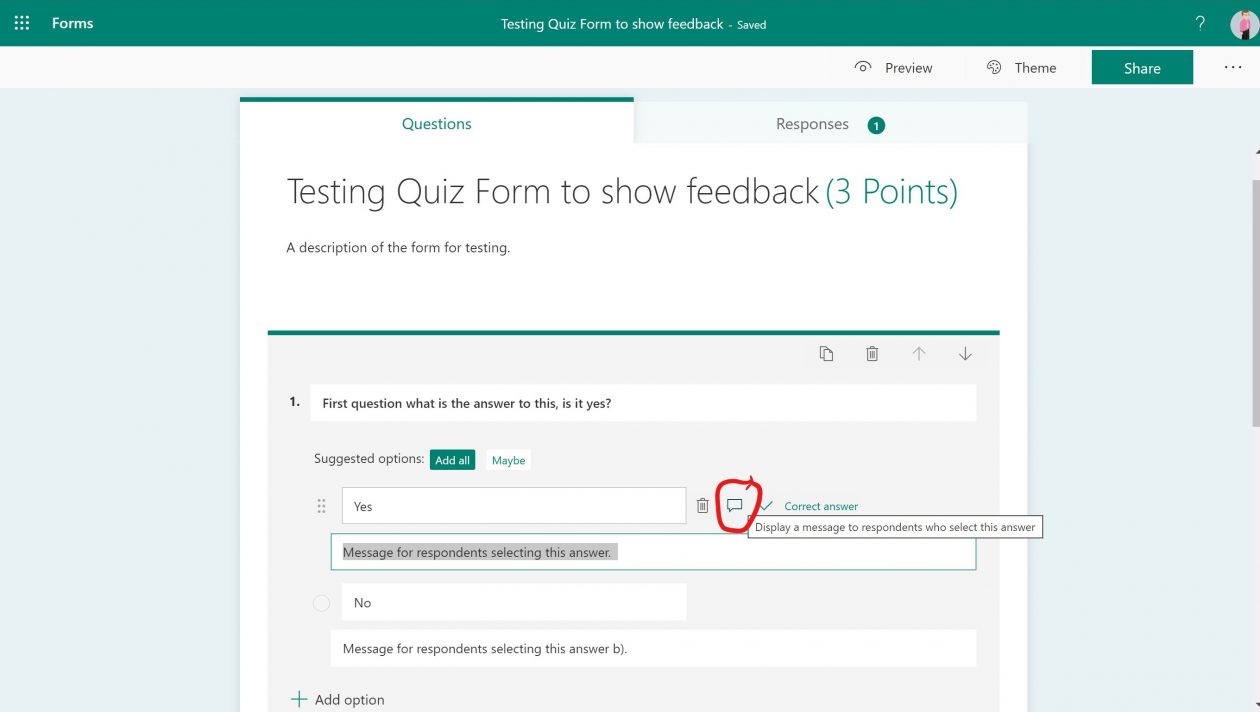
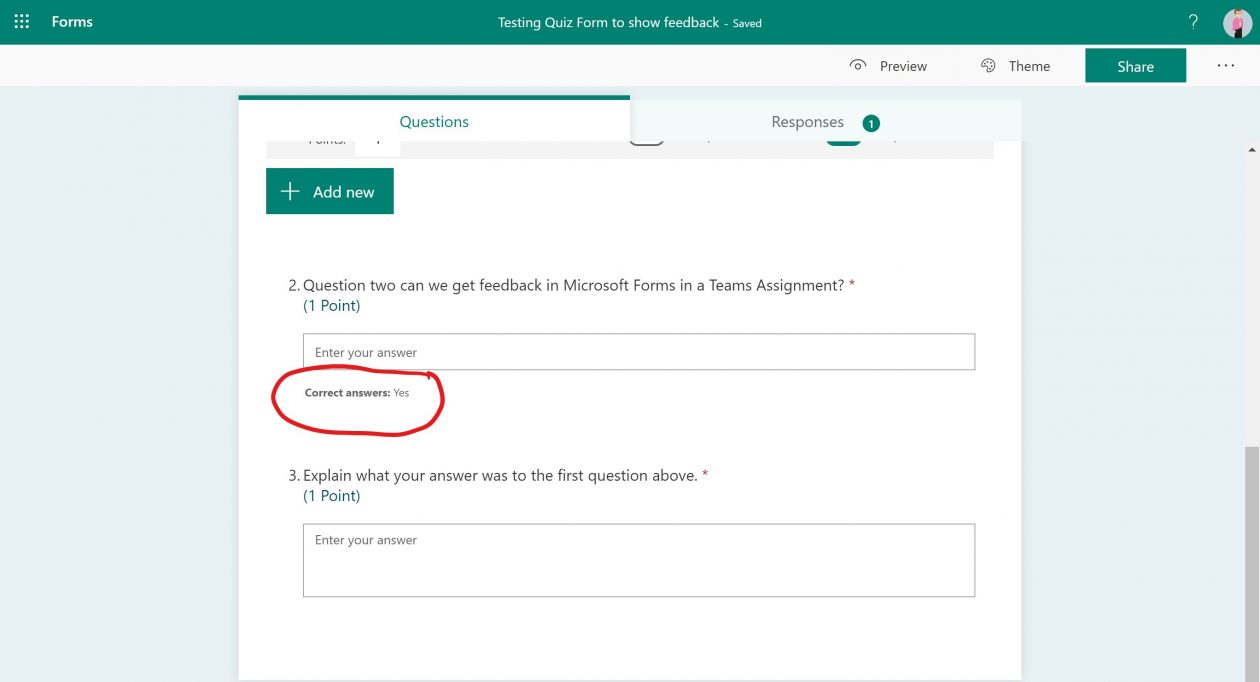
Take a look at my last blog post on Feedback in Forms for more details on how you can get Feedback in Forms.
The following week starts with a recap test on the previous week to check for understanding. Some quizzes are reissued to pupils to do again if they do poorly especially if I can see a small time of work.
If you are attaching files for pupils to edit and put in answers within assignments then you should make sure that they are:
docx not doc for Word
pptx not ppt for PowerPoint
xlsx not xls for Excel
So make sure you upload the correct file format and if you want to make the file editable choose the students edit their own copy option in the three dots to the right.
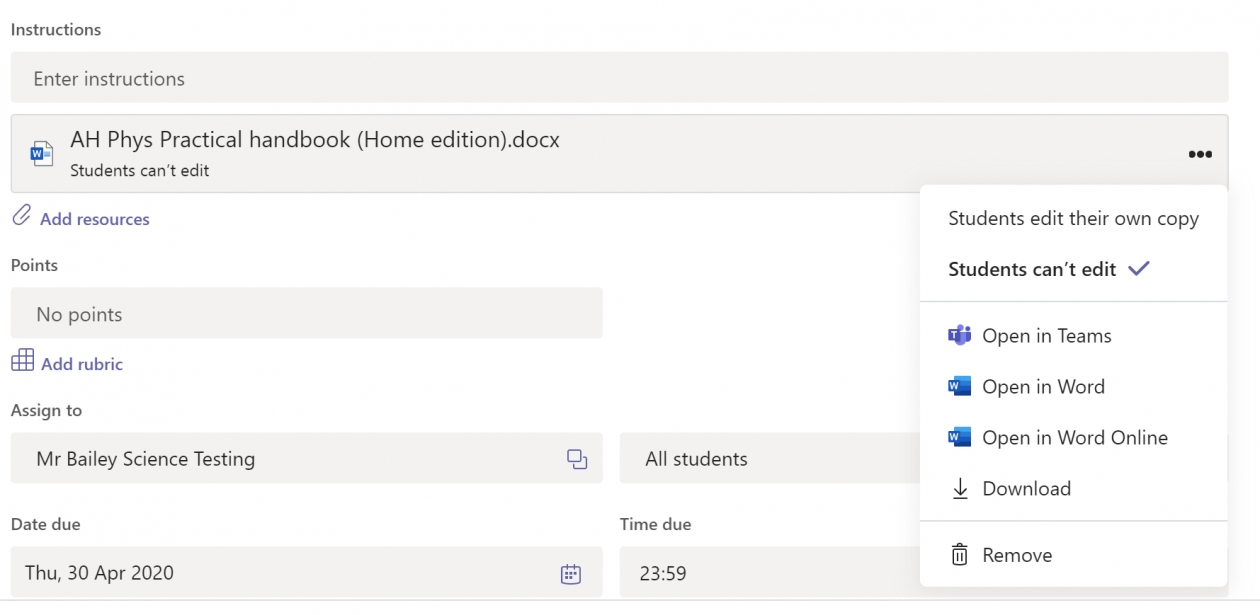
Remember if you upload PDF files then these cannot be edited if if they are editable ones. So only use PDF files for notes or instructions. If you want to change PDF to word you can do this in Microsoft Word. Here is a video showing how you can change a PDF to Word using the Office app on your phone.
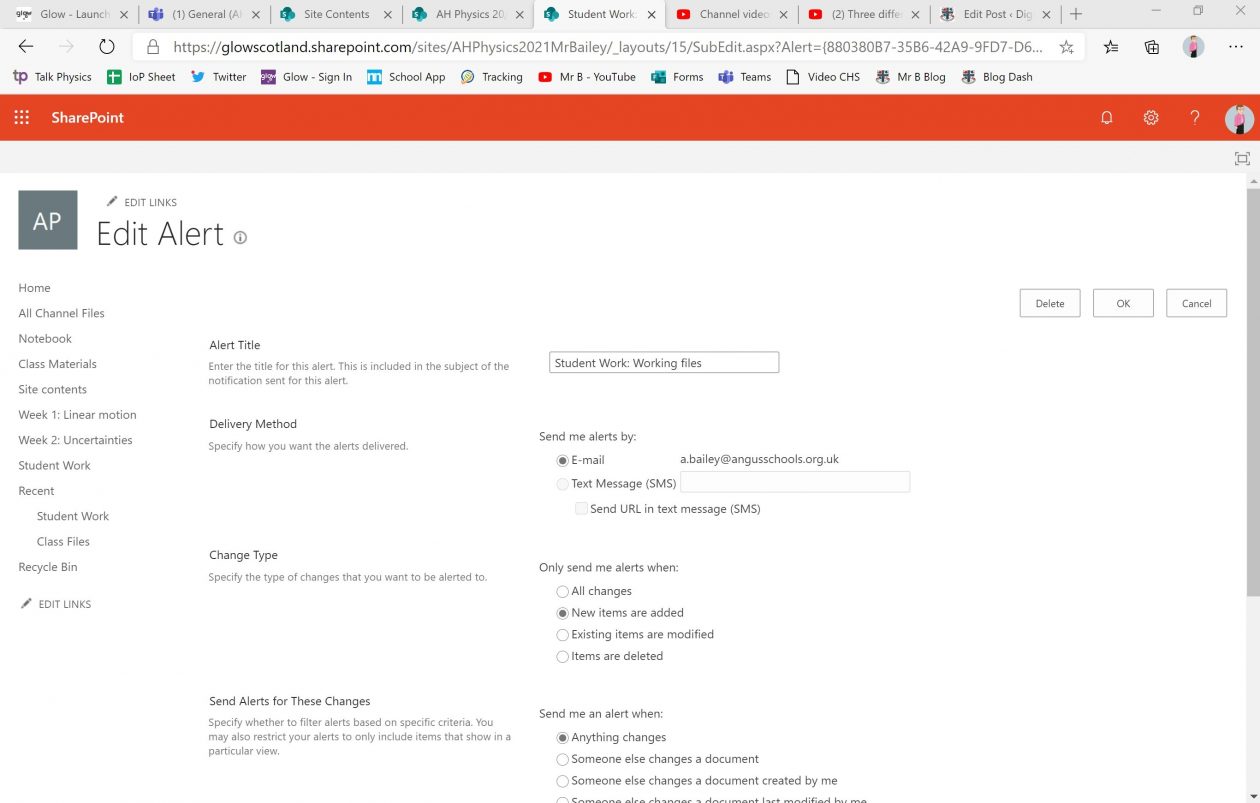
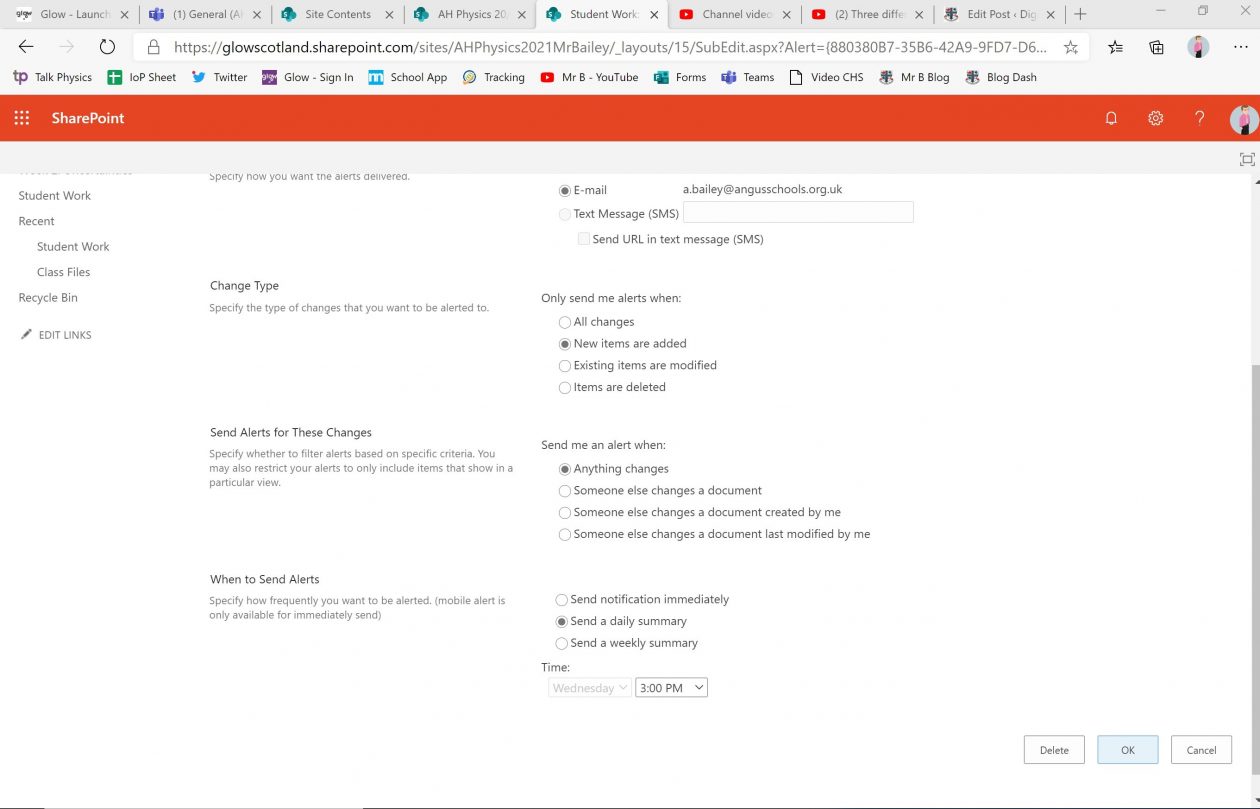
Alerts / Notifications for Teams Assignments
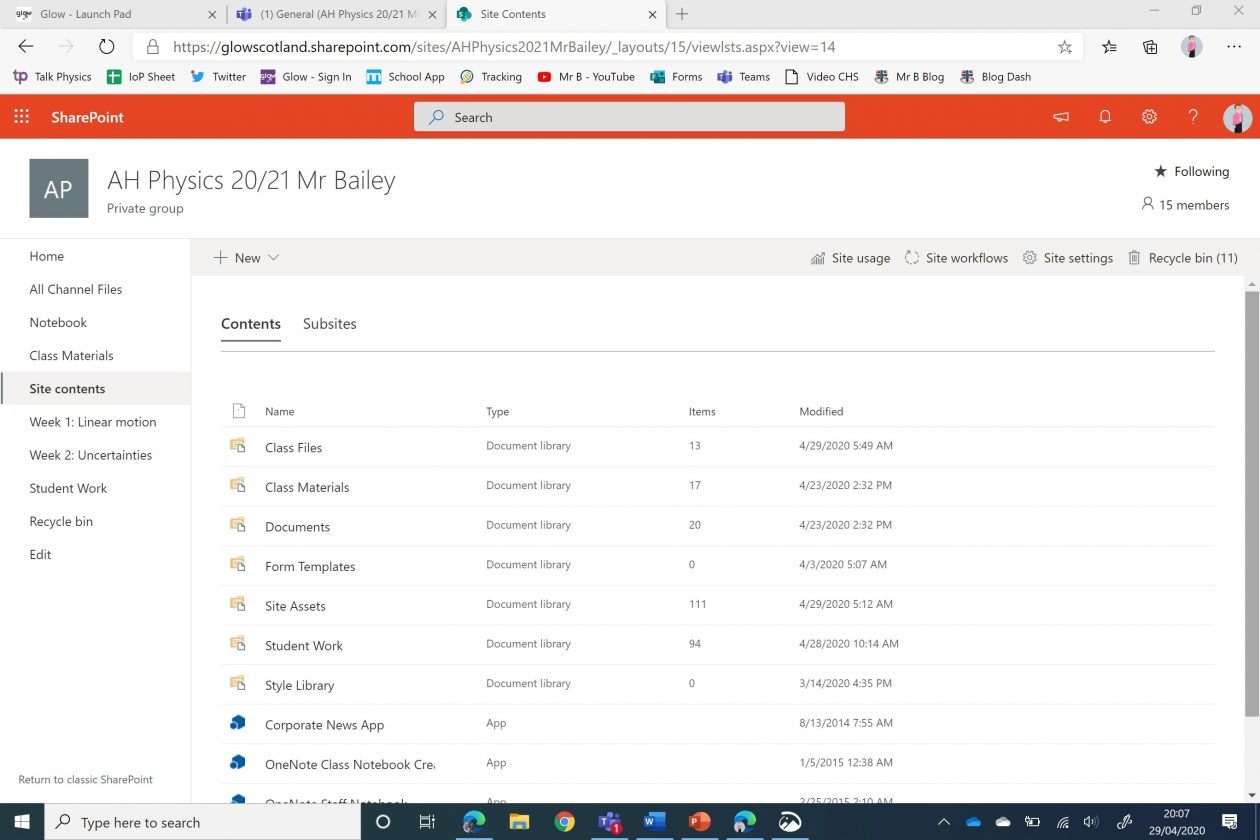
It is possible to set up notifications for when pupils upload work to Teams Assignments. Thanks to Donna Shah for sharing this. This is done in the underlying SharePoint site for the Team.
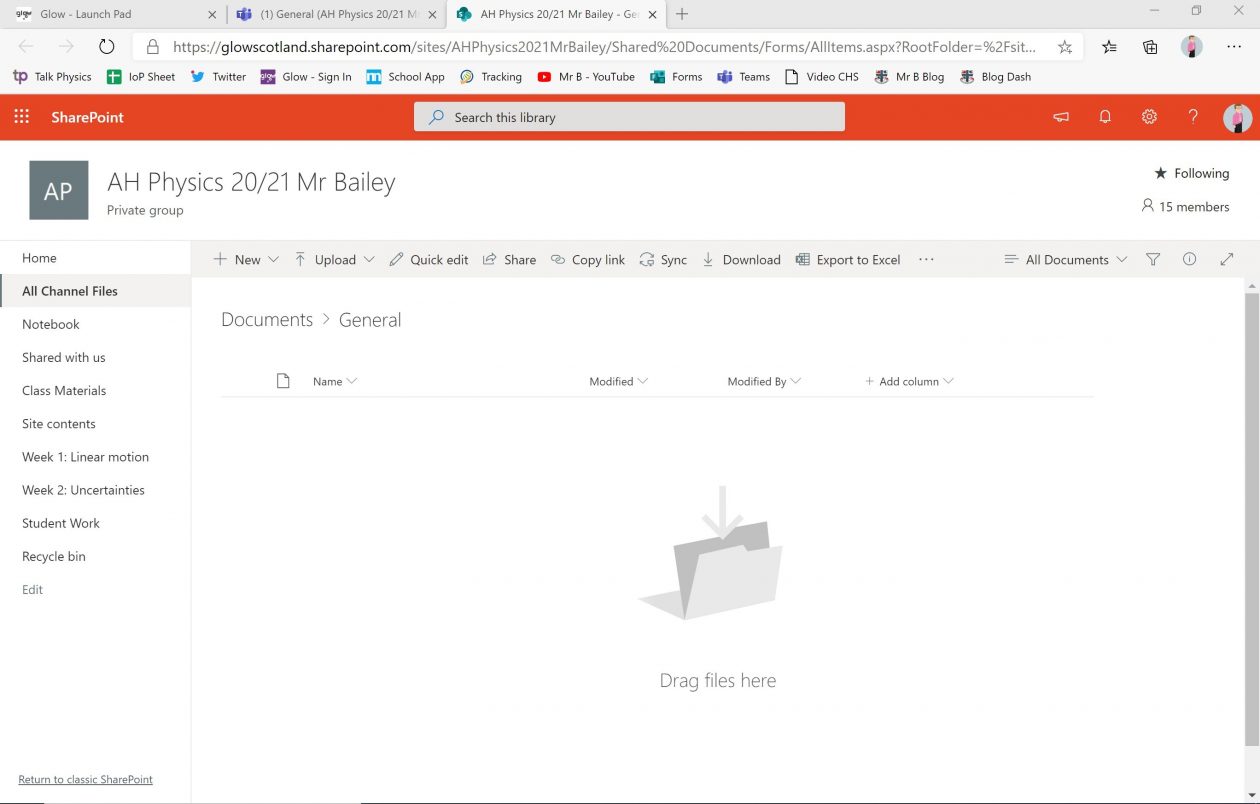
Go to the SharePoint site by choosing the files tab and then selecting behind the three dots on the right open in SharePoint. You then see the view below.
From here choose the Site Settings. Then click on the student work folder.
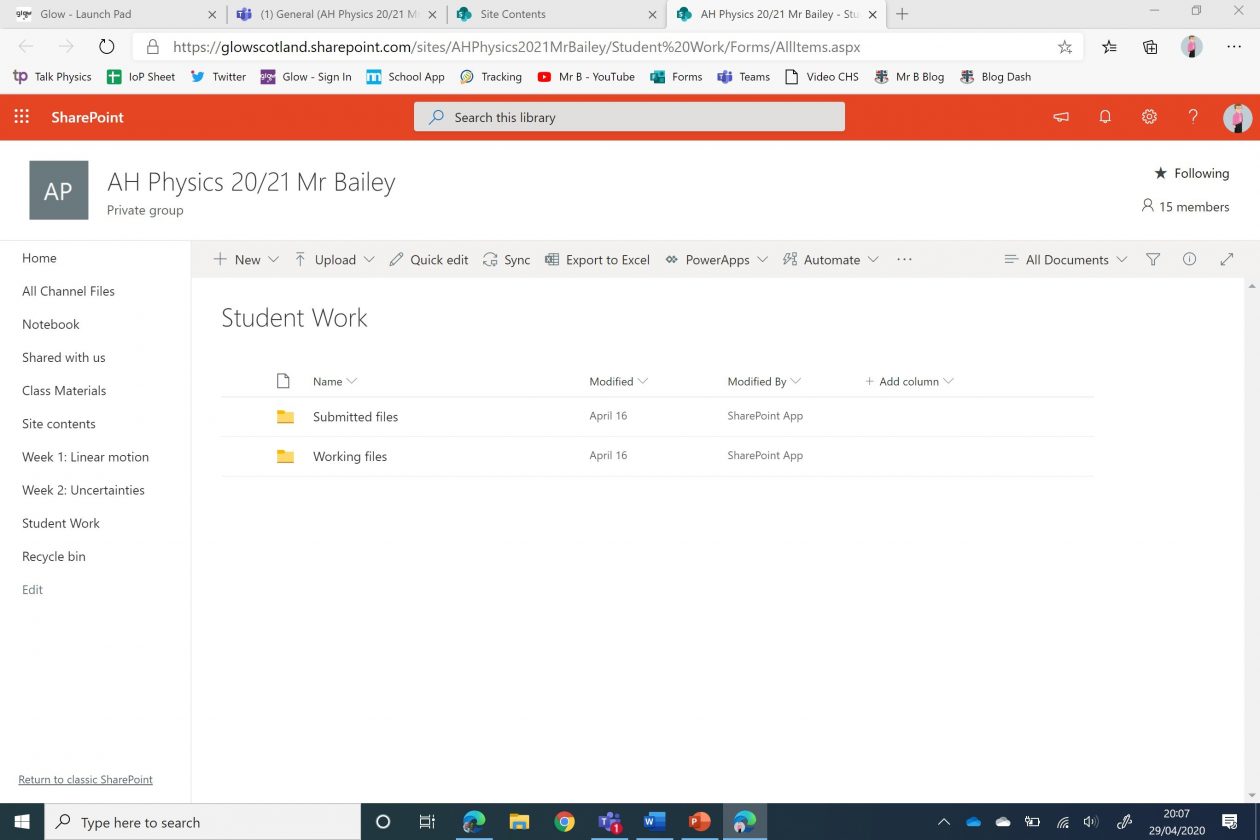
Within the student work folder are two folders submitted files and working files. The working files folder is the one we are going to use to set an alert/notification when a student add a file to Teams assignments. Here the student can still edit the file, when they click hand-in the file goes to the submitted files folder and the student can no longer edit it.
Choose from the three dots of the right of the working files menu, the alert me option.
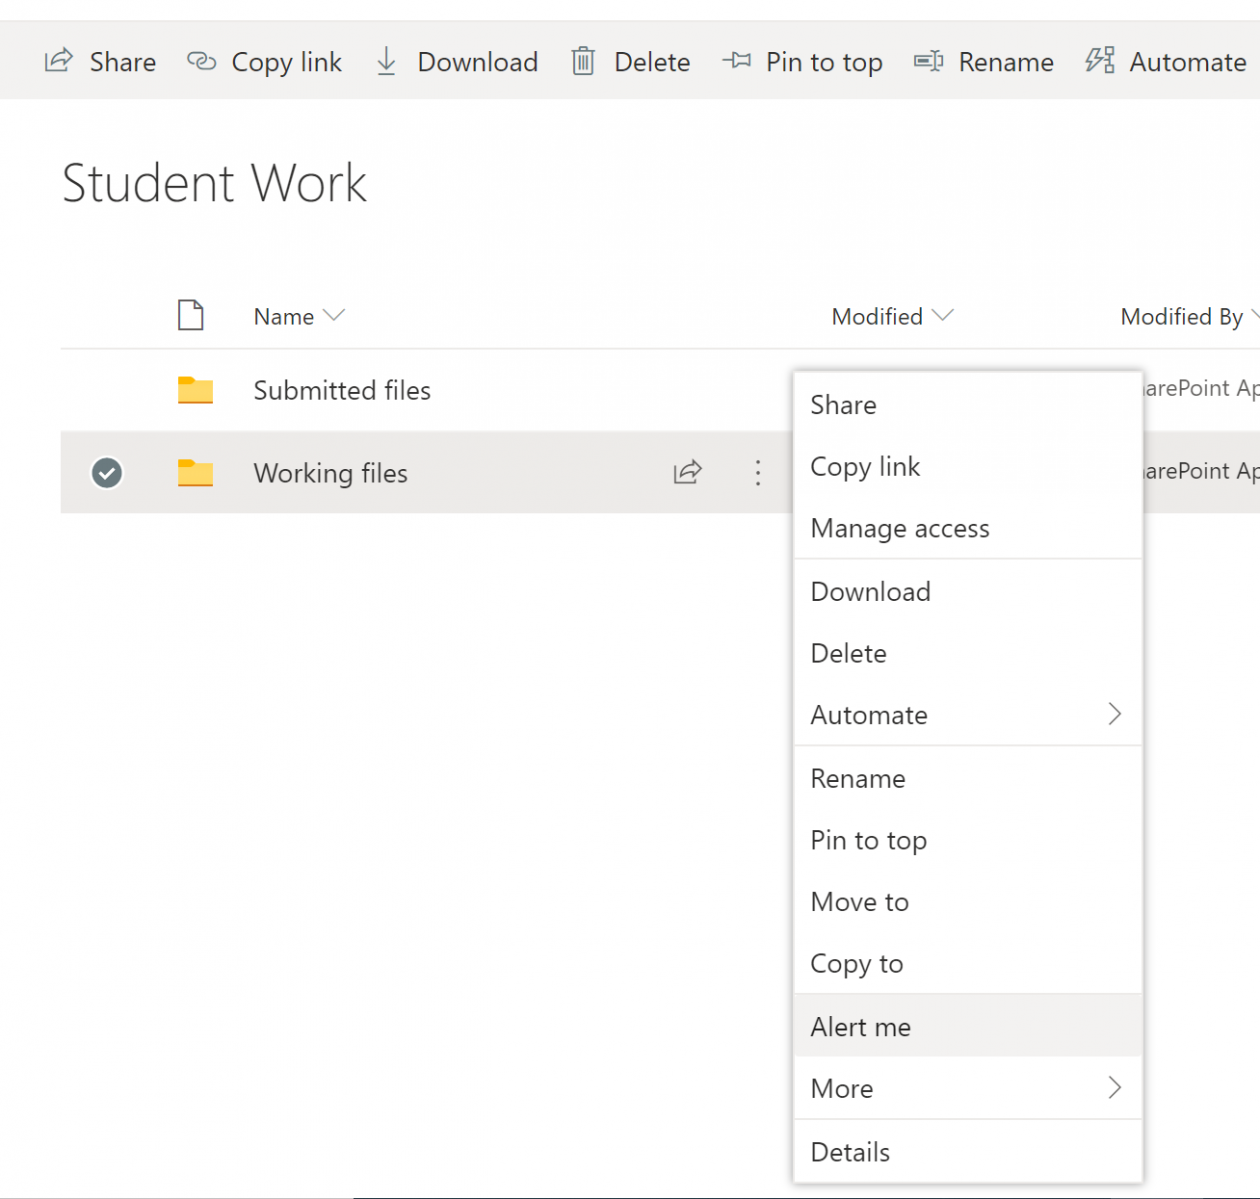
We choose email, alert when new items are added, all changes would also alert when pupils edit items. Then we have chosen a daily summary by email at 3.00 pm.
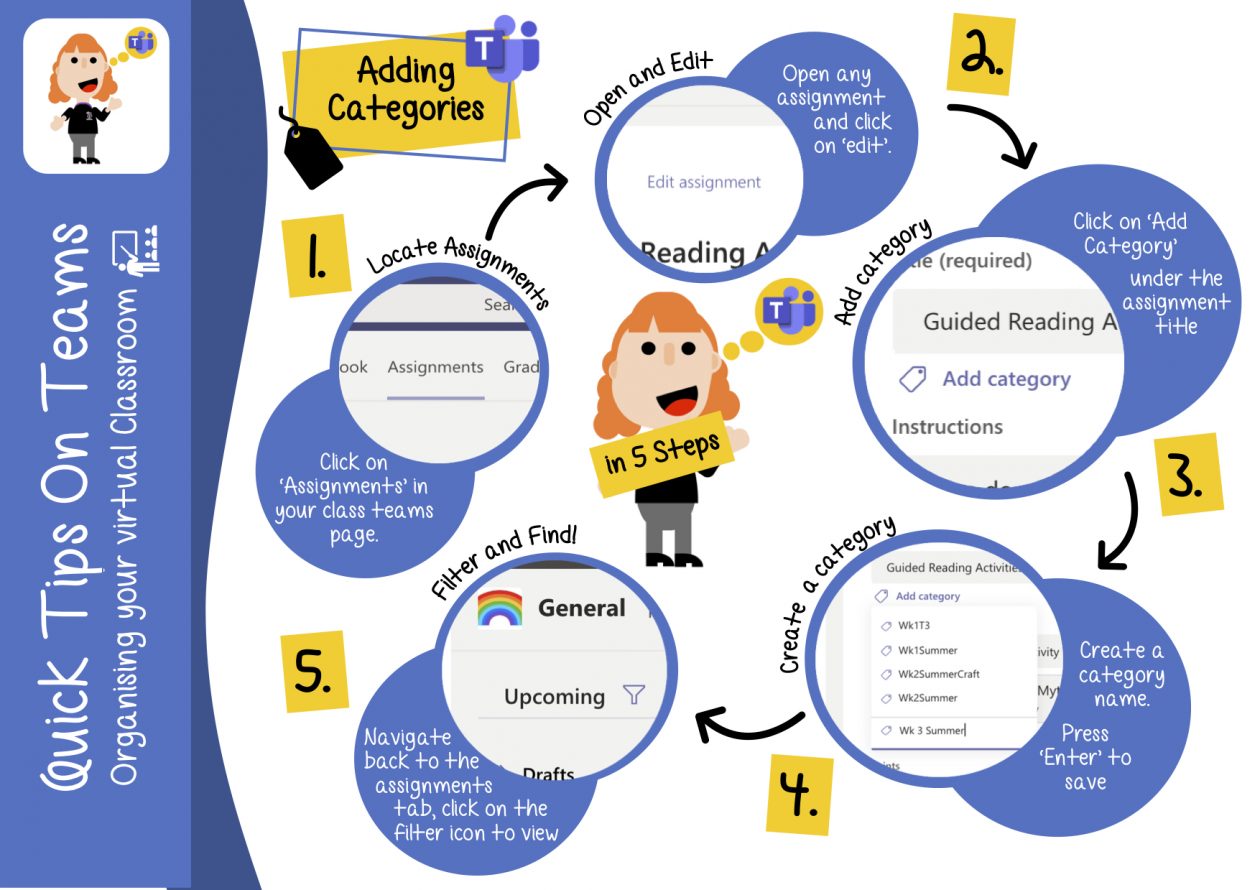
Tags for Assignments
Adding tags for assignments can help you find them quickly and filter. This from Lucy Lock shows how to add tags.
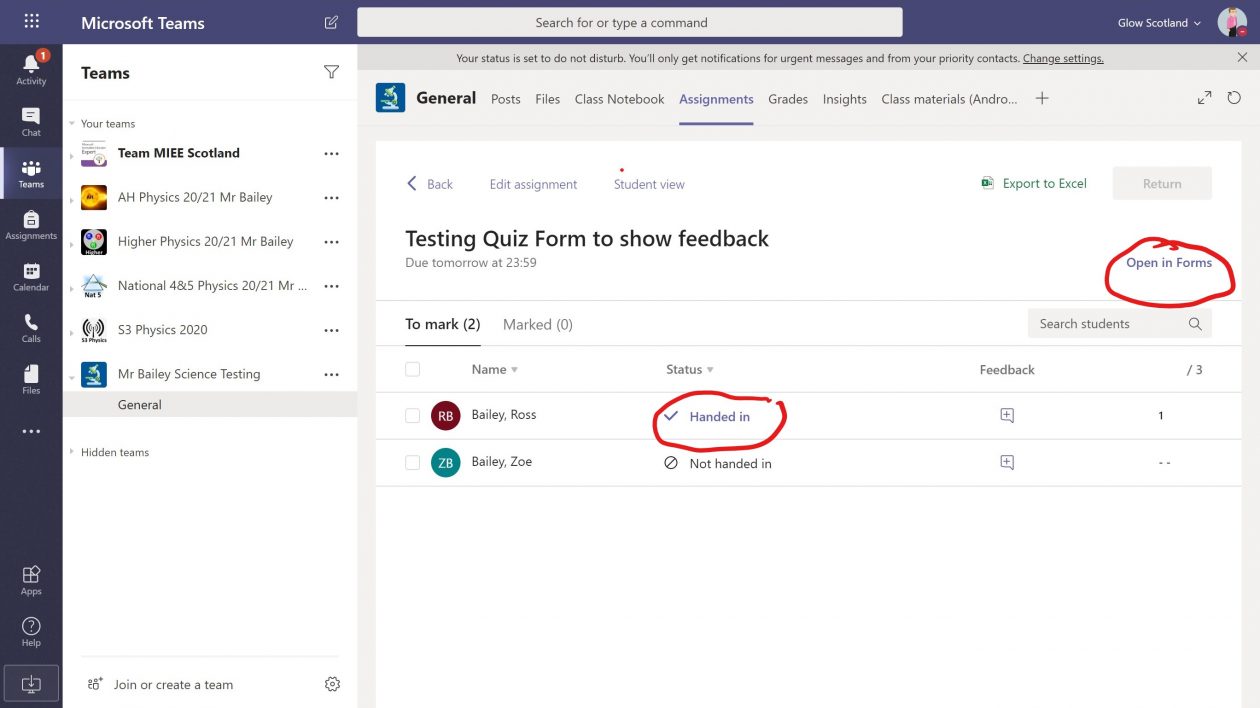
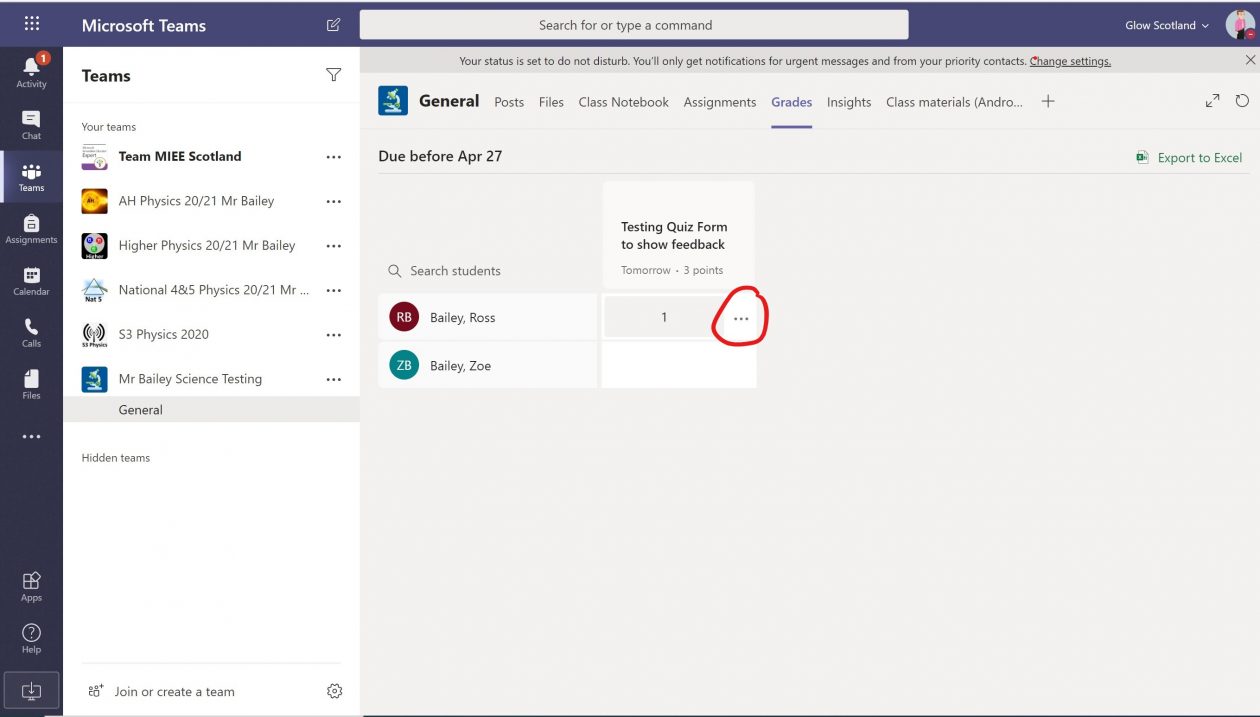
Marking Assignments
Sometimes when reviewing students hand-in work in assignments the files don’t load properly. To overcome this I have added a link to the underlying SharePoint site adding a link to the Student work folder and then you can go to the submitted files folder, find the correct pupil and click the handed-in files. Here is a video showing how to add that Student Work shortcut the SharePoint navigation menu. You can see this on the left in the picture below.
Making Work clear to students
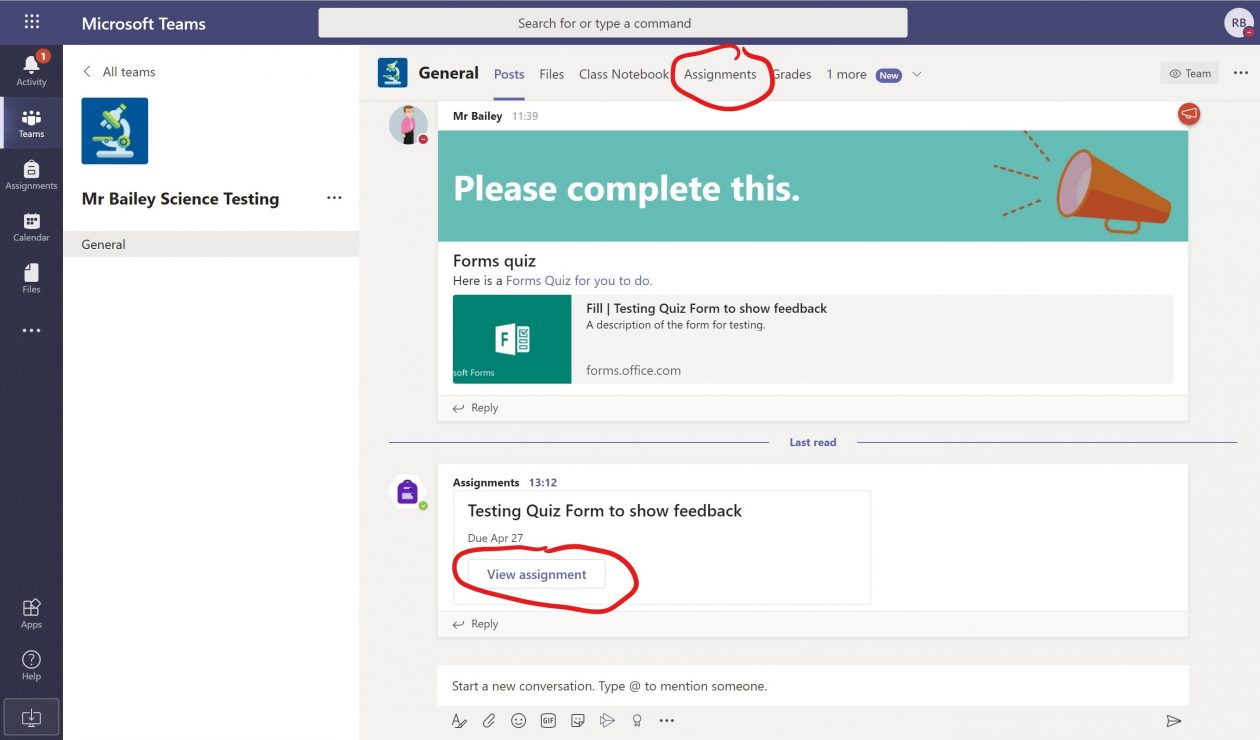
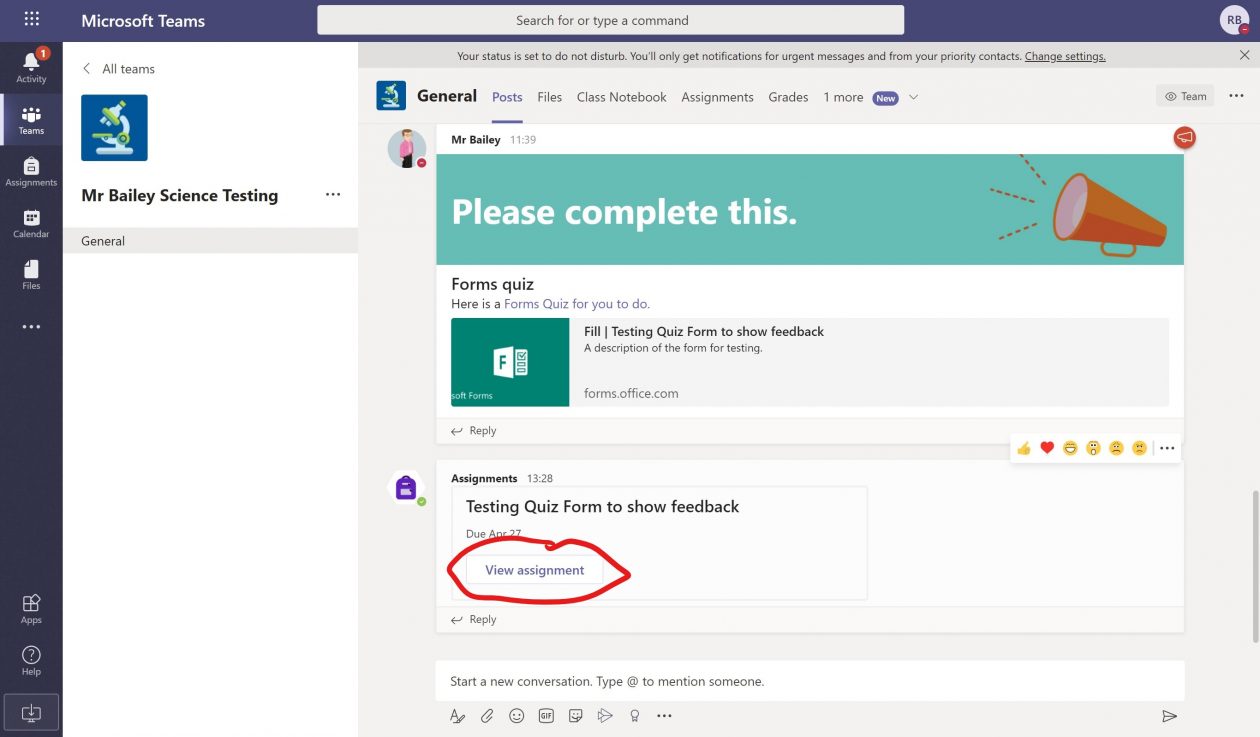
Here is my announcement post. Within the announcement posts I include hyperlinks to all of the resources that are needed for these tasks. I feel that this helps make the learning much clearer.
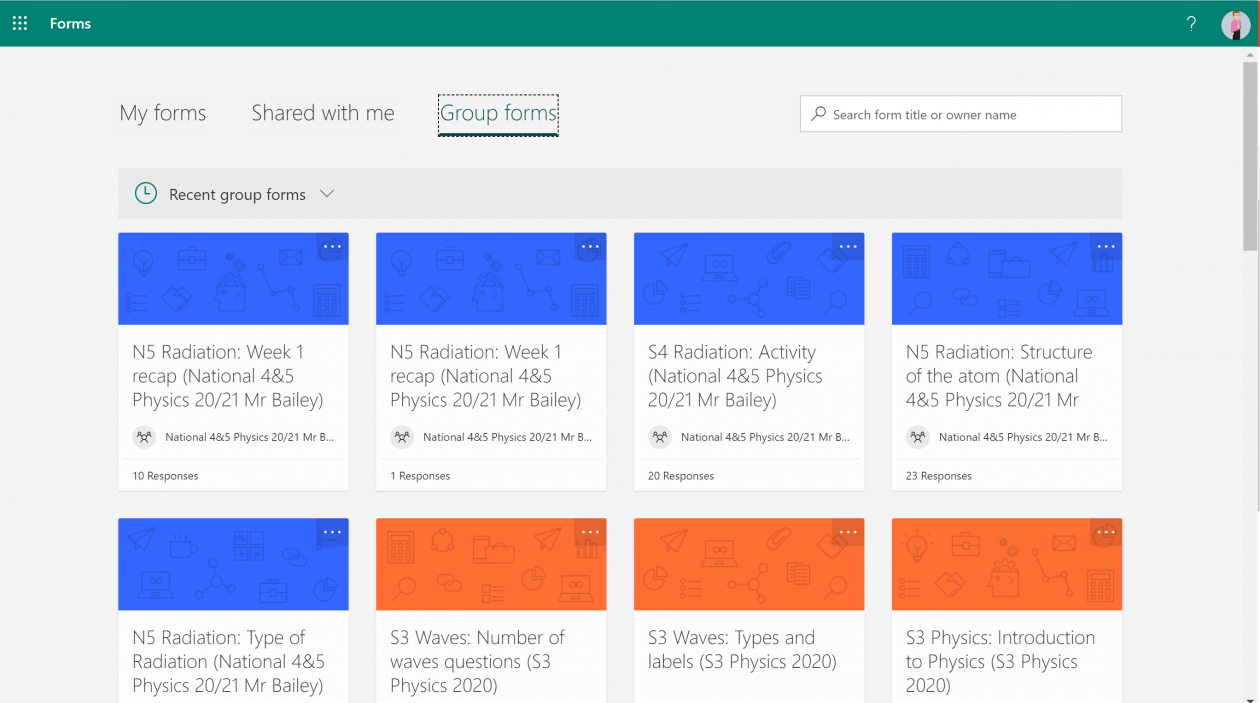
Note the Form link in the video above is not correct. The hyperlinks for the Forms quizzes if setting using an Assignment need to be shared from the Form that sits within the Groups part of Forms as shown below. Then open the Form and share. Here is a Microsoft video on Forms and sharing.
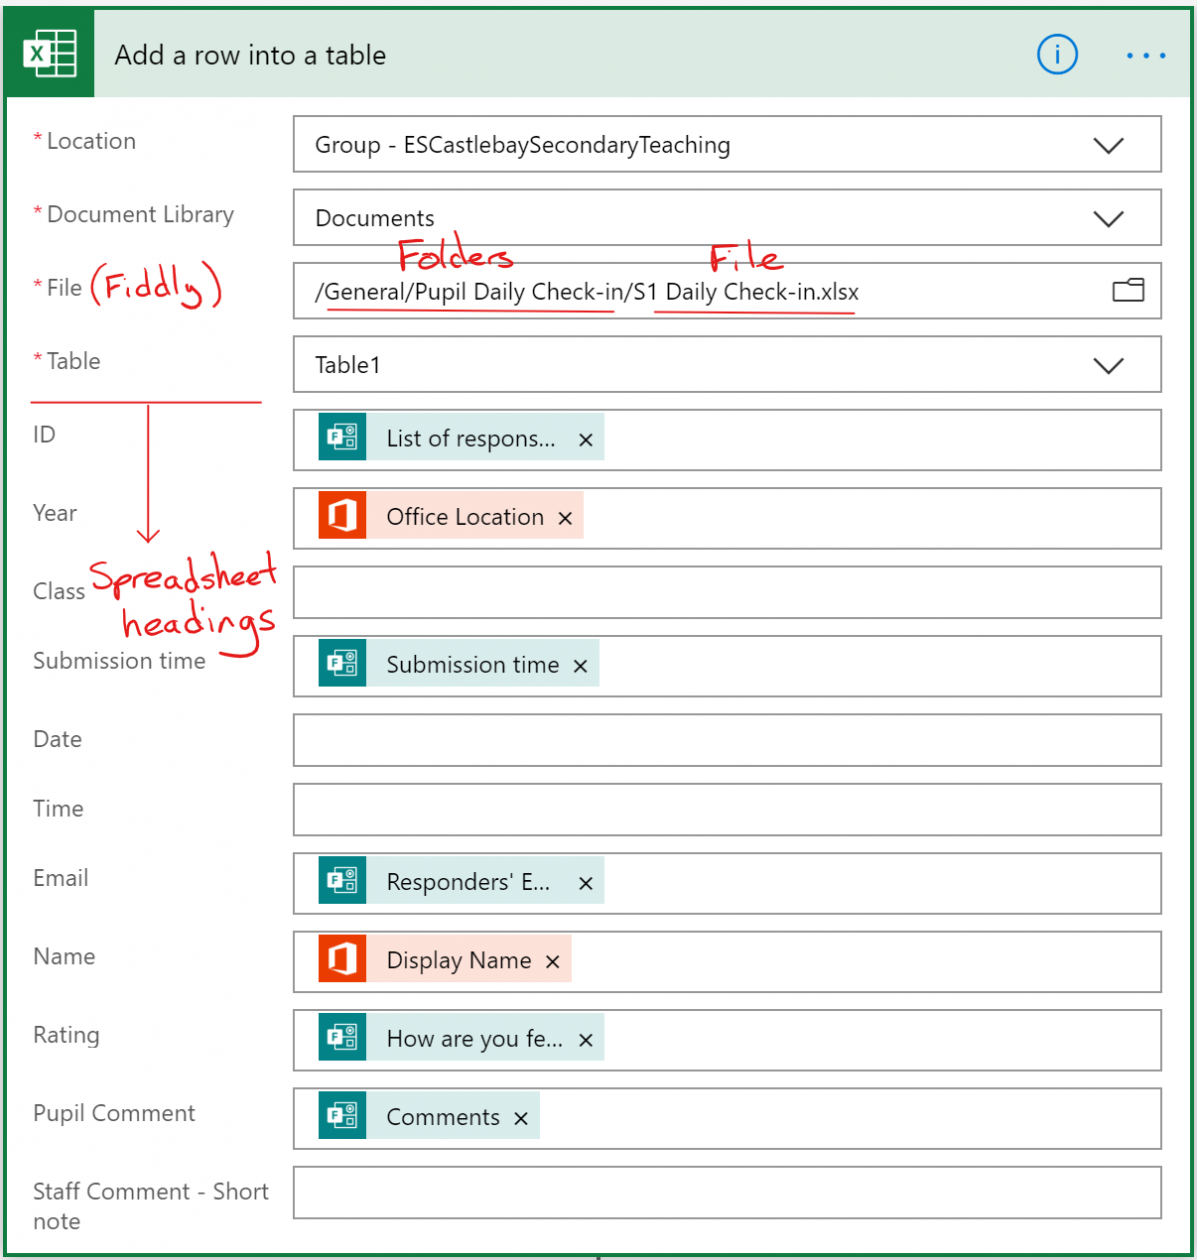
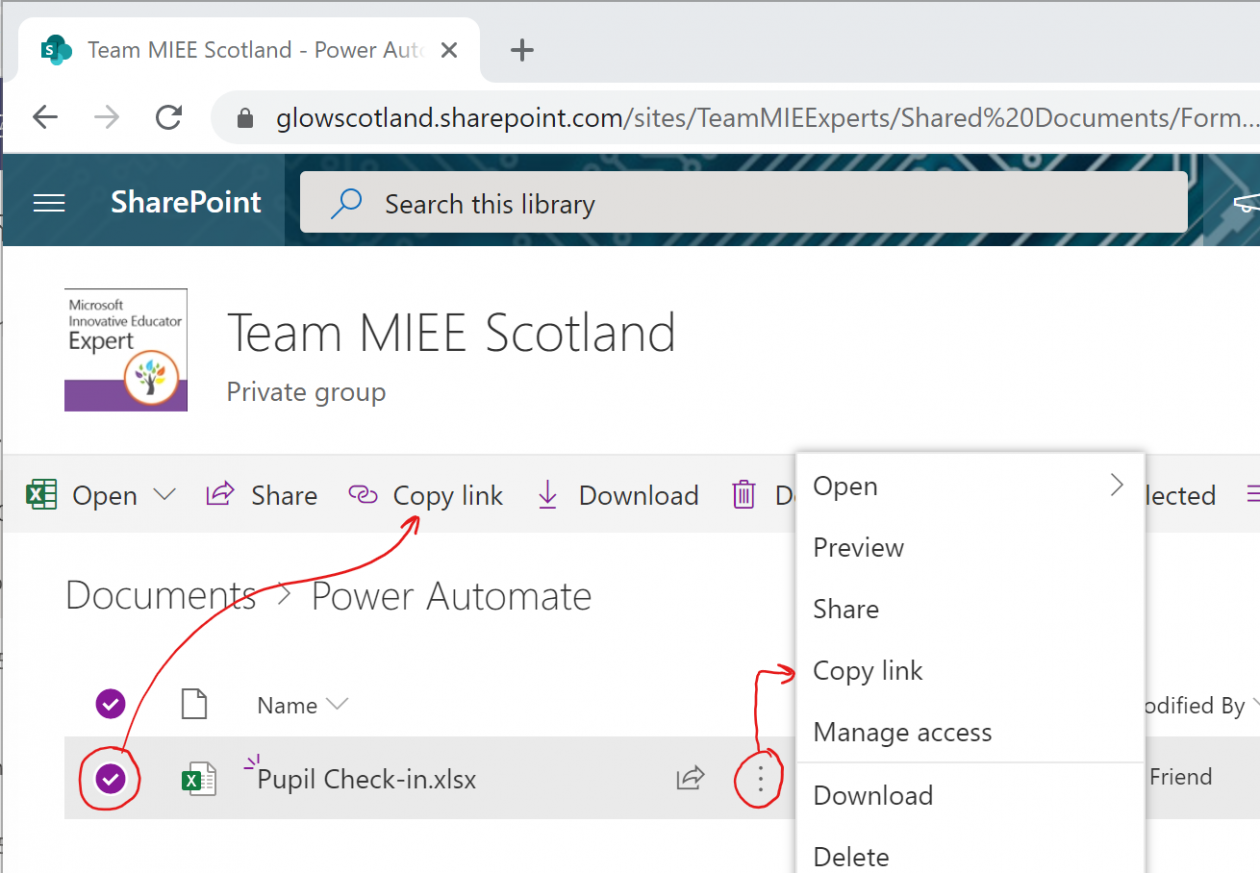
Opening the files document in SharePoint allow you to click the dots on the right of the file and click copy link.
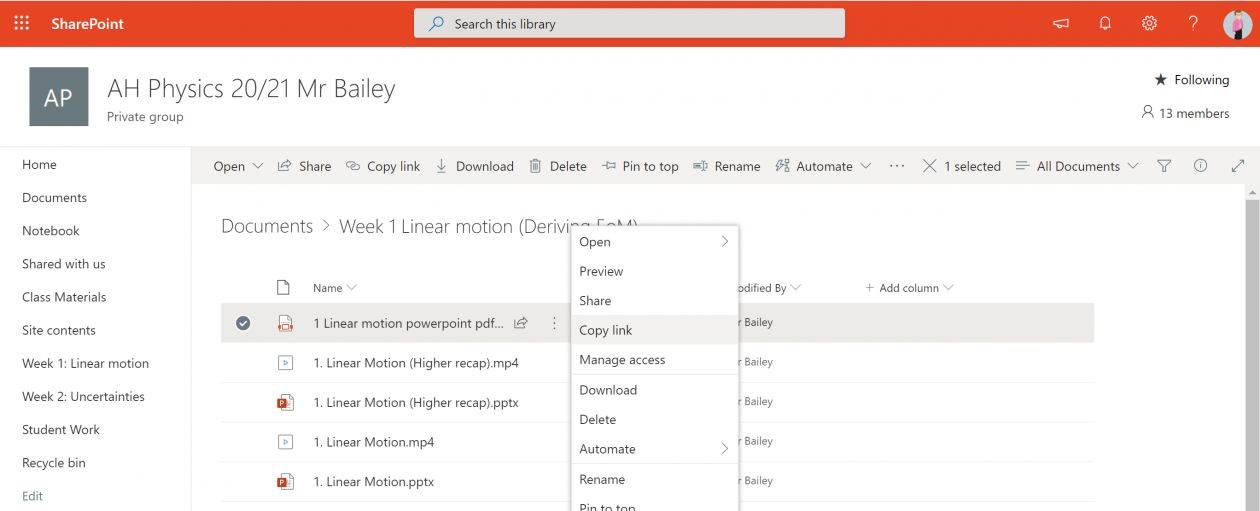
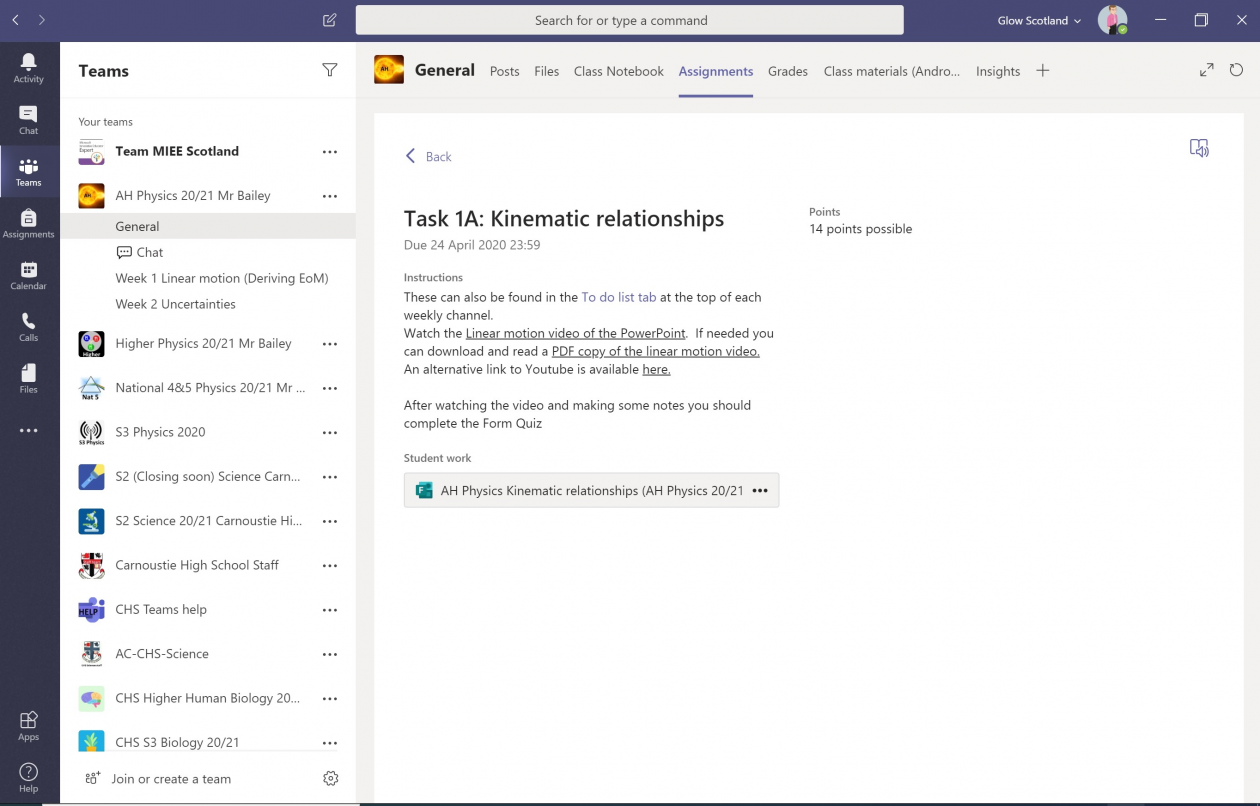
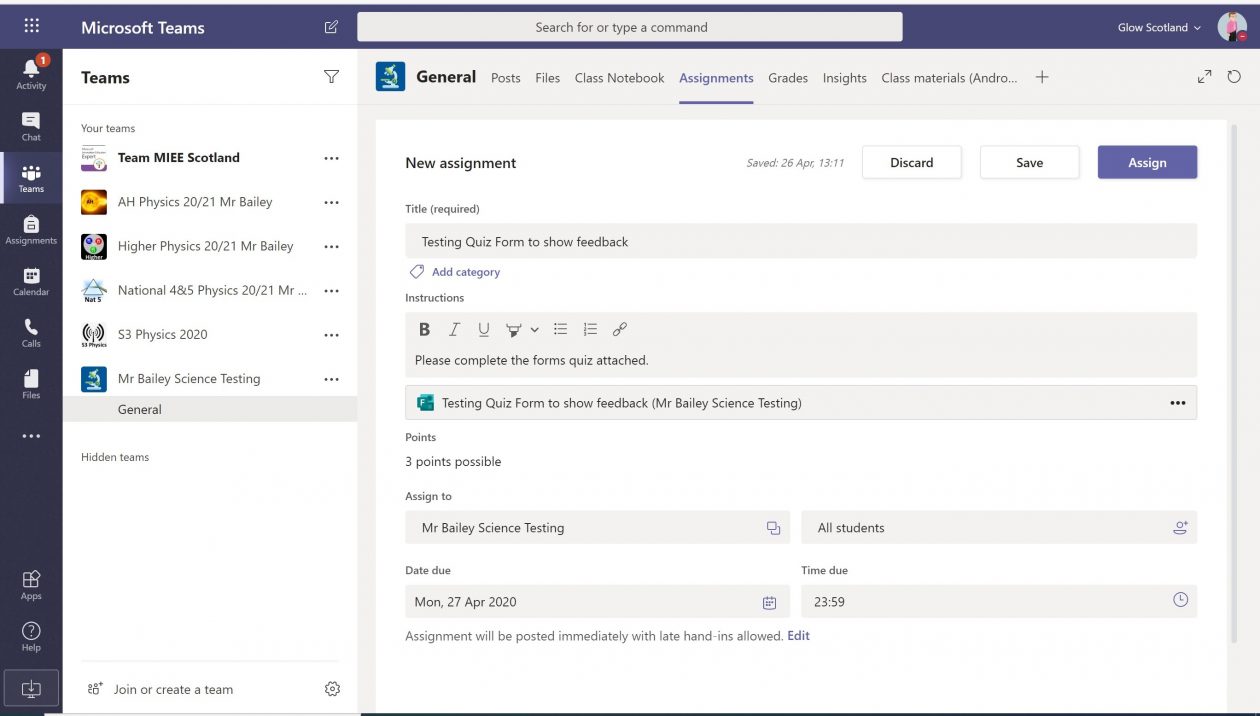
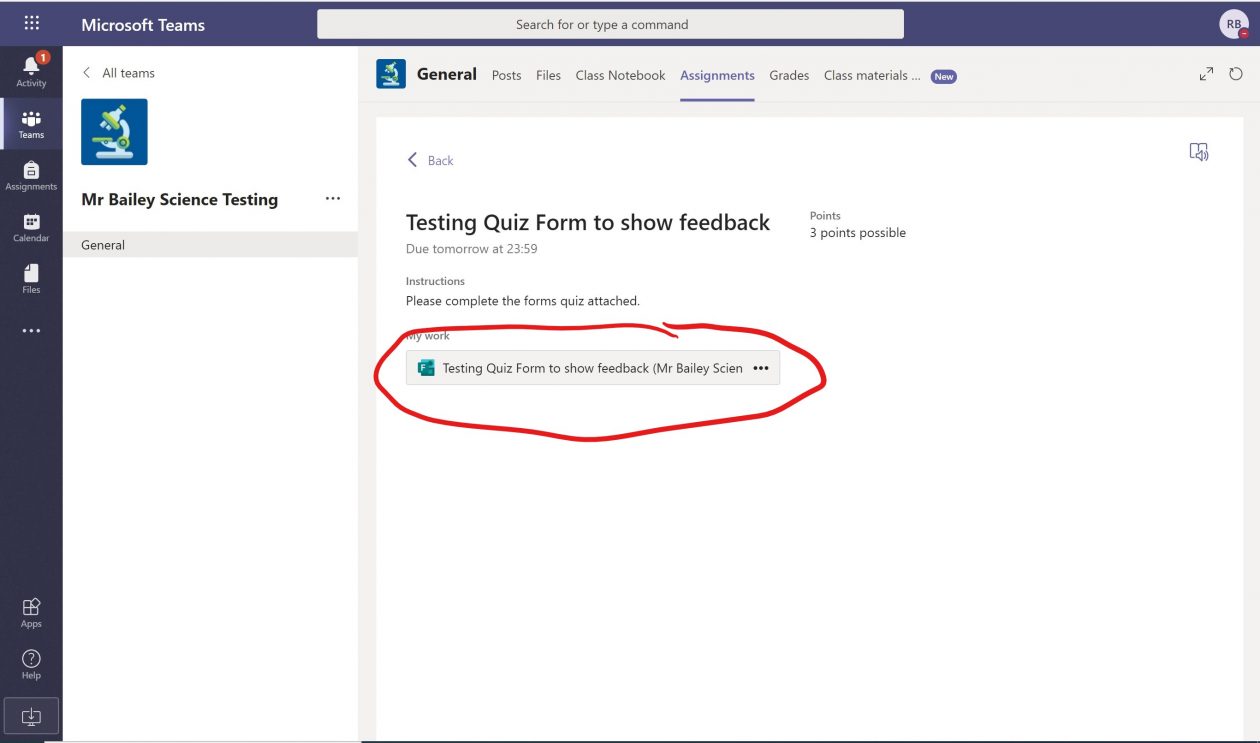
Here is the announcement post with all the links. The same details are copied into the Assignments tasks including the hyperlinks as well as attaching the files to complete or Forms quiz.
This is what it looks like on the Assignment. By scheduling the assignments they can go live at the start of the week.
For each channel I have also created a SharePoint Webpage called To do list and have linked to this SharePoint page using a tab. I got this idea and some of the other I use from a Remote Learning webinar with Dr David Kellerman on what he is doing with Remote learning at UNSW Australia.
I have this saved as a template page and then adjust the content accordingly.
I add into the page:
- Videos hosted in Glow Video.
- Slides PDF documents
- Forms Quizzes
- Question documents
This SharePoint page is added as a weblink tab at the top of the weekly channel. At the moment resources loaded via SharePoint seem to be quicker to respond than those through the Teams interface.
Within SharePoint I have added a menu link to the Student Work folder link as sometimes I use that a few times Teams Assignments has struggle to load files handed in. So adding a link to the hand-in work directly in SharePoint means you can view the files there.
The file location is TeamName/Student%20%Work (the %20% is just the space) between Student Work.
Last but not least I have populated my OneNote class notebook in the Team sharing resources with pupils here.


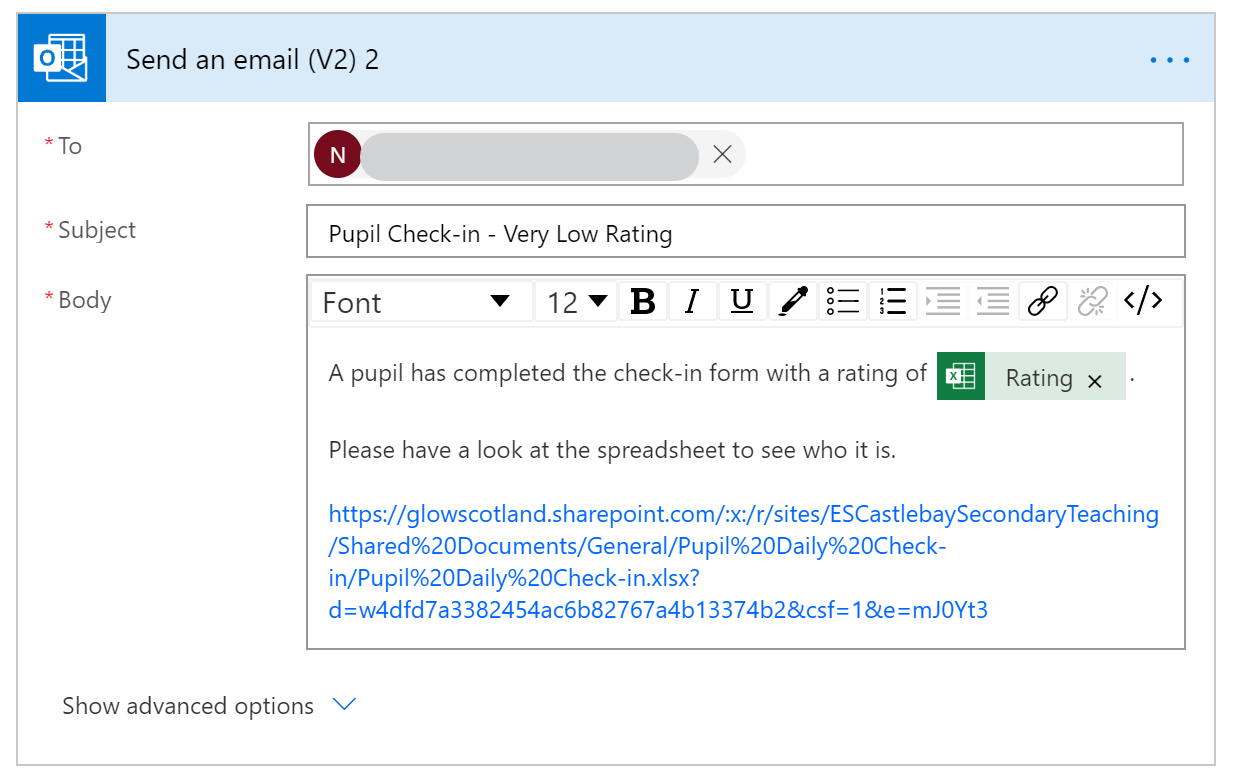
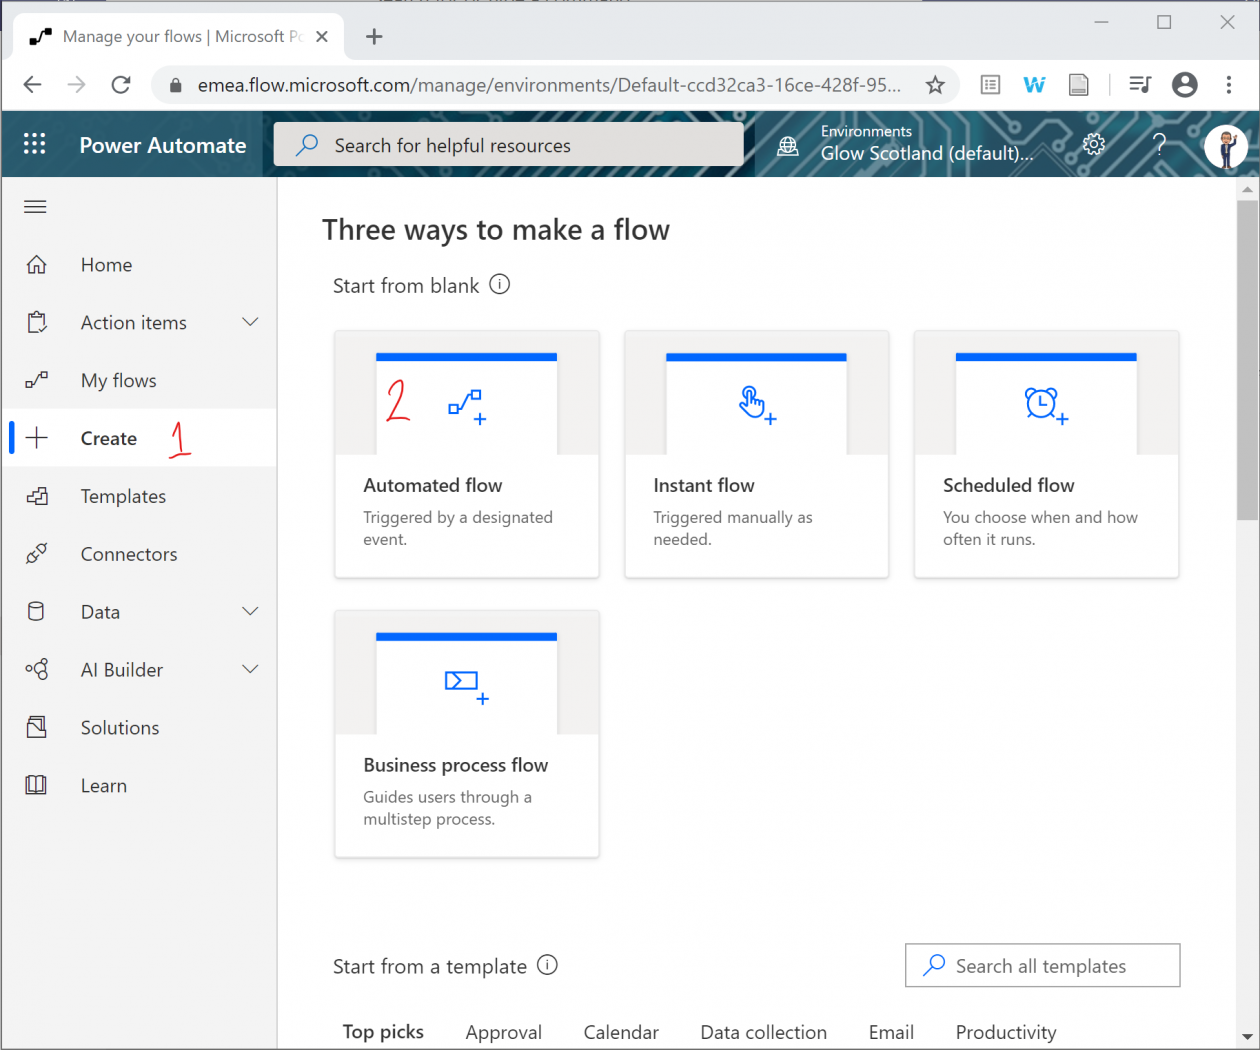 Name the Flow (1)