FAQs Index
- How do I create a new class?
- How do I organise my classes in an ELC setting which comprises of children of different ages?
- How do I create a new student account?
- How do I connect existing children to my new Showbie class?
- How do I invite parents to link to their child’s Showbie account?
- How to do I create a Group/community?
- How do I invite parents to join a Group/community?
- Setting up assignments
- How do I use the student QR codes to facilitate independent documentation of learning?
- How do I use student QR codes to promote family engagement and gather news from home?
- What do I need to do to prepare for transition of children leaving my class?
- Do I need to archive classes at the end of an academic year?
- How do I add a profile picture to Teacher and Student accounts?
Showbie
– Frequently Asked Questions (FAQ)
See full Index of all questions in left panel.
- How do I create a new class?
- Tap the ‘microwave’ (small square icon at the top left of the Showbie screen)
- Tap the banner on left entitled ‘All Classes’
- Tap the icon
- Select ‘New Class’
- Enter a name for your class
- Tap the ‘class code’ and select registration to be by approval. This means that you have some added security in that you must approve students and parents who wish to connect to your class.
- Toggle Parent Access on if you intend to invite parents to join Showbie
- Make a note of the Class Code so you can student accounts to your new class later
- Tap Save
- How do I organise my classes in an ELC setting which comprises of children of different ages?
- It is recommended that you group/community your children according to when they will be going to Primary 1, e.g. gather all ELC4 in one class and all ELC3 children in another. This means that a children have all their learning documented in the same Showbie class for the duration of their time in ELC, rather than having a separate new class each academic session.
- If you have ELC2 children, consider whether you wish to have them in a separate class which could allow you to document their learning in a more holistic way. Or whether you wish to add them to the ELC3 class, if their birthdays fall appropriately meaning they will be with these children when they move on to P1. For young 2s, it is possibly more appropriate to keep them separate so you do have their learning documented in multiple classes.
- You can rename your classes at the start of each academic year, meaning you do not need to create a new classes for all your students every year, some will ‘roll-over’. New classes will only be required for your youngest children.
- How do I create a new student account?
- First you will need to have created a class. Take a note of the class code which can be found by tapping the class and selecting the icon. Class code is the blue code next to settings. It should begin with an E.
- Log out of the app by tapping the ‘microwave’ (small square icon at the top left of the Showbie screen) which will reveal your name at the bottom left, then tap your name and ‘sign out’.
- Click ‘Get started’, then ‘I’m a student’
- Enter the class code you have recorded previously
- Select ‘Sign up with Microsoft’ – it will direct you to the Glow sign-in page.
- Enter the child’s Glow username (email address) and Glow password and you will then be redirected back to Showbie.
- If you don’t have the child’s Glow details yet, you can create them an account for them by selecting “Sign up with Username” but you should then link the child’s Showbie account to their Glow account at a later date.
- How do I connect existing children to my new Showbie class?
The easiest method is to request the student’s Showbie QR code from the child’s previous class or setting. See FAQ 9 for instructions of how to share/print these QR codes. Or you can use the child’s Glow email and password if the Showbie account was created using these details. Or if the account was created using username then contact previous setting/teacher for these details.
With QR code:
-
-
- Sign out of your Showbie app on your iPad
- Select ‘Sign in’
- Select top option of ‘Sign in with QR code’
- Position child’s QR code in the camera window and you should be automatically directed to the student account
- **Please take care of student QR codes and do not display on the wall or share on social media**
-
With Glow credentials:
-
-
-
- Select the Microsoft logo of red, green, blue and yellow squares.
- Enter Glow email address and then password
- Once recognised, you will be redirected to student’s account in Showbie
-
-
With username and password:
-
- Enter username or email if this option was included
- Enter password and click ‘sign in’
- You will directed to the student’s account
Once logged in, tap the ‘microwave’ and then , select join a class. Enter the class code you wish to connect the student. Depending on your class settings, you might have to ‘approve’ students. To do this you need to tap your class and select the icon. Go to members and students waiting to be approved will be indicated in the list. Select the green tick to approve. Teachers must be approved in the same way by selecting the teacher tab at the top.
- How do I invite parents to link to their child’s Showbie account?
Parents require a special parent code to connect to their child. This is different from the class code. Only students and teachers can use this code.
-
- Tap the ‘microwave’ (small square icon at the top left of the Showbie screen)
- Select ‘Invite parents’
- You have option to either invite specific parents (e.g. individual student’s parents) or multiple invites (a whole class)
- You then need to select which student’s parents you wish to invite. Scroll to the class the student belongs, and tap it. You will see a list all of students and you can either ‘select all’ (option at top right) or select specific students by tapping black circles next to their names.
- Once selected, the green button at the top will appear with the number of students you have selected. Tap the green button entitled ‘invite parents’ and a set of A4 invites will be generated in a pdf format for you to email, print or save. Each one has the name of the individual student at the top to ensure you distribute accordingly.
- How to do I create a Group/community?
- Tap the microwave (small square icon at the top left of the Showbie screen)
- Select the Groups/communities tab
- Tap the icon and select ‘New Group/community’
- Enter name of your group/community and a short explanation about your intended use of the group/community in the ‘about’ section.
- Select registration setting of ‘by approval’
- Toggle on ‘Parents can join’ and toggle off ‘Students can join’ unless you intend to use the group/community as a floor book or to document key worker learning.
- Take a note of the group/community code. This is what you will need to share with parents. See files at the bottom of this page for a template you can use to support parents connecting to a group/community.
- Click save.
- How do I invite parents to join a Group/community?
- First create your group/community by following instructions in FAQ number 6 above.
- Tap your group/community to enter it and then tap the … at the top right of the app screen
- Select ‘group/community info’
- Take a note of the group/community code- this is what you will need to share with parents. See a template at the bottom of the page that you might choose to use to invite parents.
- When parents have requested to join the group/community, you will need to approve them. Go to the … and select ‘Group/community members’. Parents awaiting approval will appear with a green tick and red cross next to their name. Approve by clicking the green tick.
- You might consider creating a post describing the purpose and expectations of your group/community and enter this in the comment section of your group/community, e.g. frequency of posting; two-way communication that everyone can see; confidential information to be shared using normal channels. When posted, press and hold the post or swipe left and select to ‘pin’ the post. This will keep your post fixed to the top of the feed for all to see.
- Setting up assignments
- Consider how your setting would prefer to document learning- holistically or by curricular area?
- In your class, tap the icon and select new assignment
- Enter the name of your assignment, e.g. Literacy or My learning
- Toggle off the due date
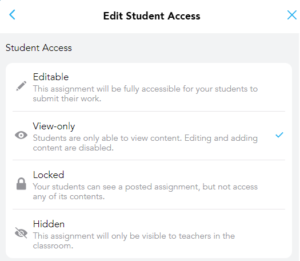
- Tap ‘set student access’ and choose most appropriate setting:
- Click save at the top right.
- How do I use the student QR codes to facilitate independent documentation of learning?
- You can generate QR codes by selecting your class and tapping the icon
- Tap the Members tab and then ‘Get QR codes’
- Select all or specific children and tap the green button at the bottom ‘Get QR codes’
- A warning note will appear with advice about how to store your QR codes, then click ‘continue’
- Showbie will generate A4 pages with all the QR codes for the students you selected. These can be saved, emailed and then printed.
- It is recommended to cut up the codes and stick them on separate pages with the student name clearly labelled and/or a photo of the student. These can be stored in folder or book.
- These codes can be used by children to log into their account and view their learning. To do this you must have the Showbie app installed on an iPad and sign out any teacher or previous student. Select ‘sign in’ and tap the ‘Sign in with QR code’
- Children can then add photographs or add video as evidence of their learning in the appropriate assignment. It is recommended that teacher check the assignment settings to ensure there are ‘editable’, rather than ‘view only’ ahead of introducing this with children.
- How do I use student QR codes to promote family engagement and gather news from home?
- It is recommended that you consider creating an assignment entitled ‘News from Home’ or ‘All about me’. This means that contributions from home will be easier to find.
- Ensure in the settings for this assignment, you select ‘editable’ or students will not be able to add photos, videos or audio comments.
- Consider how you are going to share your expectations for the use of the codes with parents- information sheet; letter; in person session?
- Consider the manageability of discussing the student contributions? One of two children per week in key worker groups/communities? The experience should be meaningful and involve dedicated time for the child to share what they have posted with an adult or group/community of peers.
- Consider what you are going to do with the information shared as a next step for learning.
- Consider adding a teacher post when the items have been discussed and share next steps that will be followed up in setting.
- What do I need to do to prepare for transition of children leaving my class?
- When children are leaving your class to join another school or to move academic classes, it is good practice to print the student QR code for their Showbie account.
- See FAQ number 9 for how to do this.
- The QR code/s should then to passed on to the next teacher. This ensures that all the child’s learning remains in one account which aids tracking progression in learning.
- Do I need to archive classes at the end of an academic year?
- If you archive a class then the work that has been documented will disappear from the student account, meaning the child will not be able to view their learning.
- Instead of archiving a class, it is recommended that when a class is no longer being contributed to, that you nominate a member of your setting or school to remain in the class and all other teachers leave. This could be a member of the SLT or an account created especially for this purpose with its own admin log in.
- To leave a class you need to go to the class and tap the icon.
- Click on members and tap the teacher tab at the top.
- Scroll to your name and tap it
- Select the red button ‘Leave Class’
- Please note that one teacher must remain attached to the class for it to remain visible to students.
- How do I add a profile picture to Teacher and Student accounts?
- Adding a photo to teacher and student accounts can help with accessibility.
Teacher profile picture:
-
-
- Tap the microwave and select your name as it appears in the bottom left
- Select ‘account’ and then tap ‘change photo’. A photo can then be uploaded. This will be visible whenever you make a post in a student’s assignment.
- Here too you can adapt your displayed name, e.g. Mrs Brown or Miss Kate.
-
Student profile picture:
-
-
-
- Tap the microwave and select the ‘Students’ tab
- Select a student and tap on the circle with their initials
- Select ‘edit’ at the top right and tap ‘change photo’
- You can use the camera to take a photo or choose to upload on from your camera roll.
- Position their face appropriately and then click ‘done’.
-
-
See Also
Apple Teacher
Inspire Learning – Early Years
iPad Demo Videos
Qr codes
Tools
Further Reading to support
Training to support
SBC Training
1) GROUPS/COMMUNITIES – Family Partnerships
2) CLASSES – Learning Journeys
3) Making Learning Visible
4) *NEW for May 2023*- Showbie: Transition in Early Years