What is it?
Showbie is an electronic platform, originally designed for use in a classroom environment to support the sharing of learning tasks digitally. For children working at early level, we can use Showbie to document learning using individual digital learning journals or digital floor books.
Showbie also provides a platform to engage with families through whole class announcements, newsletters and opportunities for parents to share in learning experiences taking place in the classroom. For parents of children working at early level, practitioners can share children’s learning in real time, which builds parental confidence and deepens their involvement in their children’s learning.
Why Showbie?
“Digital technologies provide opportunities for us to design a unique learning spaces for the children. In Early Learning & Childcare settings (ELC) and early primary settings, sharing children’s learning through blogs, e-portfolios and email are common place and can be very helpful for parents to see what their child can do in a real time experience. The caveat to this is that programmes which support this can at times, be too restrictive, in not allowing the unexpected or special moments that children experience to be recorded. We therefore also need to ensure that this special information is communicated swiftly through giving the child control of how to communicate his/her achievement.”
(Realising the ambition, Education Scotland and Scottish Government, 2020, p. 79)
Benefits
-
- Significantly faster and more efficient than paper methods.
- Using Showbie on a portable iPad allows the documenting of learning to happen in the moment, when the learning experience is most meaningful to the child
- Ensures inclusivity to all practitioners, as posts are editable, can be supported using an automatic spell checker as well as the opportunity to use speech-to-text.
- Provides opportunities for peer observation, reading & learning from the content of other practitioners’ observations, which are easily accessible on Showbie.
- Showbie supports the documentation of learning using a variety of media, including photo, video, audio and the ability to scan the children’s creations and mark making.
- Parents can be invited to link to their child’s digital learning journal and view their individual learning journal in real time, enabling them to engage in meaningful and relevant learning conversations with their child when they get home.
Key messages:
- Be strategic – think careful about how you will implement Showbie into your setting – establish which functions are going to be used by your setting and for what purpose.
- Ensure consistency across the ELC team – All practitioners must understand how to use the functions on Showbie and use it consistently across the team.
- Improve communication with Parents – Showbie should be introduced to parents at the start of each session, with expectations and guidance for parents clearly defined and explained.
- Be inclusive – Ensure you are inclusive to all stakeholders using Showbie
- Moderate – Leadership should quality assure and moderate content on Showbie for consistency and scaffold support for practitioners to use it confidently.
- Self-evaluate progress – gather feedback from parents on the use of Showbie to find out about their experience of using it as well as staff and other stakeholders.
- Engage children in posting to Showbie & reflecting on learning
Ways we can do this
Be strategic – Establish which functions will be used for what. The diagram below makes the distinction between the use of the Groups/communities and Classes facility. Practitioners should consider this and be clear in their understanding of the functionality of Showbie, ensuring they select the correct platform to meet to the needs of their setting.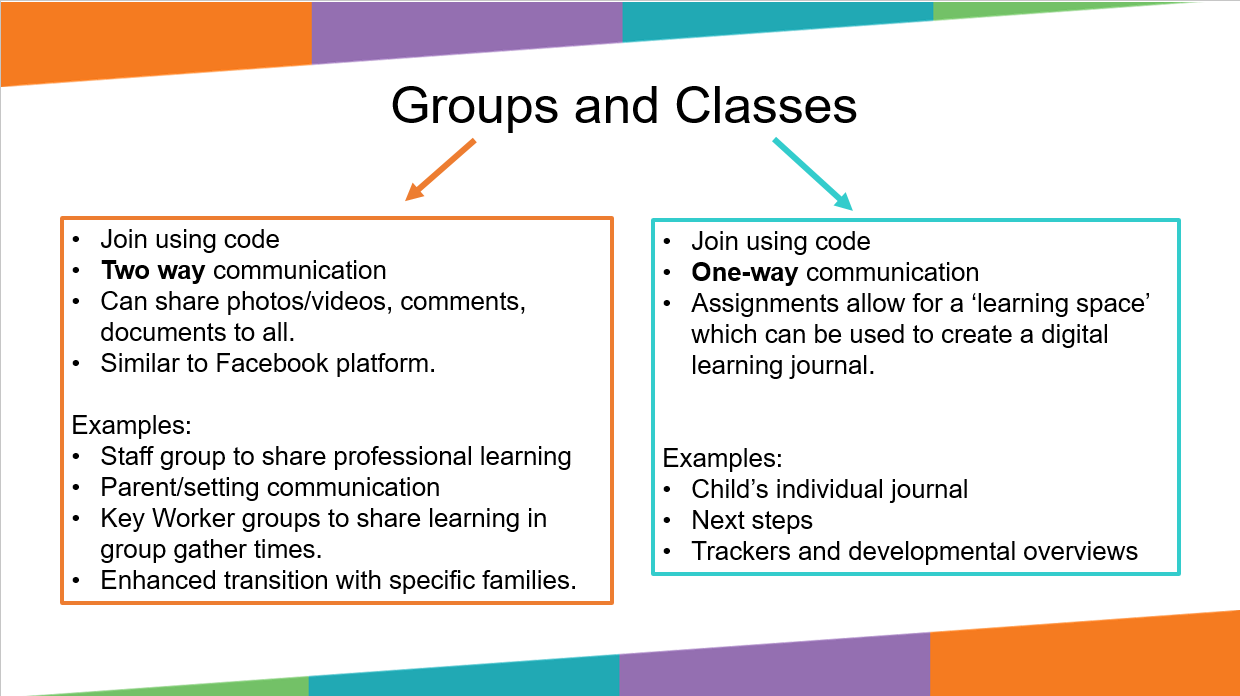
Create a clear rationale about why Showbie should be implemented, involving practitioners and senior leaders. Writing a “Showbie Framework” can be helpful, setting out all of these agreements, ensuring consistency and providing a reference to new members or supply staff joining a team. This will include expectations and guidelines about how Showbie will be used and the content that is going to be included. How often will practitioners be expected to post to Showbie and what format will observations take?
When launching, it is good practice to populate the Groups or Classes/Assignments for several weeks/months before sharing with parents to ensure that there is something there for them to see when they initially sign in. Settings should consider and make effective use of a trial period with a small group of parents.
Consistency across the ELC team – Establish expectations and guidelines about how Showbie will be used and the content that is going to be included. How often will practitioners be expected to post to Showbie and what format will observations take.
For a consistent approach, display an observations sheet template on the wall or in a space on Showbie, for practitioners to follow when they are posting to Showbie.
Consider the use of emoji’s and what benefits their use will be to practitioners, children and parents – share the “key” for emojis with all stakeholders. Have expectations displayed or shared digitally so all practitioners have access to them to ensure consistent approach.
Consider designating one person to lead on Showbie developments and to support practitioners to develop knowledge and confidence in using it.
Communication with Parents – An information sheet or video might be useful so new parents joining at different points of the year can receive the same level of information.
Using an electronic forms link sent via Showbie could be an effective method of providing information about engagement and parental view about the content on their child’s Showbie account.
Showbie should simply enhance the current practice, with regards to a setting’s family partnerships. Practitioners should continue with all the other great practice that you do to support family partnerships in person, e.g. feedback at the door, with stay & play sessions, home-visits before the child starts, information evenings in-person, parents sharing skills in the setting, parent-helpers for excursions etc.
Inclusivity – There will be varying family circumstances within a setting and consideration must be given to how to facilitate the inclusive use of Showbie by families. For example, how will you introduce Showbie to EAL (English as an Additional Language) families (see these videos on how to use iPad apps & features for translation purposes).
Moderation – The user-friendly layout of Showbie allows lead practitioners to easily oversee communities & classes from their iPad. Pass the Community/Class code on to senior leaders in the setting for them to remotely access posts too. Consider meeting termly as a team & working in pairs to moderate a partner’s posts – Showbie allows quick and easy access to other practitioners’ posts on their iPad. This can also help practitioners day-to-day if they want to ensure they are aligning with other practitioners’ posts.
Self-evaluate progress – What have been the benefits, challenges and impact on wellbeing and learning? Once feedback has been gathered, setting should collate information and plan how to act on its receipt. What is working well? What could be improved further?
Engaging children with Showbie – Showbie can be used as a learning tool with children as active contributors, documenting learning and evidencing next steps. Parents can be invited to engage in this or it can be set up as purely a setting/home communication tool for notices and alerts.
Initially, ensure that all children know what Showbie is and that their learning, progress & experiences are stored here. To support this, Showbie should be a regular part of conversations in the Nursery, some settings use the Hashtag “#SharetoShowbie” to embed this. Practitioners should model sharing to showbie & if children are keen to reflect back on previous learning in these moments, this should be facilitated.
Consider sharing individual profiles or group learning on the smartboard to support conversations & reflections on learning as well as possible lines of development – what the children would like to learn about/experience next.
Consider having a “Showbie station” in the Nursery, where one or two iPads are dedicated to children looking at their journals. Include QR codes either in books or on laminated slips of paper so that children can scan these to access their profiles.
High levels of engagement from parents is key, as this might support children to access their profiles at home too, supported by a trusted adult.
- Showbie for Learning Journals
- Showbie Groups for Parental Communication
- Showbie Groups/Communities for Floorbooks
- FAQ
Using the “Classes” function for Documentation – Learning journals
Organise classes to ensure a smooth transition between academic years within & beyond ELC (See video).
Create Assignments without due dates & with appropriate Student Access settings g. view only/hidden/editable
Organise classes either by term or curricular area. If using a photo of a child for their profile picture, permission from parents MUST be obtained. If you organise your paper learning journeys by subject area or holistically, continue to do the same in Showbie (at least until all practitioners are using Showbie confidently).
Use Folders carefully (having folders within folders can become quite cumbersome when accessing individual children’s learning)
Be clear as a setting about which learning is documented digitally on Showbie & which learning is kept in a paper book/file. Avoid repetition.
Use emojis meaningfully, with a purpose & for signposting, to support staff, parents & children to use the learning journey.
Have a consistent approach to completing & organising the Learning Journey, & writing different types of observations (& the Showbie/digital tools used for these), display approaches on the wall, in Showbie or in the Showbie Rationale.
Ensure Learning Journeys and Observations are in line with the guidance on the Learning Journey & Observations Features of a quality Learning Journal & High Quality observations should remain the same as expected for paper versions.
Ensure that learning documented in the learning journey is up-to-date & specific to that child – if posting one photo to multiple accounts, ensure posts are personalised and relevant learning is documented specific to each learner.
A key benefit of using a digital platform to document learning is the variety of media available (text, photos, videos, voicenotes) in the learning journey. Make good use of these and for a variety of purposes, particularly capturing the child’s voice. . Showbie supports a variety of evidence to be used as part of the documenting process, enriching the experience of reflection by children as they can view video, audio recordings and photographs. Practitioners & children can also “Share to Showbie” from a different app e.g. videos from the “Voice memos” app or drawings from the “Notes” app, allowing children to share their learning and ideas in different ways.
Create systems for showing updates on & progress in learning. Ensure next steps and PLODS are followed up/updated. There should be clear links between observations so that it is clear to see the thread of learning & progress over time – how it started and then how it progressed throughout the posts. Some settings have a separate ‘next steps’ assignment that summarises the ‘open’ next steps for each individual child & the progress being made with these. Practitioners could use emojis effectively by using a consistent emoji for each thread of learning. Practitioners could also date or name their entries using consistent language so that this is made clear.
SLT & Lead practitioners should have access to learning journeys to enable regular moderation.
Accessibility features should be used to support practitioners, children & parents in using Showbie (e.g. speech to text feature on keyboard, showing children & parents how to use the “speak” feature in Showbie on posts, use of voicenotes in Showbie etc)
Use Annotation tools on photos & documents (text, pen, highlighter, pinned comments & voicenotes) for specific purposes (e.g. pen for children to write, updates on a next step in text, child’s reflections on learning in a voicenote). Also, ensure effective use of “renaming photos”.
Trackers and developmental overviewscan be easily inserted into each individual child’s learning journals, readily accessible to all practitioners. If using trackers and developmental overviews, practitioners are able to hide documents from students & parents using the assignment setting ‘Hidden’ which allows teachers to access the contents, but parents and students cannot. Trackers and overviews can be updated and annotated within Showbie and exported to be stored electronically or printed to be used as part of transition.
Engaging children:
Ensure that children know what Showbie is & that their learning is stored here
Adults should model posting & post to Showbie on behalf of children who are in the early stages of using Showbie
Practitioners should support children with posting to Showbie, sharing photos & recording voice notes. When they are ready, practitioners should encourage children to do this
Encourage children to add to & engage with individual & group learning experiences recorded on Showbie, using the annotation tools on photos & by creating new documents in Showbie
Support children to reflect on learning regularly, using the annotation tools, as well as the Voice Notes feature within the Showbie posts feed.
If using QR codes with children :
Children should have opportunities to browse their learning experiences on Showbie g. via practitioner iPad or using student QR code (see below
Store QR codes securely in folder or book & not up on the wall
Practitioners should have considered practical use of QR codes, with individual code & photo of child (or name clearly displayed) on one page. Consider setting up a “Showbie Station” with one or two iPads, dedicated to viewing their Showbie account.
Engaging parents:
Ensure that parents have a way of sharing learning, achievements and news from home. This might be through a system of sending the child’s QR code home & allowing parents to add to the learning journal from home, through individual learning communities for families and key worker or through a whole-group community.
Post ideas for how parents can support, continue & extend learning at home (e.g. as information sent periodically throughout the year, or spontaneously as part of some observations). This will build parental confidence in recognising how to support their child’s learning at home.
If sending student QR codes home:
Give parents the Student QR code with clear guidance about the expectations of how they should be used.
Ensure that Student QR codes facilitate parental contributions in a specific learning assignment created to share learning/interests from home e.g. new assignment is created with settings set as ‘editable’ so child can post photos, comments & voice notes.
Using the “Groups/communities” function for parental engagement
If using a ‘Group/community’ as a platform for all families, content must be relevant to all parents, e.g. whole setting notices or whole class experiences. (Individual achievements and learning outcomes are best recorded in individual learning journals, either on paper or digital format using ‘Classes’).
A group/community page is a two-way communication platform, where all members of the group/community can view the comments and this must be clearly explained to parents. Any confidential questions or communication about individual child is best done via a private family group, email, phone call or in person conversations.
Bear in mind that these large groups are the digital equivalent of an in-person large meeting with all staff and all parents, so engagement from parents may be similar to that of these in-person meetings.
Pin a post to the top of a group so that it is clear to parents how they should be engaging with the group.
Different types of group:
-
- ELC setting information-sharing such as reminders, announcements, requests & advertisements.
- ELC setting learning experiences throughout the day/week.
- Key worker group/community to share learning experiences and outcomes at gather times.
- Multiple Individual ‘groups/communities’ for private 2-way communication between family members and practitioners. Practitioners can create individual groups for their key children with the senior practitioner being included in all groups. These small groups can also support enhanced transition between setting and individual families, enabling parents to communicate directly with key workers and practitioners to share photo evidence of a child who has settled if separation anxiety is an issue at drop off. They are also useful for EAL (English as an Additional Language) families (see these videos on how to use iPad apps & features for translation purposes) and for supporting inclusion e.g. families with parents with hearing impairments.
- Professional learning group/community for a team of practitioners to share ideas or CPD development links.
- Printing group/community – Some ELC teams are using a Group/community to facilitate printing in their setting. See this video for more information.
- Self-evaluation/feedback group/community – Showbie can also be used to gather feedback and opinions from parents, directly via the two-way communication ‘Groups/communities’ facility or through sharing a link to an e-form.
Using the “Groups/Communities” function for floorbooks
A Floorbook is essentially a learning journey for the class. You can use a similar format for your Group learning documentation as you do for your individual learning journals.
Clear links between posts – There should be clear links between the different Showbie entries so that it is clear to see the thread of learning – how it started and then how it progressed throughout the posts. Practitioners could use emojis effectively by using a consistent emoji for each thread of learning. Practitioners could also date or name their entries using consistent language so that this is made clear
Paper Floorbook to complement – The setting should have a physical floorbook that runs alongside this to capture anything that cannot be captured on the Digital Floorbook (such as children’s creations/child’s voice/child’s mark-making etc). There should be no duplication between the two. This can include entries such as a mindmap created together with children, drawings, tickets from trips out, notes jotted down by practitioners, hand prints/paintings etc. This should be readily available for the children to engage with, hold physically in their hands and might lead to the children asking to see the media captured digitally of this learning experiences.
Child’s voice – Children should be encouraged to add to the Digital Floorbook where appropriate and effective, through adding their own photos/videos/speech. Children can interact with photos recording their voice using the voice notes function or the speech-to-text function on the keyboard. Numerous voice notes can be added to one photograph capturing different children’s perspectives or opinions.
Parental engagement – Parents should be encouraged to contribute to the Digital Floorbook & their child’s learning as much as possible. Encourage parents to talk to their child about their learning evidenced at Nursery and encourage them to continue learning at home. Pin a post to the top of a group so that it is clear to parents how they should be engaging with the group. Encourage & strengthen family engagement – make it clear that comments are welcome, including documentation of learning conversations at home. Practitioners could suggest activities that could be supported at home to extend learning, and parents could even document this themselves to share with the setting on a private group or email or through using a QR codes sent home.
Reflect on learning – Children should be given the opportunity to reflect back on the posts within the Digital Floorbook and comment/record their voice where appropriate. Retrospective reflections can be documented so children can reflect on past experiences. By tapping photographs, practitioners evidence these reflections at any time, using annotation voice note or comment tools. Each comment or voice note also features the date, allowing practitioners to track engagement easily. Consider using the Smartboard to display photos/videos from the floorbook, to encourage engagement from all.
Links to other planning – There should be clear links between the Digital Floorbook and planning, as the learning captured will feed into any planning of the interactions, spaces & experiences within the setting. Use experiences and outcomes to show the links between the Digital Floorbook and Planning documentation elsewhere. On other documentation, ensure to note that evidence is recorded in the Digital Floorbook.
Different types of Digital Floorbook – Consider the use of a group to document learning indoors and another for outdoors. Another possibility could be to use a group to document learning taking place in key worker group time.
Using other apps for a Floorbook (to then Share to Showbie) – Some settings use apps, such as Book Creator or Keynote, with which to gather their photos & observations. If you do this, consider using the same background for one thread of learning over several days/weeks to show how the learning progressed over time. Take screenshots of pages to then insert into showbie, export specific pages as images to export straight into Showbie, or if there are videos included, export individual pages as videos to post into Showbie.
Frequently Asked Questions (FAQ)
- How do I create a new class?
- Tap the ‘microwave’ (small square icon at the top left of the Showbie screen)
- Tap the banner on left entitled ‘All Classes’
- Tap the g icon
- Select ‘New Class’
- Enter a name for your class
- Tap the ‘class code’ and select registration to be by approval. This means that you have some added security in that you must approve students and parents who wish to connect to your class.
- Toggle Parent Access on if you intend to invite parents to join Showbie
- Make a note of the Class Code so you can student accounts to your new class later
- Tap Save
- How do I organise my classes in an ELC setting which comprises of children of different ages?
- It is recommended that you group your children according to when they will be going to Primary 1, e.g. gather all ELC4 in one class and all ELC3 children in another. This means that a children have all their learning documented in the same Showbie class for the duration of their time in ELC, rather than having a separate new class each academic session.
- If you have ELC2 children, consider whether you wish to have them in a separate class which could allow you to document their learning in a more holistic way. Or whether you wish to add them to the ELC3 class, if their birthdays fall appropriately meaning they will be with these children when they move on to P1. For young 2s, it is possibly more appropriate to keep them separate so you do have their learning documented in multiple classes.
- You can rename your classes at the start of each academic year, meaning you do not need to create a new classes for all your students every year, some will ‘roll-over’. New classes will only be required for your youngest children.
- How do I create a new student account?
- First you will need to have created a class. Take a note of the class code which can be found by tapping the class and selecting the three dots icon. Class code is the blue code next to “Settings”. It should begin with an E.
- Log out of the app by tapping the ‘microwave’ (small square icon at the top left of the Showbie screen) which will reveal your name at the bottom left, then tap your name and ‘sign out’.
- Click ‘Get started’, then ‘I’m a student’
- Enter the class code you have recorded previously
- Select ‘Sign up with Microsoft’ – it will direct you to the Glow sign-in page.
- Enter the child’s Glow username (email address) and Glow password and you will then be redirected back to Showbie.
- If you don’t have the child’s Glow details yet, you can create them an account for them by selecting “Sign up with Username” but you should then link the child’s Showbie account to their Glow account at a later date.
- How do I connect existing children to my new Showbie class?
The easiest method is to request the student’s Showbie QR code from the child’s previous class or setting. See FAQ 9 for instructions of how to share/print these QR codes. Or you can use the child’s Glow email and password if the Showbie account was created using these details. Or if the account was created using username then contact previous setting/teacher for these details.
With QR code:
-
-
- Sign out of your Showbie app on your iPad
- Select ‘Sign in’
- Select top option of ‘Sign in with QR code’
- Position child’s QR code in the camera window and you should be automatically directed to the student account
- **Please take care of student QR codes and do not display on the wall or share on social media**
-
With Glow credentials:
-
-
- Select the Microsoft logo of red, green, blue and yellow squares.
- Enter Glow email address and then password
- Once recognised, you will be redirected to student’s account in Showbie
-
With username and password:
-
-
- Enter username or email if this option was included
- Enter password and click ‘sign in’
- You will directed to the student’s account
-
Once logged in, tap the ‘microwave’ and then g , select join a class. Enter the class code you wish to connect the student. Depending on your class settings, you might have to ‘approve’ students. To do this you need to tap your class and select the three dots icon at the top. Go to members and students waiting to be approved will be indicated in the list. Select the green tick to approve. Teachers must be approved in the same way by selecting the teacher tab at the top.
- How do I invite parents to link to their child’s Showbie account?
Parents require a special parent code to connect to their child. This is different from the class code. Only students and teachers can use this code.
-
- Tap the ‘microwave’ (small square icon at the top left of the Showbie screen)
- Tap your name/photo at the bottom left of the screen
- Select ‘Invite parents’
- You have option to either send multiple invites (a whole class) or an Individual Invite (e.g. individual student’s parents).
- You then need to select which student’s parents you wish to invite. Scroll to the class the student belongs, and tap it. You will see a list all of students and you can either ‘select all’ (option at top right) or select specific students by tapping black circles next to their names.
- Once selected, the green button at the top will appear with the number of students you have selected. Tap the green button entitled ‘invite parents’ and a set of A4 invites will be generated in a pdf format for you to email, print or save. Each one has the name of the individual student at the top to ensure you distribute accordingly.
- How to do I create a Group/community?
- Tap the microwave (small square icon at the top left of the Showbie screen)
- Select the “Communities” tab
- Tap the g icon and select ‘New Community’
- Enter name of your group/community and a short explanation about your intended use of the group/community in the ‘about’ section.
- Select registration setting of ‘by approval’
- Toggle on ‘Parents can join’ and toggle off ‘Students can join’ unless you intend to use the group/community as a floor book or to document key worker learning.
- Take a note of the group/community code. This is what you will need to share with parents. See files at the bottom of this page for a template you can use to support parents connecting to a group/community.
- Click save.
- How do I invite parents to join a Group/community?
- First create your group/community by following instructions in FAQ number 6 above.
- Tap your group/community to enter it and then tap the … at the top right of the app screen
- Select ‘Community info’
- Take a note of the Community code at the bottom – this is what you will need to share with parents. See a template at the bottom of the page that you might choose to use to invite parents.
- When parents have requested to join the group/community, you will need to approve them. Go to the … and select ‘Community members’. Parents awaiting approval will appear with a green tick and red cross next to their name. Approve by clicking the green tick.
- You might consider creating a post describing the purpose and expectations of your group/community and enter this in the comment section of your group/community, e.g. frequency of posting; two-way communication that everyone can see; confidential information to be shared using normal channels. When posted, press and hold the post or swipe left and select to ‘pin’ the post. This will keep your post fixed to the top of the feed for all to see.
- Setting up assignments
- Consider how your setting would prefer to document learning – holistically or by curricular area?
- In your class, tap the g icon and select new assignment
- Enter the name of your assignment, e.g. Literacy or My learning
- Toggle off the due date
- Tap ‘set student access’ and choose most appropriate setting
- Click save at the top right.
- How do I use the student QR codes to facilitate independent documentation of learning?
- You can generate QR codes by selecting your class and tapping the three dots icon at the top of the page.
- Tap the Members tab and then ‘Get QR codes’
- Select all or specific children and tap the green button at the bottom ‘Get QR codes’
- A warning note will appear with advice about how to store your QR codes, then click ‘continue’
- Showbie will generate A4 pages with all the QR codes for the students you selected. These can be saved, emailed and then printed.
- It is recommended to cut up the codes and stick them on separate pages with the student name clearly labelled and/or a photo of the student. These can be stored in folder or book.
- These codes can be used by children to log into their account and view their learning. To do this you must have the Showbie app installed on an iPad and sign out any teacher or previous student. Select ‘sign in’ and tap the ‘Sign in with QR code’
- Children can then add photographs or add video as evidence of their learning in the appropriate assignment. It is recommended that teacher check the assignment settings to ensure there are ‘editable’, rather than ‘view only’ ahead of introducing this with children.
- How do I use student QR codes to promote family engagement and gather news from home?
- Some settings create an assignment entitled ‘News from Home’ or ‘All about me’. This means that contributions from home will be easier to find.
- Ensure in the settings for this assignment, you select ‘editable’ or students will not be able to add photos, videos or audio comments.
- Consider how you are going to share your expectations for the use of the codes with parents- information sheet; letter; in person session?
- Consider the manageability of discussing the student contributions? One of two children per week in key worker groups/communities? The experience should be meaningful and involve dedicated time for the child to share what they have posted with an adult or group/community of peers.
- Consider what you are going to do with the information shared as a next step for learning.
- Consider adding a teacher post when the items have been discussed and share next steps that will be followed up in setting.
- What do I need to do to prepare for transition of children leaving my class?
- When children are leaving your class to join another school or to move academic classes, it is good practice to print the student QR code for their Showbie account.
- See FAQ number 9 for how to do this.
- The QR code/s should then to passed on to the next teacher. This ensures that all the child’s learning remains in one account which aids tracking progression in learning.
- What do I do with my class at the end of an academic year?
- You can either Archive the class (but every post & photo must be starred to go into the Portfolio) OR you can nominate a member of your setting/school to remain in the class to keep it open.
To Archive the class
-
-
-
- Ensure that every post is starred so it goes into the child’s portfolio.
- Select the three dots icon at the top of the screen
- Select “settings”
- Scroll down and select “Archive Class”
-
-
Nominate a member of your setting or school to remain in the class
This could be a member of the SLT or an account created especially for this purpose with its own admin log in.
The nominated member of staff should ensure they are a member of the class (select “All Classes” then the g icon, then “join a class”. Enter in the class code)
All other members of staff leave the class –
-
-
- To leave a class you need to go to the class and tap the three dots icon.
- Click on members and tap the teacher tab at the top.
- Scroll to your name and tap it
- Select the red button ‘Leave Class’
- Please note that one teacher must remain attached to the class for it to remain visible to students.
-
- How do I add a profile picture to Teacher and Student accounts?
- Adding a photo to teacher and student accounts can help with accessibility.
Teacher profile picture:
-
-
- Tap the microwave and select your name as it appears in the bottom left
- Select ‘account’ and then tap ‘change photo’. A photo can then be uploaded. This will be visible whenever you make a post in a student’s assignment.
- Here too you can adapt your displayed name, e.g. Mrs Brown or Miss Kate.
-
If you are using a Student picture for a student account, you MUST GET PARENTAL PERMISSION IN ORDER TO DO THIS.
It is recommended that you use a picture/image that is individual to that child, or use their initials.