

Make animated GIFs to show or celebrate learning with iMovie and Keynote.
What Is An Animated GIF?
An animated GIF is a short moving image with no sound that plays repeatedly in a loop. They are often seen online using sections sampled from film, television and YouTube videos. Some companies make GIFs as part of campaigns or promotional materials as they get a message across in quickly and are more eye catching than static images.
We recently joined our friends at the Falkirk Learning Resource Service for the RED Book Awards where we made animated GIFs using green screen, but you don’t need a green screen to make your own!

How Can Animated GIFs Be Used In The Classroom?
Animated GIFs can be used to convey a message, explain a process, visualise a quotation, practice spelling, celebrate an event or milestone, promote an idea or an event…the list goes on. They are also a really fun way to engage pupils while also building some handy digital skills.
How do I make one?
Making a gif is a simple process using a combination of built in apps which are on your Connected Falkirk device as standard. It seems like there are a lot of steps but once you get the hang of it you’ll be making GIFs in no time!
Step One: Make Your Short Moving Image
What app you use here depends on what you are making. If it is animation apps like FlipaClip or iMotion might be helpful. If it is footage of real people iMovie is your go to. Here is how we made our green screen GIFs:
1. We made a four second background video with the event logo and a nice sparkly red effect (we used Canva for this but you can use anything you like to make the background!).
2. We filmed people dancing, waving or giving thumbs up for four seconds in front of the green screen (green backing paper, green cloth, anything bright green will usually work). We sure that on our screen the whole background was green, no sneaky walls or extra furniture in shot.
3. Once you have your two shots, combine them in iMovie. Put the video you want as a background on the bottom layer by tapping on it and pressing ‘+’.

Then put the video with the green background on the top layer by pressing ‘…’ and then ‘Green/Blue Screen’. In a second or two iMovie will automatically remove the green background.

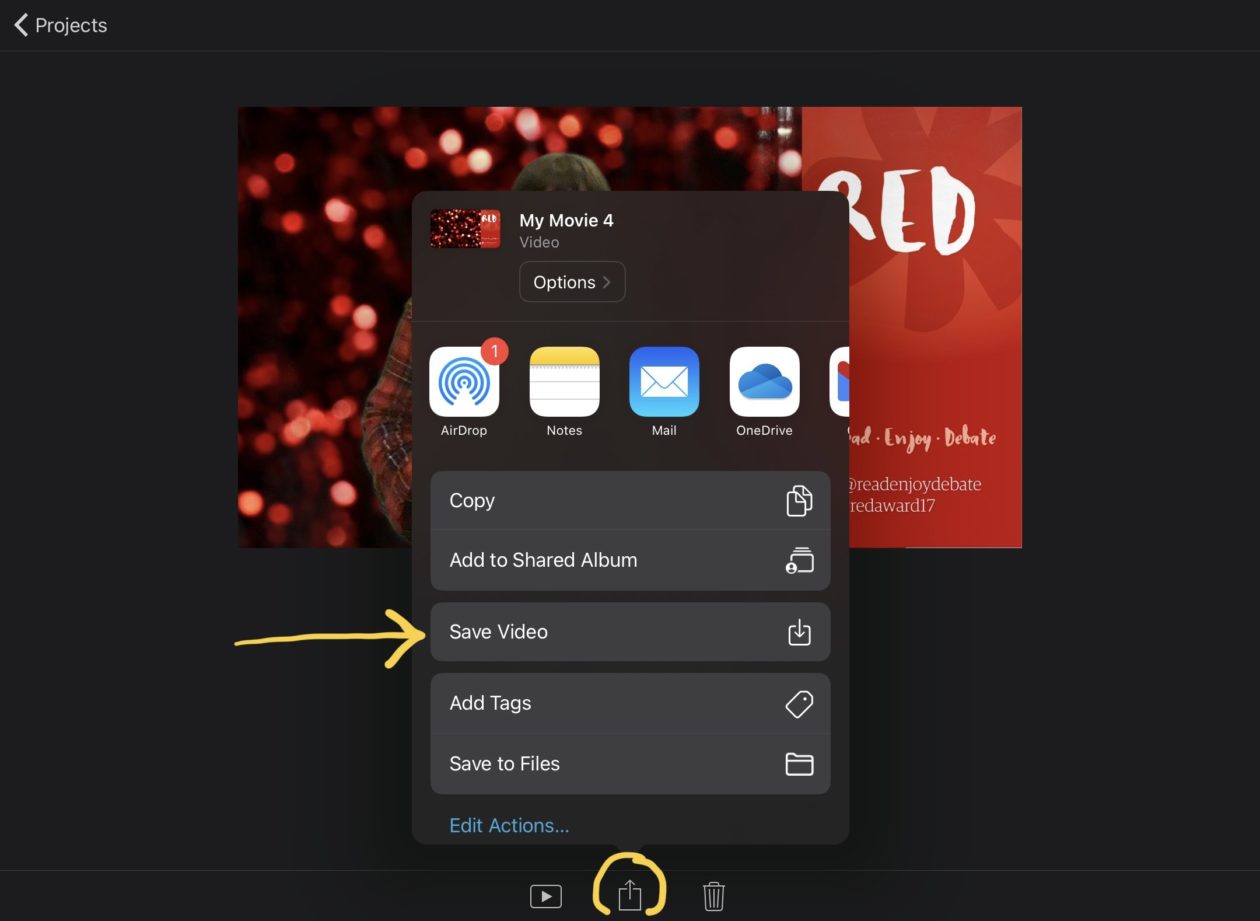
4. You’re now ready to save. Press done in the top left and when you are on the project screen look for the Share button at the bottom of the screen and tap Save Video. This will save to your Photos.
Step Two: Covert Your Moving Image to GIF
You now have a moving image in your Photos but it is a film file, we want it to be a GIF so it will play in a continuous loop without sound.
1. Open Keynote and start a new project (make sure it’s 16:9 Wide and not 4:3 Standard you can change this by tapping the ‘…’ in the top right of the screen before you start the project).
2. Once your new project, tap on the photo/video icon (for users on older versions of Keynote you might need to tap the ‘+’ first). Select your video and it will be inserted into your Keynote.

3 That’s all you have to do! Now tap the back arrow at the top left. And on the projects screen long press (tap and hold) your project and choose ‘Share’.

On the next screen tap on ‘Export’ and choose Animated GIF. In the next screen choose Export at the top right. Once it’s done tap the big blue Share button and tap Save Image. This will save to Photos.
Need those steps again in quick order?
- + for new project
- Tap Choose a Theme
- … in top right, make sure it’s 16:9
- Tap a theme to open
- Tap the photo/video icon (might be in + on older versions)
- Tap Photo or Video
- Select your video
- Tap the blue < arrow in the top left
- Tap and hold your presentation
- Tap Share
- Tap Export
- Tap Animated GIF
- Tap Export in top right
- Tap Share
- Tap Save Image
Looking to animate drawings or objects?
You don’t have to include video footage in your GIF, you can also animate drawings or objects. This video shows you how.
