
Older laptops can still be useful and made to work with Teams. This can be done for no cost factor if they are running, but using old software like Windows 7, Windows XP or Windows Vista. We have used this software to get old laptops up and running for pupils recently.
Warning: If you are using any of these operating systems, they are no longer supported by Microsoft and therefore no longer secure or recieving updates! This means hackers can potentially easily get access to your hard drive or the webcam attached to the laptop your child is using.
The solution could be a free operating system called Linux Mint 19. This is an operating system that is complety free, runs well on most laptops from the past 7-8 years and older, and tends to be very secure and very rarely hacked. It can be installed relatively easily if you have a little bit of knowledge about how to get around a computer. There are also oodles of support websites dedicated to helping people understand Linux and how to use it.
Although some of your favourite Windows Software (like Word and Excel) may not be able to run on it, Teams definitely does. You can also try before you buy as it can be installed on a USB stick and run off that before you then commit to installing it.
In this tutorial I will walk you through installing it, but remember, back up any photos, music etc before you start. We are going to wipe your Windows system and it will be very difficult to get those files back again.
Getting Mint on your USB stick
- Step 1 – Download Linux Mint by clicking here. Make sure you get the correct version by Googling “is >>>insert your computer<<<<< a 64bit system or 32bit system” then dowload the version for you. This will take a while,it’s a big file. Go make yourself a cup of tea.
- Step 2 – Download Rufus by clicking here. This will not take so long, it’s tiny in comparison – If you don’t have a USB stick, but have a blank DVD and a DVD writer in your Windows 10 laptop/PC then you can right click on the Linux software file and choose “Burn to Disc”. If you are using the DVD you can skip to the next section.
- Step 3 – Open Rufus, plug in your USB stick (at least 8GB)
- In the first drop down menu select your USB stick.
- Then click on “Select” and find your Mint download
- Click on Start and let Rufus do its thing.
- When done right click on your USB stick in This PC and eject it
Preparing your Computer for MInt
We are going in to your Computer’s BIOS Settings. Think of this as your computer’s hypothalamus. It runs in the background and controls the very basic PC functions. On most PCs or laptops this is done by pressing and holding down a certain key when the power on button switched on, usually the Del button, F2 or F12. If you are not sure, Google it.
- Step 1 – Once in Bios find the option for Boot Order/Sequence. Most Bios have a set of instructions on how to navigate around, read the first screen carefully. Each system for each make of PC can be slightly different. But may look similar to the one below. You can always Google this for your parcticular system. “How do I change boot sequence on >>>>>insert your computer<<<<<?”
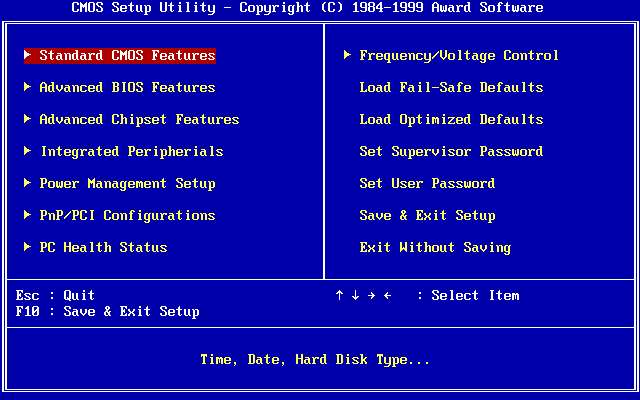
- Step 2 – When you are in the Boot Sequence menu make sure the First Boot option is USB Drive (sometimes USB HDD or USB Boot etc) by using the navigation explained on the page, usually explained either at the bottom of the screen or right-hand side.
- Step 3 – Insert your USB stick with MInt installed on it
- Step 4 – Choose the option to “Save and Exit” often F10 button.
Your PC/Laptop should now boot into the lInux System from the USB stick. You will be able to connect to the internet by clicking on the Wireless/Network icon on the bottom right, just like you would in Windows. Have a play about. At the moment nothing is permanent, it’s only stored on the USB stick and hasn’t wiped anything yet.
Installing Mint 19 on your Computer
Once you have had a play about you can either restart the computer (taking out the USB drive first) to go back into Windows or stay in the Mint Desktop and install Mint. If you wish to do the later then follow the steps below.
- Step 1 – Find the icon on the desktop that says install Linux Mint. Double click on it and let it do it’s thing. This can take a while.
- Step 2 – You will be given three options on how to install Mint. Choose the one that offers the full wipe. Make sure you back up everything before you do this though, it will wipe the drive.
- Step 3 – You will have to give your new system a name and can set a password. If you are to use it for online banking you might want to opt to encrypt the drive when prompted as well, but this can make it difficult to retrieve files if anything goes wrong with the system.
- Step 4 – When fully installed the laptop/PC will re-boot . Install updates for your system by connecting back internet, either plugging it in to your ethernet cable, or connecting to the wireless if that was used before.
To install Teams see my post titled “Installing Teams on Linux Mint”…
Extra Support Videos below. The second one talks you through updating Mint at about 10mins 20sec.