Tag: Apple

Numbers

Apple Numbers – A visual spreadsheet that turns data into interactive stories, charts, and creative organisers.


🔍 What does it do?

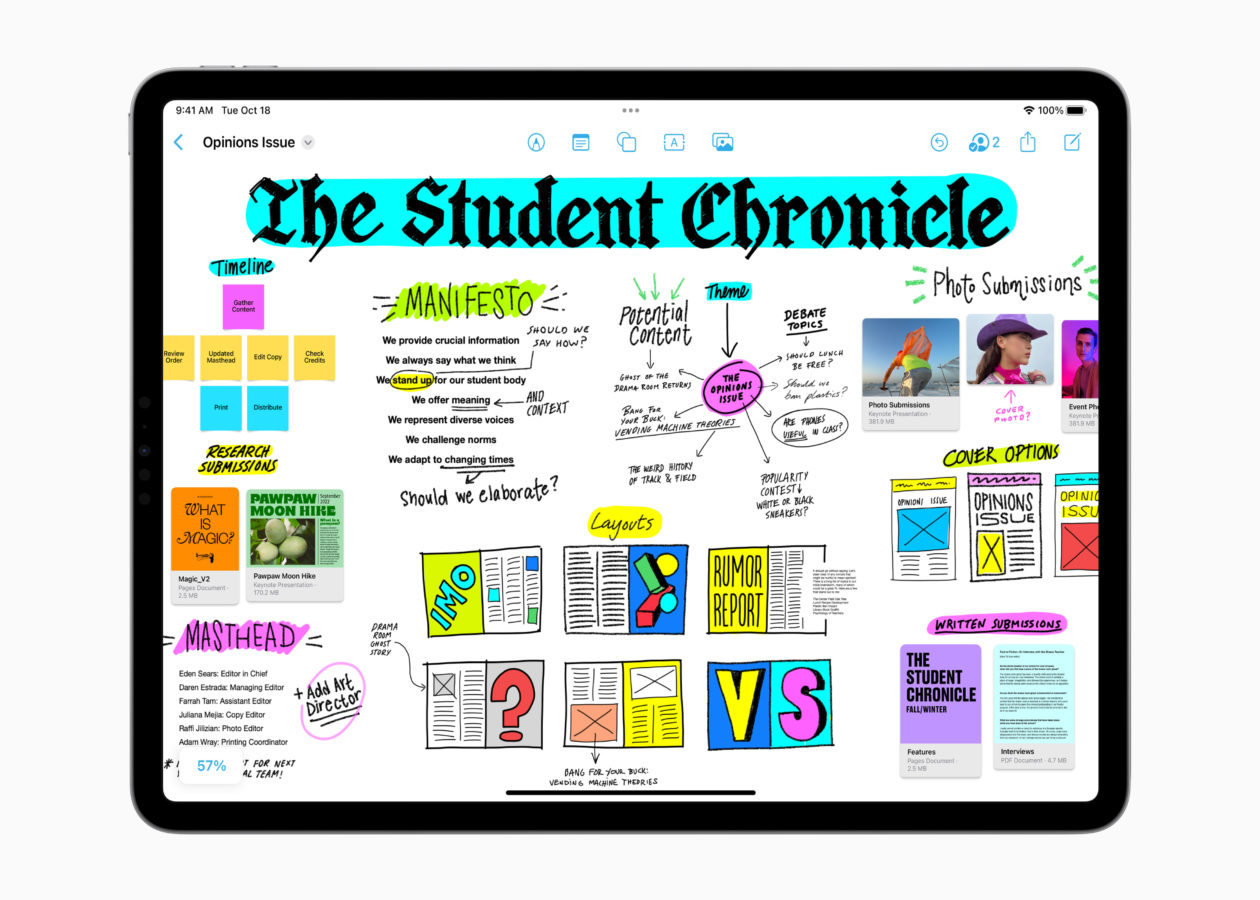
Unlike traditional spreadsheets, Numbers is a “free-form” canvas. You don’t start with a giant wall of cells; you start with a blank page where you can place small tables, images, and charts exactly where you want them. This makes it perfect for pupils to create lab reports, personal trackers, or interactive posters.


🎓 Why is it useful?

  • Multiple Tables on One Sheet: Pupils can have a small table for their results, a text box for their hypothesis, and a photo of their work all side-by-side.

  • Touch-First Data Entry: When you tap a cell, Numbers brings up a custom keyboard (numeric, date, or duration) designed specifically for the data you are entering, making it much easier for younger pupils to use their fingers accurately.

  • Interactive Charts: You can create “Interactive Charts” that allow pupils to use a slider to see how data changes over time – perfect for showing plant growth or weather patterns.

  • Smart Forms: You can turn any table into a “Form.” Pupils can then enter their data into a simple, clean interface that feels like a mobile app, which then populates the main spreadsheet automatically.

⚙️ How does it work?

  1. Launch: Open the Numbers app (Green icon with a white bar chart).

  2. Start with a Template: Choose from the Education section for pre-made templates like “Lab Report,” “Grade Book,” or “Attendance.

  3. Add Objects: Use the ‘+’ icon at the top to add Tables, Charts, Text Boxes, Shapes, and Media (photos or videos).

  4. Format: Tap an object, then tap the Format (Paintbrush) icon. This is where you change colors, fonts, and chart styles using your finger.

  5. Calculate: Tap a cell and select ‘Cell Action’ > ‘New Formula’ to use the built-in formula editor. It is designed to be tapped, not typed, so pupils can easily build sums.


🚀 Beyond the Basics

  • Digital Lab Report: Use a blank sheet. Pupils can record a video of their experiment and embed it directly next to their results table.

  • Character Trackers: Use a table to track a character’s emotions through a book. Pupils can use the ‘Star Rating’ or ‘Pop-up Menu’ cell types to make the data entry fun and visual.

  • Visualising Budgets: Give pupils a “Budget” of £50 to plan a party. They can add photos of items from the web and use a simple SUM formula to see their remaining balance update live.

  • Fitness Trackers: Create a simple “Daily Activity” log. Pupils can use the ‘Checkbox’ cell type to tick off when they’ve completed their daily mile or drank enough water.

  • Interactive Planners: Teachers can create “Weekly Checklists” for pupils. Because you can drag tables anywhere, you can make the planner look like a visual dashboard rather than a boring list.


🔗 Teacher Quick Links

Numbers User Guide for iPad

Get Started with Numbers on iPad

Pages

Pages: your digital publishing house. Create everything from simple essays to interactive e-books.


🔍 What does it do?

Pages is a flexible app that works in two ways: as a traditional word processor (like Word) and as a page layout tool (like Publisher). It allows pupils to combine text, photos, videos, and even audio recordings into a single document. Because it can export as an EPUB, it is the primary tool for pupils to become published authors of their own digital books.


🎓 Why is it useful?

  • Interactive Media: Unlike a printed sheet, a Pages document can “talk.” Pupils can record their own voice explaining a concept and embed that audio button directly next to their writing.

  • Smart Templates: Pages includes beautiful, education-specific templates for posters, research journals, and books, giving pupils a professional starting point.

  • Accessibility: It features a “Reading Mode” that hides all the editing tools, allowing pupils to focus entirely on the content without distractions.


⚙️ How does it work?

  1. Launch: Open the Pages app (Orange icon with a white pen).

  2. Choose a Mode: When you start a new document, you can choose to ‘Start Writing’ to enter a simple word processing layout (for essays) or you can ‘Choose a Template’ to make posters and books.

  3. Add Content: Tap the icons at the top to add Photos, Videos, Web Links, or Audio Recordings.

  4. Format with the Brush: To change fonts, colors, or how text wraps around an image, tap the object with your finger and then tap the Format (Paintbrush) icon.

  5. Publishing: Tap the ‘Share’ button and select ‘Export’ to save your work as a PDF or an EPUB (e-book) that can be read in the Books app built into iPad.


🚀 Beyond the Basics

  • Talking Books: Pupils can write a story and then use the ‘Record Audio’ feature to add sound effects or read their story aloud. This is a fantastic way for pupils to practice fluency and expression.

  • Digital Field Journals: Take the iPad outside. Pupils can snap photos of plants or insects and drop them straight into a Pages journal, adding text boxes with their fingers to label what they see.

  • Vocabulary Posters: Pupils can create a poster with images of common objects. They can then embed audio clips of them saying the word in another language, creating a “soundboard” for their peers.

  • Interactive Newsletters: Use a newsletter template to report on a historical event. Pupils can embed a YouTube link or a video of a mock “interview” with a historical figure to bring the report to life.

  • Image Descriptions: Teachers can show pupils how to add “Alt Text” to images within Pages. This ensures that if a visually impaired student uses a screen reader, the iPad will describe the image to them.


🔗 Teacher Quick Links

Get Started with Pages for iPad

Pages User Guide for iPad

Jacob’s Quick Tips – Pages

Freeform

Freeform is an infinite digital canvas for visual brainstorming and project planning.

🔍 What does it do?

Freeform is an “infinite whiteboard” app that comes built into the iPad on models running iPad OS 16.2 and above. Unlike a document or a slide deck, there are no page breaks or borders. You can add text, photos, videos, PDFs, web links, and hand-drawn sketches anywhere on the canvas. As you add more content, the board simply expands in every direction.

🎓 Why is it useful?

  • Total Creative Freedom: Because the canvas is infinite, pupils don’t have to worry about running out of space or fitting their ideas into a specific layout.

  • Multimedia Hub: You can “drop” almost any file onto a board. This makes it perfect for gathering research, as pupils can keep their notes, photos, and YouTube videos all in one viewable space.

  • Real-Time Collaboration: Up to 100 people can work on the same board at once. You can see everyone’s cursors moving and see ideas grow in real-time – ideal for whole-class “thought-dumps.”

  • Built-in Tools: It uses the same familiar Apple markup tools as “Notes,” making it easy for pupils to sketch, annotate images, or highlight text.

⚙️ How does it work?

  1. Launch: Find the Freeform app icon on your iPad home screen (White icon with a blue/orange squiggle).

  2. Start a Board: Tap the ‘New Board’ icon (square with a pencil) to begin.

  3. Add Content: Use the icons at the top to add Sticky Notes, Shapes, Text Boxes, or Photos/Files.

  4. Zoom and Pan: Use two fingers to pinch and zoom out to see the whole board, or drag to move to a different area of the canvas.

  5. Collaborate: Tap the Share button (box with an arrow) to invite others to edit the board with you via a link. There are two options for sharing, ‘Collaborate’ and ‘Send Copy’. ‘Send Copy’ will send a carbon copy to others which they can then use for themselves (you will not see changes). ‘Collaborate’ allows you to choose between users being able to make changes or view only. When you send using ‘Collaborate’ always use ‘Anyone with the Link’. We recommend that you use the Notes option to share Freeform boards, simply select your collaboration options then hit the Notes icon, this will automatically create a note with the link which you can Airdrop to learners – this method is generally found to be more reliable than directly airdropping from the share panel. 

🚀 Beyond the Basics

  • Storyboarding: Use the “Shapes” tool to create comic-strip boxes. Pupils can draw their scenes, add text for dialogue, and even drop in sound recordings of their characters speaking.

  • Project Planning: Use the infinite space to map out a complex experiment. Pupils can take photos of each stage of their build and “connect” them with arrows to show the process.

  • Multimedia Revision: Create a revision board on a topic like “The Wars of Independence.” Embed links to BBC Bitesize, drop in PDFs of primary sources, and add sticky notes with key dates.

  • Mood Boards: Pupils can gather inspiration from the web, crop images directly on the board, and use the markup tools to sketch colour palettes or textures alongside their found images.

  • Visual Scaffolding: Teachers can create a “Pre-filled Board” with prompts, sentence starters, and images, then share it as a template for pupils to build upon.


🔗 Teacher Quick Links

Where can you learn more about Freeform?

Get Started with Freeform on iPad

How to Use Freeform – Apple Support

Jacob’s Quick Tips – A Complete Guide to Freeform


Notes

Apple Notes – the versatile digital notebook for quick capture, sketching, and organisation.

🔍 What does it do?

Notes is a built-in app on iPad that allows you to combine typed text, handwriting, photos, and scanned documents in one place. It syncs across all your Apple devices and, thanks to the Quick Note feature, can be accessed instantly from any other app on your iPad.

🎓 Why is it useful?

  • Quick Access: You can swipe from the corner of the screen or use the Control Center to start a note in a second. It is the fastest way for pupils to record a thought before they forget it.

  • Smart Scanning: It has a high-quality document scanner built-in. It automatically detects edges and cleans up shadows,turning physical paper into a digital PDF within your note.

  • Touch-Friendly Drawing: The built-in markup tools allow pupils to use their fingers to draw diagrams, highlight text, or annotate photos with ease.

  • Seamless Collaboration: You can share a note or an entire folder with colleagues or pupils. Everyone can contribute, and you’ll see “Activity” highlights showing exactly what has been added or changed.

⚙️ How does it work?

  1. Launch: Find the Notes icon (yellow and white pad).

  2. Quick Note: Swipe up from the bottom-right corner of your screen at any time to open a small floating note – perfect for jotting down a thought while browsing Safari.

  3. Scan a Document: Tap the Camera icon in Notes and select Scan Documents. Point the camera at a worksheet or textbook page, and it will capture it automatically.

  4. Organise with Tags: Use hashtags (e.g., #LessonPlans or #Maths) anywhere in your note. This makes finding specific information across multiple folders much faster.

  5. Lock a Note: If you have sensitive information (like password reminders or meeting notes), you can “Lock” a note using your iPad passcode or FaceID.

🚀 Beyond the Basics

  • Checklists: Pupils can create interactive to-do lists for their writing projects. As they complete a draft, peer-edit, or check spellings, they can “tick” the bubbles to track their progress.

  • Searchable Handwriting: The iPad’s built-in “AI” (OCR) recognizes handwriting. If a pupil has handwritten notes, they can use the Search bar to find a specific word.

  • Maps & Links: While researching, pupils can “Add Link” to a note from Safari or Maps. It creates a rich visual thumbnail, making the note a visual “Research Hub.”

  • Smart Folders: Create a folder that automatically gathers every note containing a specific tag (like #P7Transitions). It saves you from manually moving files and keeps your admin organised.


🔗 Teacher Quick Links

Use Notes on your iPhone, iPad and iPod touch

Getting Started with Notes


Keynote

More than a presentation tool, Keynote is an animation studio and digital canvas for creative learning.


🔍 What does it do?

Keynote is Apple’s flagship presentation app. On the iPad, it allows pupils to combine text, high-quality shapes, photos, videos, and live audio. Its standout feature is its powerful animation engine, which allows pupils to move objects across the screen to explain concepts, tell stories, or create their own mini-movies.


🎓 Why is it useful?

  • Magic Move: This is the “secret sauce” of Keynote. By simply duplicating a slide and moving an object to a new position, Keynote automatically animates the movement between them. It’s the easiest way for pupils to create professional-looking animations.

  • Infinite Shapes Library: Keynote contains thousands of professional shapes – from animals and nature to symbols and science equipment. Pupils can “break apart” these shapes to customise them or use them as building blocks for their own designs.

  • Interactive Storytelling: Pupils can add “links” to shapes or text that jump to different slides. This allows them to create “Choose Your Own Adventure” stories or interactive museum exhibits.

  • Live Video: You can drop a “Live Video” feed onto a slide. This shows the iPad’s camera view directly on the slide, allowing a pupil to be “part of the presentation” or demonstrate a physical object while their information is displayed alongside it.


⚙️ How does it work?

  1. Launch: Open the Keynote app (Blue icon with a white lectern).

  2. Start a Theme: Tap the ‘+’ to create a new presentation. For creative projects, the “Basic White” or “Basic Black” themes are often best.

  3. Add Content: Use the icons at the top to add Shapes, Photos/Videos, Audio Recordings, or Tables.

  4. Animate: Tap an object and select ‘Animate’. Use ‘Action’ to create a custom path with your finger, or ‘Transitions’ to add Magic Move between slides.

  5. Export: Tap the ‘Share’ button (box with arrow) and select ‘Export’. You can save the project as a Movie or a GIF, making it easy to share on Teams or Google Classroom.


🚀 Beyond the Basics

  • Animated Retellings: Pupils can use the Shapes library to find characters for a story. Using Magic Move, they can make the characters “walk” across the screen while they record a voiceover narration using the ‘Record Audio’ tool.

  • Shape & Symmetry: Give pupils a set of basic shapes. They can use the Format (Paintbrush) tool to rotate, flip, and resize them to create symmetrical patterns or “shape pictures” (like a house made of a square and triangle).

  • Animated Cycles: Use Keynote to explain the Water Cycle or Plant Growth. Pupils can animate water droplets rising (evaporation) or a seed growing into a flower using the ‘Draw Path’ animation tool with their finger.

  • Interactive Maps: Find a map of a country. Pupils can place “invisible” shapes over cities. When someone taps the city during the presentation, it links to a slide with more information about that location.

  • Green Screen Backgrounds: Pupils can design a beautiful, static background in Keynote, export it as an image, and then use it as their backdrop in iMovie for a green-screen news report.


🔗 Teacher Quick Links

Get Started with Keynote on iPad

Jacob’s Quick Tips – Keynote for iPad

GarageBand

GarageBand – your complete recording studio for music, podcasts, and digital storytelling.


🔍 What does it do?

GarageBand is a free, high-powered audio creation app. It allows pupils to play “Smart Instruments” (like piano or guitar that stay in key), record their own voices, and mix multiple tracks together. While it is excellent for music, it is equally useful for recording speech, creating soundscapes, or producing high-quality podcasts.


🎓 Why is it useful?

  • Literacy & Voice: Pupils can record audiobooks or radio dramas. The process of editing their own speech helps them engage deeply with text, tone, and pacing.

  • Smart Instruments: You don’t need to be a musician to create music. “Smart” features ensure that whatever a pupil plays sounds professional and harmonic, boosting their confidence in creative expression.

  • Multi-Sensory Learning: Pupils can communicate mood and tone through sound – for example, creating a “suspenseful” backing track for a gothic story they have written.

  • Portable Studio: Using the built-in iPad microphone, pupils can capture “found sounds” (like wind, footsteps, or rain) to use in their projects, or record on the go making learning truly mobile.


⚙️ How does it work?

  1. Launch: Open the GarageBand app. Tap the ‘+’ to create a new song.

  2. Choose a Tool: Select Audio Recorder (the microphone) to record speech, or Live Loops to create instant electronic music by tapping colored cells.

  3. Record: Tap the red Record button at the top. Use the “Metronome” icon to keep a steady beat if needed.

  4. Edit: Tap the Tracks View icon (looks like a brick wall) to see your recordings. You can trim, move, or loop clips by tapping on them.

  5. Export: When finished, go to My Songs, long-press your project, and select Share > Song to save it as a high-quality audio file.


🚀 Beyond the Basics

  • Podcasting: Have pupils record a 3-minute “Expert Interview” on a class topic. Use the “Telephone” or “Robot” voice effects to make it sound like a real radio broadcast.

  • Ratio & Patterns: Music is built on patterns. Use the Beat Sequencer to build drum beats – pupils can see how different “ratios” of beats create different rhythms.

  • Expressing Emotion: Pupils can use the “Strings” or “Keyboards” to create a short piece of music that represents a specific feeling (e.g., calm, angry, or excited).

  • Language Practice: Record pupils speaking in a different language. They can use the Sampler to play their own voice back at different pitches, making pronunciation practice fun and engaging.

  • Soundscapes: Create the “sound of a setting.” Pupils can layer tracks of wind, whispering, and door creaks to bring a setting from their creative writing to life.


🔗 Teacher Quick Links

Connected Falkirk GarageBand ‘How To’ Playlist

GarageBand Tips: How to Get Started with GarageBand

Apple GarageBand Page


iPad Camera

iPad Camera is the window to your classroom. Capture evidence, scan documents, and support accessibility.


🔍 What does it do?

The Camera app is the primary way pupils capture their learning. It can take high-quality photos, record video, capture slow-motion clips, and even read text directly from a book or whiteboard. In a “1:1 iPad” classroom, it becomes a digital bridge between physical work in a jotter and digital work in the cloud.


🎓 Why is it useful?

  • Evidence of Learning: Not all work is digital. Pupils can take a photo of their physical models, posters, or written work and upload them instantly to Teams or Google Classroom.

  • Live Text: One of the most powerful features – if the camera sees text (on a whiteboard or in a book), a small icon appears that allows the pupil to copy and paste that text directly into a document or note or have it read aloud.

  • Scan QR Codes: No more typing in long web addresses. Pupils simply point the camera at a QR code to be taken directly to a website, a Form, or a video.

  • Magnifier: For pupils with visual impairments, the camera can act as a high-powered magnifying glass, allowing them to zoom in on small text or distant displays.


⚙️ How does it work?

  1. Launch: Tap the Camera icon (Gray icon with a black lens) or swipe left on the Lock Screen.

  2. Switch Modes: Swipe your finger up or down on the right side of the screen to switch between Photo, Video, Time-Lapse (great for long science experiments), and Slo-Mo.

  3. Focus and Exposure: Tap a specific part of the screen to tell the camera where to focus. If the image is too dark, tap the screen and slide your finger up or down next to the “Sun” icon to adjust the brightness.

  4. Zoom: Use two fingers to “pinch” or “spread” on the screen to zoom in or out.

  5. Review: Tap the small thumbnail in the corner to view your most recent photo and use the ‘Edit’ button to crop or rotate it.


🚀 Beyond the Basics

  • Time-Lapse & Slo-Mo: Use Time-Lapse to record a plant growing over a day or a chemical reaction. Use Slo-Mo to capture fast-moving events, like a ball being dropped, to analyse the physics of the movement.

  • Shape Hunts: Send pupils on a “Shape Hunt” around the school. They can use the Markup tool in the Photos app to draw over their photos with their fingers, highlighting the 2D and 3D shapes they find in the real world.

  • Visual Timetables: Use the camera to take photos of the equipment needed for a lesson. Display these on the board or in a shared Note or Keynote to provide a clear, visual checklist for pupils who struggle with multi-step instructions.

  • POV Storytelling: Have pupils film “Point of View” videos where they act as a character in a story, speaking directly into the camera to explain their feelings or motives.


🔗 Teacher Quick Links

Take Photos with Your iPad Camera