Category: Tool

Borrowbox

BorrowBox is the digital library for Falkirk schools. Thousands of eBooks and eAudiobooks at your fingertips.

🔍 What does it do?

BorrowBox is a digital reading platform provided by the Falkirk Learning Resource Service. It allows pupils across the Falkirk to borrow and download digital books and audiobooks for free. Just like a physical library, pupils can browse the “shelves,” reserve popular titles, and return books when they are finished – all through the app on their iPad or via a web browser.

🎓 Why is it useful?

  • Instant Access to Choice: Pupils have access to a huge range of titles that might not be available in their physical school library, from the latest bestsellers to classic curriculum texts.

  • Support for Dyslexia and Visual Impairments: The eBook reader allows pupils to change the font (including a dedicated OpenDyslexic font), adjust text size, and change background colors to make reading more comfortable.

  • Audiobooks for Literacy: Audiobooks are a fantastic way to improve vocabulary and listening skills. Pupils can listen to stories while they follow along with a physical book or use them to access complex stories that might be above their current reading level.

  • Offline Reading: Once a book is downloaded, it can be read or listened to without an internet connection – perfect for reading at home or on the bus.

  • No Late Fees: Books are returned automatically at the end of the loan period, so there is never a worry about “overdue” items!

⚙️ How does it work?

1. Launch: Open the BorrowBox app on your iPad or find the Bolinda BorrowBox tile on your Glow Launchpad.

2. Sign In: Users sign in using their Glow credentials, see below for specific login guides:

Logging in on iPad

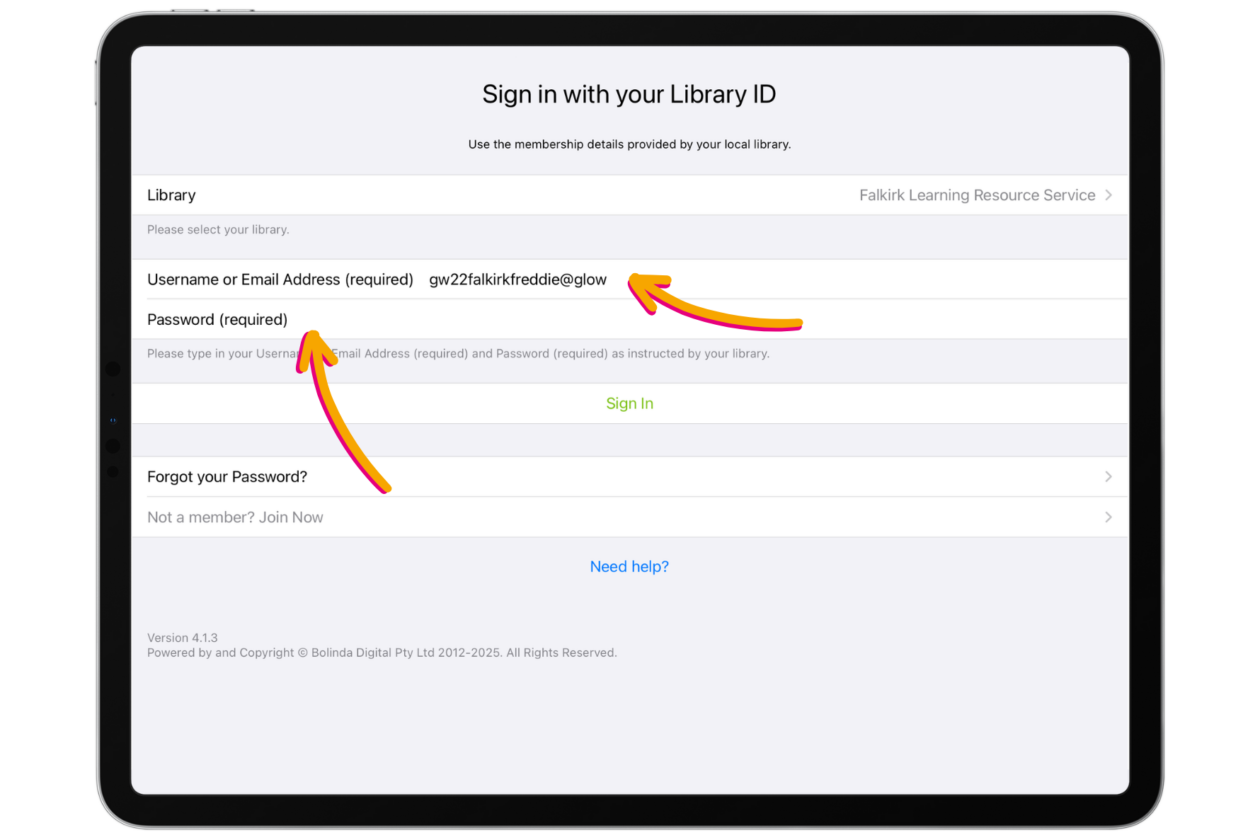
Open the Borrowbox app. Next to ‘Library’ choose ‘Falkirk Learning Resource Service’ (hint if you start typing a drop down list will appear where you can select it without typing in the whole thing).

Next to ‘username’ type in the first part of your Glow username followed by @glow (i.e. gw22falkirkfreddie@glow). Type your usual Glow password and press ‘Sign in’.

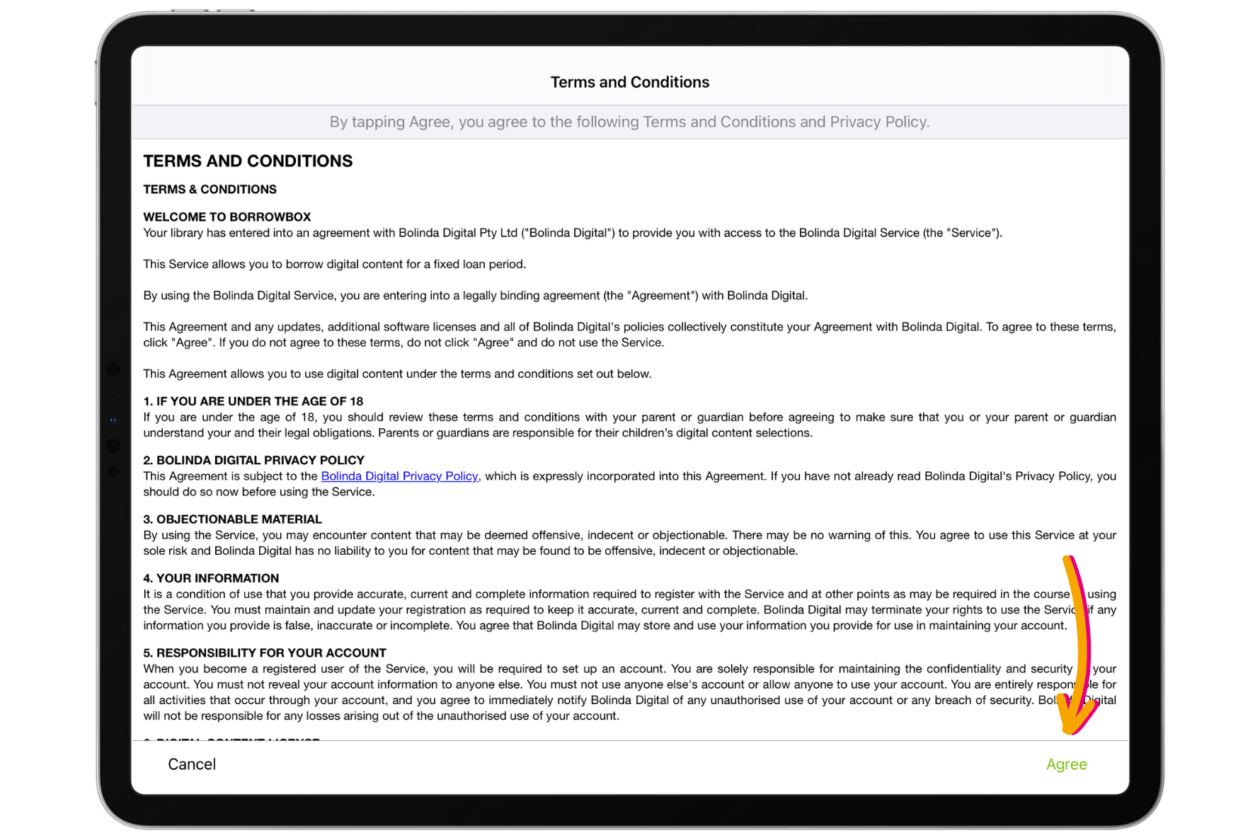
You will be asked to accept the terms and conditions of Borrowbox. Choose ‘Agree’ in the bottom right hand corner.

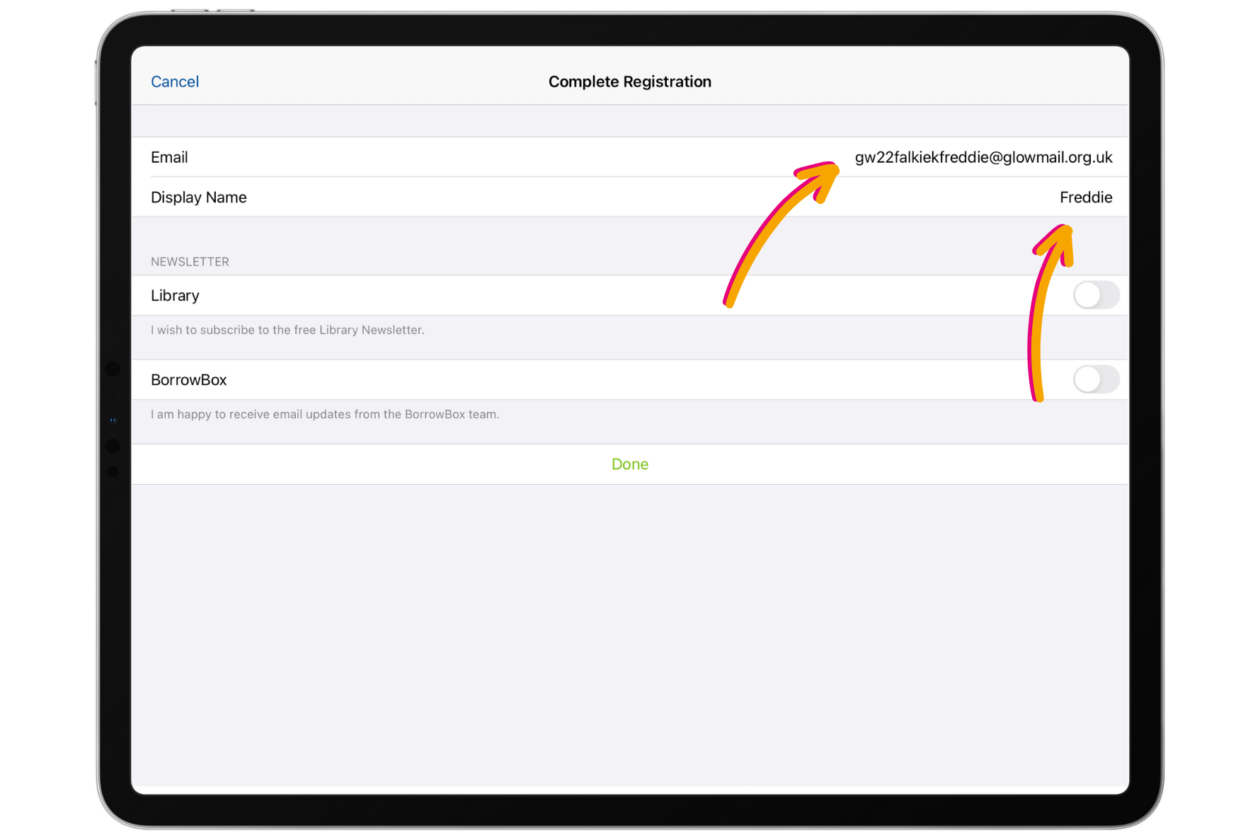
The first time you log in you’ll be asked to complete your registration. Fill in the ‘Email’ box with your full Glow email. Use your first name as your ‘Display name’. Select ‘Done’ at the bottom of the screen.

You can now use Borrowbox. Next time you log in follow the same process (you will not have to do the complete registration process again).

Logging in on Browser

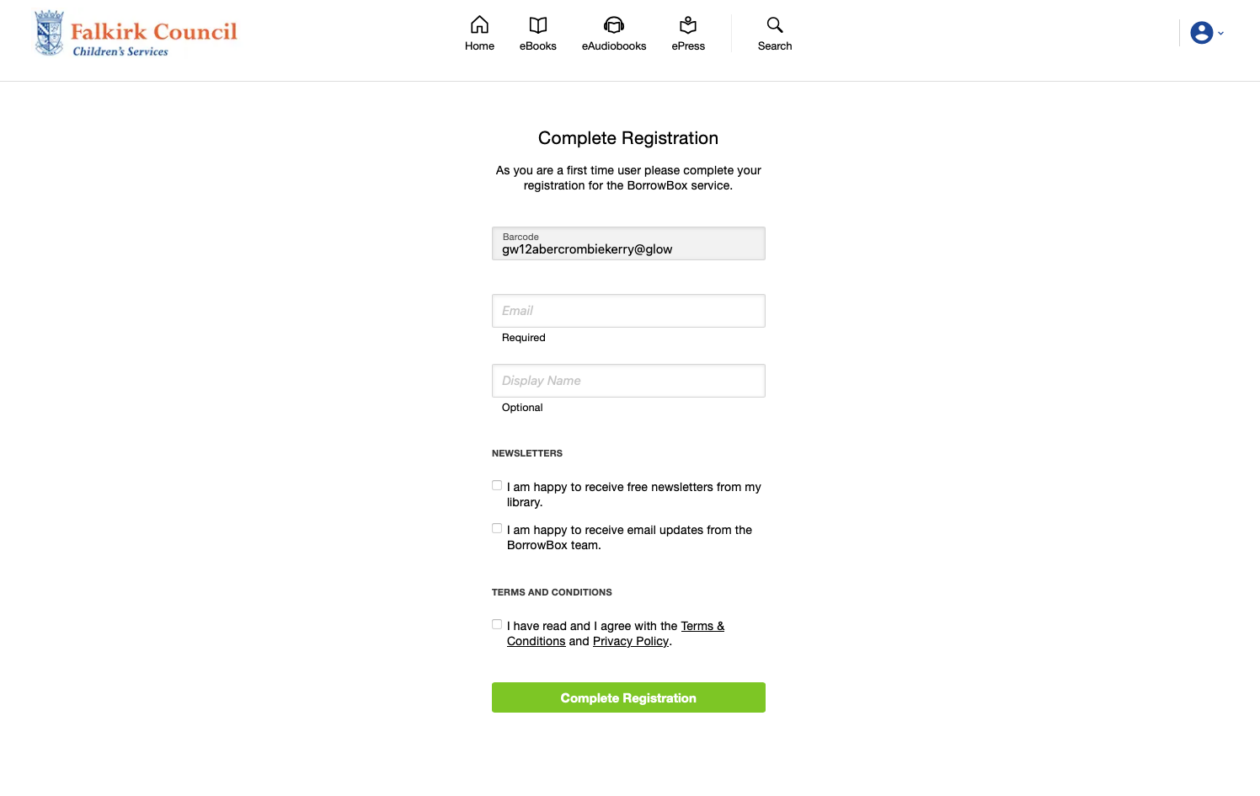
Log into Glow as normal and select the Borrowbox tile from your school launch pad. Borrowbox should open in a new tab with you logged in. You may be asked to ‘Complete registration’. Add your Glow email, choose a display name and tick the terms and conditions box. Choose ‘Complete Registration’.

You should then be taken to the main Falkirk Learning Resource Borrowbox home page where you can begin using the service.

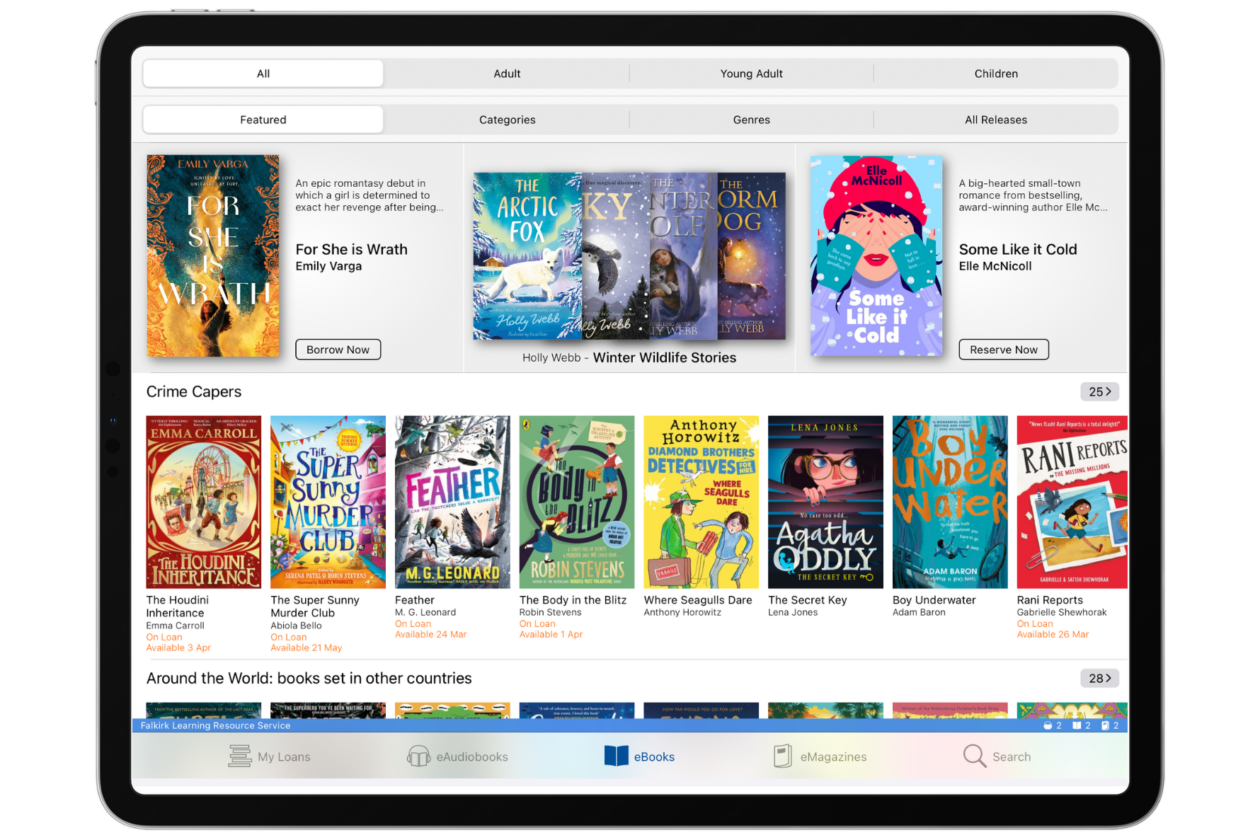
3. Search & Browse: Use the “Search” tab to find a specific author or the “Explore” tab to see themed collections (e.g., “First Level,” “New Releases,” or “Picture Books”).

4. Borrow: Tap on a cover and select ‘Borrow’. You can have up to 2 eBooks and 2 Audiobooks on loan at any one time.

5. Listen & Read: Your borrowed items appear in the ‘My Loans’ section. Tap a book to start reading or listening instantly.


🚀 Beyond the Basics

  • ERIC Time: Use BorrowBox as a digital alternative during “Everyone Reading In Class” time. It ensures every pupil has something they want to read, even if they forgot their physical book.

  • Customising the Experience: Show pupils how to tap the ‘Aa’ icon in an eBook. They can change the line spacing and font to suit their specific needs, helping to remove barriers to reading for pleasure.

  • Sleep & Relaxation: Audiobooks can be a great tool for “wind-down” time. The app includes a Sleep Timer that automatically stops the audio after a set time (e.g., 15 or 30 minutes).

  • For Modern Languages: Look for the “World Languages” section to find eBooks in different languages, supporting pupils with EAL or those learning a second language.

  • eMagazines: BorrowBox also provides access to digital magazines. Use these for non-fiction reading tasks or to keep up with current events and STEM news.

Google Classroom

Google Classroom: The central hub to manage, distribute, and grade classwork in one place.

🔍 What does it do?

Google Classroom is a free web-based platform that brings all your teaching materials together. It replaces the traditional “paper trail” by allowing you to post announcements, set assignments, and collect work digitally. It automatically organises your files into folders in Google Drive, making it impossible for students to “lose” their homework. In Falkirk Google Classroom is used as a Virtual Learning Environment which is a digital extension of the physical classroom.

🎓 Why is it useful?

  • Centralised Communication: Use the Stream to post daily agendas, reminders, or discussion prompts. It keeps your class informed without cluttering their inbox.

  • Paperless Workflow: When you create an assignment, you can choose to “Make a copy for each student.” This automatically gives every pupil their own Doc or Slide to work on – no more photocopying!

  • Real-time Feedback: You can see student work as they are doing it. You don’t have to wait for them to “hand it in” to leave a helpful comment or nudge them in the right direction.

  • Streamlined Grading: The Grades tab gives you a birds-eye view of who has submitted work, what is missing, and how the class is performing overall.

⚙️ How does it work?

  1. Launch: Open the Google Classroom app on your iPad or login to Google Classroom on your internet browser.

  2. Sign In: Use your Glow email (e.g., gw15smithjohn@fa.glow.scot) and use your normal Glow password.

  3. Create a Class: Tap the ‘+’ icon and select ‘Create class.’ Give it a name like “P6 2025/2026” or “Mr F – S2 Science.”

  4. Invite Students: Share the unique Class Code with your pupils. They enter this code on their iPads to join instantly.

  5. Create Assignments: Tap the ‘Classwork’ tab and then the ‘+’ icon. Choose between Assignment, Quiz, Question, or Material.


🚀 Beyond the Basics

  • Discussion Forums: Use the ‘Question’ tool to post a debate topic (e.g., “Should school uniforms be banned?”). Students can post their answers and – if you enable the setting – reply to their classmates’ points.

  • Exit Tickets: At the end of a lesson, post a quick Google Form as a ‘Quiz Assignment.’ Classroom will automatically show you which pupils grasped the concept and who needs more help tomorrow.

  • Multimedia Resources: Use the ‘Material’ type to post a “Choice Board.” You can attach a YouTube video, a website link, and a Google Doc, allowing pupils to choose how they want to research the topic.

  • Private Check-ins: When students submit an assignment, they can add a ‘Private Comment.’ This is a safe space for them to tell you if they found the work hard or if they are proud of what they achieved.

  • Individualised Assignments: You don’t have to send every assignment to the whole class. Use the ‘All Students’ dropdown to select specific pupils for differentiated tasks or extension work.


💡 Top Tips for Google Classroom

  • The Comment Bank: Save time when marking! You can create a “Bank” of your most common feedback (e.g., “Great use of adjectives!”) and pull them into any student’s work with just a few taps.

  • Scheduled Posts: You don’t have to post your work in real time. Use the ‘Schedule’ feature to prepare your whole week’s lessons in advance; they will appear for students exactly when you want them to.

  • Reuse Post: Don’t reinvent the wheel. If you have a great lesson from last year, use the ‘Reuse post’ feature to pull it into your new class, including all the attachments and instructions.


🔗 Teacher Quick Links

Get Started with Google Classroom for Students – iPad

Get Started with Google Classroom for Students – Latop/PC

A Guide to Google Classroom on Your Connected Falkirk Device

Google Classroom 101 for Teachers

Google Sites

Google Sites: Pull your classroom resources, school event or project information together into one secure, professional website.


🔍 What does it do?

Google Sites is a drag-and-drop website builder. It allows teachers and pupils to create “internal” websites that can only be seen by people with a Glow login or external facing websites easily. 


🎓 Why is it useful for Glow users?

  • Centralised Learning: Instead of pupils searching through Google Drive or Classroom for five different links, you can give them one “Site” URL that contains everything they need for a specific unit or project.

  • Instant Embedding: You can “embed” a Google Doc or Slide directly onto the page. If you update the Doc in your Drive, it automatically updates on the website – no re-uploading required.

  • Student Ownership: It is an incredible tool for Digital Portfolios. Pupils can create their own sites to showcase their best work across the year, choosing their own themes and layouts.

  • Safe Publishing: By default, sites created in Glow are private. You choose whether to keep it visible only to you, your class, or the whole school community.


⚙️ How does it work?

  1. Launch: Open Safari on your iPad and go to sites.google.com.

  2. Request Desktop View: Tap the ‘AA’ icon in the Safari address bar and select ‘Request Desktop Website’ to unlock the full editor.

  3. Create: Tap the ‘+’ icon to start a new site. Choose a Theme from the right-hand menu to set your colors and fonts.

  4. Add Content: Use the ‘Insert’ menu to drag in text boxes, images, or “Layouts” (which are pre-made grids for photos and text).

  5. Publish: Tap the blue ‘Publish’ button. Give your site a name (e.g., “Room4-Vikings”) and check your privacy settings to check who can see it.


🚀 Beyond the Basics

  • Class News Site: Set up a “Class Newspaper” site. Assign different pupils to be “Editors” for different pages (e.g., Sports, Book Reviews, School News). They can type their articles directly into the site.

  • Maths Help Hub: Create a site filled with “How-to” videos and links to interactive maths games. Embed a Google Form at the bottom of the page where pupils can submit “Question of the Day” answers.

  • Unit Dashboard: For a topic like “Space,” create a page for each planet. Embed your class Slides presentation on the first page and a Shared Drive folder on the last page for pupils to download experiment templates.

  • Virtual Classroom: Create a “Calm Zone” site. Embed a Spotify or YouTube playlist of relaxing music, a Google Doc with mindful colouring templates, and a “Check-in” Form for pupils to share their feelings.

  • Visual Choice Boards: Use large, clear images as “Buttons.” Link each image to a different activity or website. This helps pupils who struggle with heavy text to navigate their learning independently.


💡 Top Tips for Google Sites

  • Data Protection: Remember you should not use any personal sensitive information or non-public data in Glow, including in Google Sites! 
  • Layouts are your friend: Don’t struggle with moving text boxes manually. Use the pre-set ‘Content Blocks’ in the Insert menu to keep your site looking neat and professional on both iPads and phones.

  • Version History: If a pupil accidentally deletes a whole page of work, don’t panic! Tap the ‘three dots’ menu at the top and select ‘Version History’ to restore the site to how it looked yesterday.

  • Preview Mode: Before you publish, tap the ‘Preview’ icon (it looks like a laptop and phone). This lets you see exactly how the site will look to a pupil using a mobile phone versus a tablet.


🔗 Teacher Quick Links

How to Use Google Sites

Google Drive

Google Drive, your digital filing cabinet: store, organise, and share your learning from any device.

🔍 What does it do?

Google Drive is a cloud-based storage service. It is where all your Google Docs, Slides, and Sheets are automatically saved. It also allows you to upload photos, videos, and PDFs. Because it is part of Glow, everything is saved “in the cloud,” meaning you can start a project on a school iPad and finish it on any other device.

🎓 Why is it useful?

  • Automatic Backup: There is no “Save” button in Google apps. Everything you do is instantly backed up to Google Drive. You never have to worry about losing work if an iPad runs out of battery or your computer shuts down unexpectedly.

  • Paperless Scanning: Use the iPad camera to scan physical worksheets or hand-drawn posters directly into Drive as high-quality PDFs.

  • Search Mastery: Drive has a powerful search bar. You can search for a keyword (like “Vikings”) and it will find that word even if it’s buried inside a PDF or a handwritten note you scanned.

⚙️ How does it work?

  1. Launch: Open the Google Drive app on your iPad or login to Google Drive on your internet browser.

  2. Sign In: Use your Glow email (e.g., gw15smithjohn@fa.glow.scot) and use your normal Glow password.

  3. The ‘+’ Button: Tap the colorful ‘+’ icon to create new folders, upload photos from your library, or start a new Google Doc/Slide.

  4. Organising: Tap and hold a file to move it into a folder. Use the ‘Star’ icon for files you need to find quickly every day.

  5. Sharing: Tap the ‘three dots’ next to a file and select ‘Share.’ to share files and folders with other Glow Google Workspace users


🚀 Beyond the Basics

  • Digital Portfolios: Create a folder named “Writing Portfolio.” At the end of every unit, upload your best piece of work. By the end of the year, you have a visual record of how much your writing has improved.

  • Observation Logs: If you are doing an experiment, take a photo or short video each day. Save them in a specific Drive folder to create a “Time-lapse” record of your results. Once you have all the images, you can use Slides, Docs or Sheets to create a report.

  • Scanning Sketches: Use the ‘Scan’ feature (tap + in the bottom right hand corner of the iPad add then choose Scan document) to digitise your physical drawings. This makes it easy to put your artwork into a Google Slide later.

  • Offline Mode: If you don’t have Wi-Fi at home, tap the ‘three dots’ on your important files and select ‘Available offline.’ You can keep working on the bus or at home, and it will sync when you get back to an internet connection.


💡 Top Tips for Google Drive

  • Shared with me: This tab can get messy! If someone shares a file with you, don’t just leave it there. Tap the ‘three dots’ and select ‘Add shortcut to Drive’ to put it in one of your own organised folders.

  • Naming Files: Always name your files clearly (e.g., “Maths_Fractions_Jan19”). If you leave them as “Untitled,” you may have trouble finding them again.

  • Trash: If you delete a file by mistake, it stays in the ‘Trash’ for 30 days. Tap the menu (three lines) in the top left to find it and restore your work.


🔗 Teacher Quick Links

How to Use Google Drive – iPad

How to User Google Drive – Laptop/PC

Google Forms

Google Forms: Create surveys, self-marking quizzes, and exit tickets in minutes.


🔍 What does it do?

Google Forms is a web-based tool used to create digital forms. Whether you need to collect evidence of learning, create a quick “Exit Ticket” at the end of a lesson, or build a complex end-of-topic test, Forms handles the collection and organisation of that data automatically.


🎓 Why is it useful?

  • Instant Data Visualisation: As soon as a pupil submits a form, their response is added to a “Summary” tab. Forms automatically creates bar charts and pie charts, allowing you to see class-wide trends at a glance.

  • Self-Marking Quizzes: You can set “Correct Answers” and “Point Values.” Once a pupil finishes, they can see their score immediately, and you get a pre-marked gradebook.

  • Seamless Integration with Sheets: With one tap, you can export every single response into a Google Sheet for more detailed analysis or to use as a class register.

  • Secure and Controlled: You can restrict your form so that only users with a Glow account can respond, ensuring the data you collect stays within your school community.


⚙️ How does it work?

  1. Launch: Open Safari on your iPad and go to forms.google.com.

  2. Sign In: Use your Glow email (e.g., gw15smithjohn@fa.glow.scot) and use your normal Glow password.

  3. Create: Tap the ‘Blank form’ icon or use the ‘+’ button. Give your form a title and description.

  4. Add Questions: Tap the ‘+’ icon in the floating sidebar to add a question. Use the dropdown to choose from Multiple Choice, Short Answer, Checkboxes, or Linear Scales. Add other types of content to your Google Form using the floating sidebar, including video – pssst, if you use a video from YouTube there will be no adverts!

  5. Classroom: If using Forms with Google Classroom you can directly create an assignment that is based in Forms by going to ‘classwork’ > ‘+create’ >  ‘quiz assignment’. From there a blank form will be added, click on the Form within the post to add to/change your Form. You can use an existing Form by deleting the blank Form and using the ‘upload’ button to upload a pre-made Form instead. 


🚀 Beyond the Basics

  • Reading Comprehension: Create a quiz based on a class novel. Use ‘Section Breaks’ to separate different chapters, and add an image of a specific page for pupils to analyse.

  • Daily Mental Maths: Build a 10-question multiple-choice quiz. Enable the ‘Shuffle question order’ setting in the ‘Settings’ tab so that pupils sitting next to each other have their questions in a different order.

  • Observation Logs: If pupils are doing a long-term experiment (like growing a plant), they can use a Form as a daily log. They can enter the date, height, and a brief observation, creating a perfect data set for Google Sheets later.

  • Mood Check-ins: Start the day with a 1-question “How are you feeling?” form. Use the ‘Linear Scale’ (1-5) to let pupils discreetly share their wellbeing with you.

  • Adding Media: Use the ‘Add Video’ icon to embed a YouTube clip (e.g., a short historical documentary). Pupils watch the video and then answer questions below it, supporting those who find heavy text challenging.


💡 Top Tips for the Google Forms

  • Make it a Quiz: Go to the ‘Settings’ tab and toggle on ‘Make this a quiz.’ This unlocks the “Answer Key” feature where you can assign points and provide instant feedback for correct/incorrect answers.

  • Required Questions: Use the ‘Required’ toggle at the bottom of a question to ensure pupils don’t accidentally skip a task before submitting.

  • Response Validation: For “Short Answer” questions, you can set rules (e.g., “The answer must be a number”). This prevents pupils from typing text where you need a numeric value for your data.


🔗 Teacher Quick Links

How to Use Google Forms

Google Docs

Google Docs: write, edit, and share ideas together in real-time.

🔍 What does it do?

Google Docs is an online word processor that allows pupils to create reports, essays, and stories. Its most powerful feature is “Live Collaboration” – multiple pupils can work on the same document simultaneously, seeing each other’s changes as they happen. It removes the need for “saving” and “emailing versions,” as everything is stored live in the cloud via Glow.

🎓 Why is it useful?

  • Instant Collaboration: Perfect for group writing projects. Pupils can be in different parts of the classroom (or in other locations) and contribute to the same piece of work at once.

  • Voice Typing (Accessibility): Pupils who struggle with typing can use the “Dictation” feature (via the iPad keyboard) to turn their speech into text directly on the page.

  • Version History: (Accessible via browser version) Teachers can see exactly who contributed what to a group project and “roll back” the document if something is accidentally deleted.

  • Feedback Loop: Teachers and peers can highlight text and leave Comments, allowing for a digital dialogue about the work without changing the original text.

⚙️ How does it work?

  1. Launch: Open the Google Docs app on iPad or login to Google Docs on your internet browser.

  2. Sign In: Use your Glow email (e.g., gw15smithjohn@fa.glow.scot) and use your normal Glow password.

  3. Create: Tap the ‘+’ icon to start a new document or pick from a template like “Report” or “Letter.”

  4. Share: Use the Share button to add collaborators or send a link to the Google Doc.

  5. Classroom: If using Docs with Google Classroom you can directly create an assignment that is based in Docs by going to ‘classwork’ > ‘+create’ >  ‘assignment’ > ‘+create’ and selecting Docs. From there you can choose whether learners can view the Doc, edit it as one group or make a copy for each student. If you want to add a scaffolded Doc with information or instructions already in it, it is the same process but instead of clicking ‘+create’ as the last step, click ‘upload’ and choose the Doc you have already made to support learners.  

🚀 Beyond the Basics

  • Collaborative Storytelling: Start a “Pass the Story” activity. One pupil writes the introduction, a second writes the problem, and a third writes the resolution—all in the same Doc at the same time.

  • Structured Reports: Use the ‘Insert Table’ feature to help pupils organize their research into categories like “Climate,” “Culture,” and “History.”

  • Smart Chips: Type ‘@’ to bring up a menu that lets you quickly insert smart chips, files or building blocks like dates, drop downs, links to other Google files. This helps pupils keep their resources organised in one place.

  • Suggested Edits: Teach pupils how to use “Suggesting” mode (under the ‘three dots’). This allows them to propose changes to a partner’s work that the original author can choose to ‘Accept’ or ‘Reject.’

  • Meeting Minutes: Teachers can use the built-in “Meeting Notes” template which automatically pulls in the date and participants, making it easy to share notes with a department instantly via Glow.


💡 Top Tips for Google Docs

  • Reading Mode: If a document is long, pupils can change the ‘Print Layout’ toggle in the menu to see how it will look on paper, or keep it in mobile view for easier reading on the iPad.

  • The ‘Explore’ Tool: While the iPad app is streamlined, opening Docs in Safari allows you to use the “Explore” feature to research topics and find images without ever leaving the document.

  • Offline Working: Tap the ‘three dots’ on a file in the main list and select ‘Available offline’. This is vital for pupils who may not have reliable Wi-Fi at home but want to finish their homework.


🔗 Teacher Quick Links

Google Docs Training and Help

Google Sheets

Google Sheets in Glow is a digital spreadsheet, Organize data, perform calculations, and visualise results in real-time.

🔍 What does it do?

Google Sheets is a cloud-based spreadsheet tool. It allows pupils to collect data, use formulas to perform calculations (from simple addition to complex statistics), and turn those numbers into clear, colorful charts. Because it is part of Glow, pupils can work together on the same sheet at the same time, seeing each other’s edits instantly.

🎓 Why is it useful?

  • Single Sign-On: Pupils log in with their Glow credentials, automatically saving all work to their secure Google Drive.

  • Real-Time Collaboration: Entire groups can contribute to one data set. For example, a whole class can input their height or eye color into one shared sheet to create a “class profile.”

  • Mathematical Accuracy: It teaches pupils the logic of formulas. Instead of just doing a sum, they learn how to “tell the computer” to do the work, a vital STEM skill.

  • Automatic Saving: There is no “Save” button. Every change is tracked, and pupils can use Version History (on the web version) to go back if they make a mistake.

⚙️ How does it work?

  1. Launch: Open the Google Sheets app on your iPad or login to Google Sheets on your internet browser.

  2. Sign In: Tap ‘Sign In’ and enter your Glow email (e.g., gw15smithjohn@fa.glow.scot) and use your normal Glow password.

  3. Create: Tap the ‘+’ icon to start a new spreadsheet or choose a template like a “To-do list” or “Budget.”

  4. Enter Data: Tap a cell and use the keyboard to type numbers or text. Tap the ‘fx’ bar at the bottom to enter a formula (starting with =).

  5. Share: Use the Share button to add collaborators or send a link to the sheet.

  6. Classroom: If using Sheets with Google Classroom you can directly create an assignment that is based in Sheets by going to ‘classwork’ > ‘+create’ >  ‘assignment’ > ‘+create’ and selecting Sheets. From there you can choose whether learners can view the Sheet, edit it as one group or make a copy for each student. If you want to add a scaffolded Sheet with data or instructions already in it, it is the same process but instead of clicking ‘+create’ as the last step, click ‘upload’ and choose the Sheet you have already made to support learners.  


🚀 Beyond the Basics

  • Budgeting Challenges: Give pupils a “Virtual £100.” They use a Sheet to list items they want to buy, using the =SUM() formula to keep track of their total and ensure they don’t go over budget.

  • Experiment Results: When doing a “Dissolving” or “Growth” experiment, pupils record their daily measurements in a Sheet. They can then highlight the data and tap + > Chart to instantly create a line graph showing the change over time.

  • Spelling Checkers: Pupils can build their own self-marking spelling tests. Using simple “IF” statements, they can program a cell to turn green and say “Correct!” when the word is spelled right.

  • Demographic Charts: Research populations or climate data. Pupils can use Conditional Formatting to automatically colour cells (e.g., Red for hot temperatures, Blue for cold) to spot patterns in the data visually.

  • Checklists & Visual Organisers: Teachers can create a “Digital Planner” for pupils. Using Checkboxes (found in the ‘Insert’ menu), pupils can tick off their tasks as they complete them, giving them a sense of progress and structure.


💡 Top Tips for the Google Sheets

  • App vs. Browser: The iPad App is best for quick data entry and basic charts. For more complex features (like advanced conditional formatting or Pivot Tables), open Sheets in the Safari browser and “Request Desktop Website.”

  • Offline Access: Pupils can tap the ‘three dots’ on a file and toggle ‘Available Offline’ if using the Sheet outside of school wifi range (when outdoor learning for example). They can keep working, and it will sync back to Glow once they are back online.

  • Clean Data: Use the ‘Sort and Filter’ tools (under the ‘three dots’ menu) to help pupils organise messy data sets without needing to re-type everything.


🔗 Teacher Quick Links

Google Sheets Training and Help

Book Creator

Book Creator (Web Version) is a simple way to create, read, and share interactive digital books.


🔍 What does it do?

Book Creator is an online platform where pupils build their own eBooks. They can combine text, images, video, and audio recordings. For the free version, teachers create a “Library” and invite pupils to join using a simple code. Once inside, pupils can see each other’s work (if the teacher allows it) and build books that can be read like a real flip-book.


🎓 Why is it useful?

  • Multimodal Evidence: Pupils don’t just write, they can record their voice reading their story, embed a video of a science experiment, or use the “Pen” tool to draw diagrams.

  • Accessibility Built-In: It includes features like “Read to Me” (which reads the book aloud) and Dictation, allowing pupils to “write” using their voice.

  • Real Audience: There is a huge motivational boost for pupils when they know their book will be “published” online and can be read by their parents or peers.

  • Cross-Platform: Because it’s web-based, pupils can start a book on an iPad in school and finish it on a laptop or tablet at home.


⚙️ How does it work?

  1. Launch: Go to app.bookcreator.com in Safari.

  2. Teacher Sign-In: Create and sign into your free account.

  3. Create a Library: On the Free Plan, you get 1 Library that can hold up to 40 books.

  4. Invite Pupils: Click the ‘Invite Code’ button. Pupils go to the same website, select ‘Student Sign In’, and enter their code to join your library.

  5. Build a Book: Tap the ‘New Book’ button. Add media, change colors, fonts, and page backgrounds.


🚀 Beyond the Basics

  • Instructional Manual: Pupils can create a “How-To” guide (e.g., “How to make a jam sandwich”). They can take photos of each step and record a short audio clip explaining what to do.

  • Interactive Lab Reports: Use the Video tool to capture an experiment in action. Pupils can then use the Text tool to write up their findings alongside the video evidence.

  • Personal Portfolios: Create an “About Me” book. Pupils can use the Shapes and Stickers to decorate their pages and add audio reflections on their goals for the year.

  • Visual Social Stories: Teachers can create a book with photos of school routines (e.g., “Going to the Dining Hall”) and share it with pupils who benefit from visual transitions.


💡 Top Tips for the Free Plan

  • Managing Your 40 Books: The limit is 40 books per library. Once your library is full, you can archive it or delete old books to make room for new projects.

  • Collaborative Settings: In the Library settings (the cog icon), you can toggle whether pupils can see each other’s books. Turning this ON is great for peer feedback; turning it OFF helps pupils focus on their own work.

  • Publishing Safely: You can “Publish” a book online with one click. This generates a private link that you can share with parents. You can “Unpublish” it at any time.


🔗 Teacher Quick Links

Get Help with Book Creator

Book Creator – One Pagers

Numbers

Apple Numbers – A visual spreadsheet that turns data into interactive stories, charts, and creative organisers.


🔍 What does it do?

Unlike traditional spreadsheets, Numbers is a “free-form” canvas. You don’t start with a giant wall of cells; you start with a blank page where you can place small tables, images, and charts exactly where you want them. This makes it perfect for pupils to create lab reports, personal trackers, or interactive posters.


🎓 Why is it useful?

  • Multiple Tables on One Sheet: Pupils can have a small table for their results, a text box for their hypothesis, and a photo of their work all side-by-side.

  • Touch-First Data Entry: When you tap a cell, Numbers brings up a custom keyboard (numeric, date, or duration) designed specifically for the data you are entering, making it much easier for younger pupils to use their fingers accurately.

  • Interactive Charts: You can create “Interactive Charts” that allow pupils to use a slider to see how data changes over time – perfect for showing plant growth or weather patterns.

  • Smart Forms: You can turn any table into a “Form.” Pupils can then enter their data into a simple, clean interface that feels like a mobile app, which then populates the main spreadsheet automatically.

⚙️ How does it work?

  1. Launch: Open the Numbers app (Green icon with a white bar chart).

  2. Start with a Template: Choose from the Education section for pre-made templates like “Lab Report,” “Grade Book,” or “Attendance.

  3. Add Objects: Use the ‘+’ icon at the top to add Tables, Charts, Text Boxes, Shapes, and Media (photos or videos).

  4. Format: Tap an object, then tap the Format (Paintbrush) icon. This is where you change colors, fonts, and chart styles using your finger.

  5. Calculate: Tap a cell and select ‘Cell Action’ > ‘New Formula’ to use the built-in formula editor. It is designed to be tapped, not typed, so pupils can easily build sums.


🚀 Beyond the Basics

  • Digital Lab Report: Use a blank sheet. Pupils can record a video of their experiment and embed it directly next to their results table.

  • Character Trackers: Use a table to track a character’s emotions through a book. Pupils can use the ‘Star Rating’ or ‘Pop-up Menu’ cell types to make the data entry fun and visual.

  • Visualising Budgets: Give pupils a “Budget” of £50 to plan a party. They can add photos of items from the web and use a simple SUM formula to see their remaining balance update live.

  • Fitness Trackers: Create a simple “Daily Activity” log. Pupils can use the ‘Checkbox’ cell type to tick off when they’ve completed their daily mile or drank enough water.

  • Interactive Planners: Teachers can create “Weekly Checklists” for pupils. Because you can drag tables anywhere, you can make the planner look like a visual dashboard rather than a boring list.


🔗 Teacher Quick Links

Numbers User Guide for iPad

Get Started with Numbers on iPad

Microsoft OneDrive

Microsoft OneDrive in Glow: securely store, share, and collect files from anywhere.

🔍 What does it do?

OneDrive is the “storage heart” of Glow. Every Falkirk teacher and pupil has space to save documents, photos, and videos. Because it is cloud-based, you can start a file on your classroom PC and pick it up exactly where you left off on your iPad. It’s also the engine that allows for real-time collaboration in Word, Excel, and PowerPoint.


🎓 Why is it useful?

  • Version History: Accidents happen! If a pupil accidentally deletes their entire essay, you can use “Version History” to go back in time and restore a previous version of that document.

  • Files On-Demand: It doesn’t use up all the space on your iPad. You can see all your files, but they only download when you actually click to open them.

  • Seamless Sharing: No more emailing large attachments. Send a “view-only” or “edit” link to a colleague or pupil to work together on a single version of a file.


⚙️ How does it work?

  1. Access: Find the OneDrive tile on your Glow Launchpad or open the app on your iPad.

  2. Organise: Create folders for different subjects or terms to keep your “My Files” area tidy.

  3. Share: Select a file and click the Share icon. You can decide if the person can “Edit” or just “View,” and even set an expiry date for the link.

  4. Sync: Ensure the OneDrive app is signed in on your iPad so that your “Camera Roll” can automatically back up your classroom photos. Find out how to do this here.


🚀 Beyond the Basics

  • Shared Folders: Create a folder for your department or stage. Share it with your colleagues with “Edit” access to build a shared library of lesson plans and resources that everyone can contribute to.

  • Data Analysis: If you collect survey data using a Microsoft Form, the results are stored in your OneDrive as an Excel file. You can share this file with pupils so they can practice “Live Data” analysis in class.

  • Live Peer Editing: Have two pupils share a Word document stored in OneDrive. They can use the “Comments” feature to give each other feedback in real-time without ever leaving the document.


🔗 Teacher Quick Links

Glow Connect – OneDrive Articles