
With iMovie, create professional‑looking videos without an editing degree. Easily add photos and videos to projects, trim clips with your finger, add seamless transitions, and fade audio like a pro.
.
What does it do?
Creating and editing a film in the classroom with an iPad is easy with the built in core app iMovie. This is a type of editor that you can use to cut and edit videos, music, and graphics. Professional-grade editors cost a lot and can be complex to use and because iMovie is free, it’s a great place for beginners to start. iMovie is intuitive and keeps the average user at it’s heart. Anyone can create high quality moving image projects in iMovie—all it takes is a little practice.
.
Why is it useful?
Film and moving image is one of the most dominant forms of storytelling in modern society. From feature length Hollywood blockbusters to twenty second Tik Tok’s, moving image is used to communicate information and ideas on all kinds of subjects. In the classroom the process of creating a moving image text not only develops practical digital skills and encourages collaboration, but it can also benefit retention of information and allow students new avenues to demonstrate their learning in engaging and exciting ways. It also happens to be a brilliant vehicle for showcasing learning to a real world audience.
.
How does it work?
The YouTube video below from Apple Distinguished Educator Mat Pullen provides a tutorial on how to get started with iMovie. If you want to learn more, his iMovie playlist has loads of advanced and specific feature tutorials.
In April 2022 iMovie got a big update. You may still be working on the old version of iMovie at the moment but if you have updated here is a video explaining the new features.
.
Want to see more features of iMovie?
iMovie does more than just piece clips together with a range of features such as green screen, picture in picture, titles, voice over, filters, speed settings and much much more your pupils can really develop their video editing skills and showcase their learning in full moving image glory!
A quick YouTube search will bring up lots of online tutorials on using specific features as well as videos from experienced users on how to get some cool special effects.
iMovie tips: Using Green screen in iMovie (iPad tutorial 2020) by Mat Pullen shows how to get that ever popular green screen effect on iMovie.
iMovie tips: Using Overlays in iMovie (iPad tutorial 2020) also by Man Pullen shows how to use the other overlay effects such as picture in picture and cutaway.
7 iMovie Special Effects for iPhone You May Have Missed by VideoZues shows some brilliant things you can do with the iOS version of iMovie (for iPhone and iPad).
Create your own Green Screen Magic Reveal by Jacob Woolcock shows a really neat idea for getting students started with green screen.
.
Where can you learn more about iMovie?
This webpage from Apple gives more information on iMovie.
Apple Education have a free downloadable guide called Everyone Can Create showing how to make use of iMovie to support creativity in learning and teaching. They even have a specific book called Everyone Can Create Video.
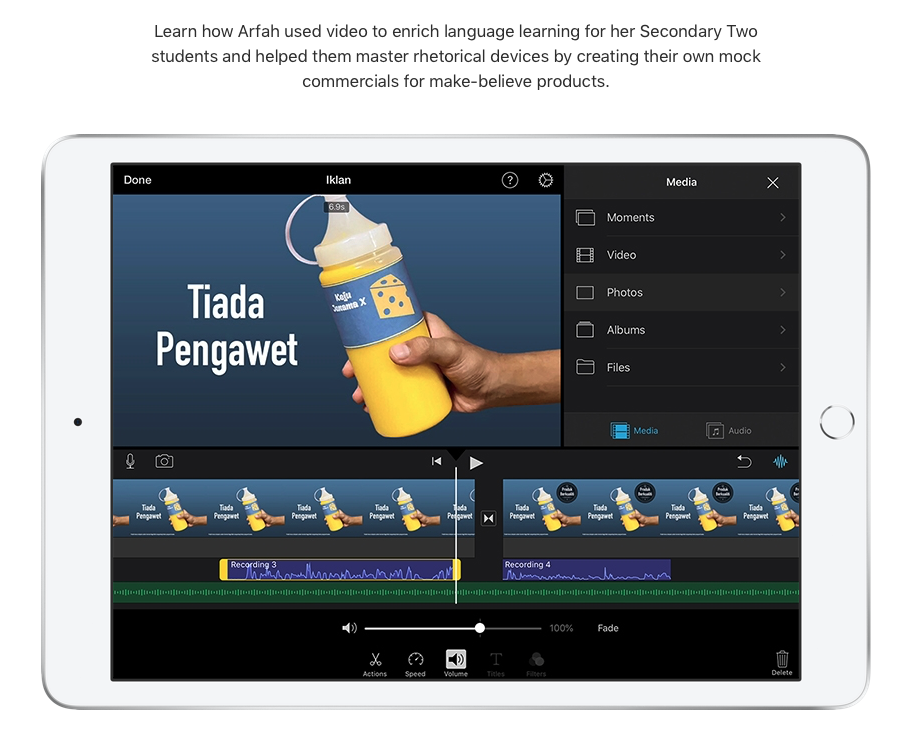
Get ideas for using iMovie meaningfully in your lessons can be found at the Apple Teacher Learning Centre. We particularly like this one on Creating a TV Commercial to support literacy learning on rhetorical devices.
.
Educator Voice
iMovie is video storytelling made simple. From quick classroom updates to Hollywood-style trailers.
🔍 What does it do?
iMovie is a powerful, free video editing app that allows pupils to combine video clips, photos, and audio into a polished film. On the iPad, it features two “smart” modes – Magic Movie (which builds the video for you) and Storyboards (which gives you a template to follow) – alongside the traditional manual editor.
🎓 Why is it useful?
-
Guided Storytelling: Pupils no longer have to start with a blank timeline. They can choose a Storyboard template like “Science Experiment” or “News Report,” and iMovie provides a step-by-step shot list of exactly what to film.
-
Instant Creation with Magic Movie: Got a collection of photos and videos from a school trip? Magic Movie can instantly identify the best parts and create a finished video with titles and music in seconds.
-
Accessible Editing: The touch interface allows pupils to trim, move, and split clips using just their fingers. It is far more intuitive for younger learners than traditional desktop editing software.
-
Green Screen Magic: iMovie includes a high-quality green screen effect. Pupils can “transport” themselves anywhere – from the surface of Mars to a Victorian street – by filming in front of a green background.
⚙️ How does it work?
-
Launch: Open the iMovie app (Purple icon with a white star).
-
Start a Project: Tap or swipe up Start New Project and choose your path:
-
Magic Movie: Pick your media and let the iPad do the work.
-
Storyboard: Pick a template and follow the guided “placeholders.”
-
Movie: Start from scratch for total creative control.
-
-
Record or Import: Use the iPad camera to film directly into your project, or tap the ‘+’ icon to add clips and photos already saved in your library.
-
Edit with Touch: Tap a clip in the timeline to see yellow “handles.” Drag them with your finger to trim the start or end of a clip.
-
Share: When finished, tap the Share button to export your movie to your Photos, or send it directly to other apps.
🚀 Beyond the Basics
-
Book Trailers: Use the “Trailer” feature (found within Storyboards) to create a high-energy 60-second teaser for a class novel. It forces pupils to summarize the plot and identify the most “exciting” parts of a story.
-
Step-by-Step Experiments: Use the “DIY” or “Science Experiment” Storyboard. It prompts pupils to film a “Hypothesis” shot, an “Equipment” shot, and the “Conclusion,” ensuring their scientific report is logically structured.
-
Picture-in-Picture: Pupils can film a video in a foreign language and use the “Picture-in-Picture” overlay to show a small video of them explaining what they are saying in English simultaneously.
-
Personal Reflections: Have pupils record a weekly “Vlog” (Video Blog) about their learning. They can use the Voiceover tool to speak over images of their work, reflecting on their progress.
-
News Reports: Use the Green Screen effect to put pupils “on location” in the country or historical period they are studying. Simply record against a green wall and swap the background for a photo from the web.
🔗 Teacher Quick Links
Jacob’s Quick Tips – Getting Started with iMovie
Jacob’s Quick Tips How to Use the Green Screen Effect in iMovie
