Apple Classroom is a powerful app for iPad that helps you guide learning, share work, and manage student devices. Perfect for use in a 1:1 environment to support learning and teaching. This guide explores how to set up and use Apple Classroom on your Connected Falkirk Device.
⚠️ NOTE: There has recently been an update to Apple Classroom. If you are running version 3.4.1 the interface looks different but functionality is the same. Please see the short guide on the updated version at the the end of this post! ⚠️
Creating Your Class
Apple Classroom is linked to school, pupil and teacher information stored in Apple School Manager. This means it is easy, safe and quick to set up your class or classes. Follow the text steps below or watch the video to set up your class.
Simple Steps to Create Your Class
- Tap on the Apple Classroom app to open.
- Tap on the blue ‘Create Class’ ribbon (if it’s your first time) or the big blue plus to create a new class.
- In the ‘New Class’ menu give your class a name – be aware this will show on both your teacher device and the devices of the pupils.
- Using the ‘Location’ tab, tap select. You will then be taken to a list of establishments, most Falkirk Council teachers will only see one establishment which is that in which they are based. This selection allows you access to add pupils ONLY from that establishment. Tap on the desired location.
- Select an icon and colour scheme.
- Tap done – this will automatically take you back to the main screen.
- On the main screen tap on your newly created class to enter the classroom.
- Tap the ‘Add’ button on the top right of the screen. Use the search function to find your pupils. Pupils will appear as ‘Firstname Surname’ as they are in Apple School Manager (based off Seemis records, not ‘known as’ names), the pupil’s Managed Apple ID will show on the right hand side for you to check in the event of two pupils having the same name. Tap the pupil to select them. Once you’ve selected all pupils tap ‘Add’ in the top right hand corner of the pane.
- If you have accidentally added a pupil, on the main screen tap and hold on their name to bring up the ‘Remove From Class’ option.
A few things to note:
- You can continue to add or remove pupils on an ad hoc basis in the event of class changes.
- If your base establishment is wrong or not present email connectedfalkirk@falkirk.gov.uk
- You can do this in advance without pupils being present – all pupils will appear greyed and show as ‘offline’ until they are in physical proximity of your class.
- Remember to use the ‘End Class’ function after each lesson, both to minimise interference with other teachers using Apple Classroom with your students and to allow the app the chance to refresh.
- Apple Classroom works on physical proximity so when you start the class there may be a short period where pupil devices are being ‘authenticated’ by the app.
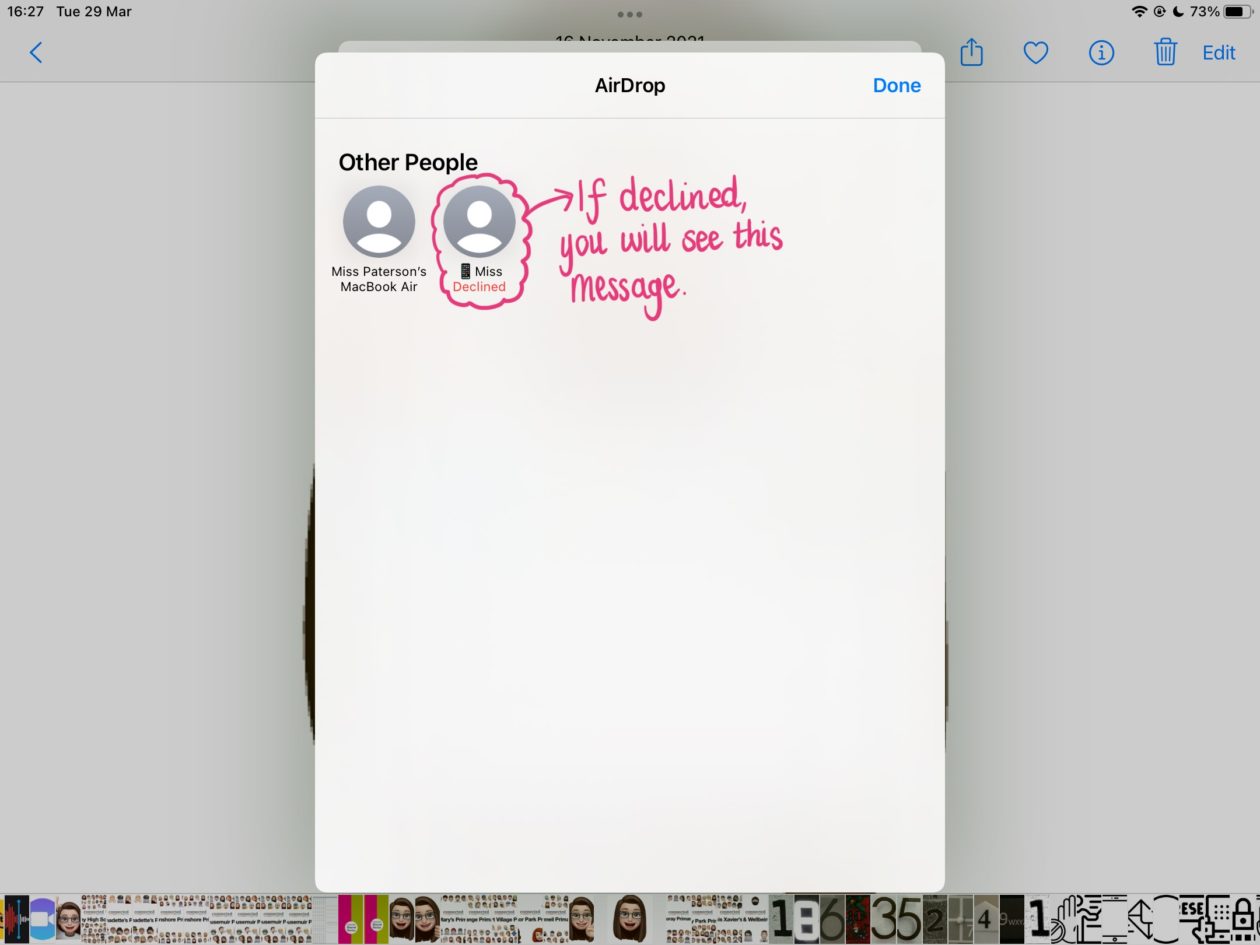
Pupil not showing in Apple Classroom?
From time to time pupils may show as ‘offline’ despite being in the physical proximity. This can be for a number of reasons but there are quick steps you can take to get them showing again.
Video Guide – Setting Up A Class
If your Apple Classroom doesn’t look like this you may be on the updated version.
Main Screen and Functionality
Apple Classroom has excellent functionality tools to help you manage pupil devices in class and keep the focus on learning and teaching.
Main Screen

If your Apple Classroom doesn’t look like this you may be on the updated version.
Functionality Buttons
The buttons along the top of the main screen allow for various functionalities. These buttons work in conjunction with the groupings shown in the interface below. So if you use one of these buttons while in the ‘All’ tab it will perform that function on all devices, using these buttons while in grouping tabs only performs these functions on those devices in the group. To perform a function on an individual pupil device simply tap on the pupil and a new pane will appear allowing you to perform all of these functions for that single selected pupil device.
Device Management
Hide – Takes pupil devices out of their current active app and returns them to their Home Screen.
Lock – Locks pupil devices and renders them temporarily unusable until you unlock them.
Mute – Reduces the volume on pupil devices to zero. Pupils can then manually readjust their volume.
Screens – Allows you to see pupil screens in real time. When using in the grouping tabs each pupil icon is replaced with their real time screen. Pinch to zoom in or out to make the screens bigger or smaller on the display. Tapping on individual pupils and using the ‘Screen’ button allows you to see their screen fully on your own – pupils are made aware of this with a small blue icon in the top right of their screen next to the battery indicator.
Groups – Allows you to make your own custom groupings for your main screen. Tap on the ‘Groups’ icon, name your group and then select students from the class to add to that group by tapping to select them.
Video Guide – Managing Devices
If your Apple Classroom doesn’t look like this you may be on the updated version.
Sharing Resources and Materials
Open – Opens a particular app on pupil device with the option to lock pupils into that app upon launch.
Navigate – Navigates pupil devices to a particular place. Options available on Connected Falkirk devices include Apple Books, GarageBand or Safari bookmarked pages. Ability to lock pupils into this app upon launch.
Video Guide – Sharing Resources and Materials
If your Apple Classroom doesn’t look like this you may be on the updated version.
Groups
You will see various different groupings of pupils on your main screen. ‘All’ allows you to see all pupils and apply functionality buttons across the whole class. Groupings are auto created for pupils working in the same active app. You can also add custom groupings using the ‘Groups’ button on the far right of the functionality button bar.
Version 3.4.1
If you have updated your Apple Classroom you’ll notice it looks slightly different to the videos and images above. Don’t panic! The good news is the functionality is almost identical, only the layout has changed!
Main Screen
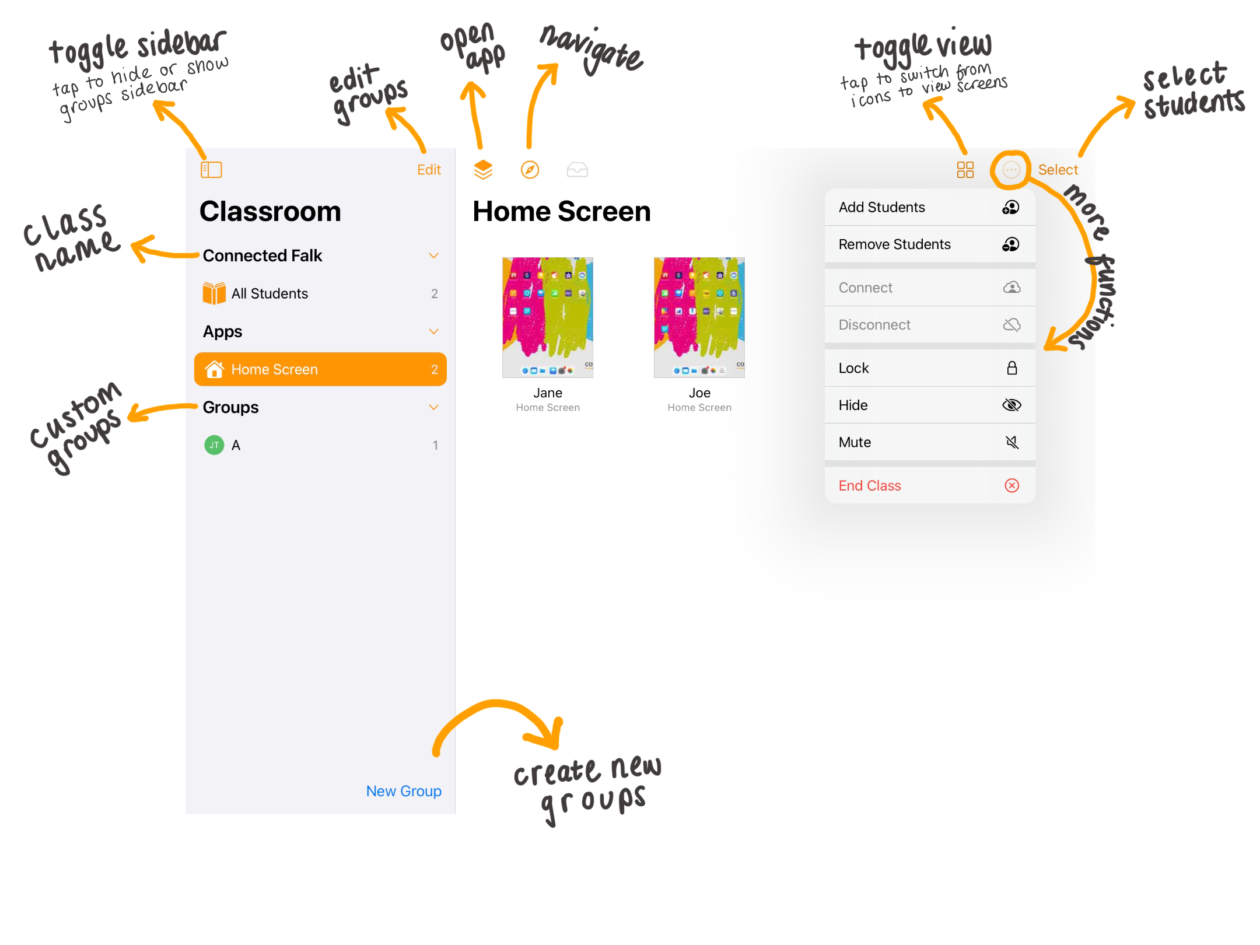
Groups Sidebar
One of the most notable changes is the groups are now shown in a grey sidebar. This sidebar is where you now add, manage and remove custom groupings. You can also tap on the square icon in the top left to toggle the sidebar on and off as required.
Functionality Buttons
Rather than being across the top in a line we have a bit of movement on where the functionality buttons are placed. Fear not, all the great functionality you’ve become used to is still here! In order from left to right we have:
Open – (stacked orange squares icon) – Opens a particular app on pupil device with the option to lock pupils into that app upon launch.
Navigate – (compass icon) – Navigates pupil devices to a particular place. Options available on Connected Falkirk devices include Apple Books, GarageBand or Safari bookmarked pages. Ability to lock pupils into this app upon launch.
Toggle View – (four circles or square icon) – Allows you to toggle between seeing pupil screens in real time or have pupils showing as icons. Pinch to zoom in or out to make the screens bigger or smaller on the display. Tapping on individual pupils and using the ‘Screen’ button allows you to see their screen fully on your own – pupils are made aware of this with a small blue icon in the top right of their screen next to the battery indicator.
More Functionality – (ellipsis icon) Probably the most significant change, this where most of the functionality we know and love is now placed. Tap on the ellipsis to:
- Add Students – Add students to the class from your establishment’s list of users.
- Remove Students – Remove pupils from the class.
- Lock – Locks pupil devices and renders them temporarily unusable until you unlock them.
- Mute – Reduces the volume on pupil devices to zero. Pupils can then manually readjust their volume.
- Hide – Takes pupil devices out of their current active app and returns them to their Home Screen.
- End Class – End the class and see the class summary.
Video Guide – 3.4.1 Update