
What is printmaking?
“Printmaking is an indirect means of creating art by transferring an image or design by contact with a matrix such as a block, plate, stone, or screen.” – OnlineArtCentre.com
Printmaking can be adapted to each learner’s age and abilities.
Learning outcomes for printmaking include: problem solving, teamwork, communication, listening, personal reflection, debating, being objective and critical, developing own visual language and artistic interpretation. The practical artistic skills developed include drawing, understanding materials and processes and creating a two dimensional artwork.
How do you carry out printmaking?
- Draw your design

- Carve out a negative space
- Pour out a small amount of ink onto a clean surface.
- Roll out ink with your brayer until it is smooth and velvety
- Roll a thin layer of ink onto your block.
- Use steady pressure to lightly press cardstock
 onto your block
 - Carefully remove the paper from the block.
- Rinse ink off, let dry, and repeat.
What are the advantages and disadvantages of printmaking in the primary classroom?
Advantages:
- It is an engaging activity for visual learners
- It can develop literacy skills through encouraging critical and expressive use of language in response to the student’s observations.
- It develops the pupil’s fine motor skills due to the practicality of this activity.
- It creates a sense of ownership and pride in each child.
Disadvantages:
- The materials (e.g. ink) can be expensive for schools
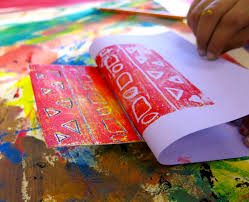
During this workshop, we were taught how to use lino tiles to create prints of our evocative objects. We first started by drawing out our design on a piece of paper. This gave us a guide to the outline we would cut out the lino from the tile. We then rubbed charcoal over the back of our paper and placed it onto the lino. I was then able to see the outline of my evocative object which had imprinted onto the lino. We then used a go uging tool to remove the lino, resulting in us being able to see the outline clearly.The next step to the process was to use paint to print our design onto paper. As you can see below, these are my finished prints.

Prints of my evocative objects
References:
- Stephens, Cassie. In The Art Room: Troubleshooting Printmaking With The Littles [Online]https://cassiestephens.blogspot.co.uk/2016/01/in-art-room-troubleshooting-printmaking.html [6 Apr. 2017]
- Apartment Therapy. DIY Printmaking: How To Make Your Own Linocut Print”. [Online] http://www.apartmenttherapy.com/diy-art-how-to-create-a-linocut-print-165526. [6 Apr. 2017]