In March 2025, Connected Falkirk’s Lauren McKechnie led young explorers in this ‘Classroom Jungle’ live interactive lesson based on the British Science Week theme of ‘adaptations.

In March 2025, Connected Falkirk’s Lauren McKechnie led young explorers in this ‘Classroom Jungle’ live interactive lesson based on the British Science Week theme of ‘adaptations.


In October 2024, we set Falkirk schools another new challenge task for Halloween. This year was all about looking to the stars as we explored the spooky skies using an adapted version of the Apple Creative Activities ‘Reveal a Constellation’ activity. Find out more about the live lesson and the night frights we created below.


In February 2024, we set new STEM based challenge task for Falkirk Schools. Our asynchronous Balloon Pop challenge was a Scratch code-along for Connected Falkirk devices. Find out more below.

This challenge is accompanied by a live lesson on 1st December. For those who can’t make it or need the instructions again there is a full length 23 minute step by step video. We recommend an hour or more to complete this challenge.
You don’t actually need a micro:bit for this challenge! You can code a virtual micro:bit using the App or the micro:bit MakeCode website. We recommend setting aside 45 minutes to an hour for this challenge, the videos are short but coding the musical notes may take time.

This is the shortest challenge of the bunch. It would be great as a free time option or as an extension activity in December as each learner can play independently at their own pace. How many levels can your class complete?

Airdrop is a feature built into all Apple iOS devices including iPad, iPhone and Mac. It allows users to send and receive files instantly from one device to another. In a learning environment this forms part of an effective workstream as a variety of materials – instructions, workbooks, scaffolded learning materials, articles, ePubs, PDFs – can be sent quickly and easily (to one or multiple pupils) without the need for a lengthy uploading and downloading process.
It is important that all users approach Airdrop responsibly and safely.
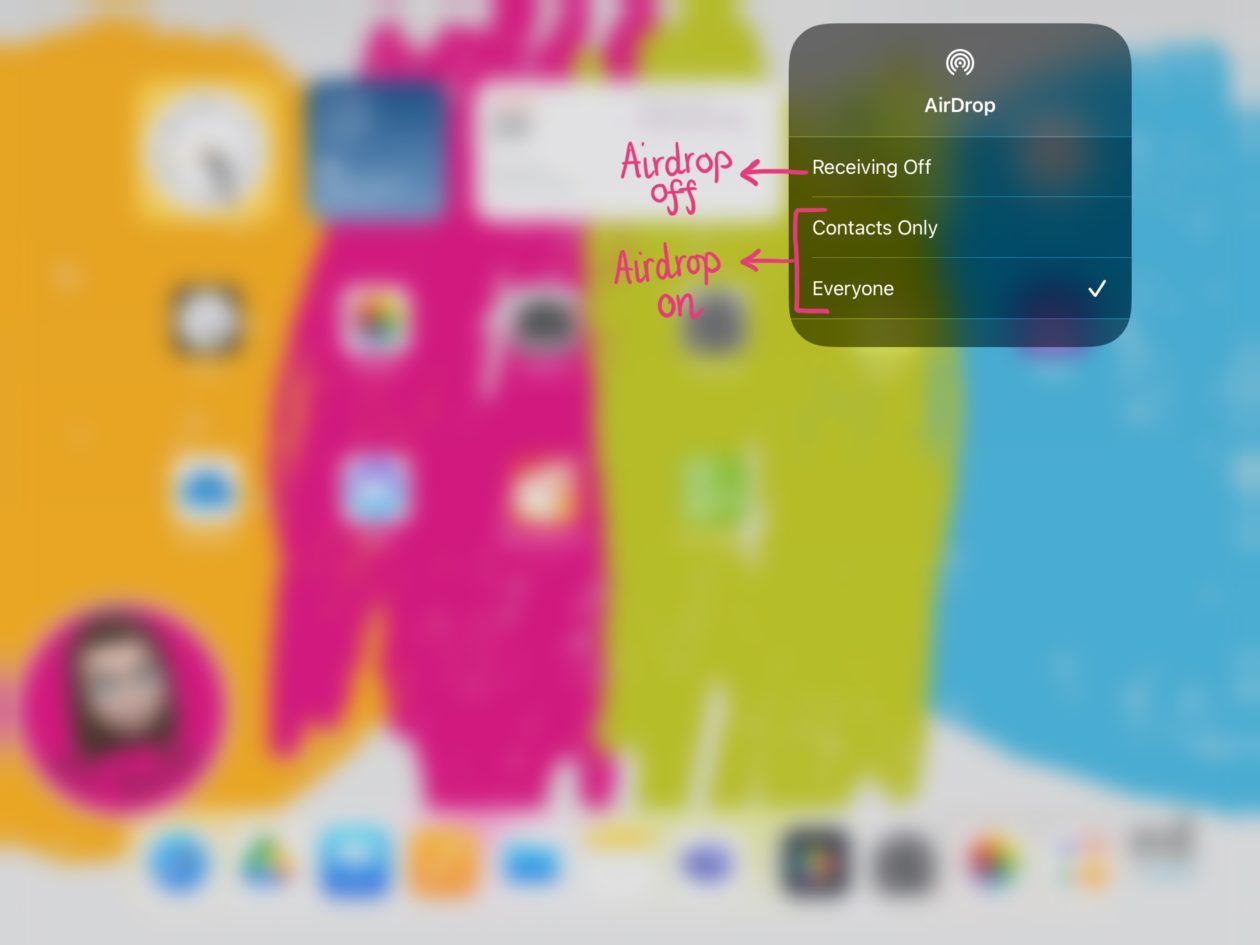
Airdrop works on proximity, meaning devices have to be within a particular physical range of one another.
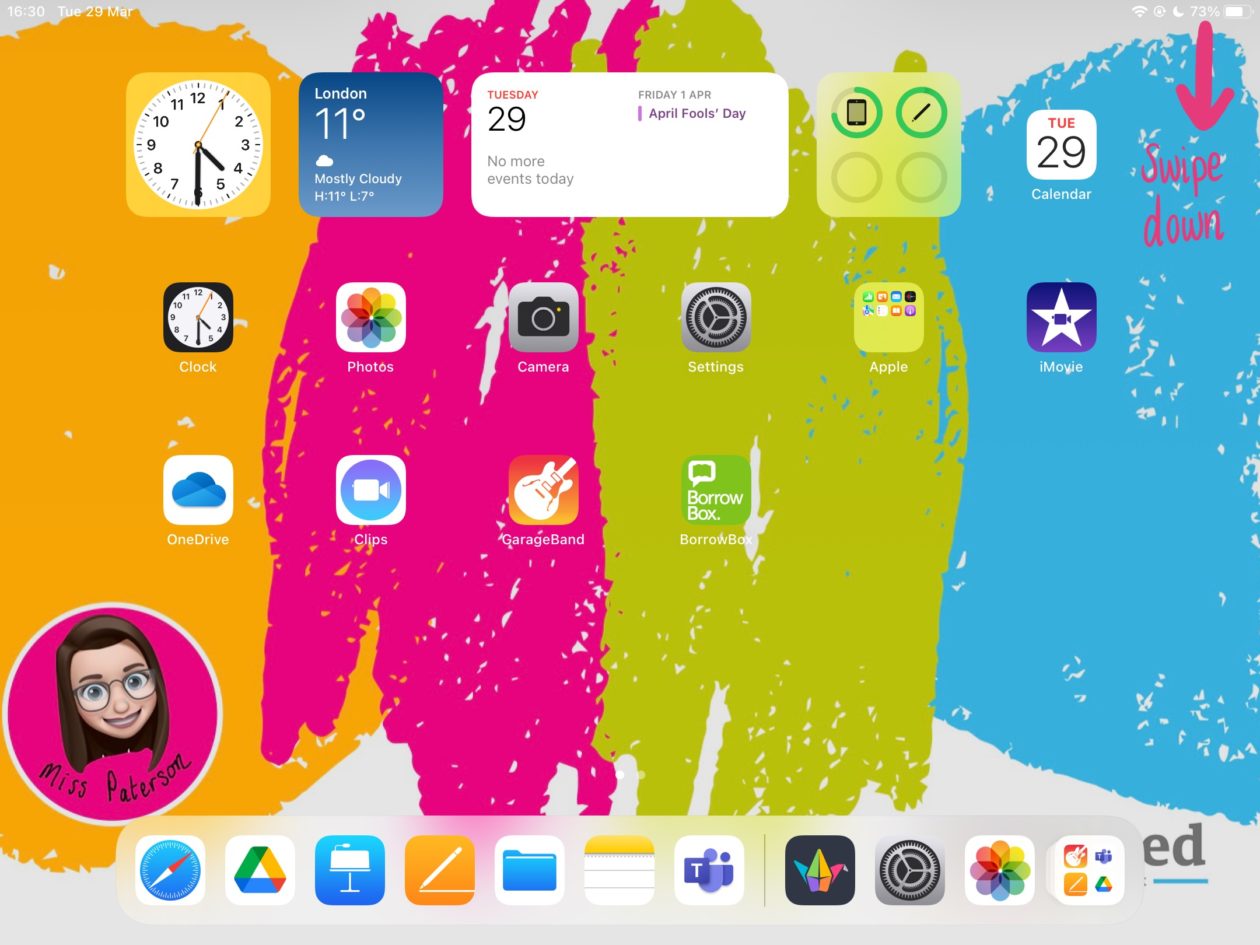
Swipe down from the top right hand corner to open the control centre. Tap on Airdrop and switch to ‘receiving off’, ‘contacts only’ or ‘everyone’ to change your Airdrop settings quickly.
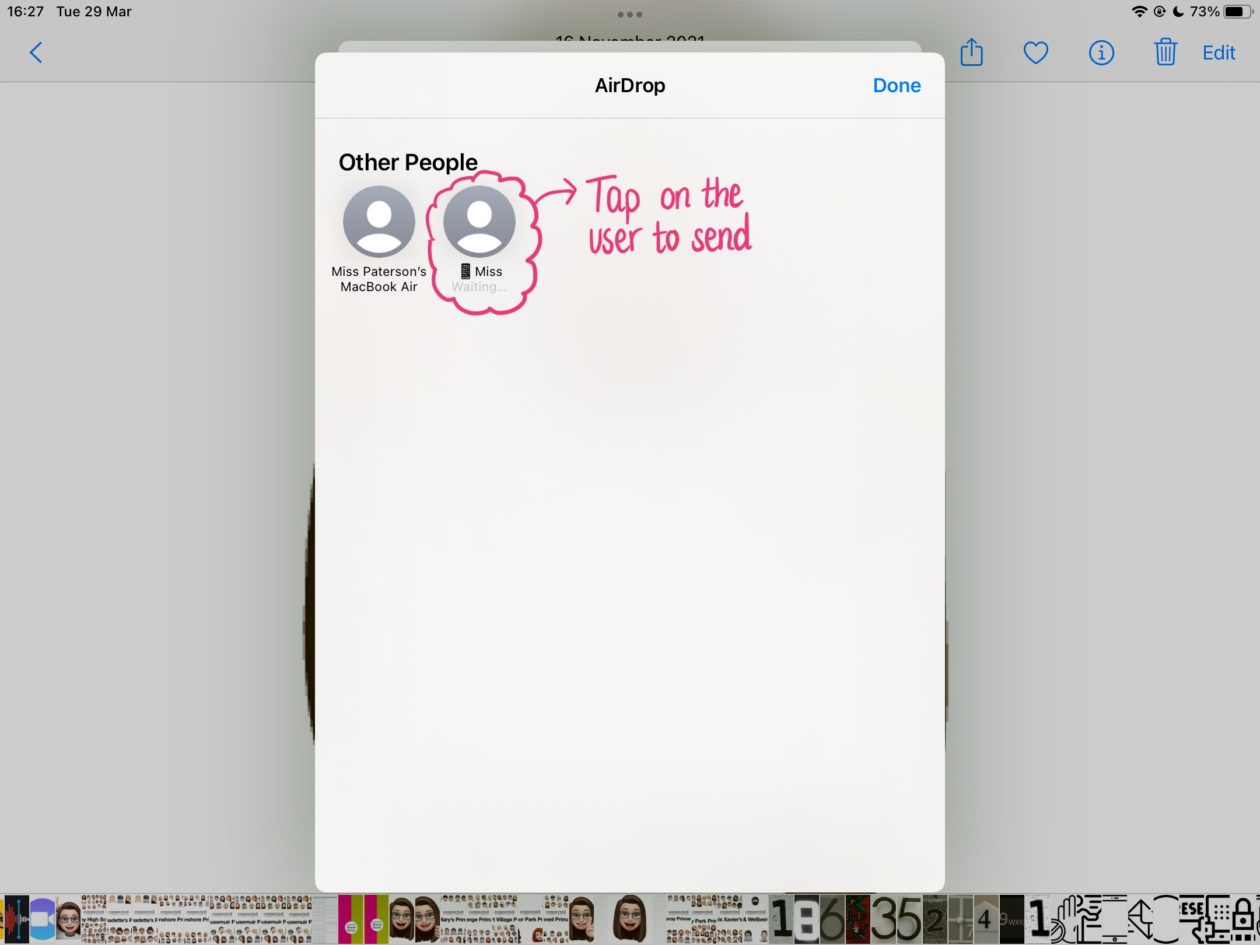
Check the images below to see this in action on a Connected Falkirk device.

Check the images below to see this in action on a Connected Falkirk device.
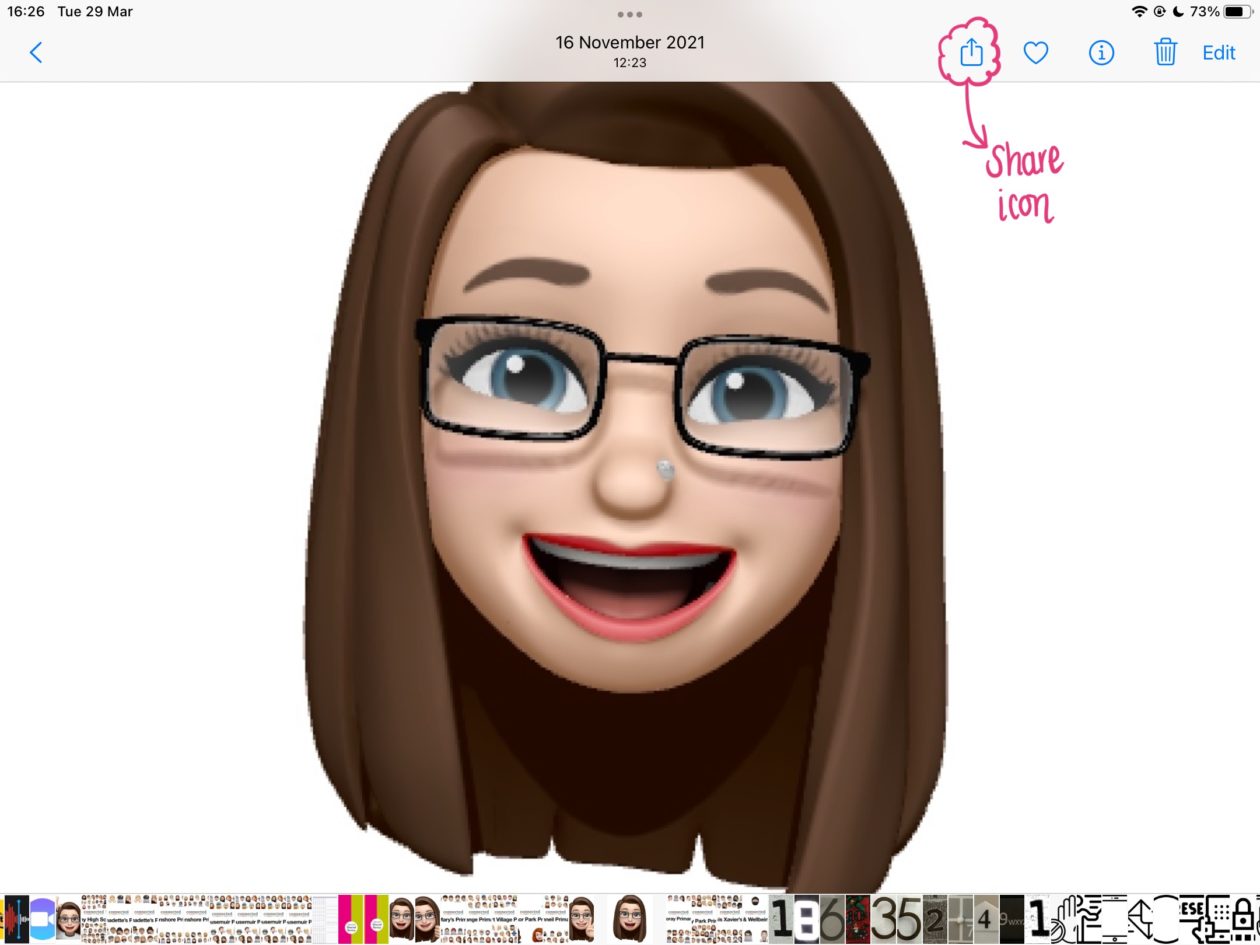
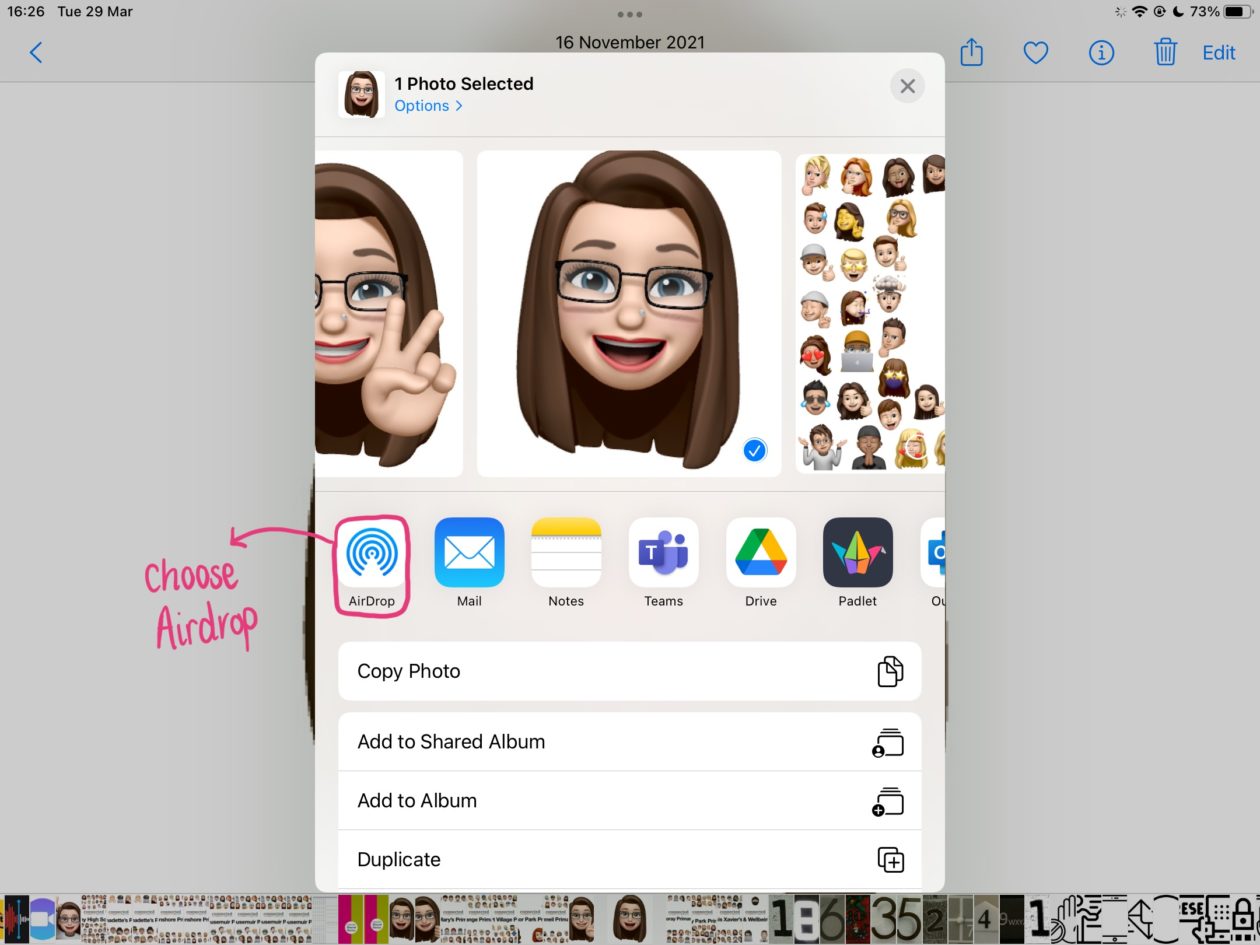
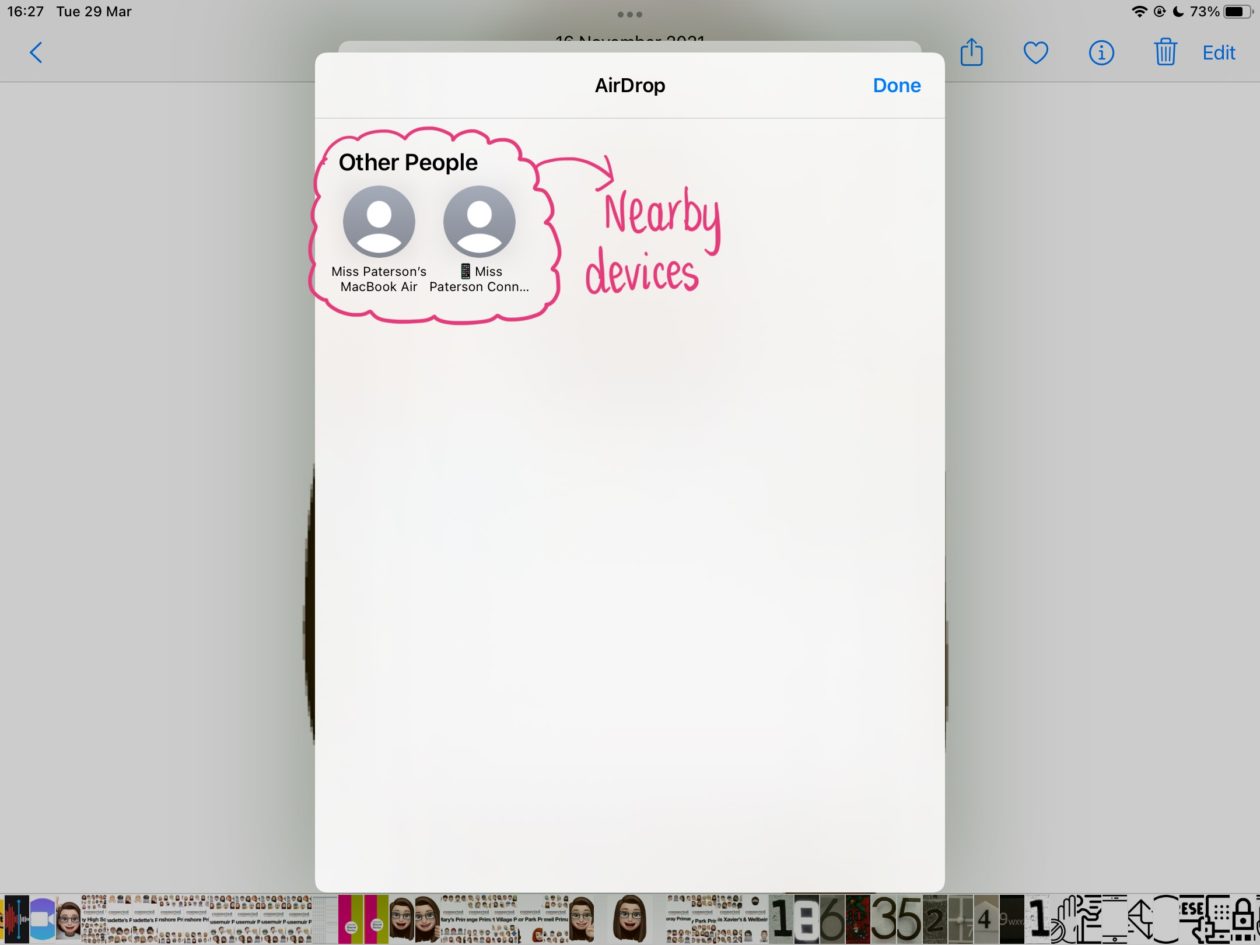
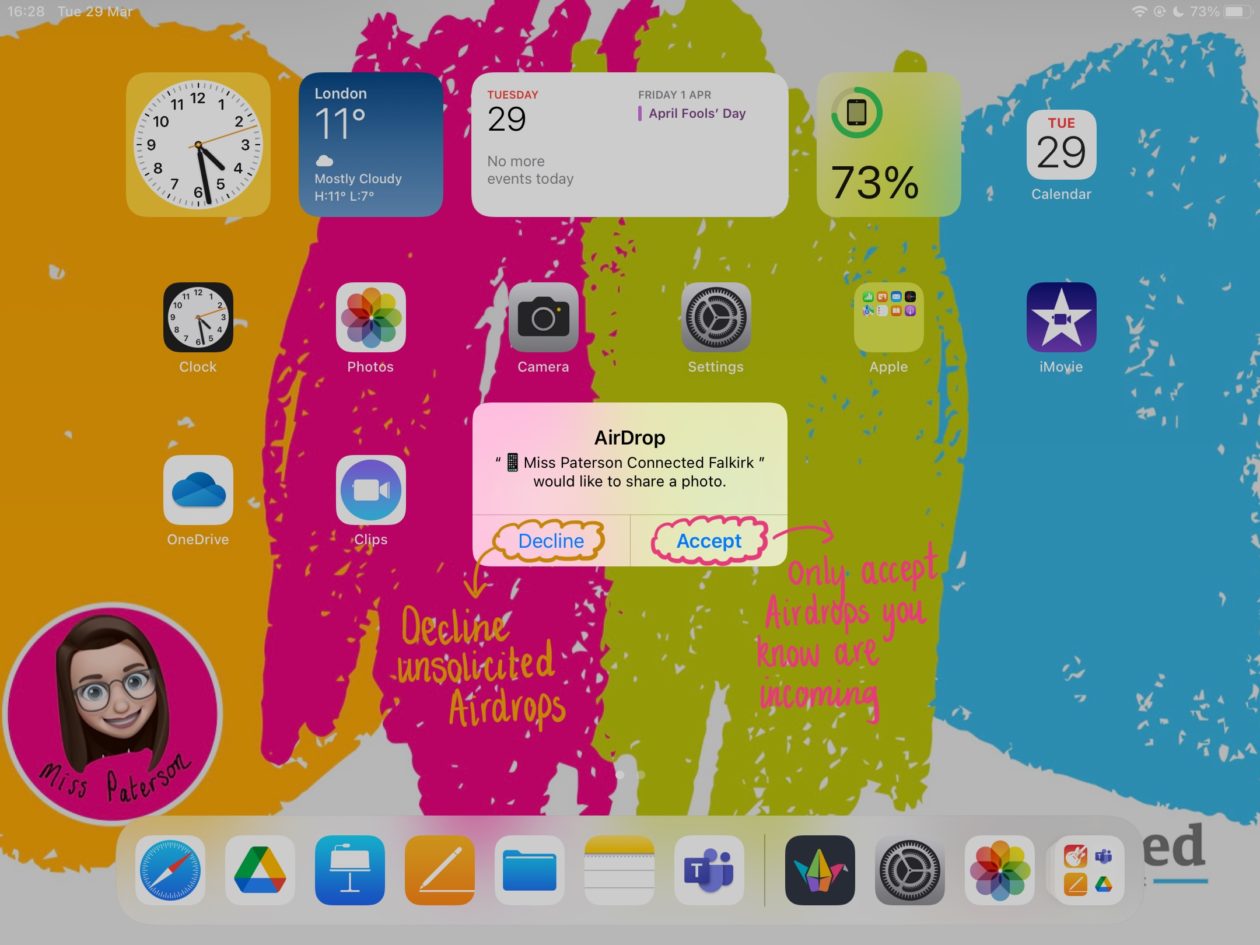
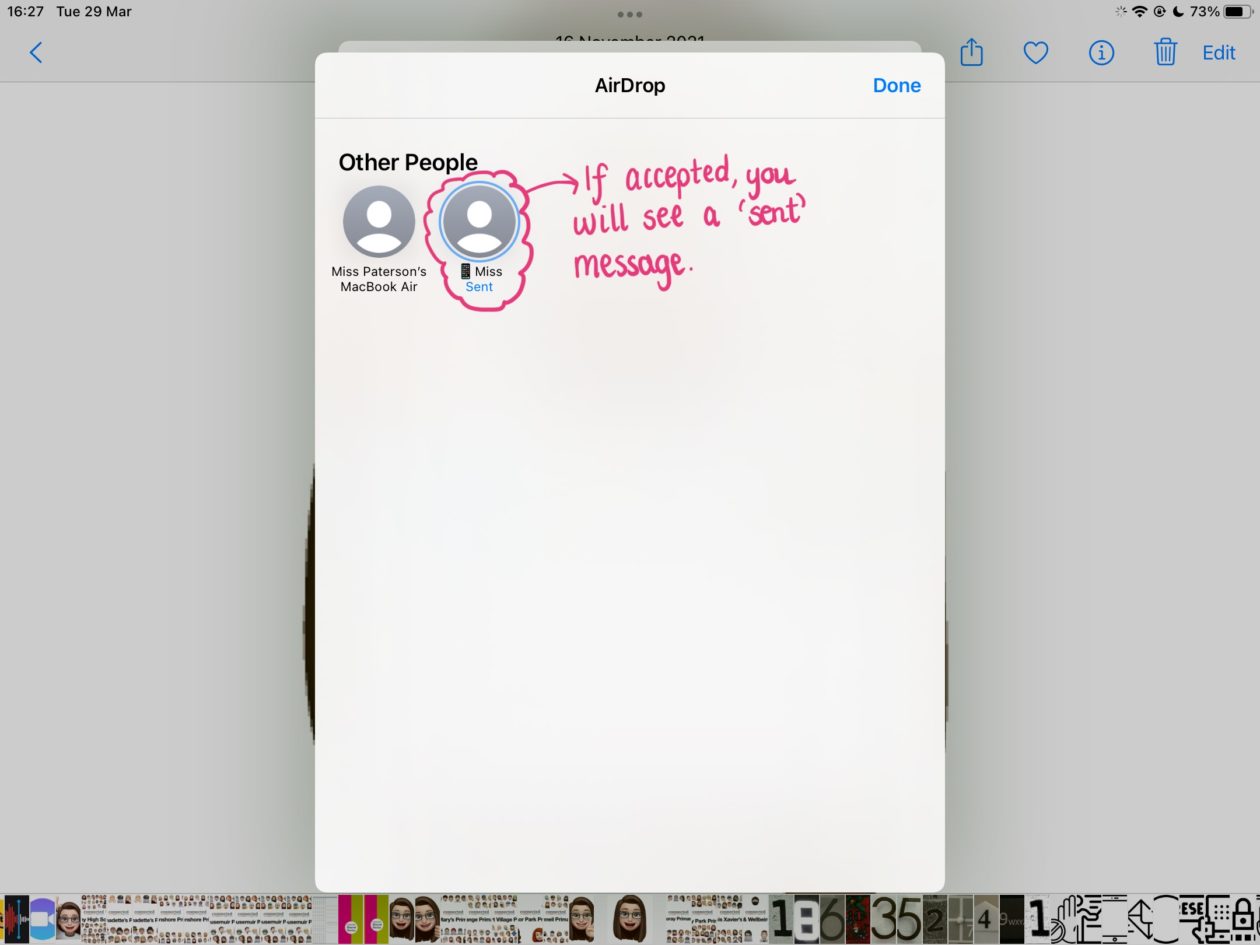
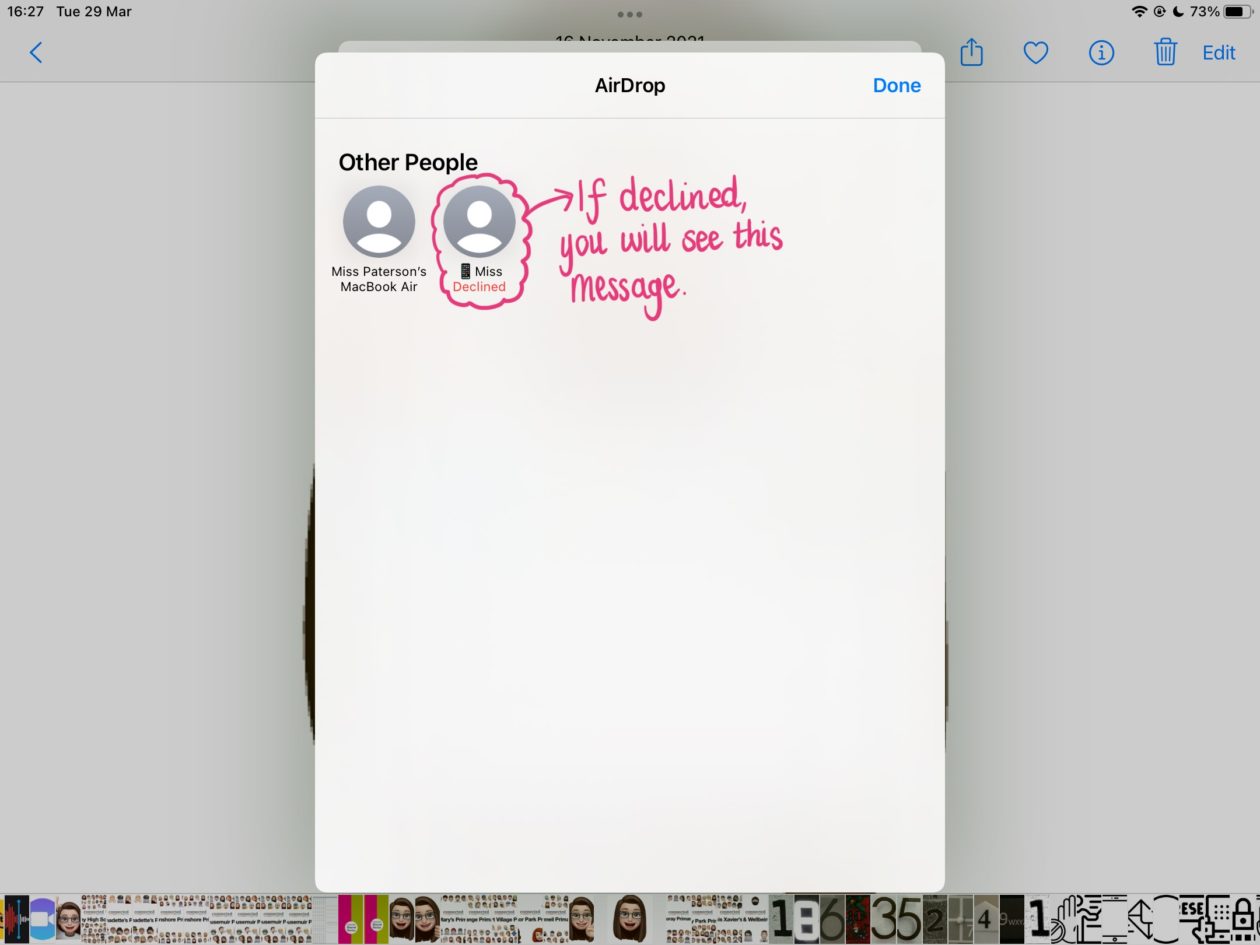
When you receive an Airdrop a pop up will appear asking you if you want to accept or decline the Airdrop (this will also tell you the name of the device the Airdrop is from). Declining will cancel the transfer and notify the sender that you have declined. Accept will allow the transfer of the file from the sender’s device to yours and will notify the sender once the transfer is complete.
Swipe through the images below to see this in action on a Connected Falkirk device.
Establishing an etiquette around the use of Airdrop is the first step in ensuring the safety of all users.
Airdrop on managed devices can be disabled by the administrator. This means that Airdrop can be switched off on your managed device and you will be unable to make use of this function.
All Connected Falkirk devices have been named as part of the deployment process. For P6-S6 the standard format is the pupil’s first name followed by the first initial of their last name (i.e. Johnny A) – this is for safeguarding reasons. If a pupil’s device is unnamed or does not follow this format please contact your Connected Falkirk cluster link for Primary or your school technician for Secondary.
If you have any concerns over Airdrop, please contact your Connected Falkirk Cluster Link.

![]()
Apple Classroom is a powerful app for iPad that helps you guide learning, share work, and manage student devices. Perfect for use in a 1:1 environment to support learning and teaching. This guide explores how to set up and use Apple Classroom on your Connected Falkirk Device.
⚠️ NOTE: There has recently been an update to Apple Classroom. If you are running version 3.4.1 the interface looks different but functionality is the same. Please see the short guide on the updated version at the the end of this post! ⚠️
Apple Classroom is linked to school, pupil and teacher information stored in Apple School Manager. This means it is easy, safe and quick to set up your class or classes. Follow the text steps below or watch the video to set up your class.
A few things to note:
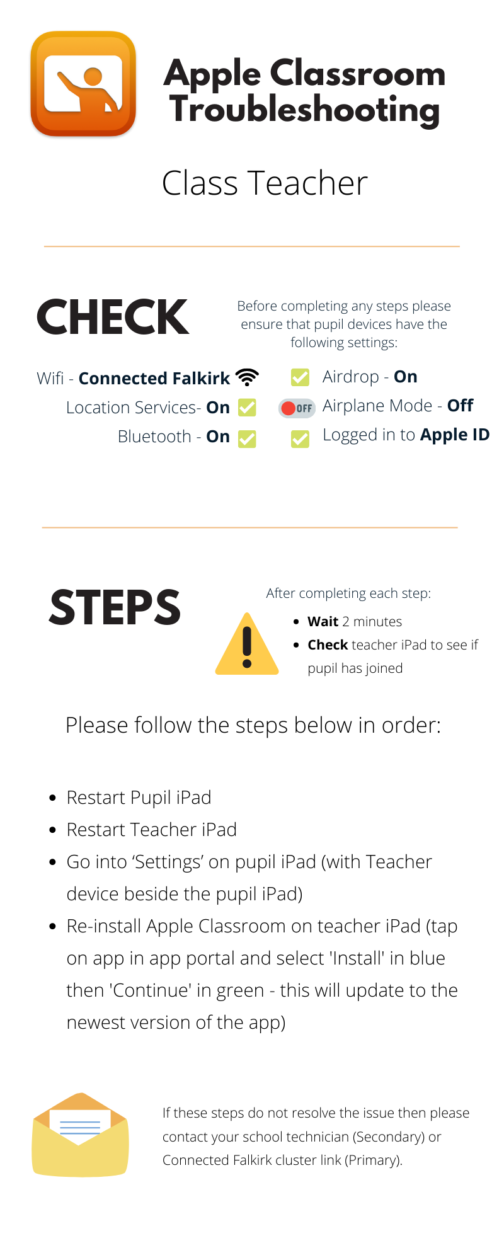
From time to time pupils may show as ‘offline’ despite being in the physical proximity. This can be for a number of reasons but there are quick steps you can take to get them showing again.
If your Apple Classroom doesn’t look like this you may be on the updated version.
Apple Classroom has excellent functionality tools to help you manage pupil devices in class and keep the focus on learning and teaching.

If your Apple Classroom doesn’t look like this you may be on the updated version.
The buttons along the top of the main screen allow for various functionalities. These buttons work in conjunction with the groupings shown in the interface below. So if you use one of these buttons while in the ‘All’ tab it will perform that function on all devices, using these buttons while in grouping tabs only performs these functions on those devices in the group. To perform a function on an individual pupil device simply tap on the pupil and a new pane will appear allowing you to perform all of these functions for that single selected pupil device.
Hide – Takes pupil devices out of their current active app and returns them to their Home Screen.
Lock – Locks pupil devices and renders them temporarily unusable until you unlock them.
Mute – Reduces the volume on pupil devices to zero. Pupils can then manually readjust their volume.
Screens – Allows you to see pupil screens in real time. When using in the grouping tabs each pupil icon is replaced with their real time screen. Pinch to zoom in or out to make the screens bigger or smaller on the display. Tapping on individual pupils and using the ‘Screen’ button allows you to see their screen fully on your own – pupils are made aware of this with a small blue icon in the top right of their screen next to the battery indicator.
Groups – Allows you to make your own custom groupings for your main screen. Tap on the ‘Groups’ icon, name your group and then select students from the class to add to that group by tapping to select them.
If your Apple Classroom doesn’t look like this you may be on the updated version.
Open – Opens a particular app on pupil device with the option to lock pupils into that app upon launch.
Navigate – Navigates pupil devices to a particular place. Options available on Connected Falkirk devices include Apple Books, GarageBand or Safari bookmarked pages. Ability to lock pupils into this app upon launch.
If your Apple Classroom doesn’t look like this you may be on the updated version.
You will see various different groupings of pupils on your main screen. ‘All’ allows you to see all pupils and apply functionality buttons across the whole class. Groupings are auto created for pupils working in the same active app. You can also add custom groupings using the ‘Groups’ button on the far right of the functionality button bar.
![]()
If you have updated your Apple Classroom you’ll notice it looks slightly different to the videos and images above. Don’t panic! The good news is the functionality is almost identical, only the layout has changed!
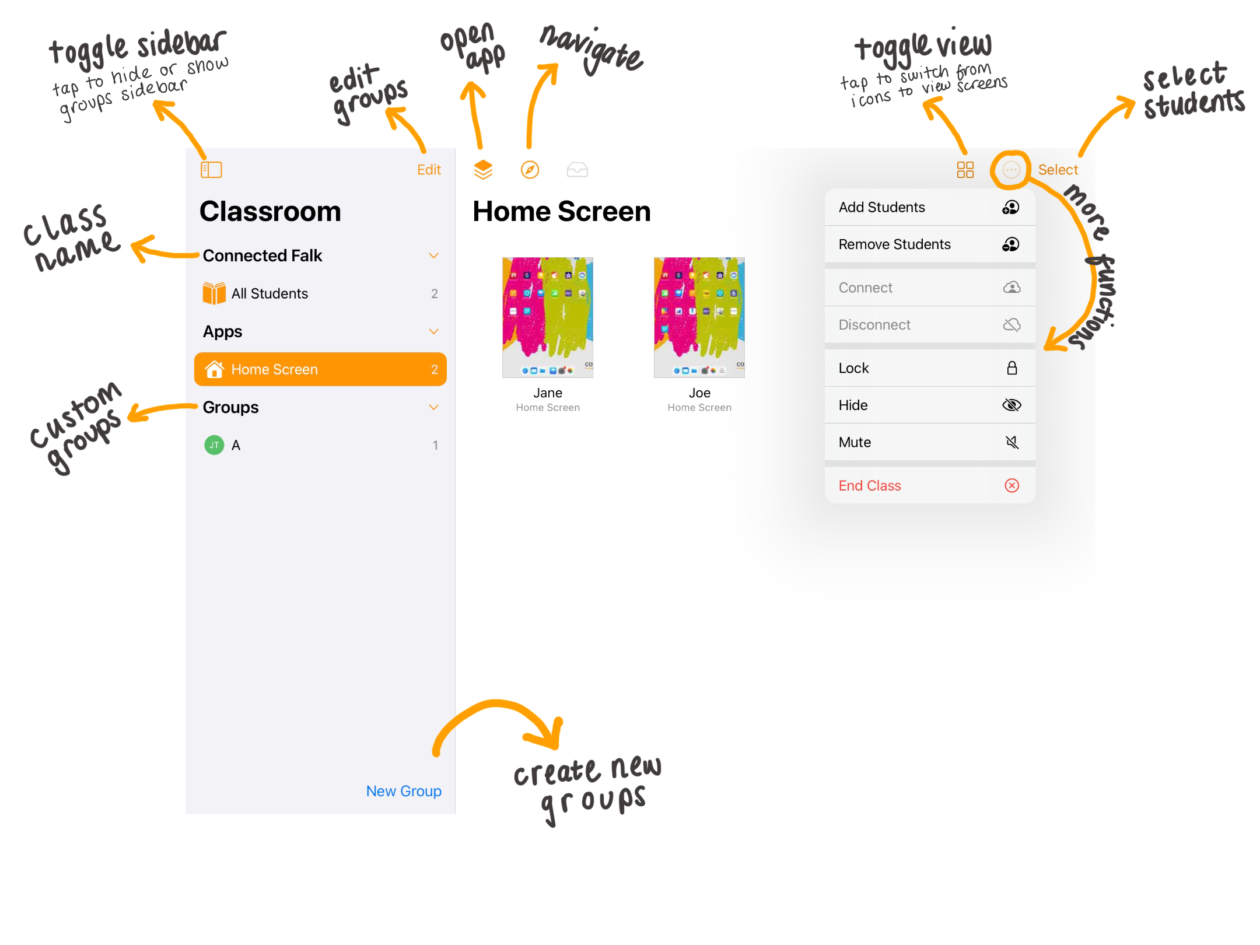
One of the most notable changes is the groups are now shown in a grey sidebar. This sidebar is where you now add, manage and remove custom groupings. You can also tap on the square icon in the top left to toggle the sidebar on and off as required.
Rather than being across the top in a line we have a bit of movement on where the functionality buttons are placed. Fear not, all the great functionality you’ve become used to is still here! In order from left to right we have:
Open – (stacked orange squares icon) – Opens a particular app on pupil device with the option to lock pupils into that app upon launch.
Navigate – (compass icon) – Navigates pupil devices to a particular place. Options available on Connected Falkirk devices include Apple Books, GarageBand or Safari bookmarked pages. Ability to lock pupils into this app upon launch.
Toggle View – (four circles or square icon) – Allows you to toggle between seeing pupil screens in real time or have pupils showing as icons. Pinch to zoom in or out to make the screens bigger or smaller on the display. Tapping on individual pupils and using the ‘Screen’ button allows you to see their screen fully on your own – pupils are made aware of this with a small blue icon in the top right of their screen next to the battery indicator.
More Functionality – (ellipsis icon) Probably the most significant change, this where most of the functionality we know and love is now placed. Tap on the ellipsis to:

Michael Conlon (@mconlon68) from XMA discusses the role technology can play in enhancing learning and the research that underpins this.
Teachers have met and seen off many a snake-oil salesman in their teaching careers, so it is not entirely surprising to be faced with a few arched eyebrows and the general air of suspicion when you rock up to a school with a suitcase full of iPads. They may be expecting a sermon on the “transformational power of technology”, all hallelujah choruses and “blessed be the touch screen”. We’re a bit more grounded in reality at XMA because it’s teachers that transform students’ lives, so whilst we do believe in “transformational power” much of its source lies in the teacher, and their ability to use technology for learning.
George Couros,
“ The Innovators Mindset: Empower Learning, Unleash Talent, and Lead a Culture of Creativity”
By all accounts, teaching is a research-based/research-led profession. The reality is that you’ll not find many teachers who have been deeply involved in academic research. Much of the research that is published is undertaken by academics who haven’t spent much time with the objects of their study, by which I mean students. Research evidence definitively concluding that technology will raise attainment is quite tricky to nail. That shouldn’t surprise us. Teaching and learning are complex, and so are students. There are a thousand other variables in play in any given week in your classroom, so being able to pin attainment on the technology – the printer, the interactive whiteboard, the laptop -is actually very hard.
A better approach is to start by leaning into the research on how learning happens, what the impediments to learning are and how the brain develops. We have oodles of that research and plenty of evidence to hand. It is then that you can look at the functionality afforded by the technology that can support, extend or accelerate the learning, overcome those impediments or even offer you teaching and learning experiences previously unavailable to you or your students.
So as a start, we could look at some of the well-quoted work of John Hattie in his Visible Learning research. Take feedback, for example, one of the top 10 influences in improving students’ progress in learning. One of the core tenets of its success is that feedback is timeous and elaborative in manageable chunks. We know that when we assign a grade with written feedback, pupils don’t get much far past looking at the grade. In a digital environment, when a piece of work has been submitted digitally, or even a picture of their work has been submitted digitally, we now have the opportunity to deliver voice feedback. This allows for elaboration, and in the same empathetic, knowledgeable tone that reflects the nature of your relationship with that student. Written feedback on paper usually has to be condensed and short, written in a way that does not reflect in any way your relationship with that student and the way you would relay feedback to them if you were face to face. Lots of apps do this now, from Seesaw in primary to Showbie in secondary as well as in particular apps in Office 365 and Google GSuite. Teachers who use this approach report that feedback takes less time as it is quicker to put your thoughts into the audio clip than the thinking required to condense what you mean into a few short statements that you write on the page. Students report they find that kind of feedback much more useful in helping them understand the next steps and provides greater clarity and personalisation in what the teacher is trying to say.
Dual-Coding is a well-established theory[1] in education that essentially equates to the idea that a picture is worth a thousand words, and that when we combine visual and verbal explanations of concepts, ideas etc., then we are much more likely to recall and remember that information. This is different from learning styles – visual, auditory and kinaesthetic – which, as a theory of learning, has been debunked in every piece of research evidence I’ve come across.
There is a bit of an art in getting dual coding right – choosing the correct visuals, ensuring students had the opportunity to study the visual before you start talking, treating text and verbal communication as the same thing – but technology not only allows you to choose from a rich source of visual images across the internet but also to create your own, built from images or videos you’ve taken, using icons and infographics apps or allowing you to sketchnote on the screen itself. More powerfully, with every student now having a camera in their own hands and with access to the same resources you have, they can build their own learning assets and presentations. The iPad, for example, has everything you need to help them to produce infographics, timelines, diagrams and cartoon strips that strengthen their memory traces.
Here’s an interesting article about Dual-Coding in the classroom: https://bit.ly/2IAMLWV
One of Hattie’s most important findings was in the impact of collective teacher efficacy, the idea that staff can accomplish great things when they believe in their ability to positively affect outcomes for their students and that if they believe that then they most likely will. I hope that as iPads are introduced into the school, teachers will take the opportunity to be active researchers in their own classrooms, linking the technology to how learning happens and growing together with their students about how to make technology work for them and what they are trying to achieve. We’ll undoubtedly be there to support those discussions and can’t wait to work with you in the classroom in bringing so many positive benefits to teachers and students.