Target Golf Game
To make a Target Golf Game, you will need:
- A fairly large cardboard box
- scissors
- a pencil and a black felt tipped pen
- a ruler
- brown paper
- Sellotape and/or double sided tape
- P.V.A. glue (craft glue)
- coloured paper and a small piece of white paper
- some balls (I used golf balls).
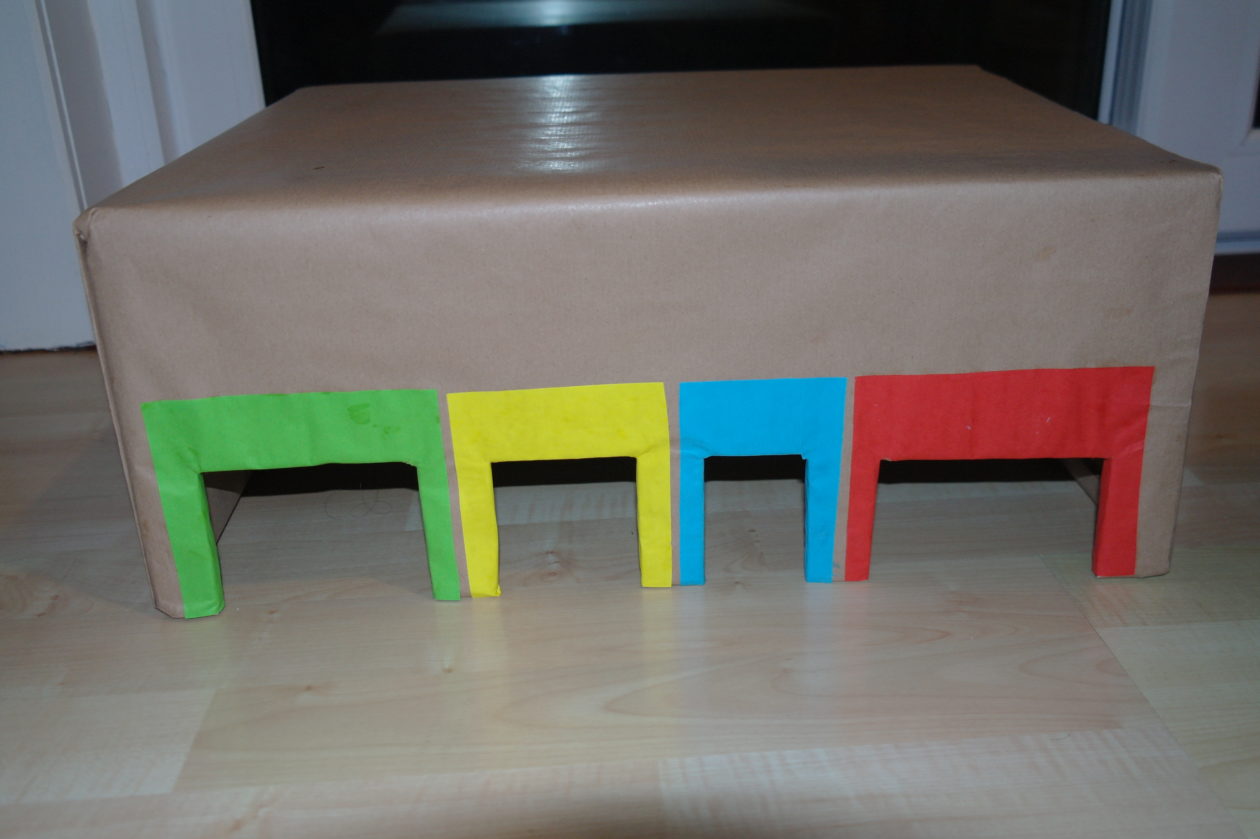
Cover the cardboard box with brown paper.
Use a ruler and pencil to measure out some different sized ‘doorways’ in your box, making sure you make them big enough to fit your ball through (I used a golf ball but you could use a different ball, such as, a bouncy ball or a tennis ball). Cut out your ‘doorways’.
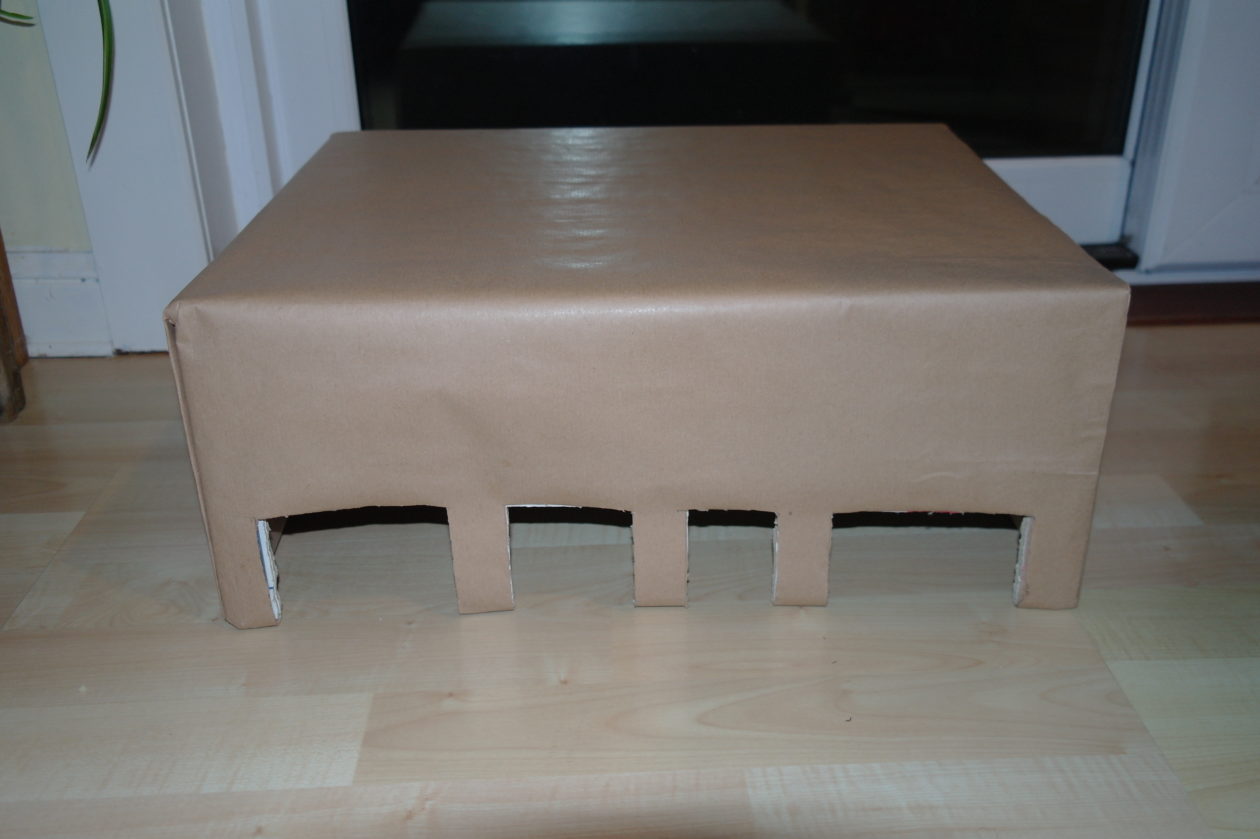
Use coloured paper to make ‘frames’ around your ‘doorways’ and use P.V.A. glue to stick them on.
Cut out some small, white circles (one for each ‘doorway’) and write numbers on these with a black felt tipped pen (I chose 10 for the widest ‘doorway’ and went up in tens to 40 for the smallest ‘doorway’). I also wrote the name of my game on my box.
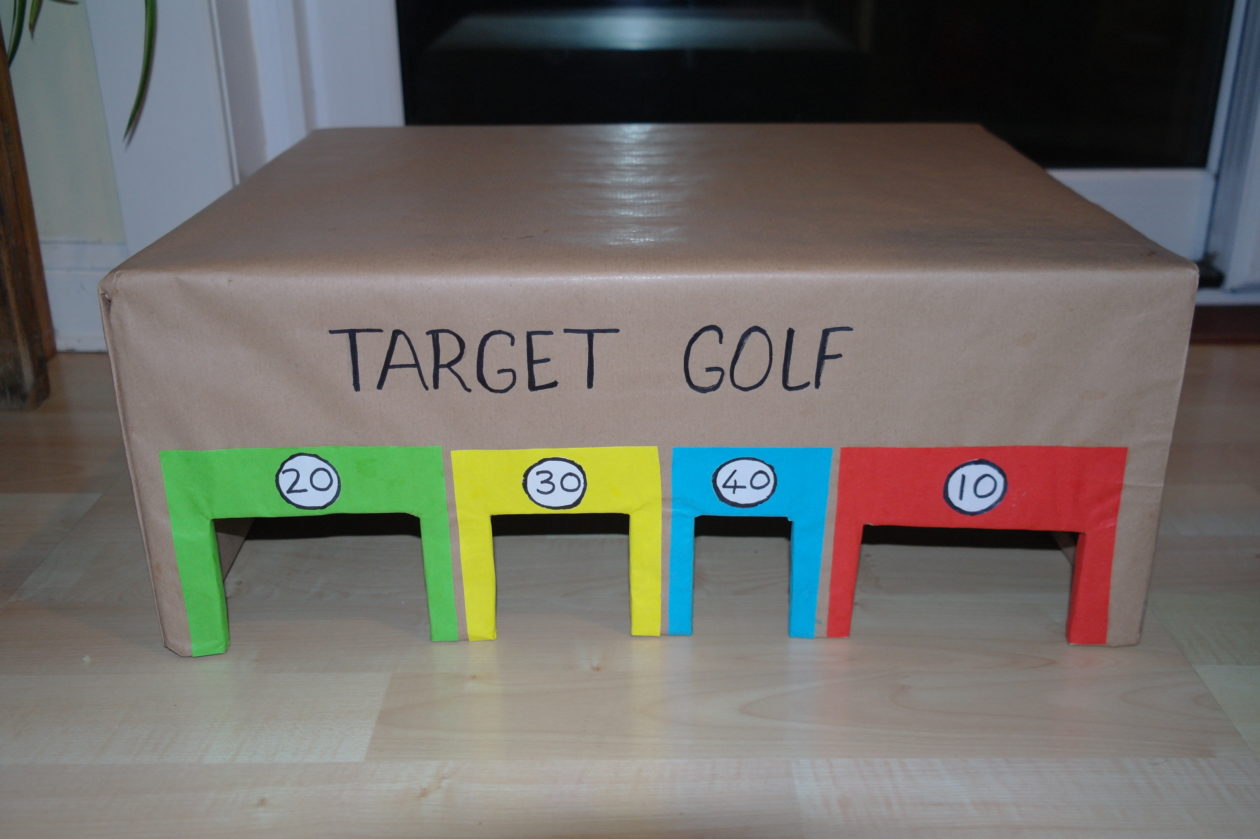
Now you are ready to play the game. I set mine up in the hallway with cushions at either side of the box. We used golf balls and a golfing ‘putter’ to play but you could just roll the balls into the holes and don’t forget to add up your scores – great practise for counting in tens!

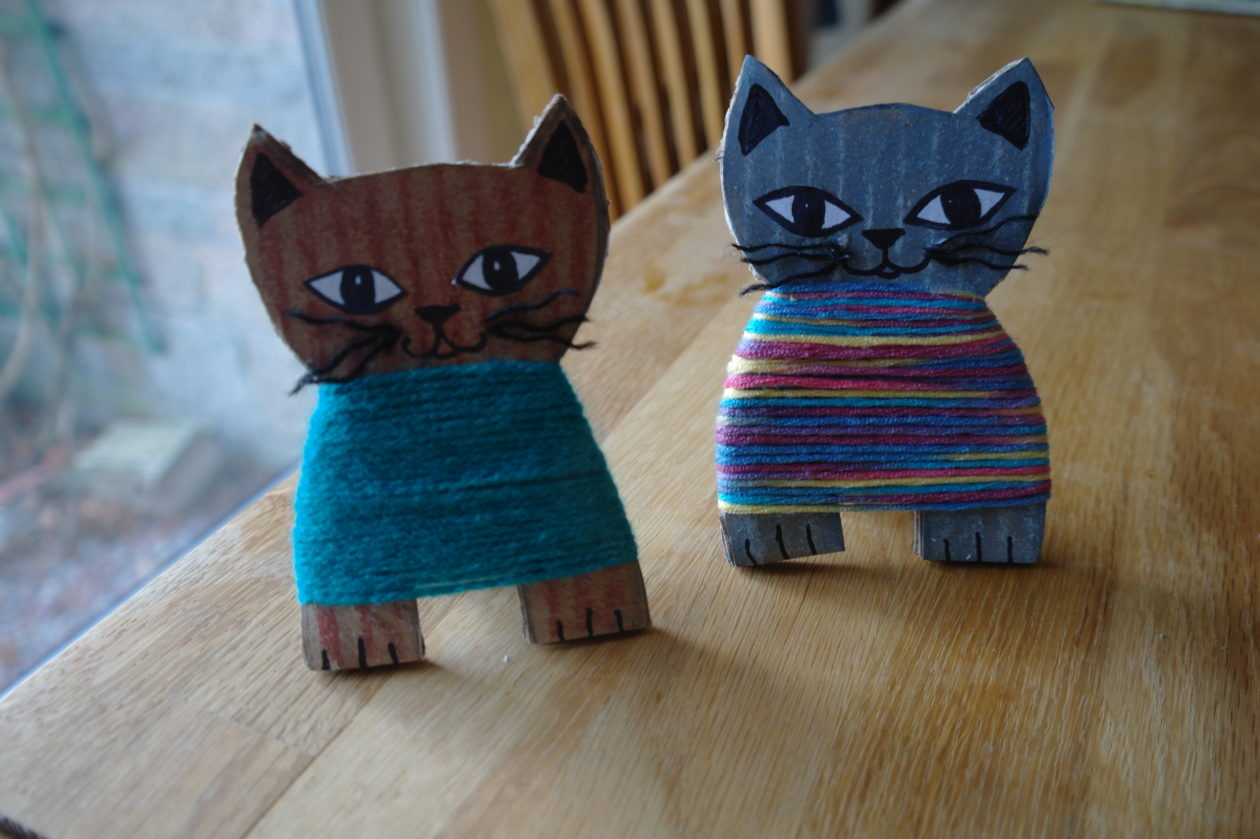
Cardboard Cats in Jumpers
To make a cardboard cat, you will need:
- A piece of cardboard box
- a pencil
- scissors
- double sided tape and P.V.A. glue
- wax crayons or paints and brushes
- a black felt tipped pen
- a small piece of white paper
- a piece black yarn
- some coloured yarn

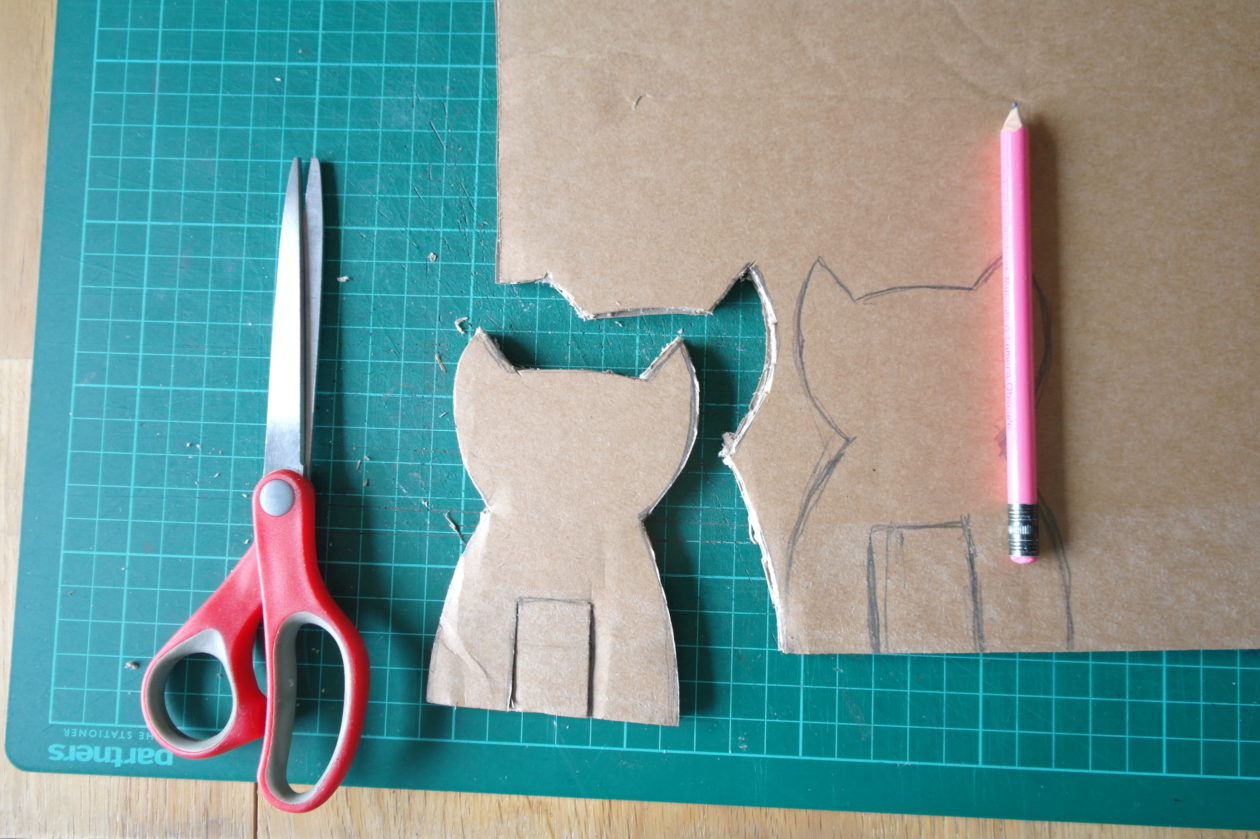
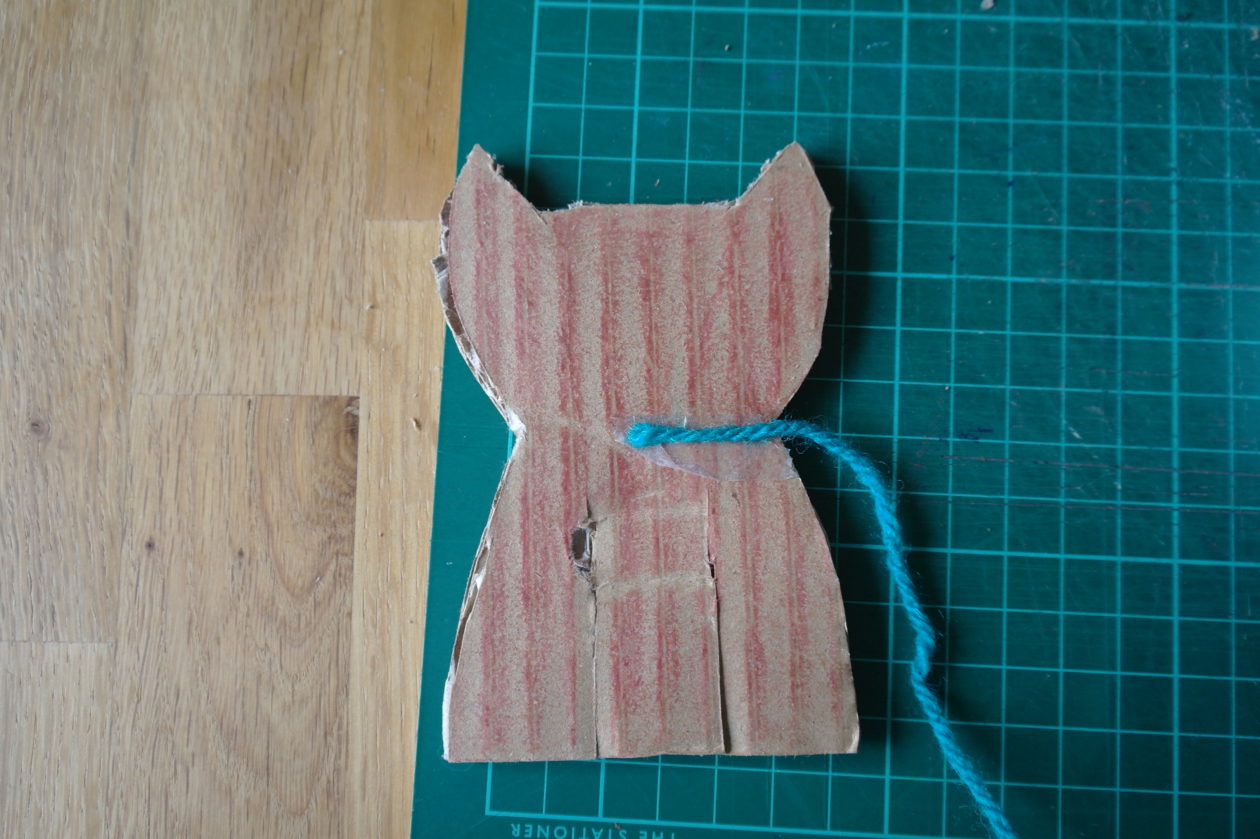
Draw the shape of your cat onto the cardboard and cut it out. Make a couple of cuts up into the cat’s body to form the legs at the front and fold the middle part back to create a stand for your cat.
I used the side of a brown wax crayon to colour my cat because it picks up the ridges in the cardboard and makes the cat look stripy but you can paint your cat instead. I stuck on a piece of double sided tape, just below the head, on the back of my cat (you can use glue instead).
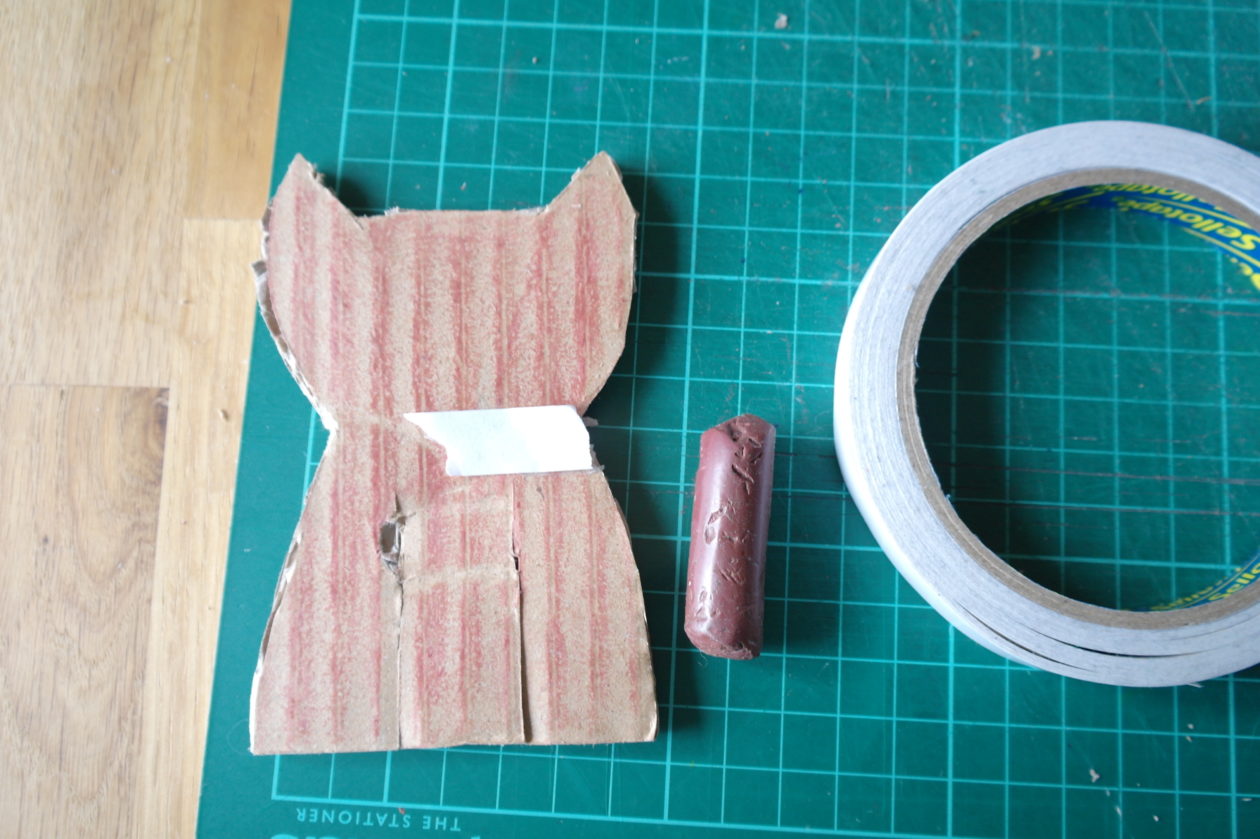
Stick the end of your coloured wool to the tape (or glue) and wind it around the cat’s neck.
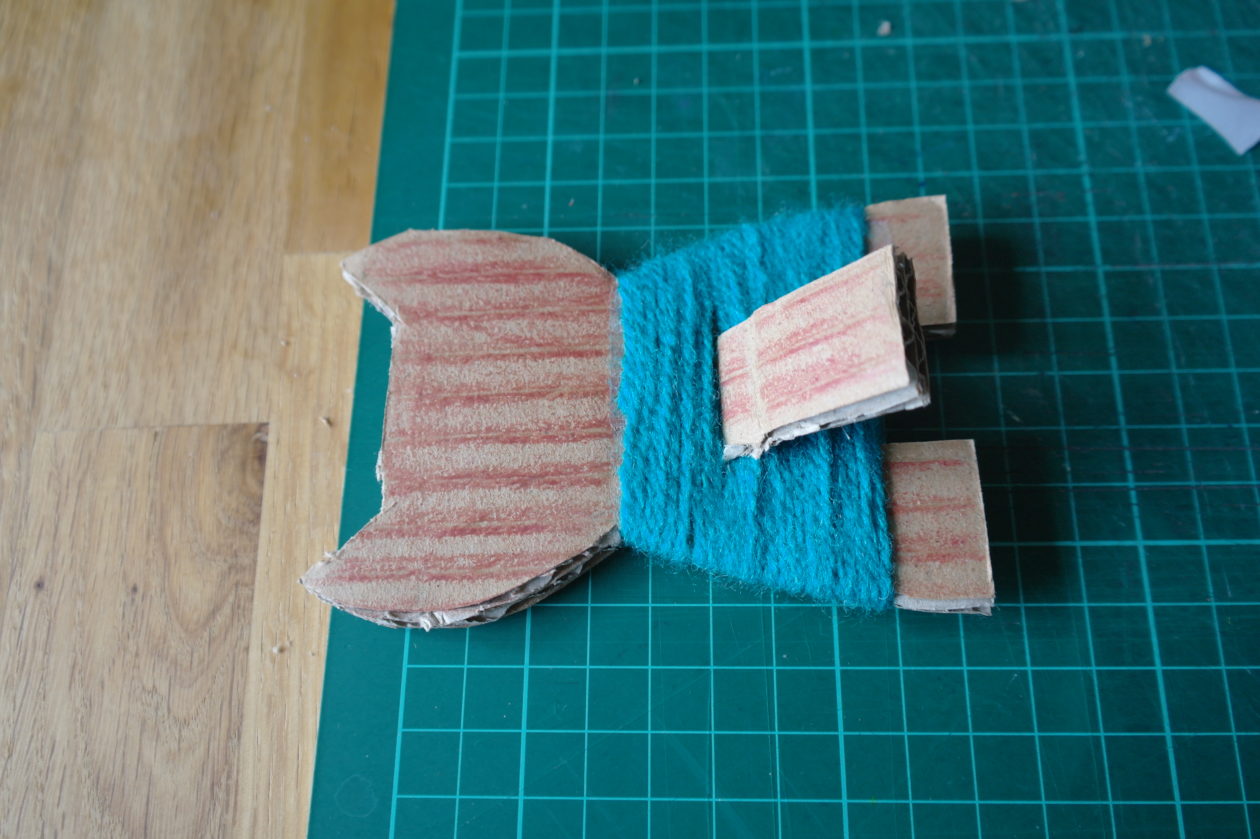
Continue to wind the wool around and down the cat’s body, making sure you go under the ‘stand’ at the back.
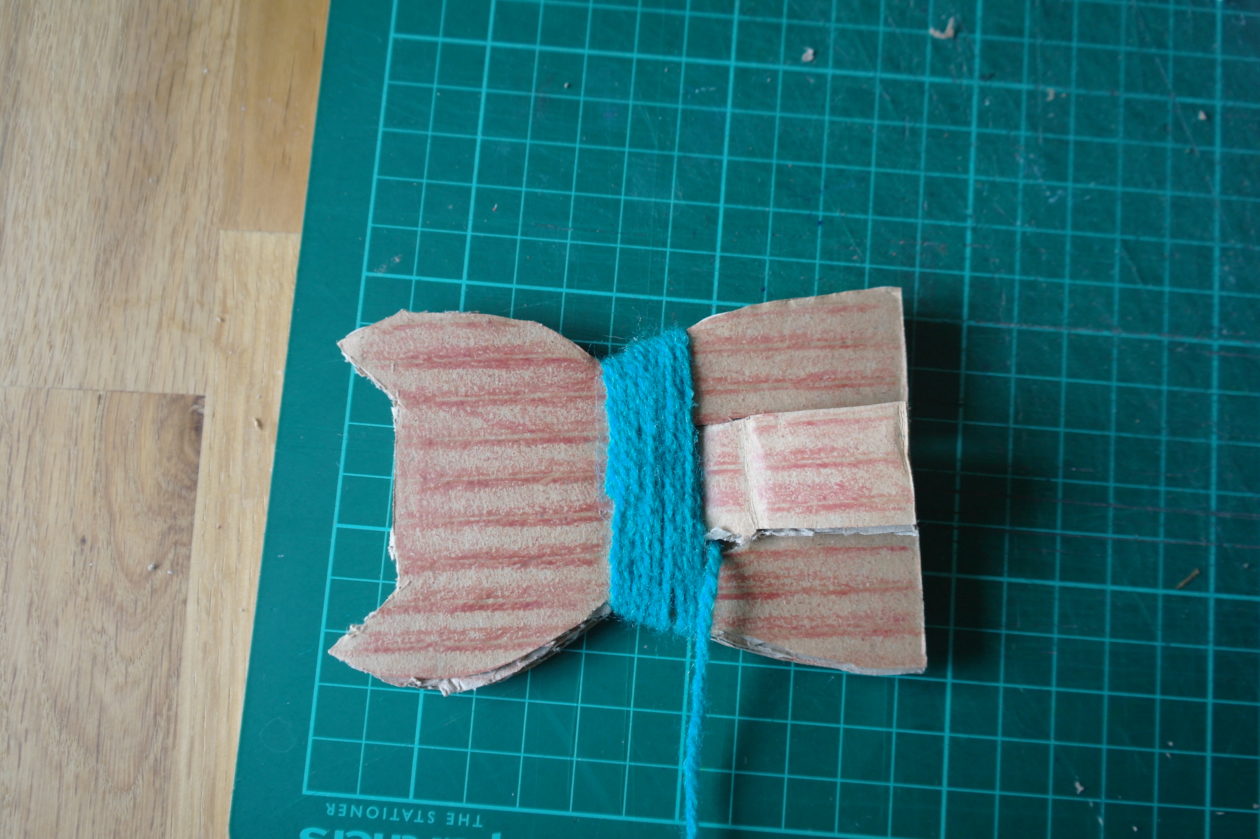
When you have finished, cut the yarn and secure the end with double sided tape or glue. It should look like this:
Cut out two eye shapes from a piece of white paper and use a black felt tipped pen to draw around the edges of the eye shapes and to draw the pupils in the middle.

Stick on your cat’s eyes and draw on a nose, a mouth, two triangles inside the ears and three short lines on each paw using the black felt tipped pen. Also, cut a short piece of black yarn and separate it into strands. Stick these on with glue to form the whiskers.
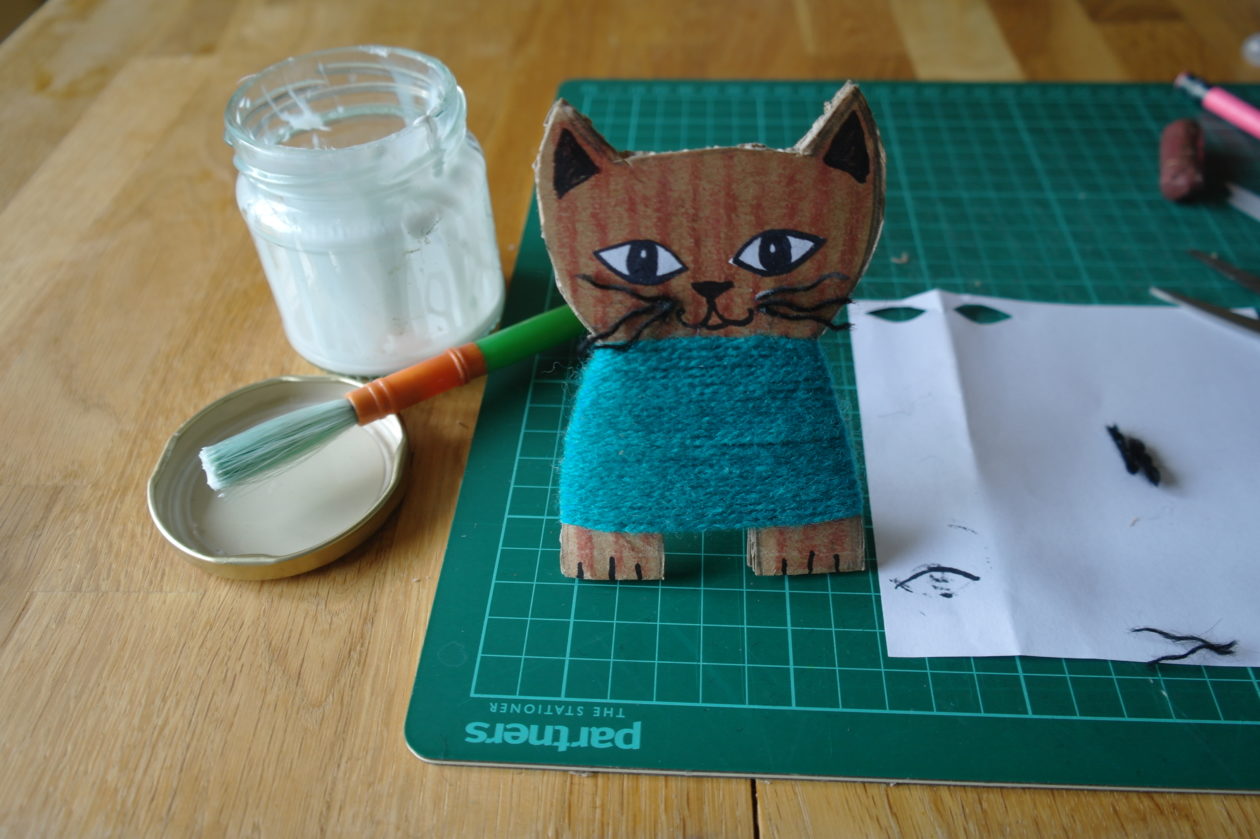
Your cat is complete. I made another cat which I painted grey before using a white wax crayon to make the stripes and I used a different yarn for the ‘jumper’.
Marble Maze
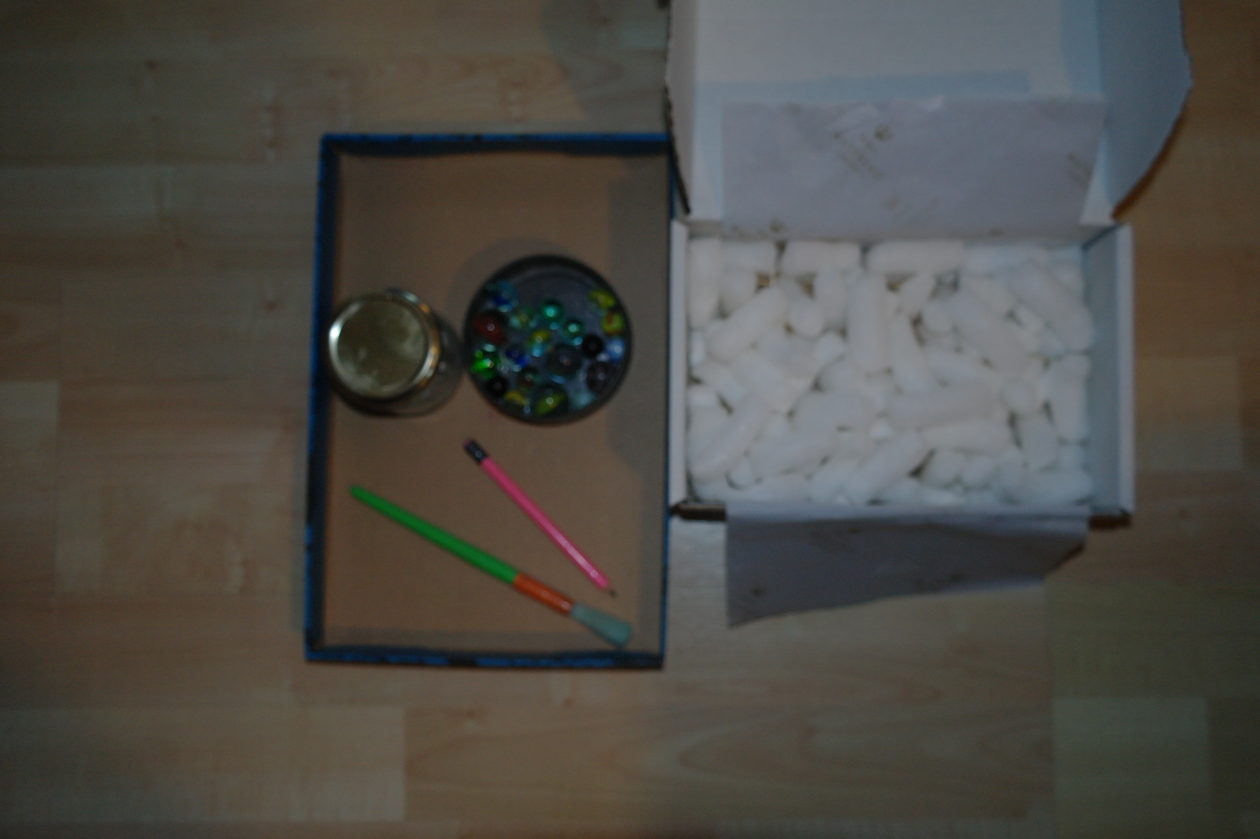
To make a marble maze, you will need:
- A lid from a cardboard shoe box
- some packing noodles (alternatively, you could use straws or strips of cardboard)
- P.V.A. glue (craft glue) and an old paint brush
- a pencil and a felt tipped pen
- some marbles
Plan out your maze, in pencil, on the inside of the shoe box lid. Lay out the packing noodles (or straws, or strips of cardboard) on top of your pencil lines to make sure they fit and the marble can pass through the gaps.
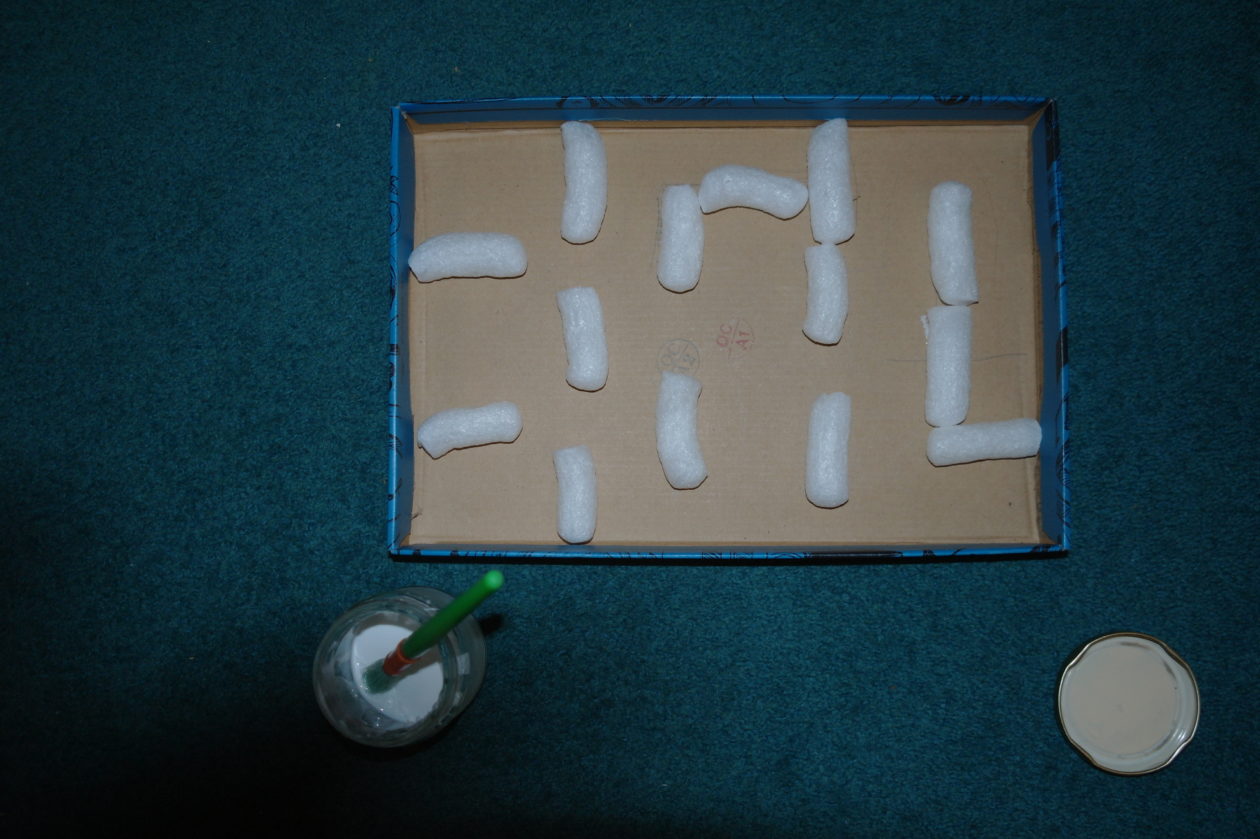
Put glue on one side of each packing noodle and stick them in place. I used a black felt tipped pen to draw a route for my marbles and to write on where to start and finish.
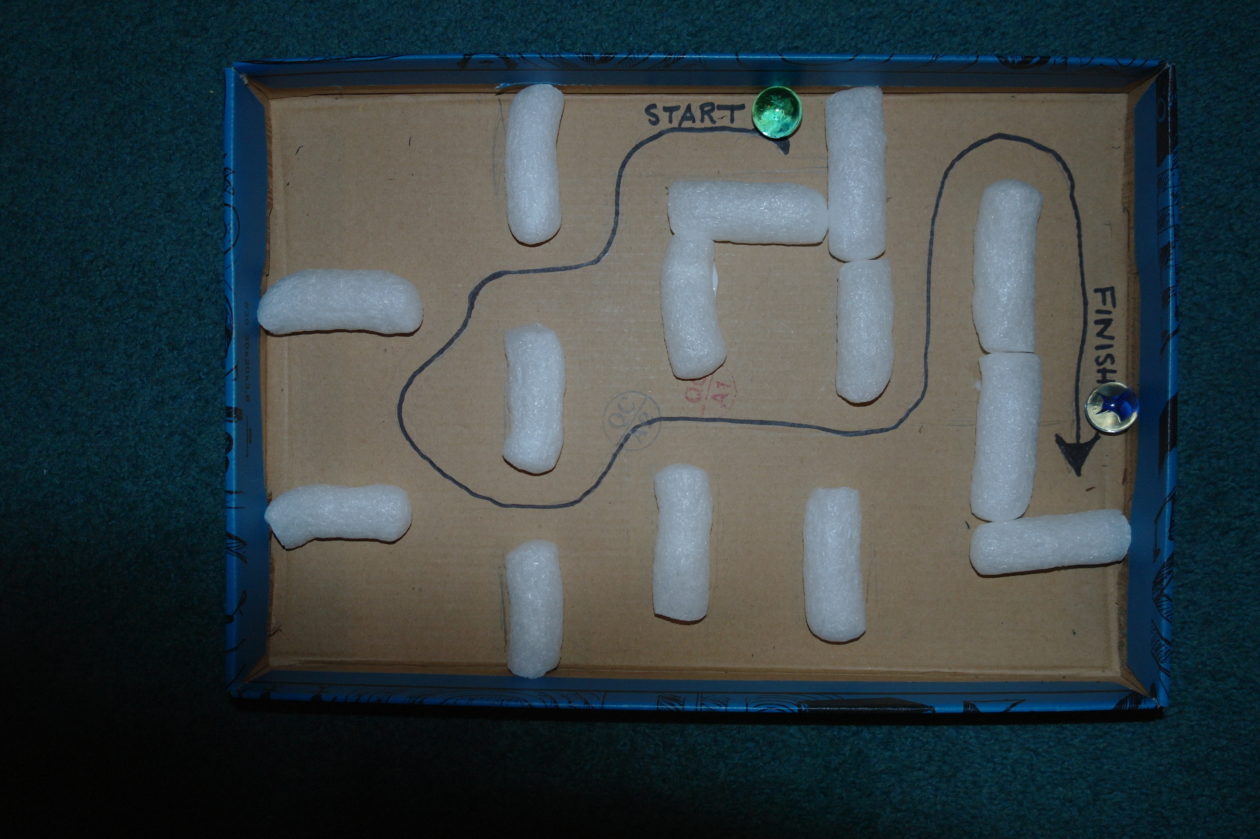
Now you are ready to play. To make the game harder, you can try using more than one marble at a time or by making holes in the shoe box lid, big enough for the marbles to drop through, in certain places on your maze.
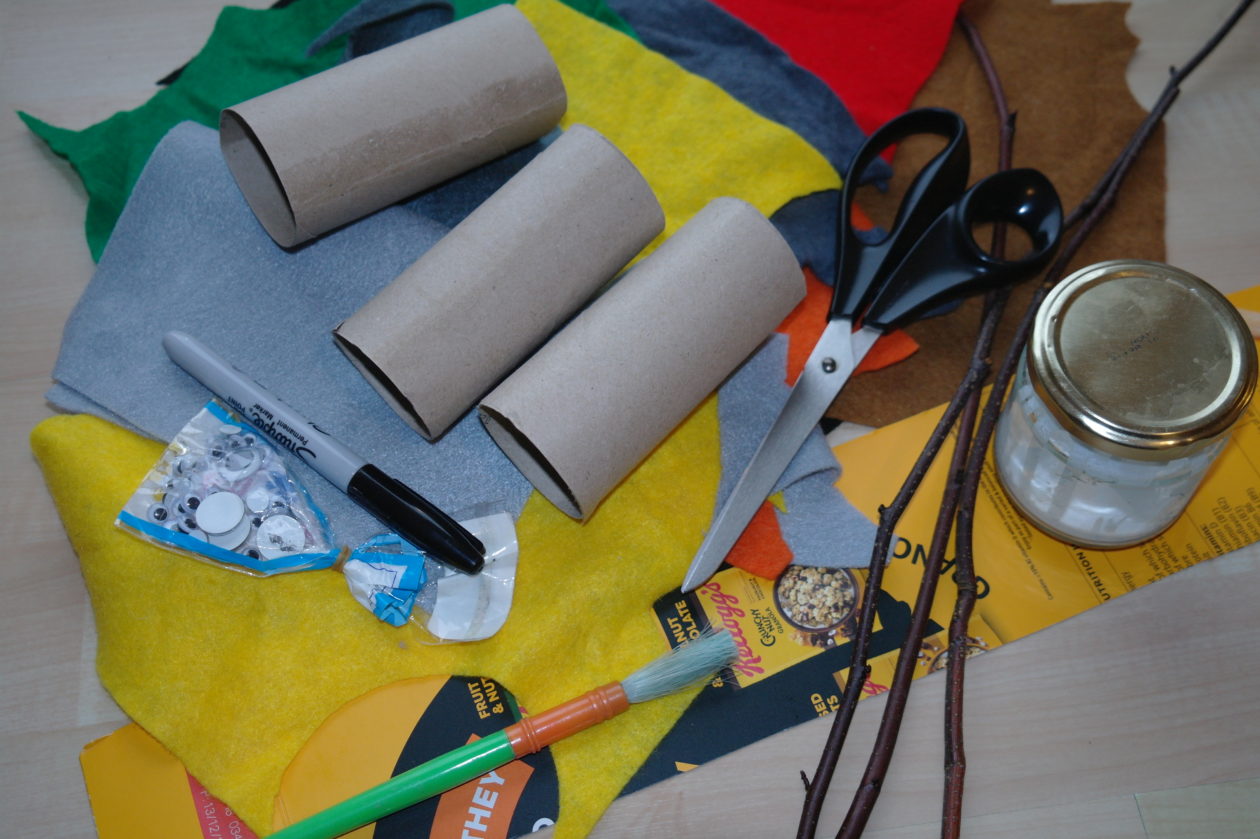
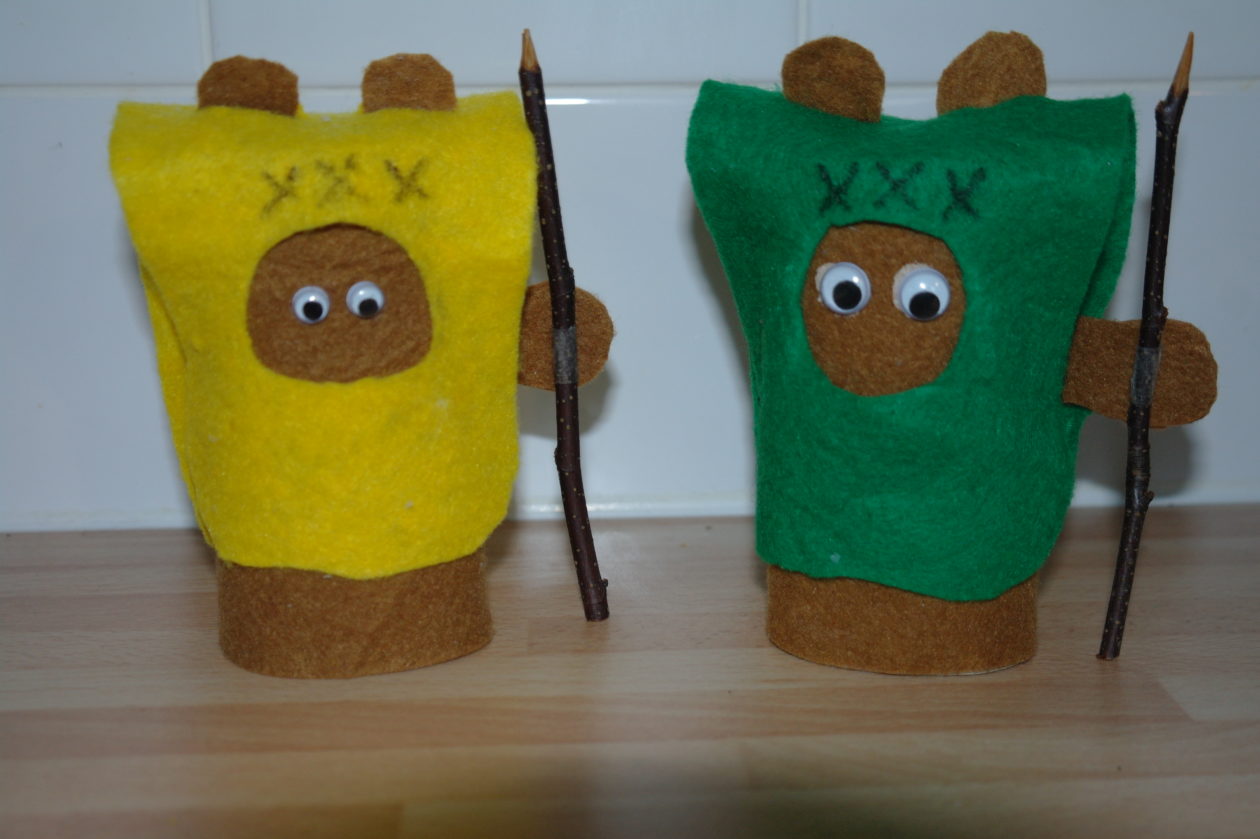
Toilet Roll Tube Ewoks!
To make an Ewok, you will need:
- Toilet roll tubes
- felt
- P.V.A. glue (craft glue)
- scissors
- double sided tape
- a black felt tipped pen
- an old brush for the glue
- a small twig
- thin card (I used an old cereal packet)
- some googly eyes (you can use tiny circles of white paper and put a black dot in the middle)
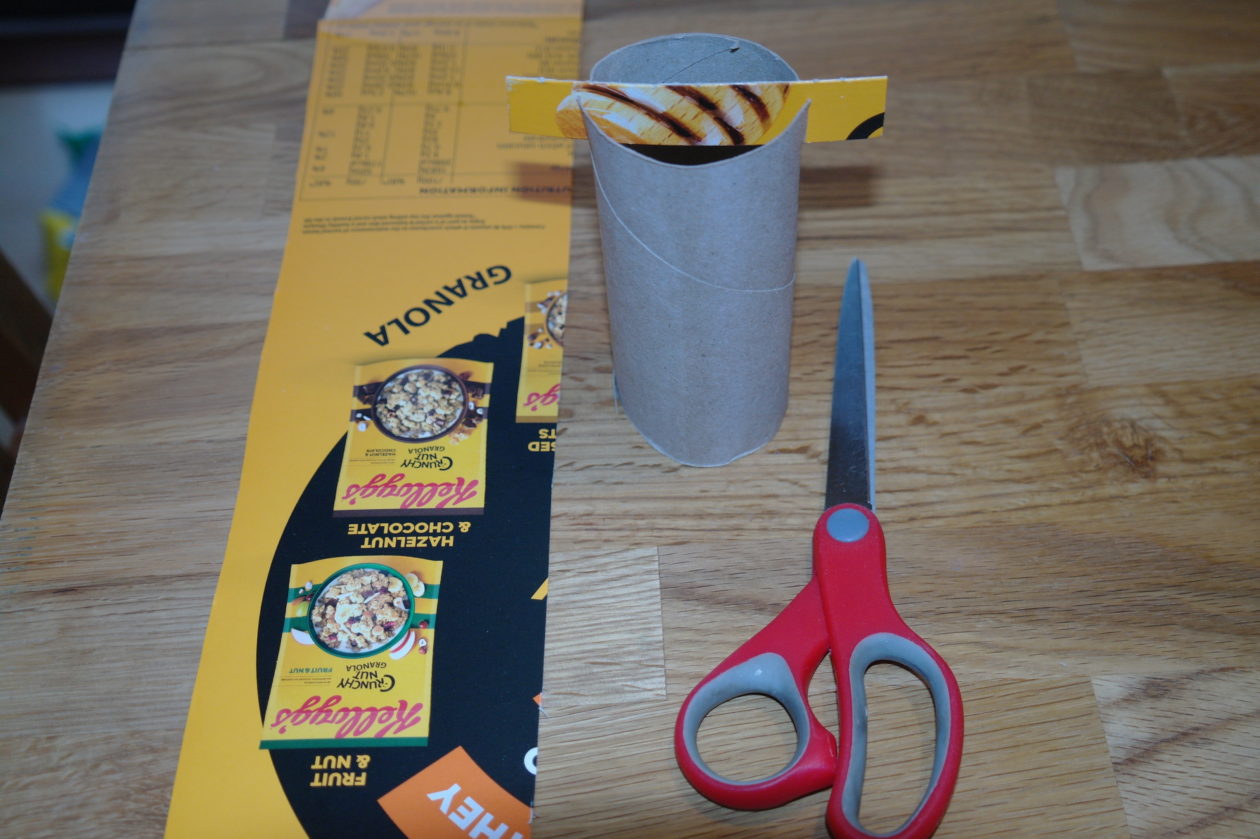
Cut a strip of card (I used a cereal box) that is slightly longer than the diameter of your tube. Cut two slits at one end of your tube, one at either side and slot the piece of card into the slits.
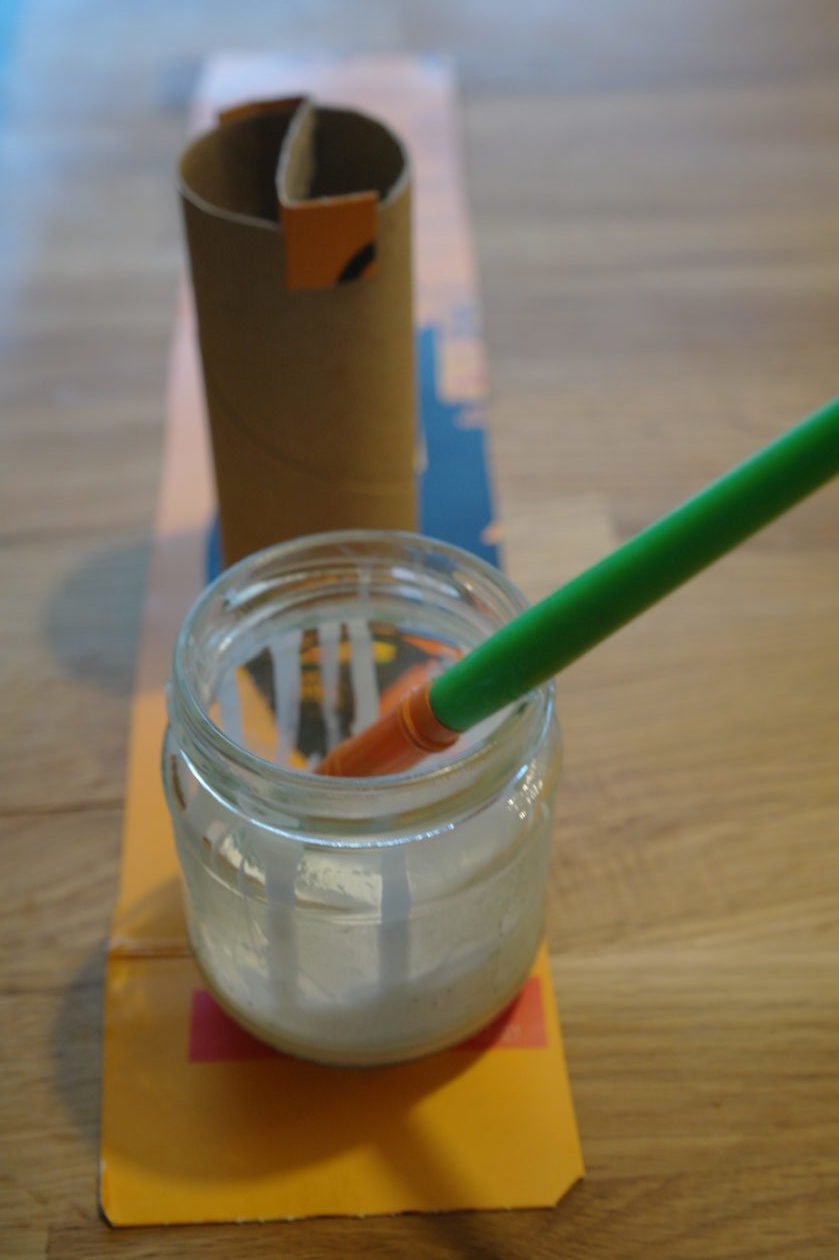
Fold in the ends of the card that are sticking out and glue them to the outside of the tube.
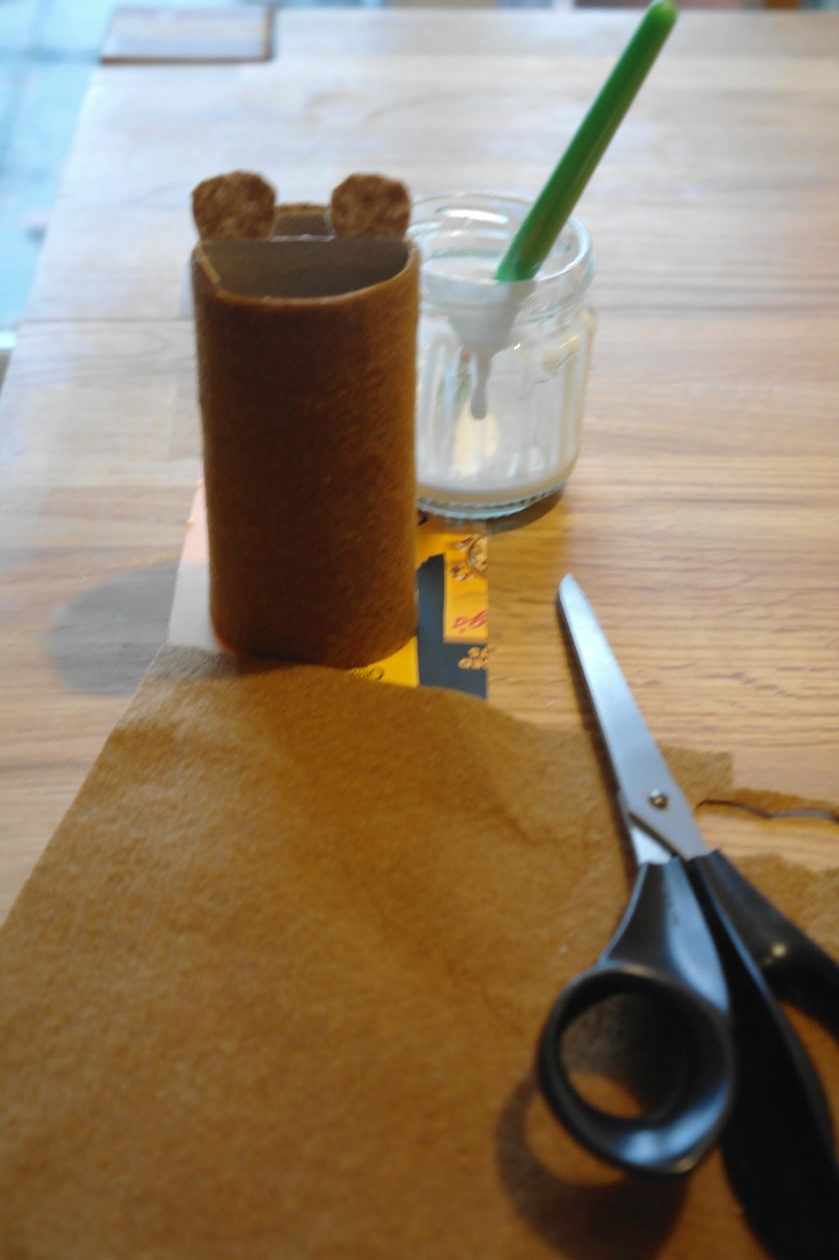
Cut a rectangle of brown felt that is big enough to wrap all the way around your tube and glue it to the tube. Also, cut two small ear shapes from the brown felt and stick them to the strip of card that you put across the top of your tube.
Cut a long rectangle from another colour of felt and cut an oval shaped hole near one end for the face and a couple of slits for the ears in the middle of your long rectangle. I also rounded the corners and made the edges a bit wavy.

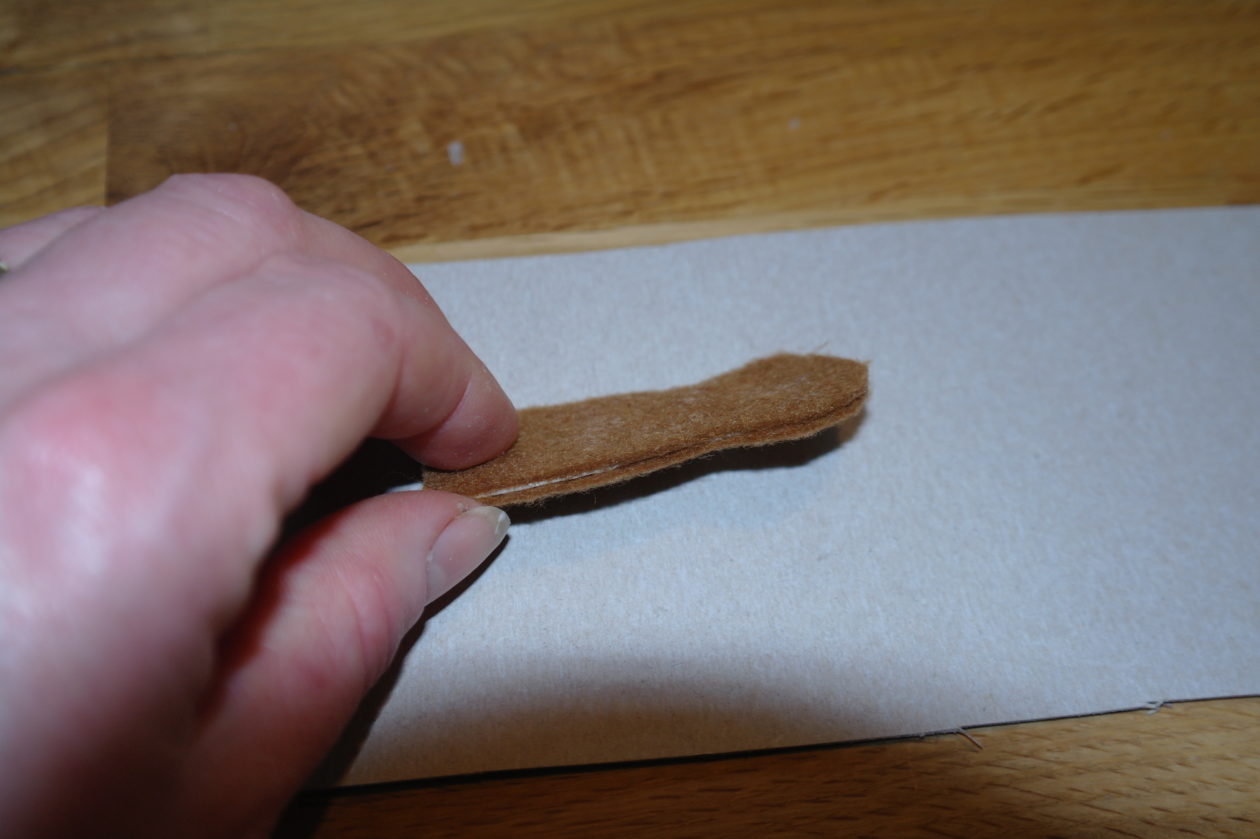
Cut two arm shapes from brown felt and one, slightly narrower, arm from thin card (cereal packet).
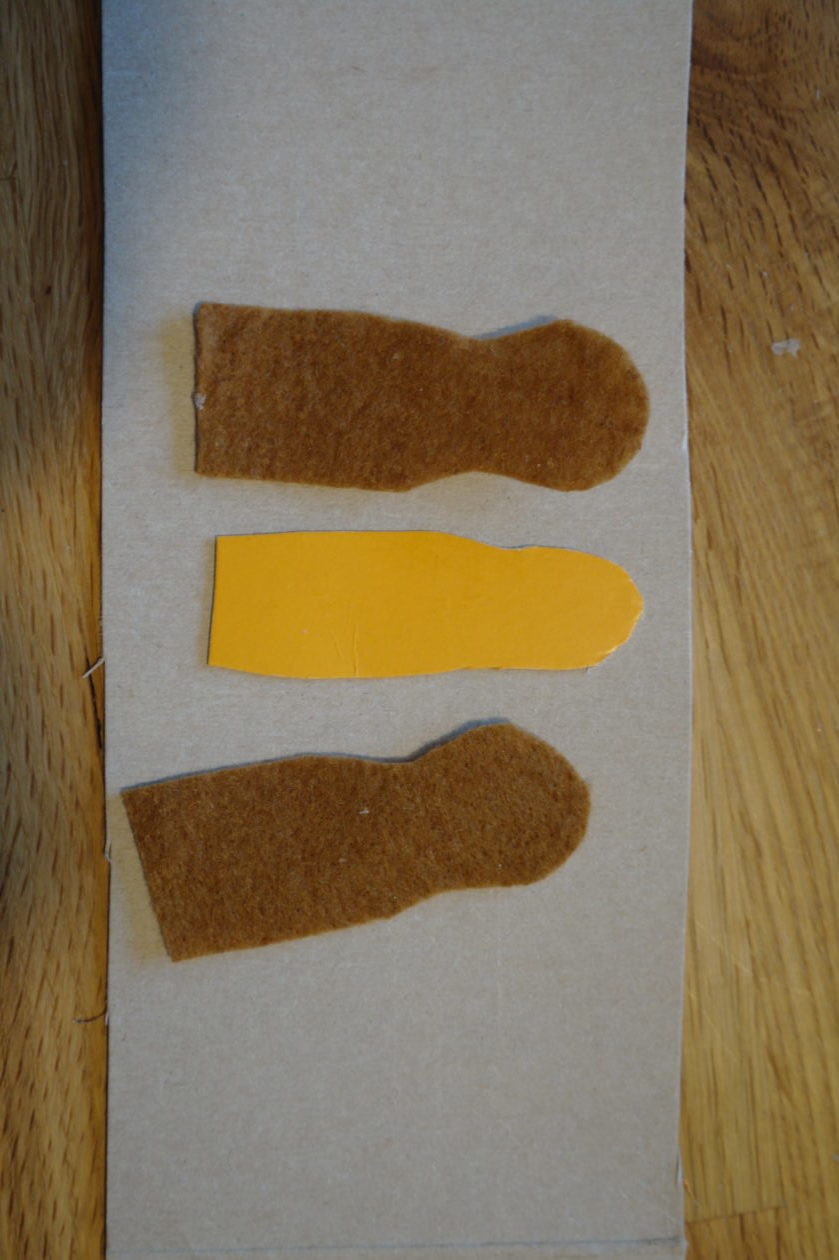
Glue a felt arm shape at either side of the card to make a ‘sandwich’. This will make the arm stronger.
Stick some double sided tape on one side of the arm but not over the paw.
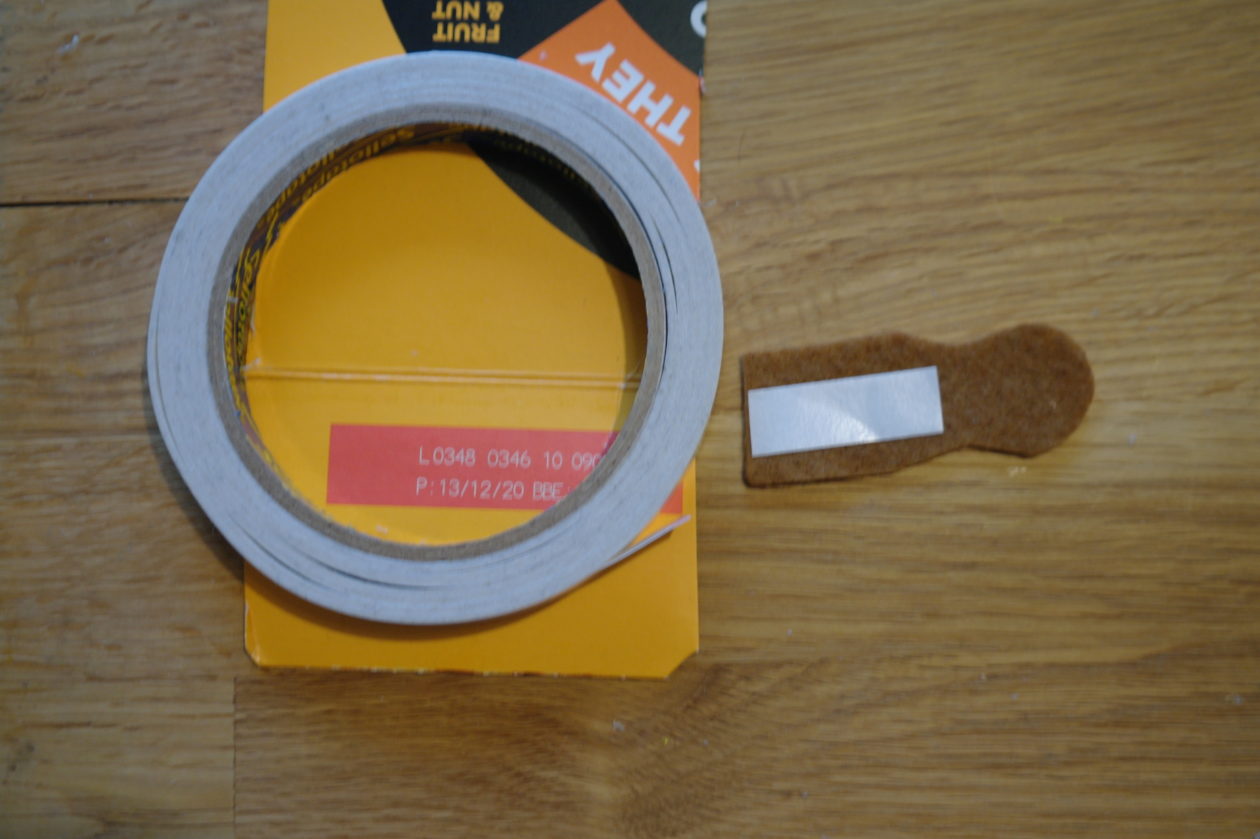
Put some double sided tape along either end of your long rectangle of felt and put it on your tube, making sure you push the ears through the slits in the middle. Also, stick the arm on to the tube, under the long rectangle.
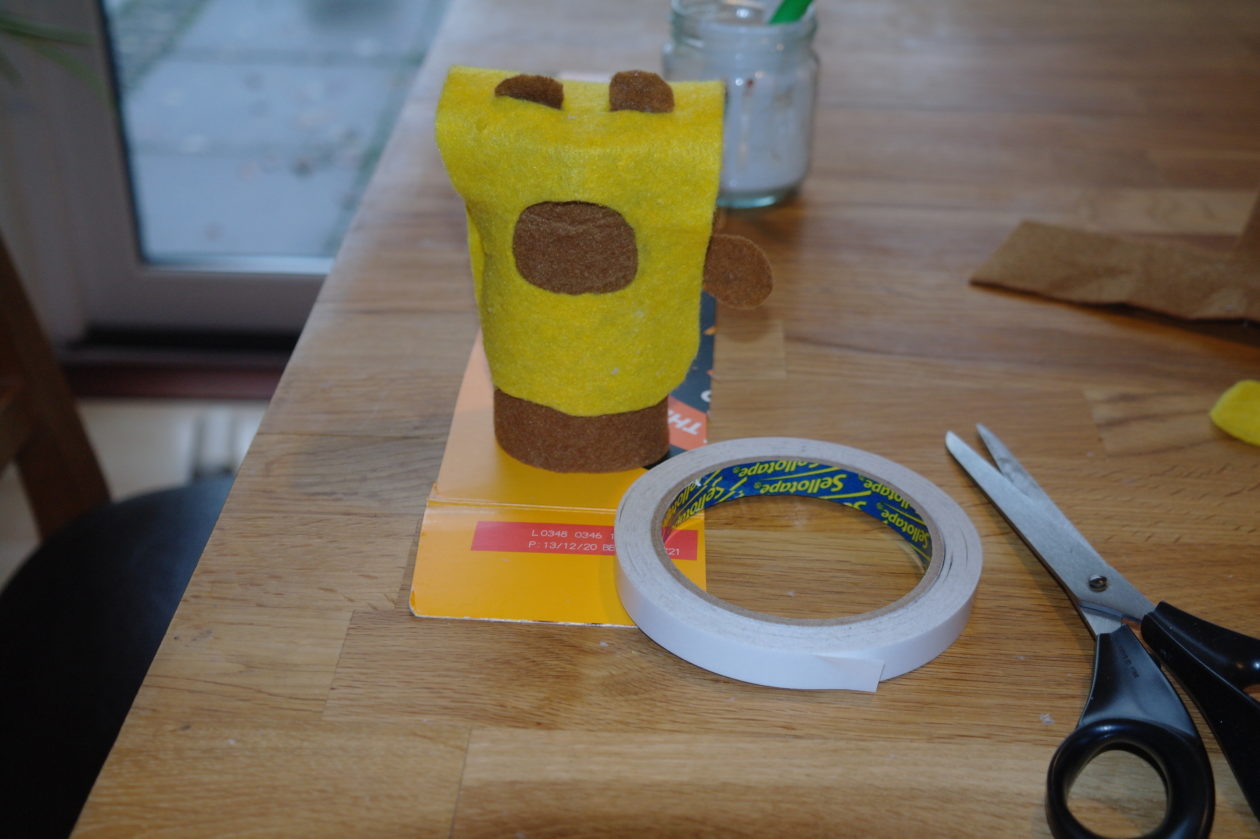
Finally, stick on some googly eyes, sharpen a little stick, for a spear and use double sided tape to stick it to the paw. Draw three crosses above the face hole with black felt tipped pen.
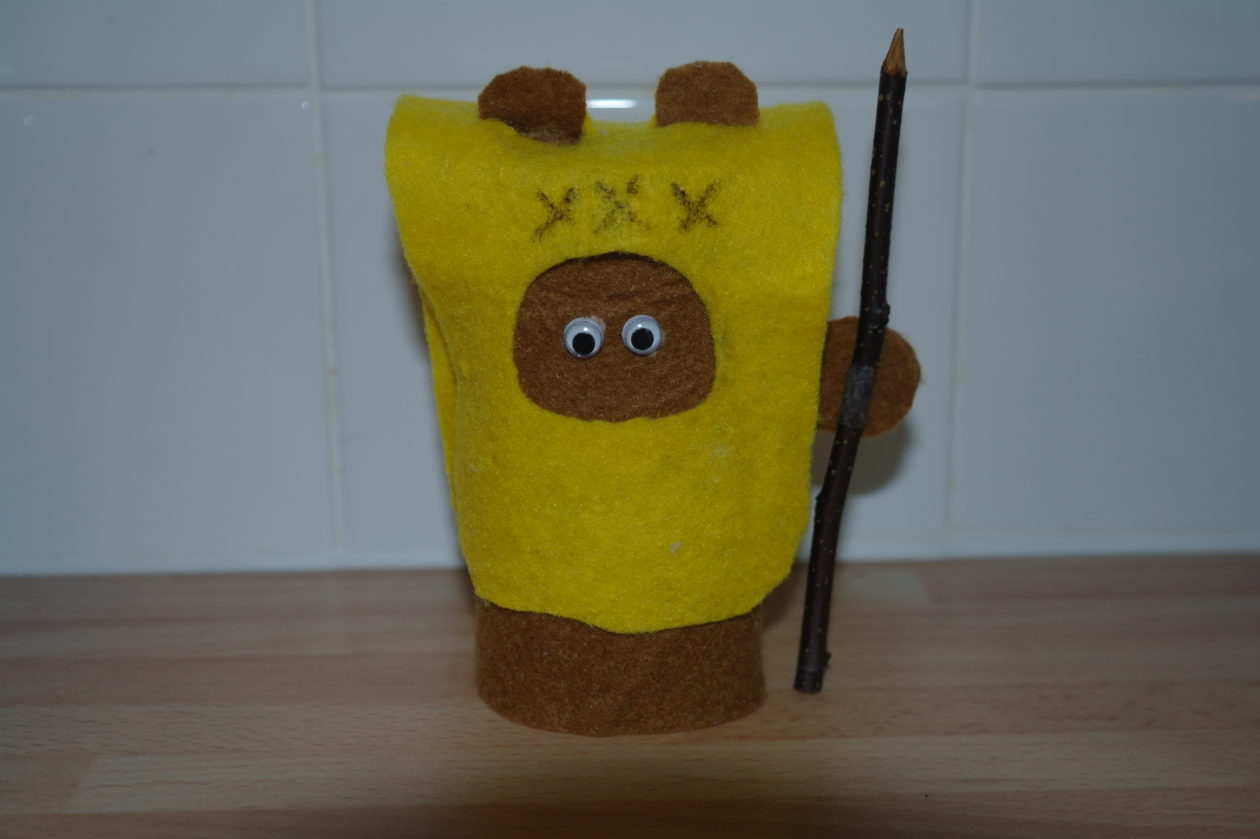
I made another one to go with my first Ewock because you can’t just have one!
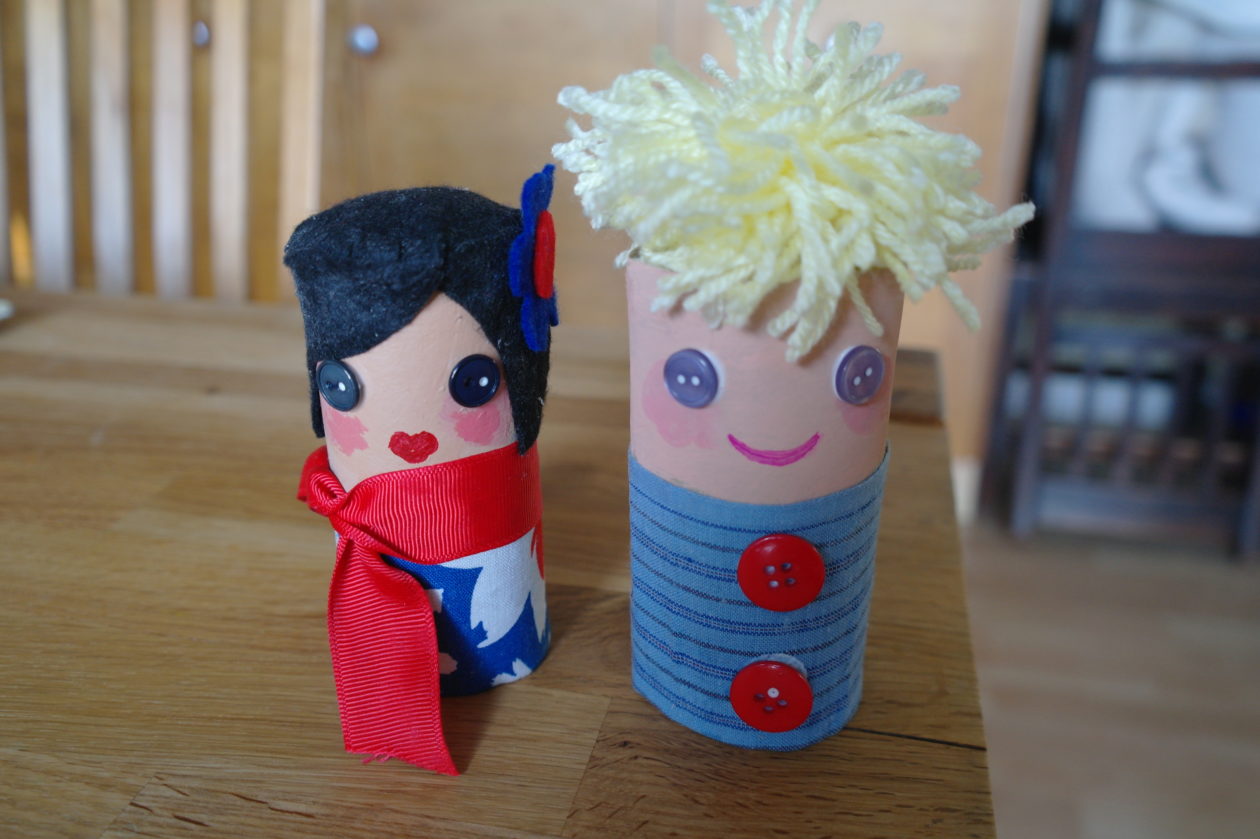
Kitchen and Toilet Roll Tube People
To make a kitchen/toilet roll tube person you will need:
- A toilet or kitchen roll tube
- scissors
- paints and brushes
- P.V.A./craft glue
- a selection of bits of material, wool, buttons, ribbon
- a piece of tissue paper or scrap paper
I used a kitchen roll tube for my person so first, I cut the tube in half and scrunched up my piece of tissue paper (I got the tissue paper from inside an old shoe box) and stuffed it inside my tube.

I mixed a skin tone colour with my paints and painted around the top of the tube.
I used some yellow wool to make the hair. I wrapped it around my fingers.
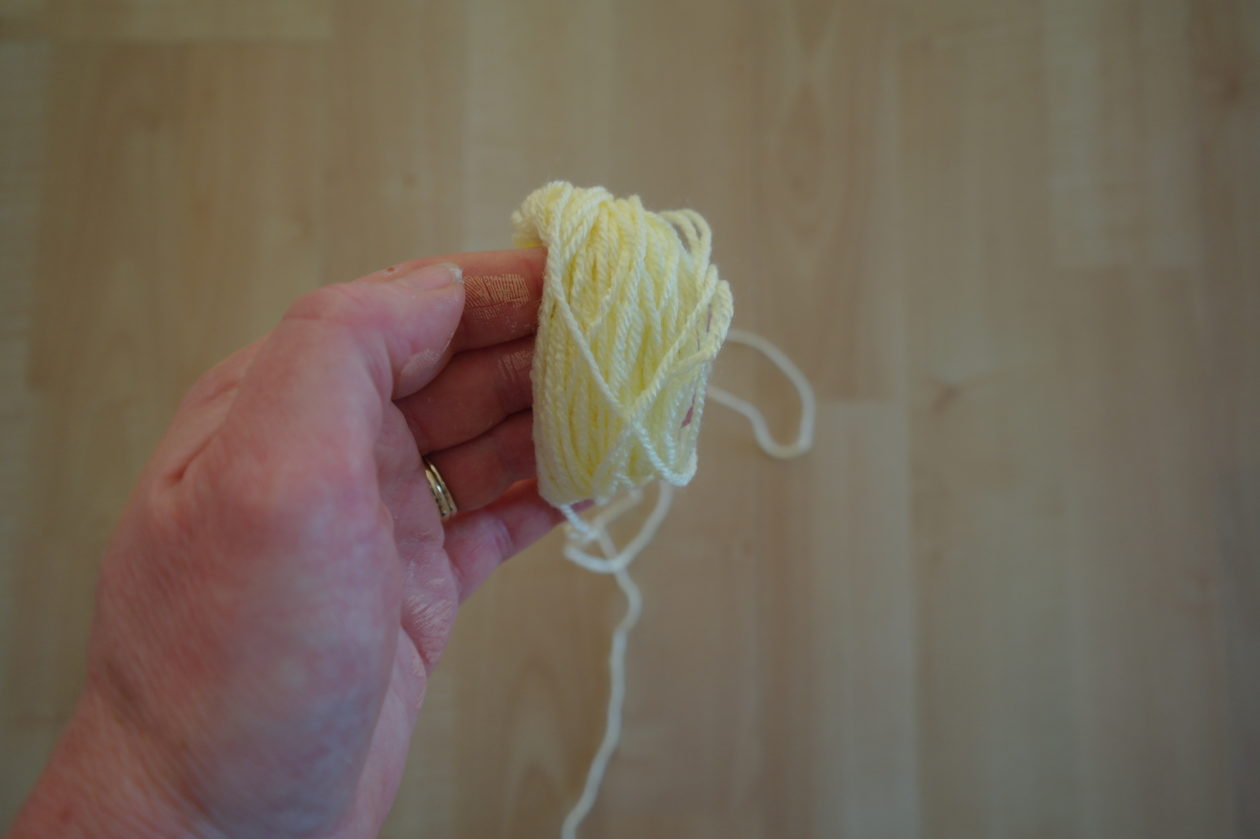
Cut a piece of wool and tie it around the middle of your wrapped wool.
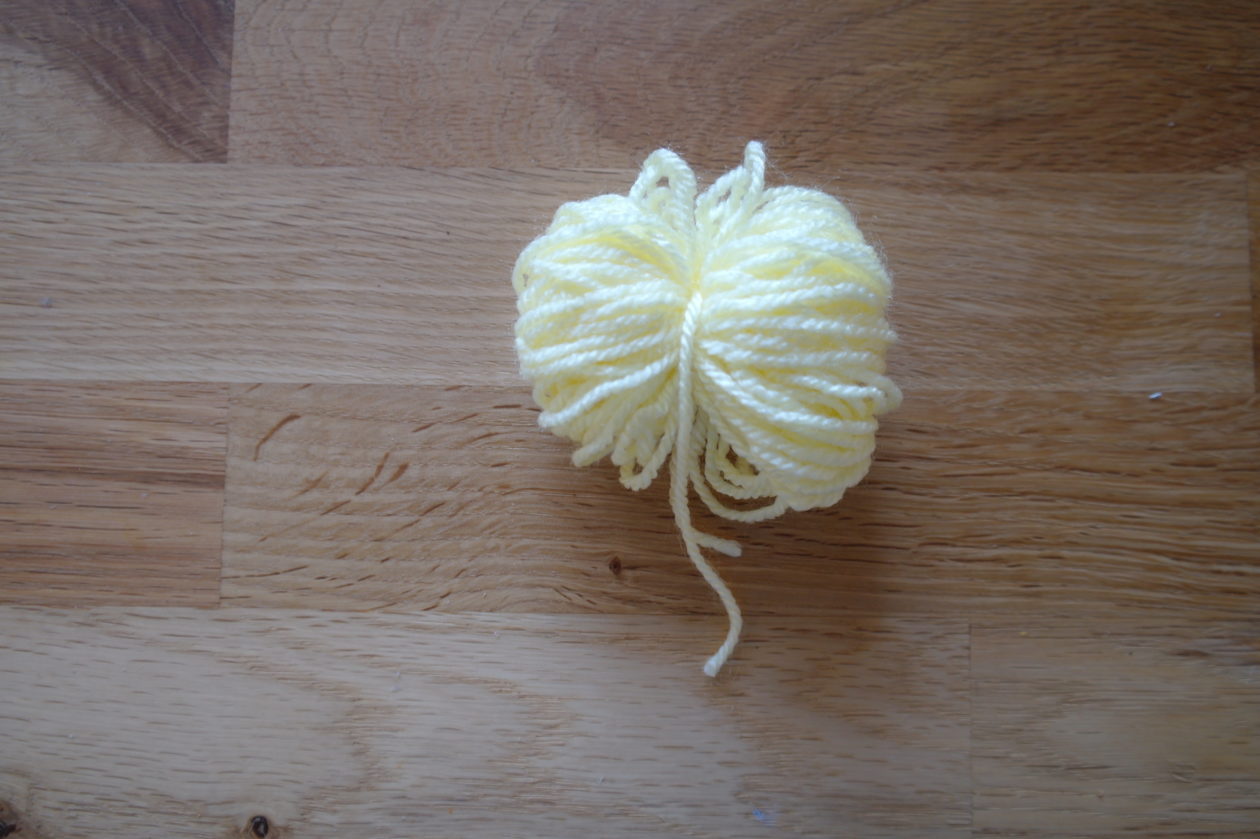
Cut through the looped ends of your wool to make a sort of pom-pom and use P.V.A. glue to stick it to the top of the tube.

Cut a rectangle of material and stick it around the lower section of the tube and stick on a couple of buttons down the front. Choose a couple of smaller buttons and stick them on the face to create some eyes.
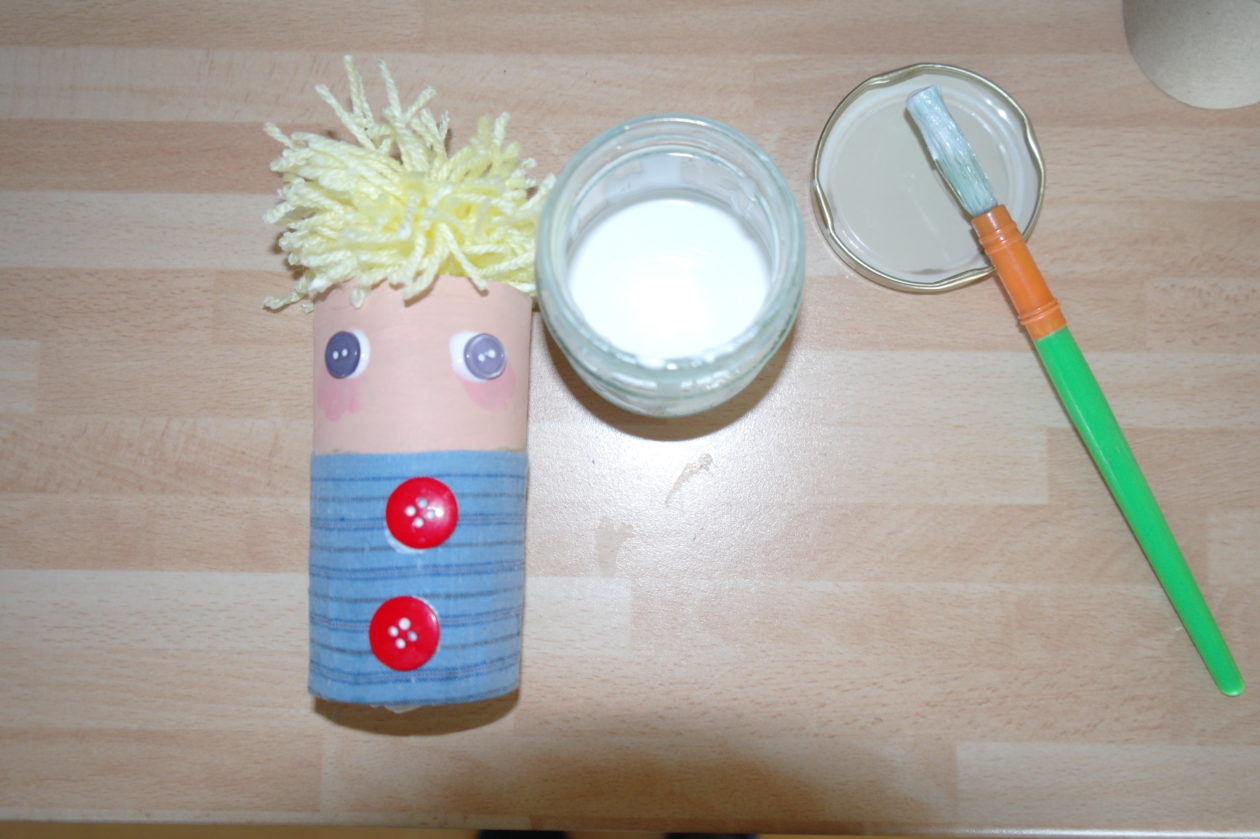
Finally, draw or paint on a mouth.
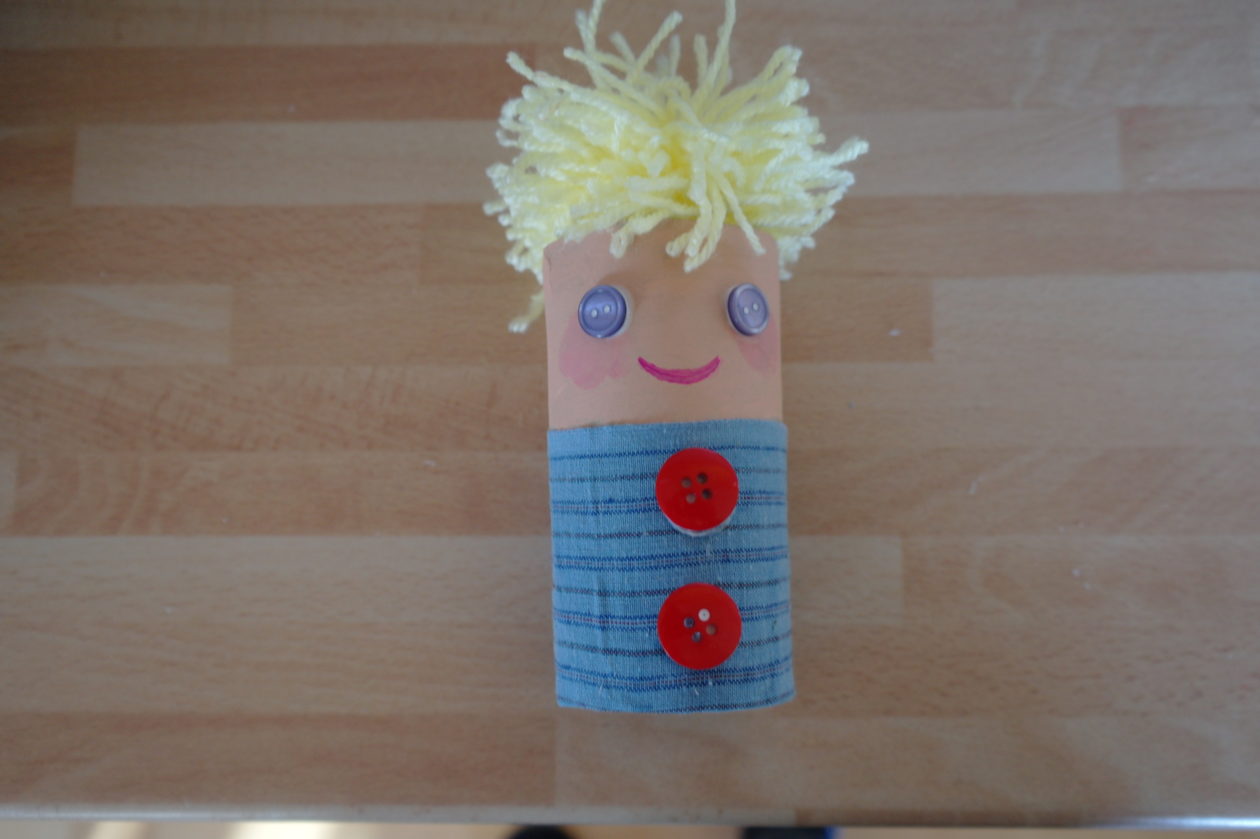
I also made a girl tube person but I used felt for the hair instead of wool.
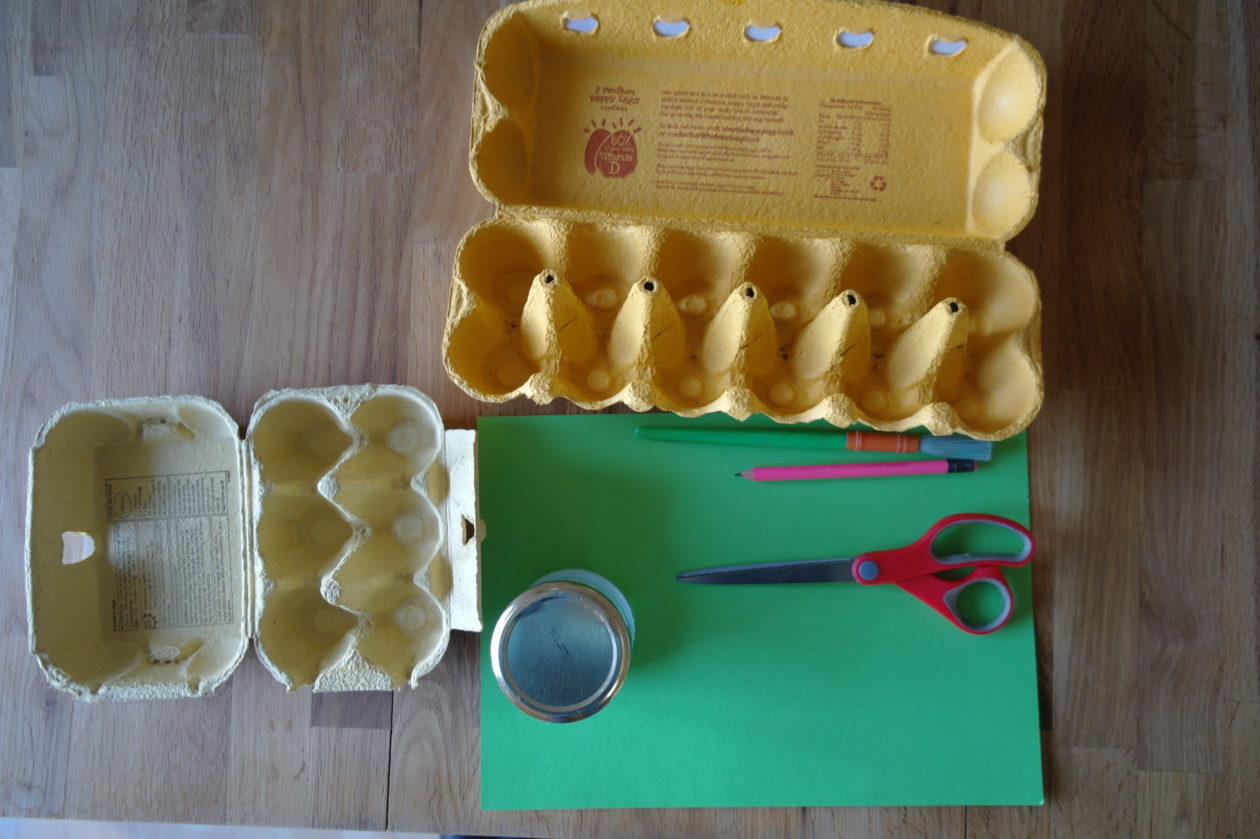
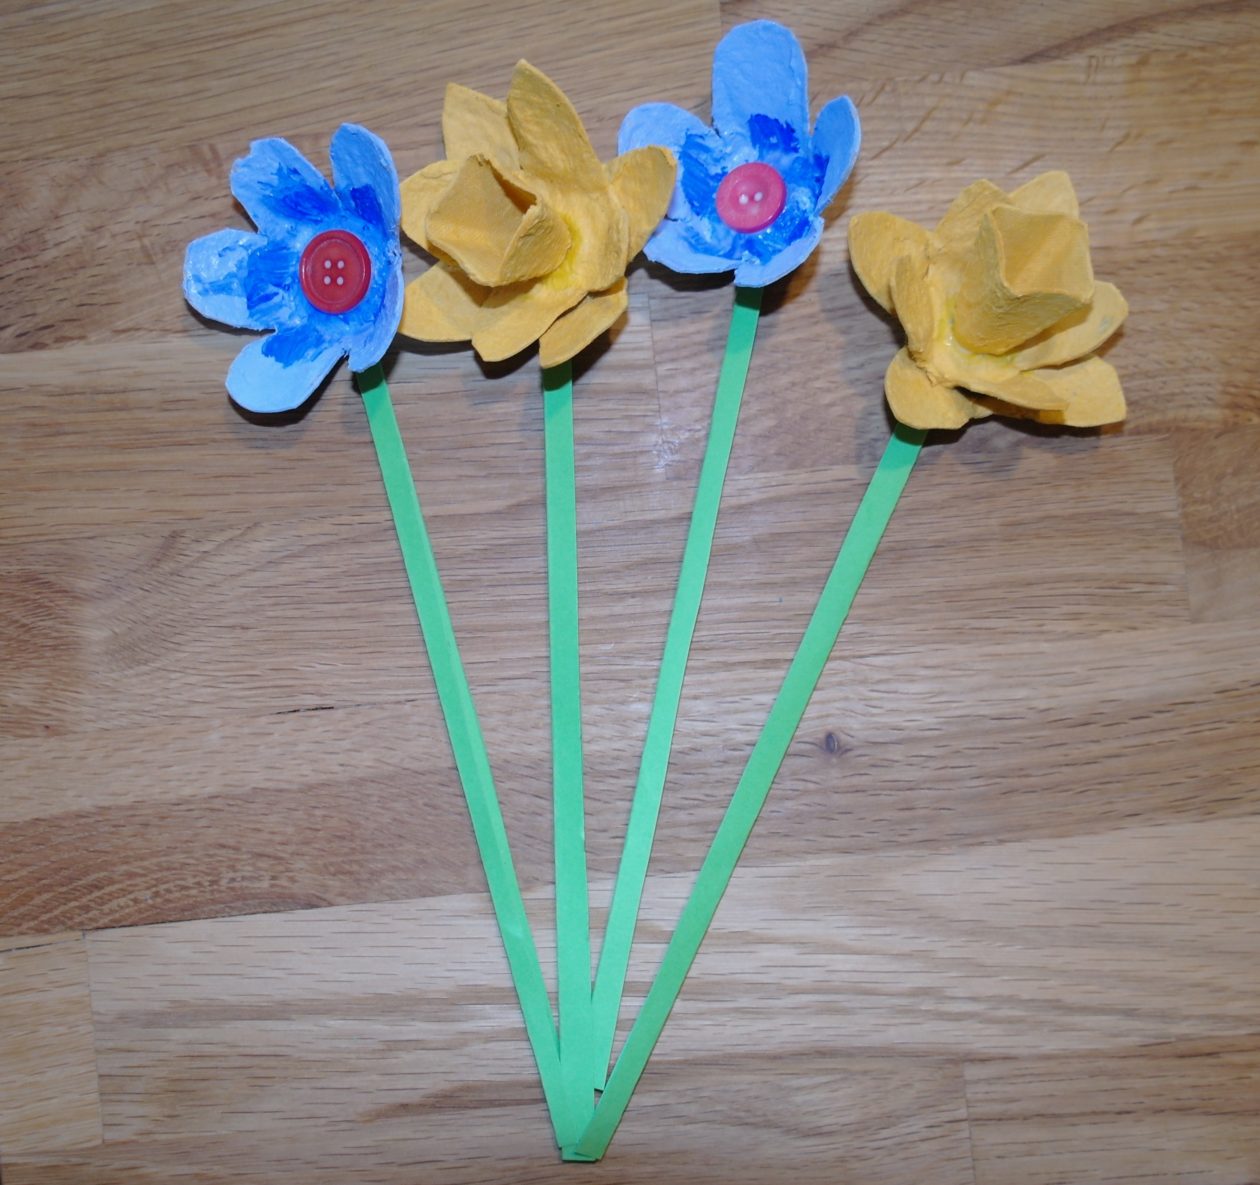
Egg Box Flowers
To make some egg box flowers, you will need:
- Egg boxes
- scissors
- a pencil
- P.V.A. glue (craft glue)
- a piece of thin card (preferably green but any thin card will do)
- an old paintbrush
- some paints (if you want to make different coloured flowers)
- ruler.
Cut the tops off cone shapes that are sticking up down the centre of the egg tray – these will form the centre part of the daffodil. Then cut out the other parts of the egg tray and shape each one into four petals.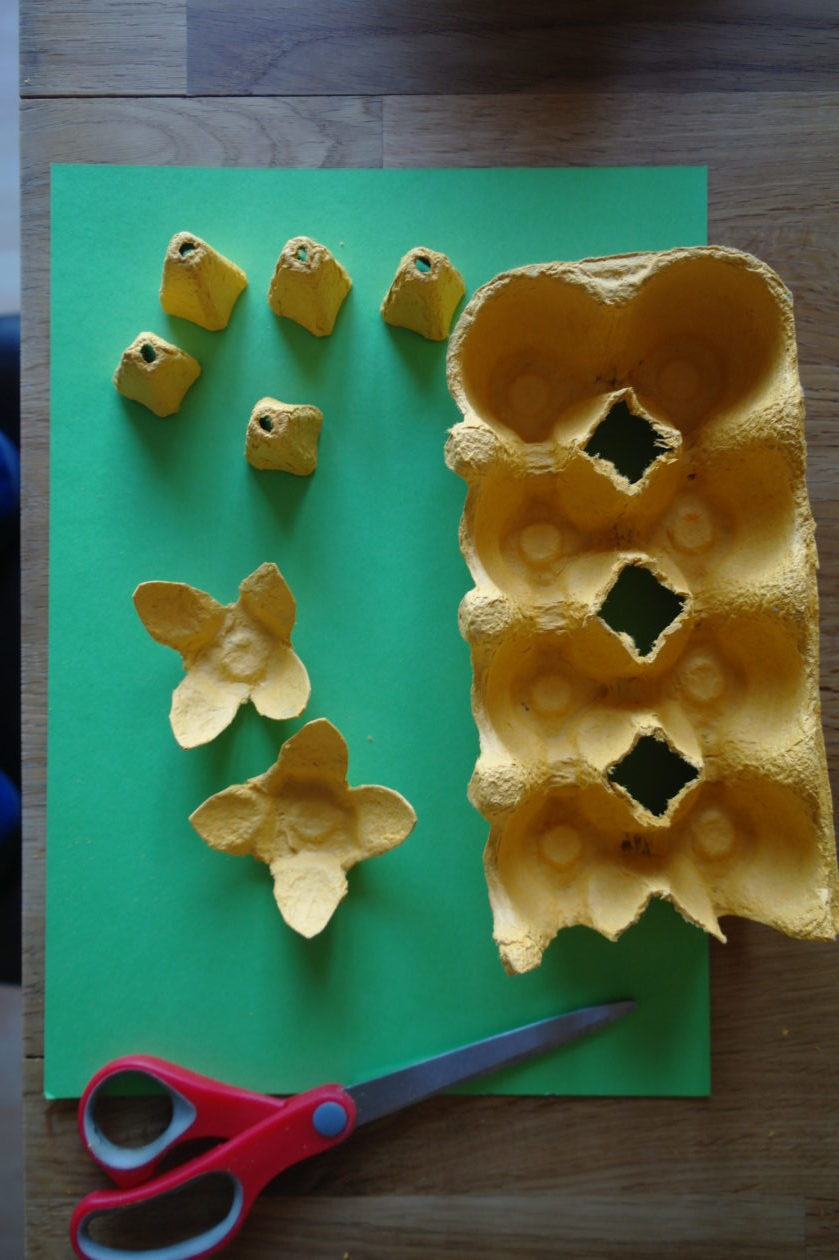
Take two of the petal pieces and glue one on top of the other, making sure the petals of the top piece sit between the petals of the bottom piece.
Glue one of the cone shaped piece in the middle of the flower you have created making sure it is open end up.
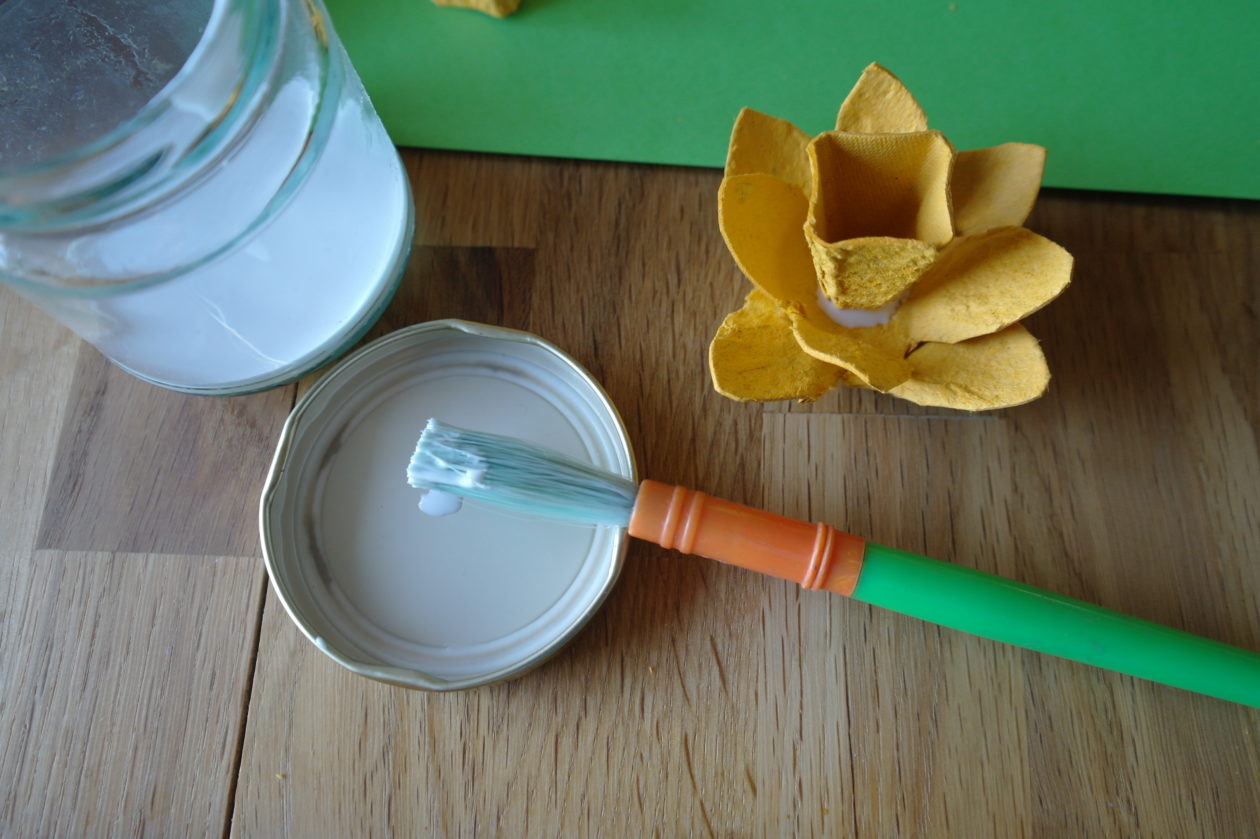
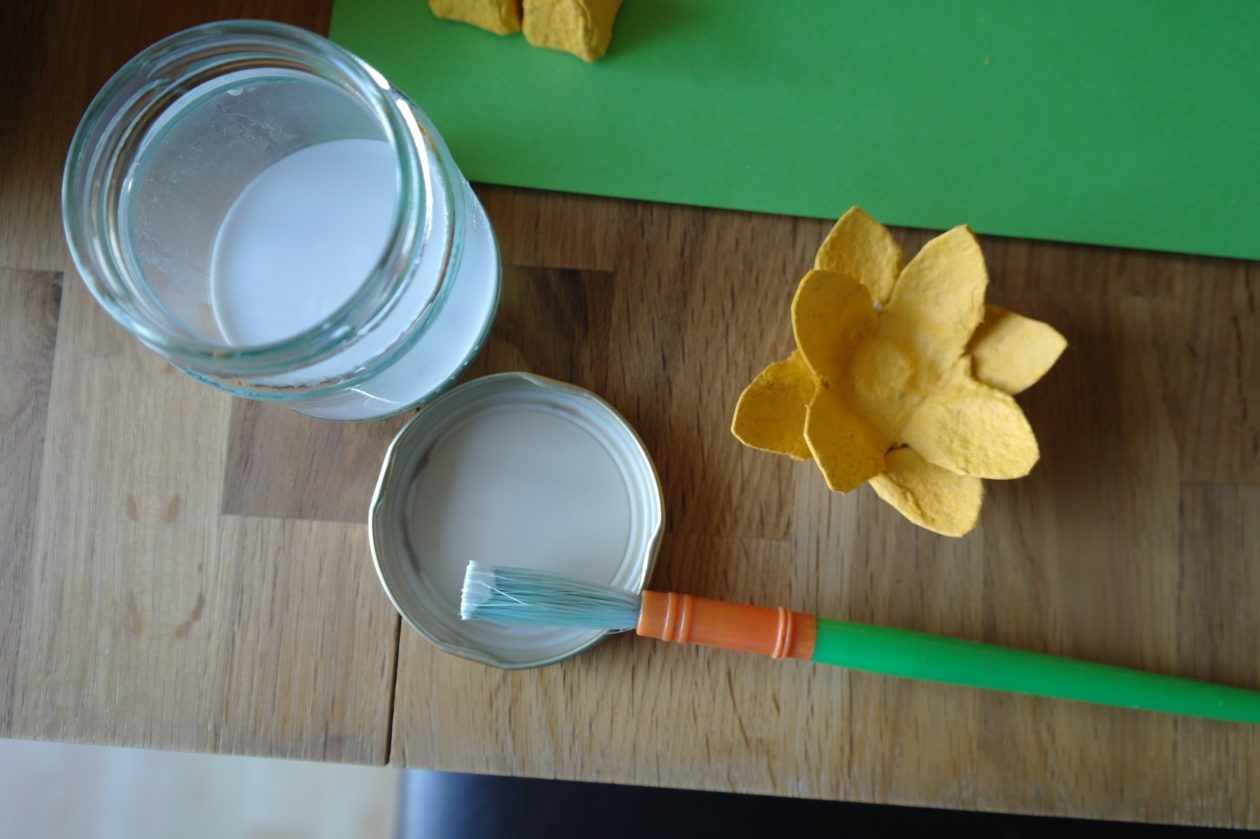
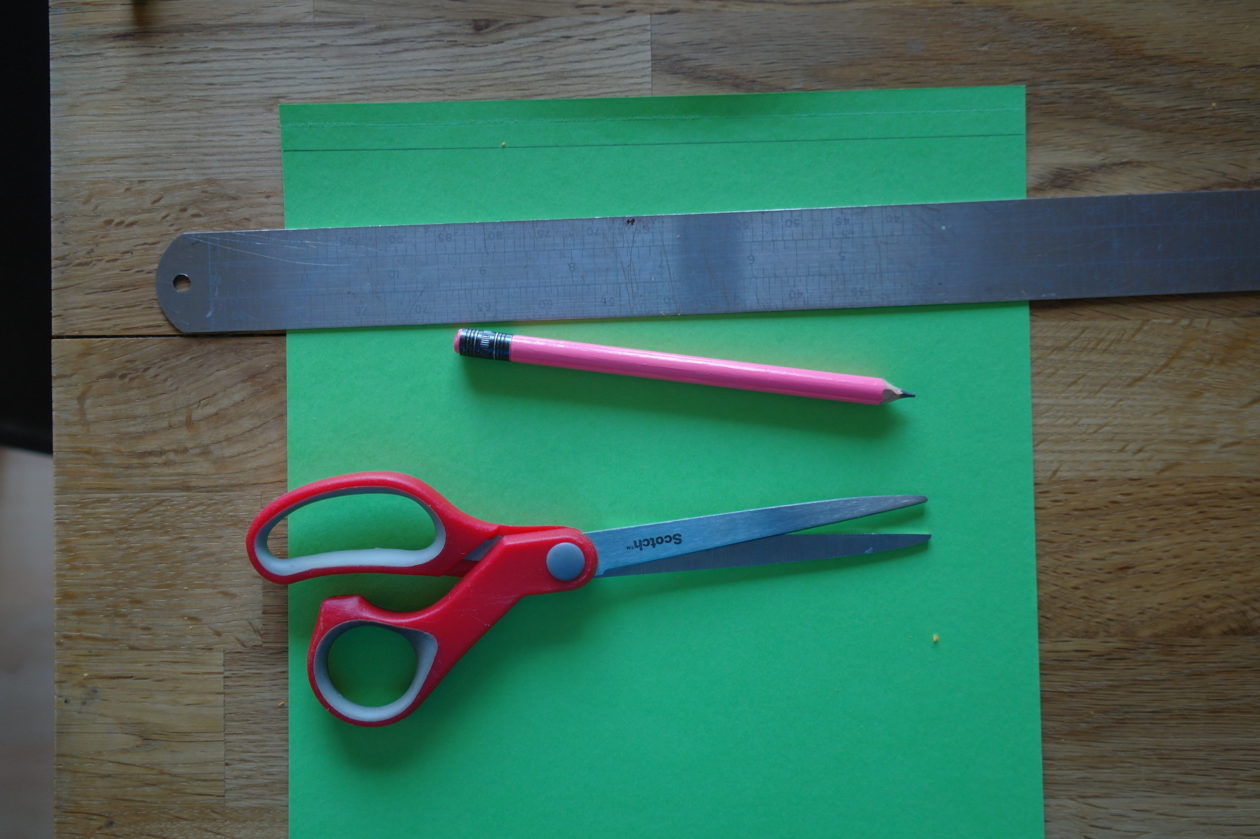
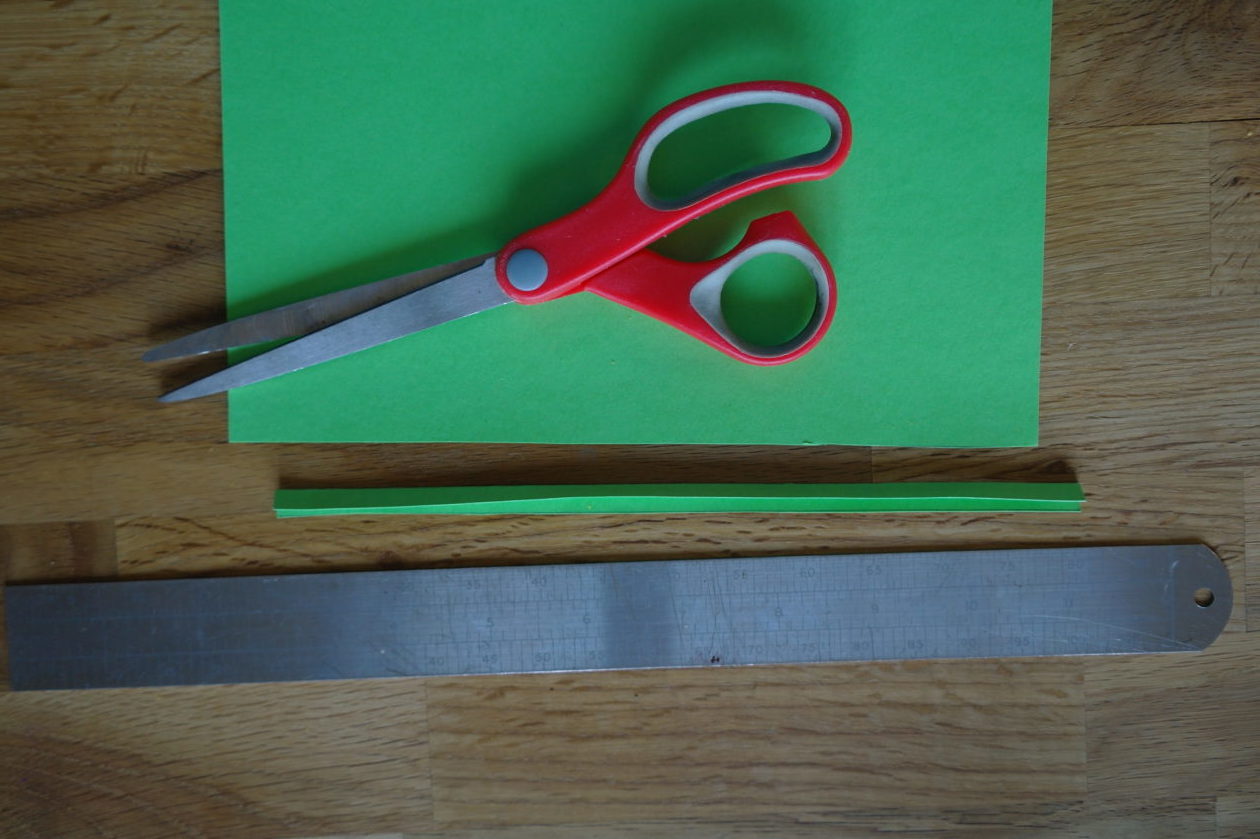
Use a ruler to draw a line 1 cm in from the edge of your thin card and cut along this line. Score a line, using the ruler and edge of the scissors, down the centre of your strip of card.
Fold your strip of card, along the scored line.
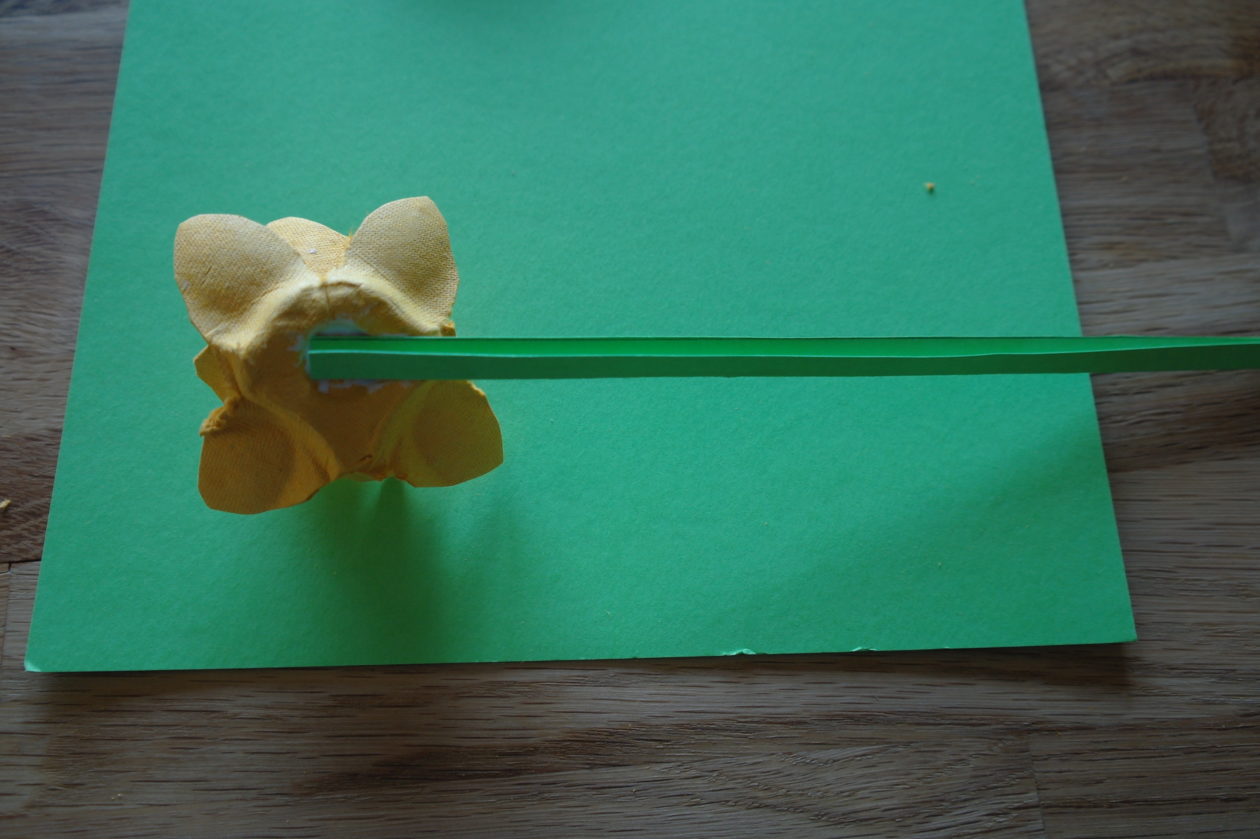
Glue one end of your folded strip of card to the back of your flower to create the stem.
I had a yellow egg box to make my daffodils so I didn’t need to paint them but I did paint the other blue flowers I made and glued a button in the centre of each of them.
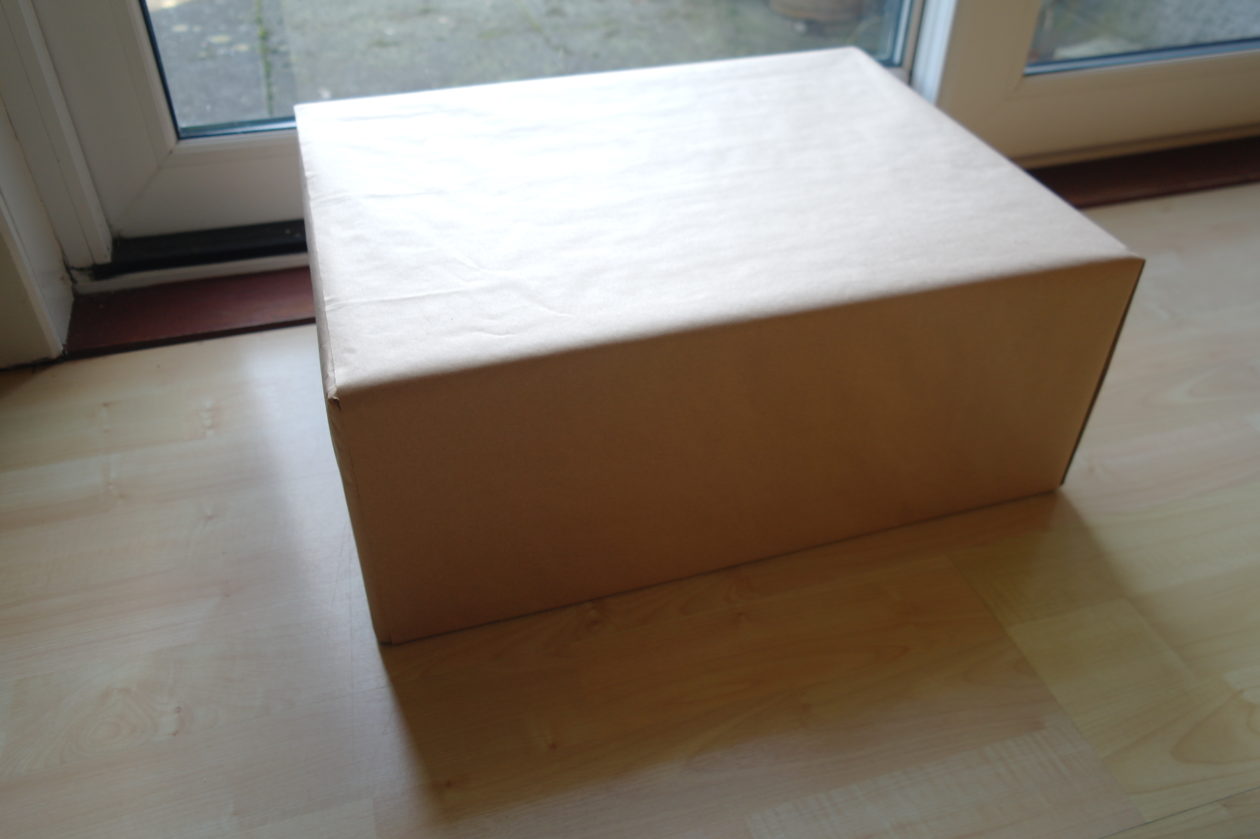
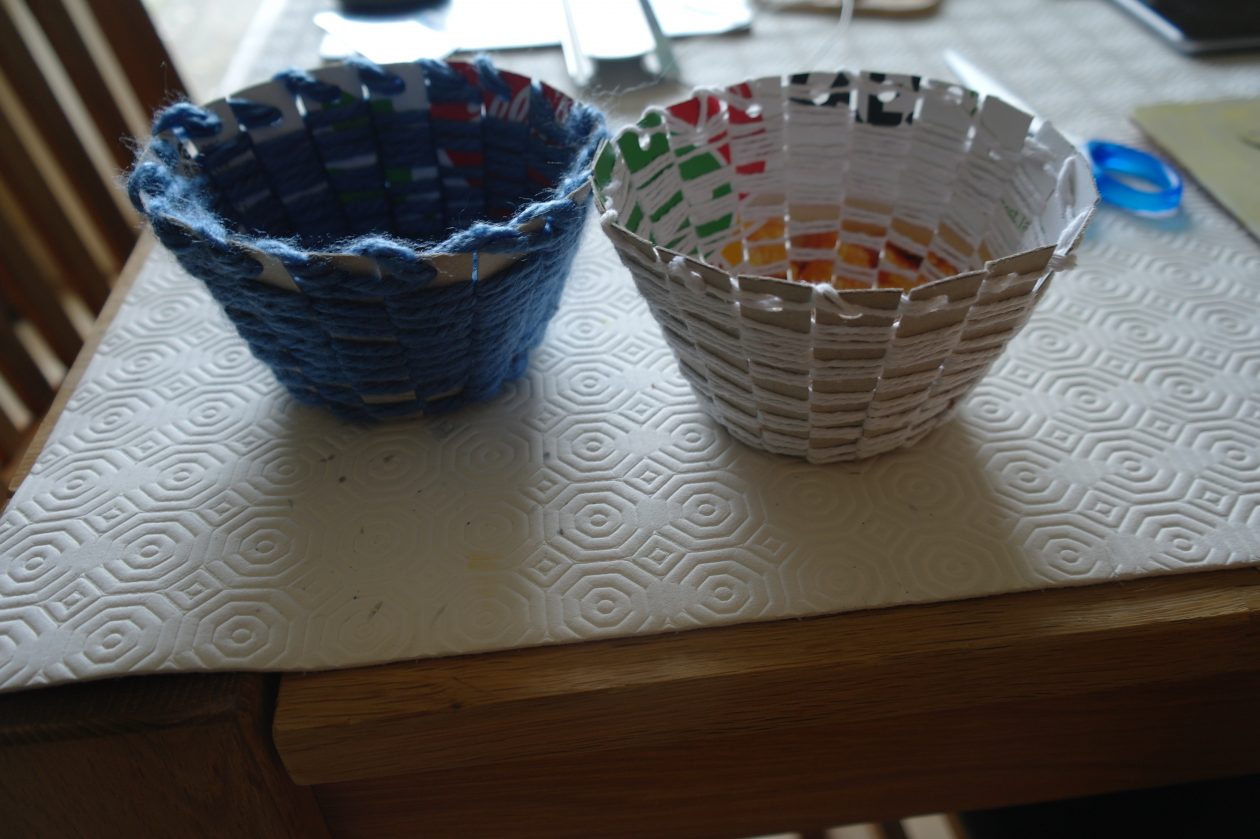
A Box made from Cereal Boxes
I have a lot of cereal boxes that I have collected for recycling. I haven’t been able to take them to the recycling centre because it is not yet open (the tip is, but not the recycling part of it). I decided to turn them into a useful storage box.
To make this woven box, you will need:
- Cereal boxes opened out, flat
- a long ruler
- scissors
- a pencil
- glue (I used P.V.A.)
- paper clips
- masking tape.
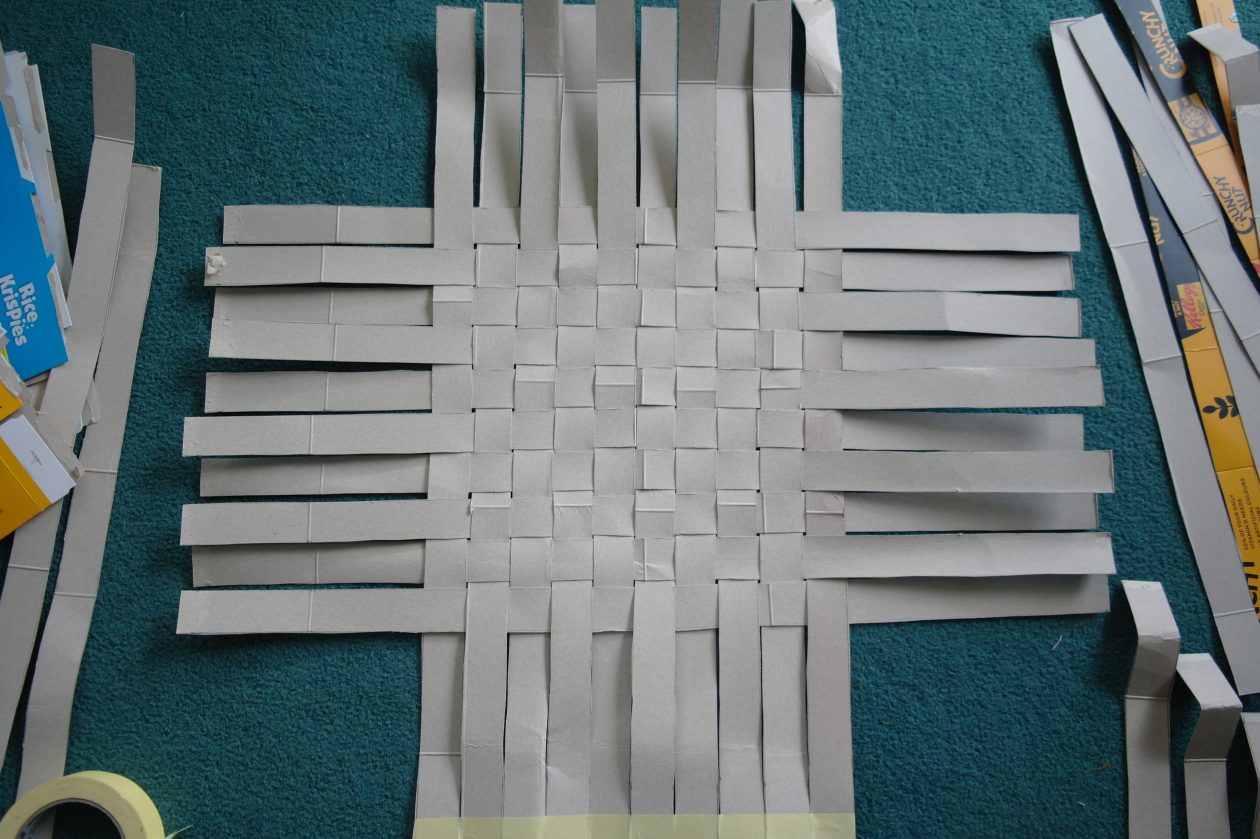
Once you have opened out your cereal boxes, cut off the tabs around the edges and any damaged bits to make a rectangle.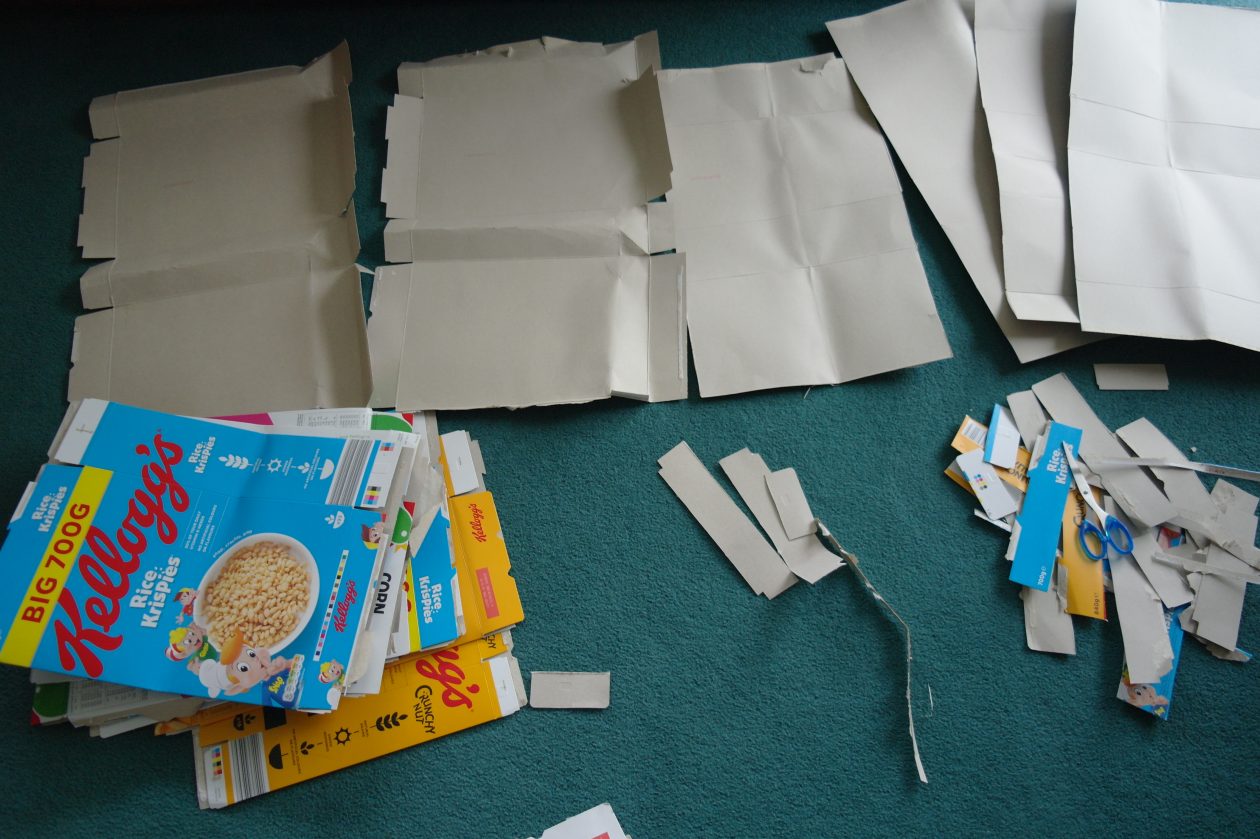
Use your pencil and ruler to mark, at 3 cm intervals, along the short sides of your rectangle and rule lines. Cut along the lines to make strips.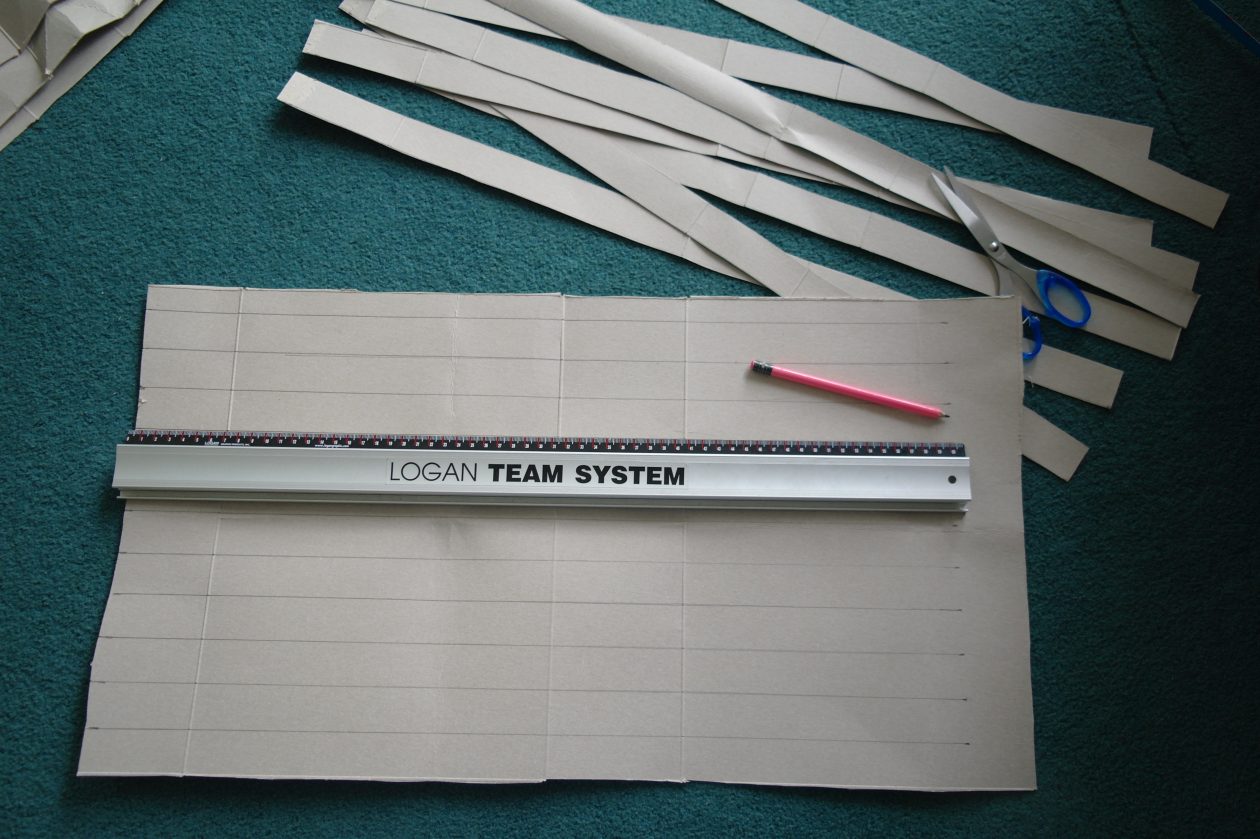
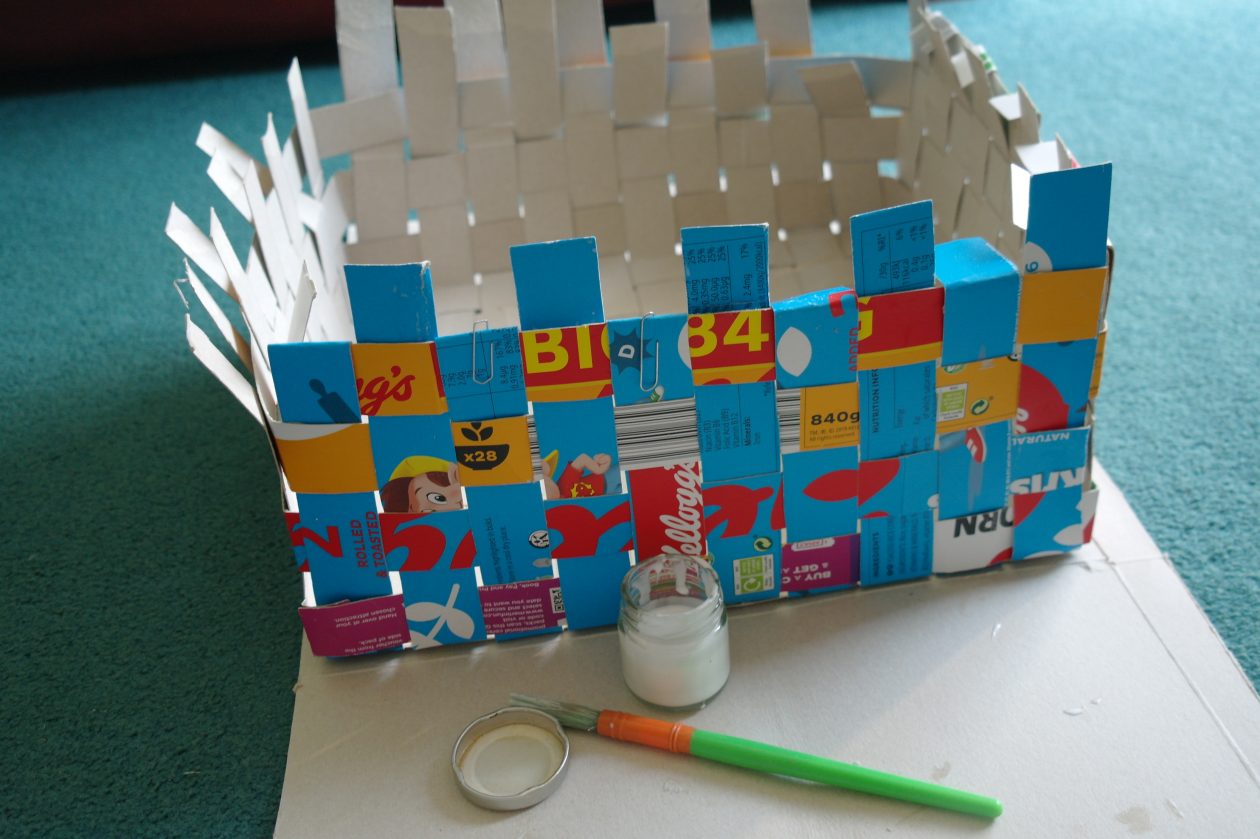
Lay out 10 strips, horizontally, and tape them together, using masking tape, at one end. Begin to weave 10 more strips, vertically, through your horizontal strips – make sure you have an equal length, sticking out, at either side.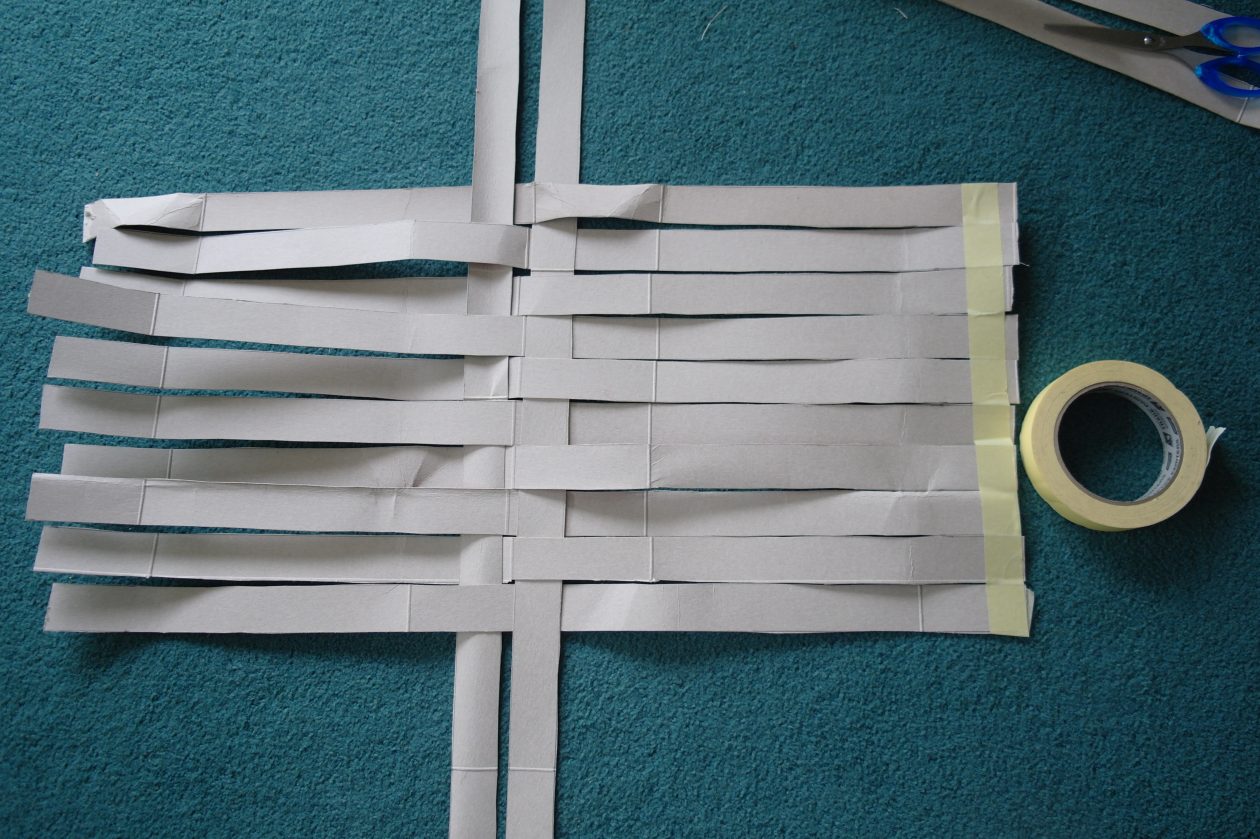
Once you have woven in all 10 strips, use masking tape to hold the ends together at each side and fold the sides up to form a box shape. Weave some more strips going around, diagonally, opposite corners of the box.
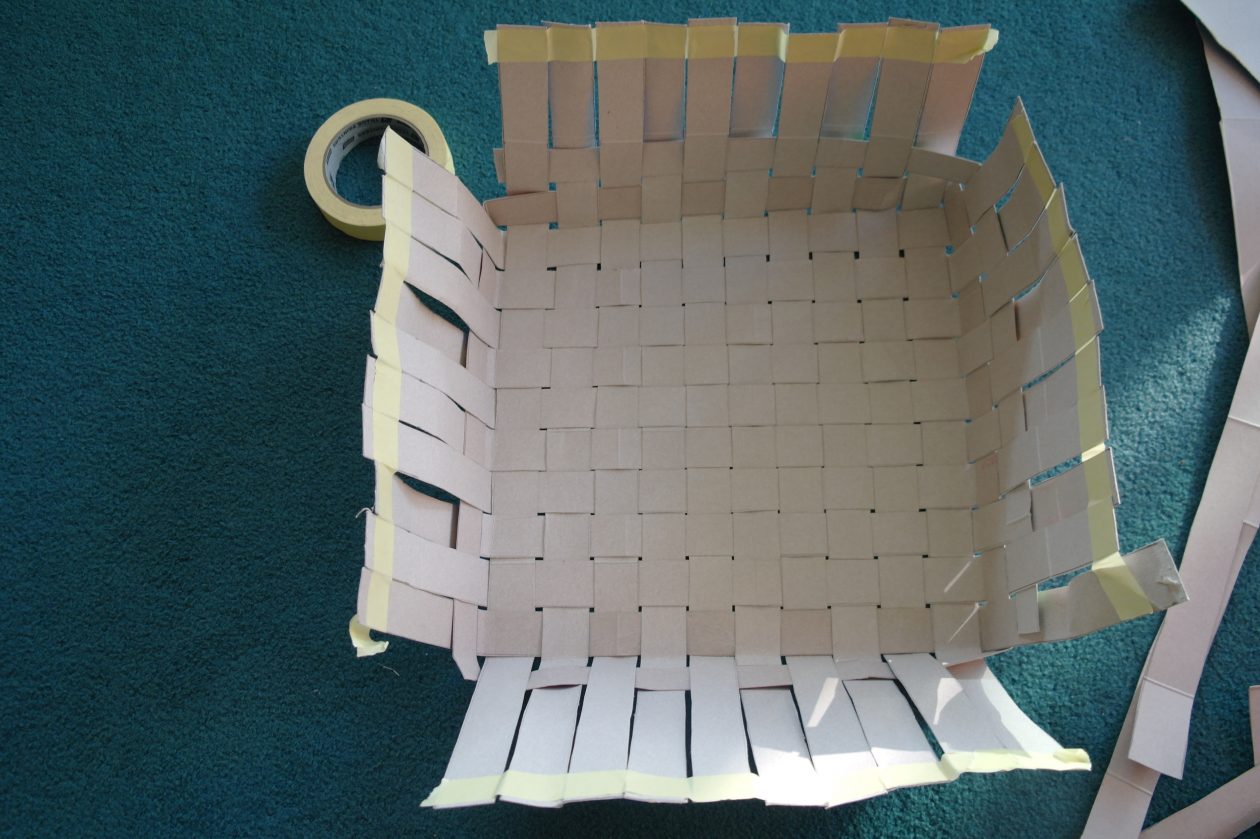
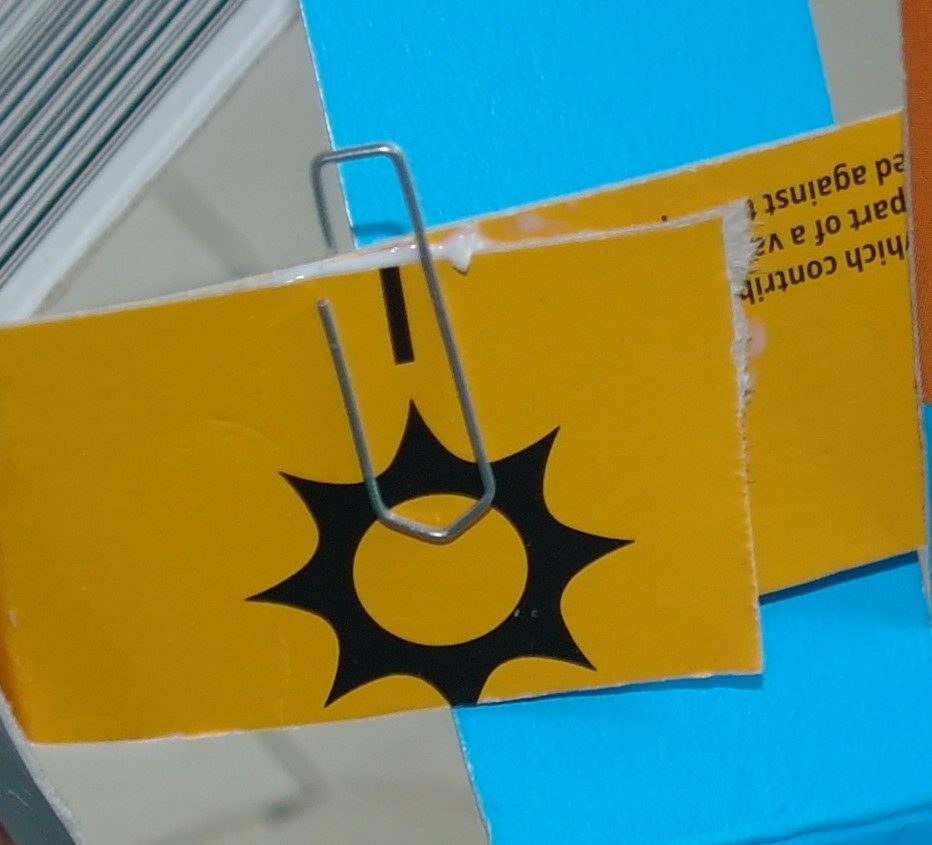
Keep weaving until you have nearly reached the top of the box strips. Remove the masking tape, glue any ends together at the corners and secure using paper clips, until dry.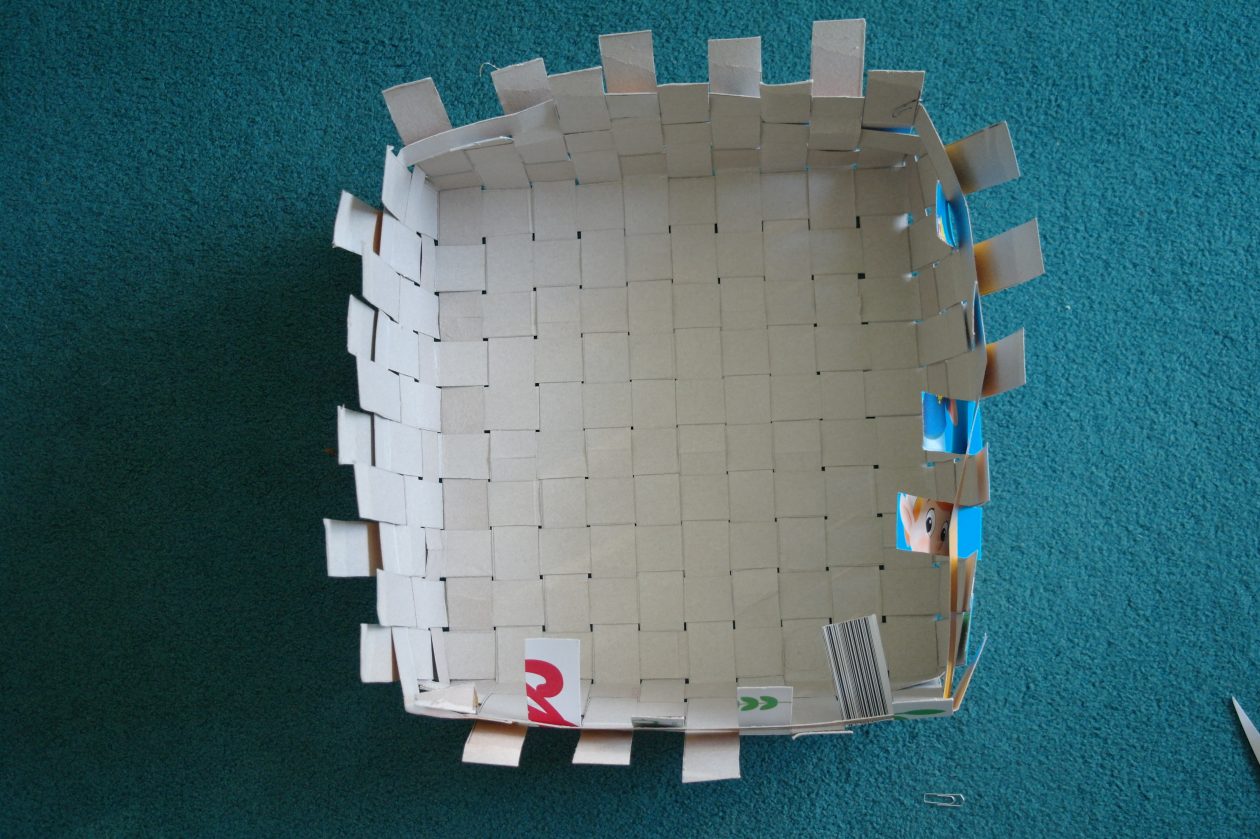
Cut four more strips to the length of each side, glue the inside and weave them along each edge, at the top of the box. Fold alternate strips down, over this strip, glue and secure using paper clips. Allow to dry.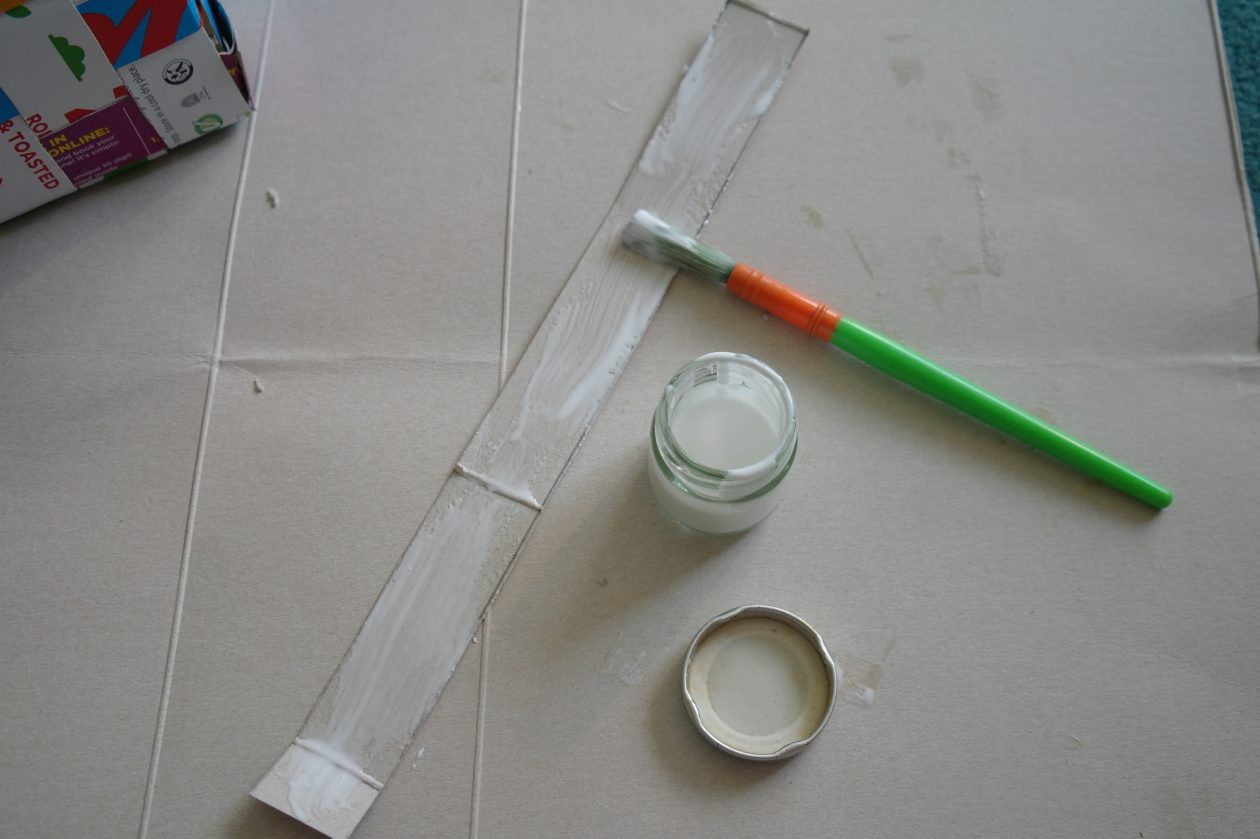
Finally, glue another strip on the inside of the box, along the top edge, folding and gluing the remaining strips down over it. Secure using paper clips until dry.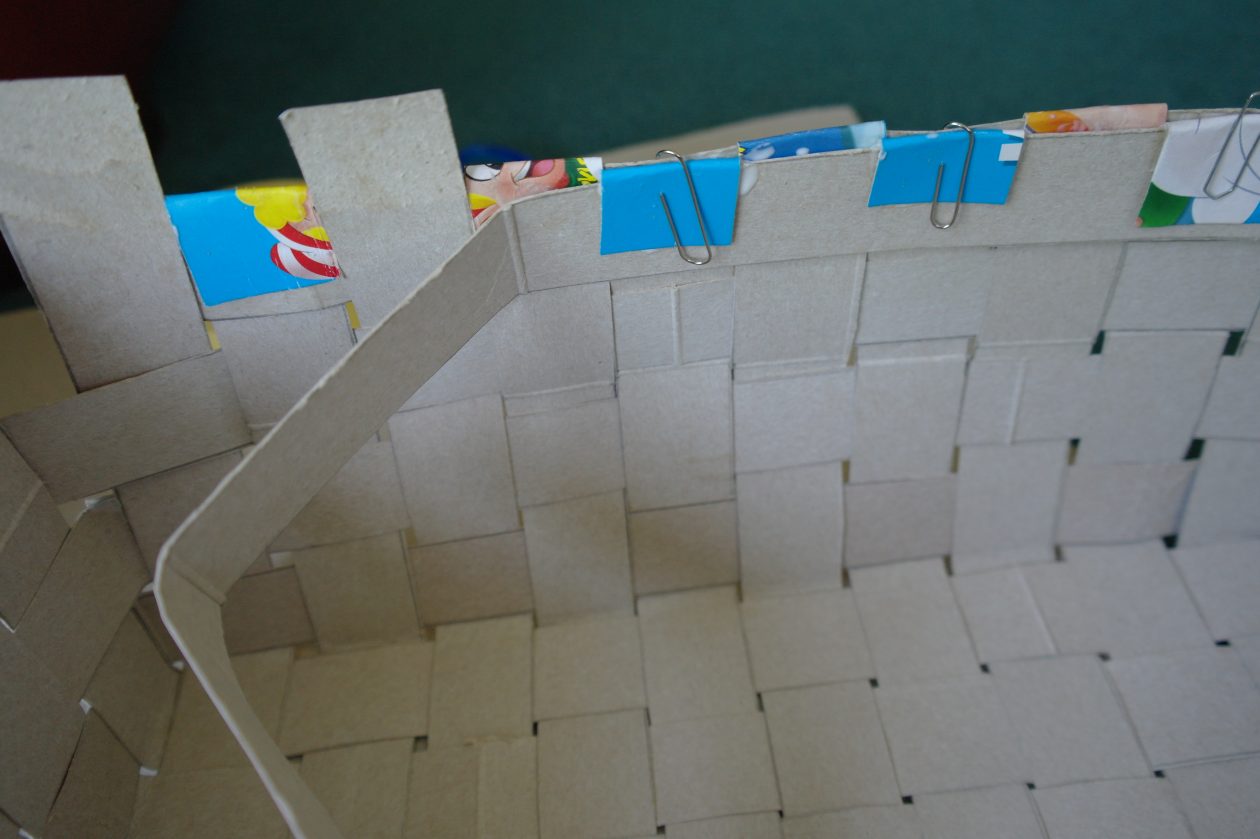
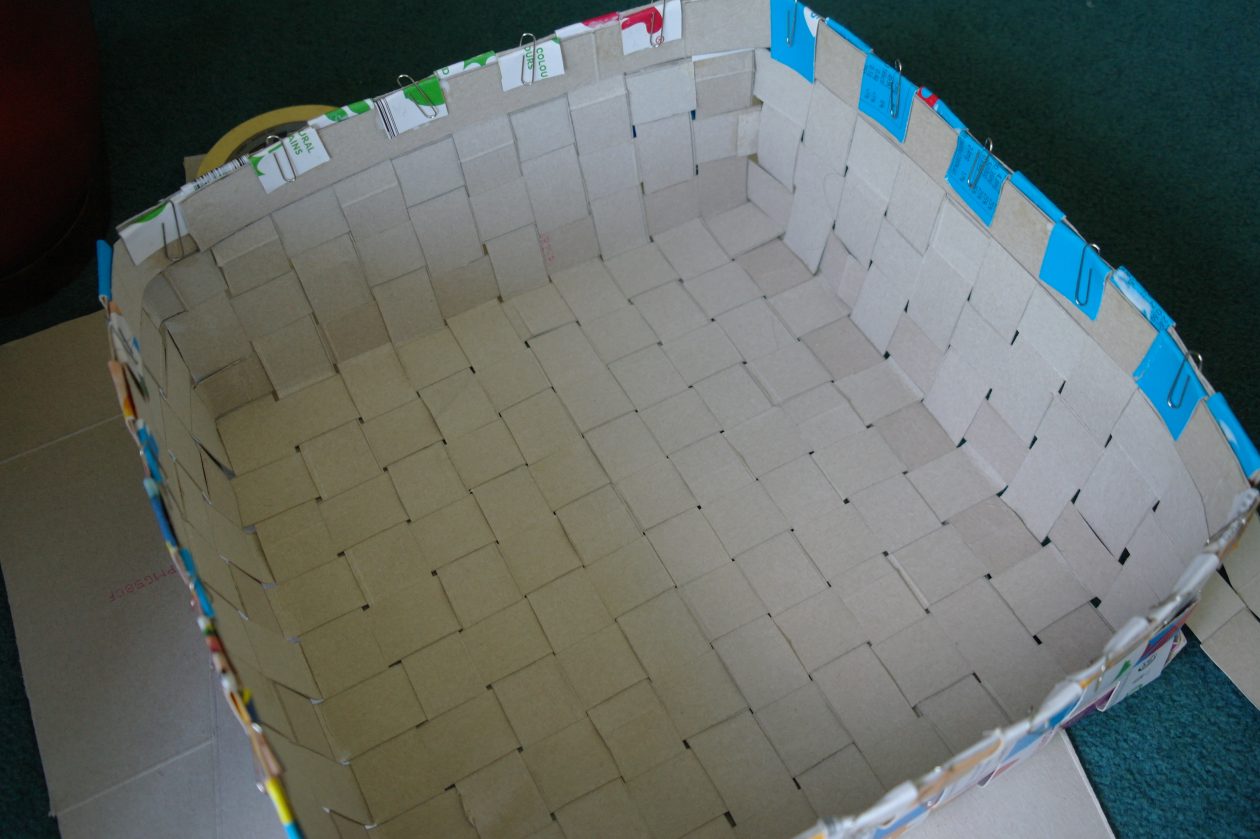
Your recycled storage box is complete.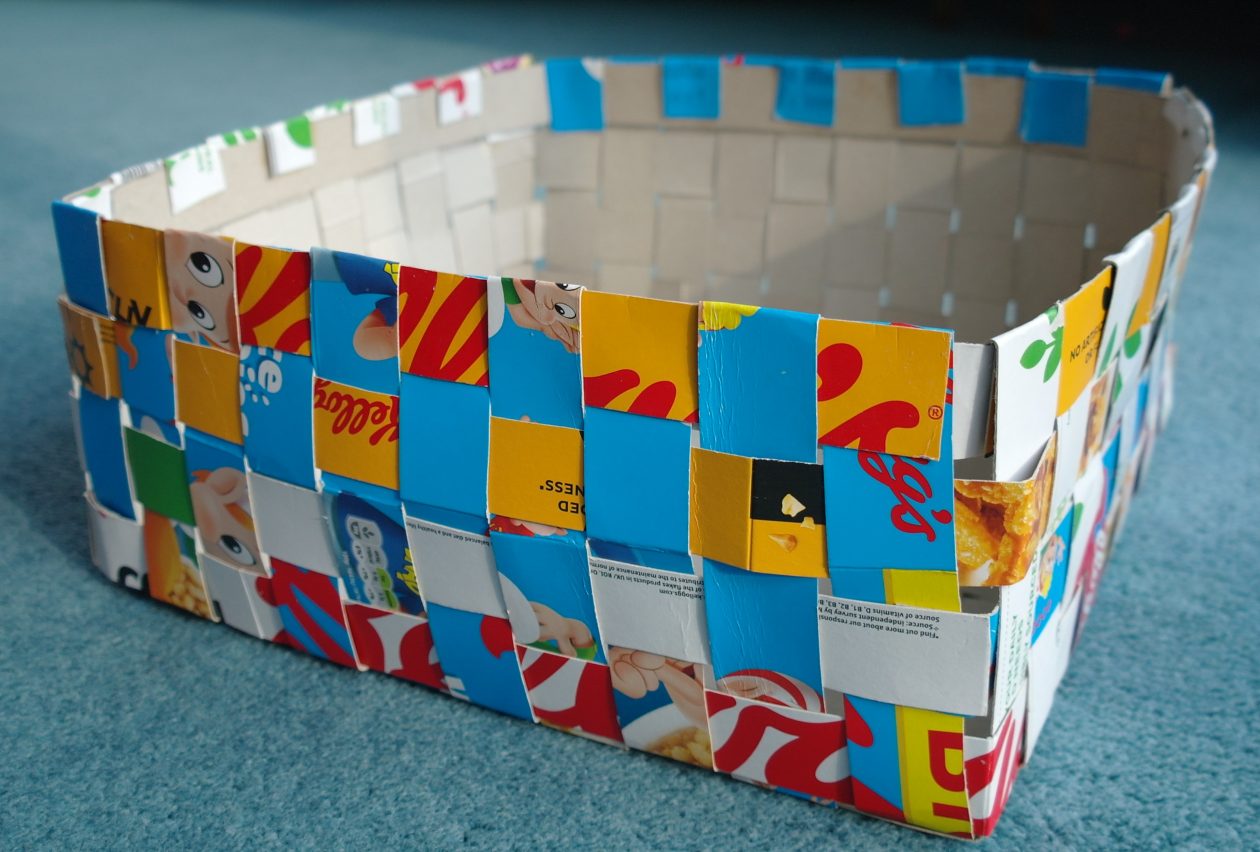
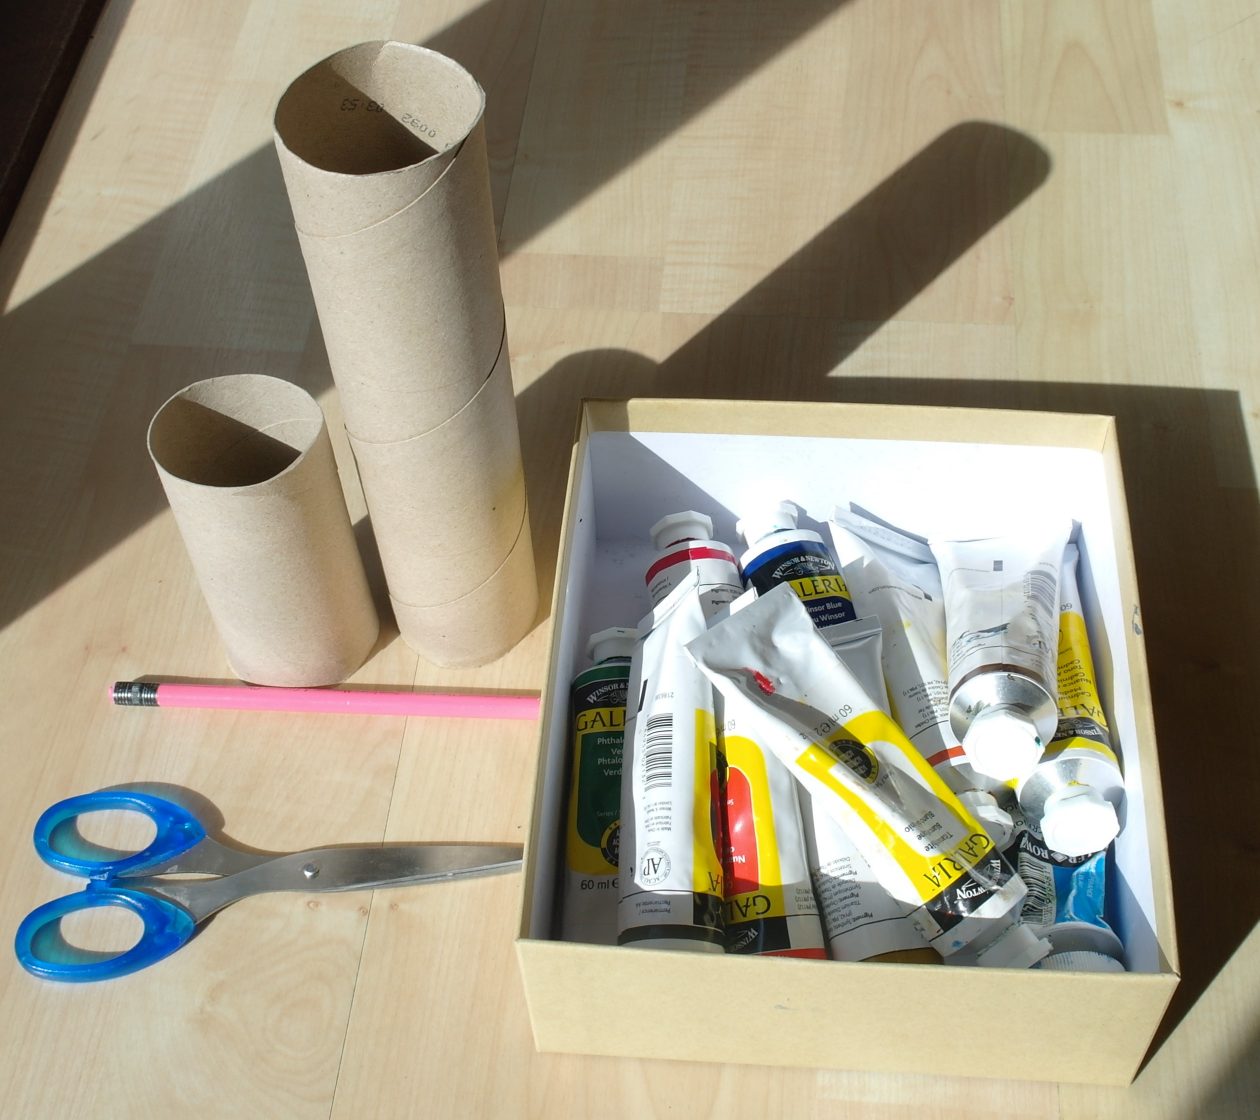
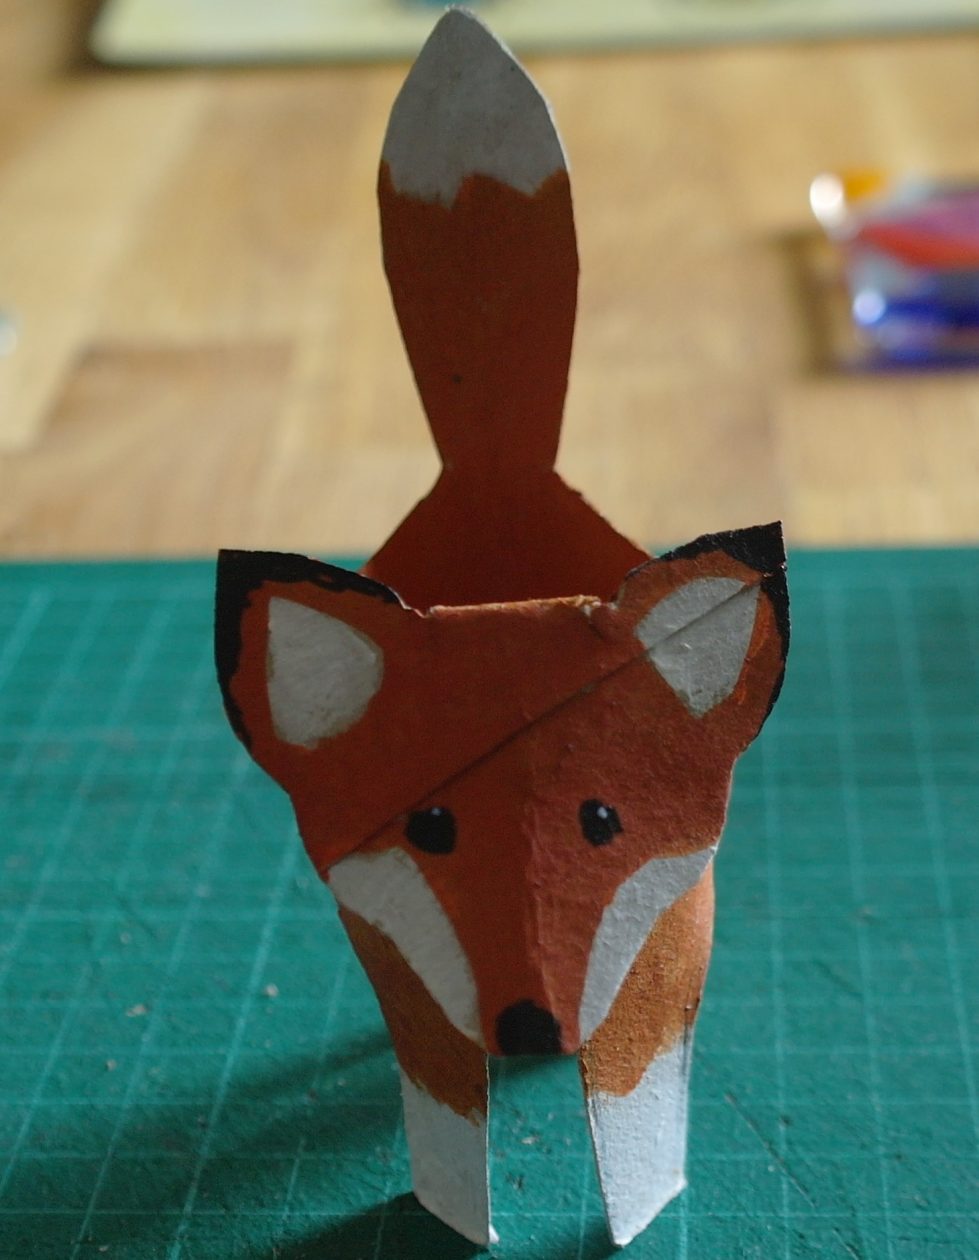
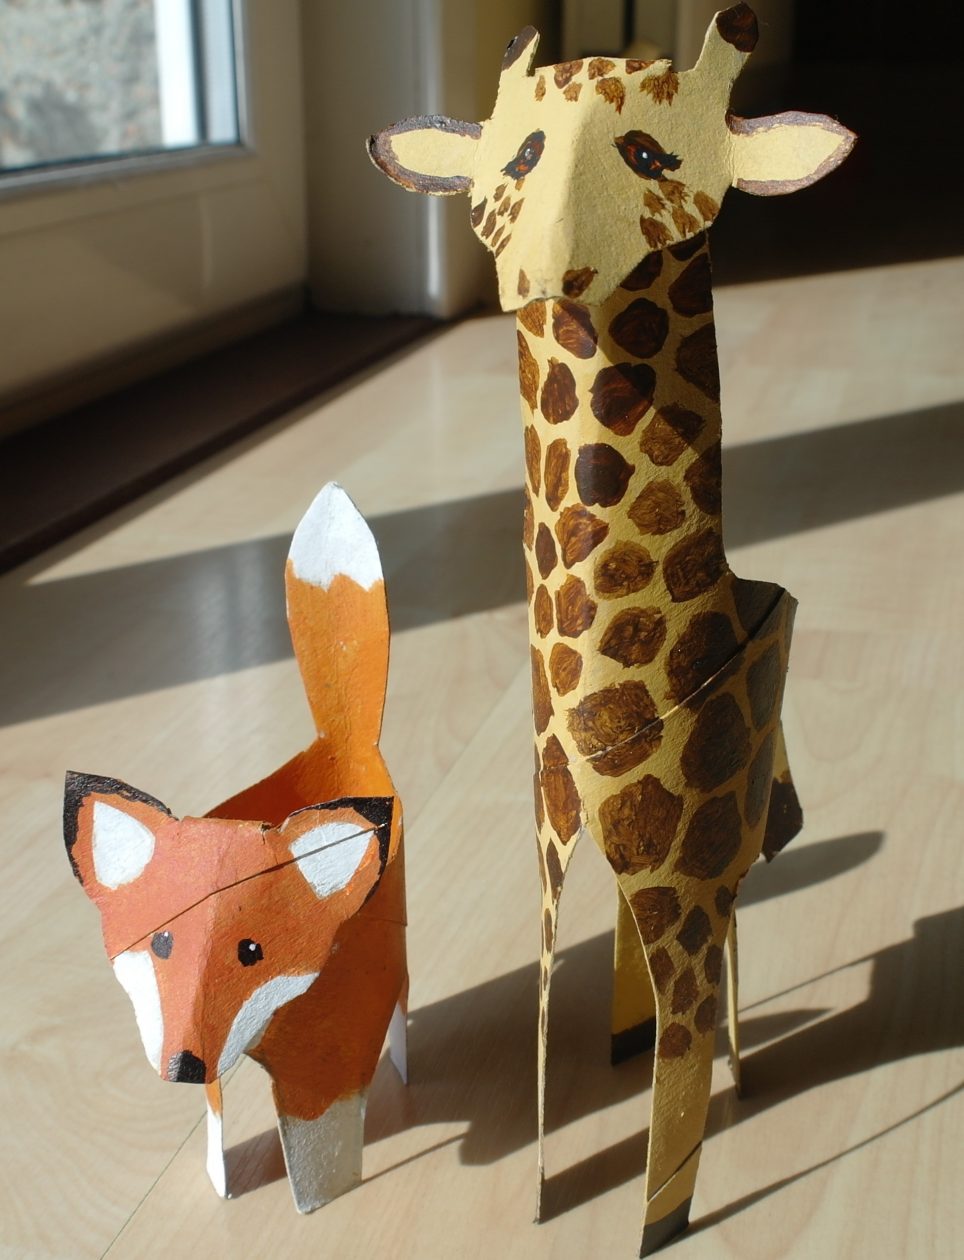
Cardboard Tube Animals
To make a cardboard tube animal, you will need:
- a toilet roll tube (I also used a kitchen roll tube to make the giraffe)
- a pair of scissors
- a pencil
- some paints and brushes (I used acrylic paints).
Flatten the toilet roll tube.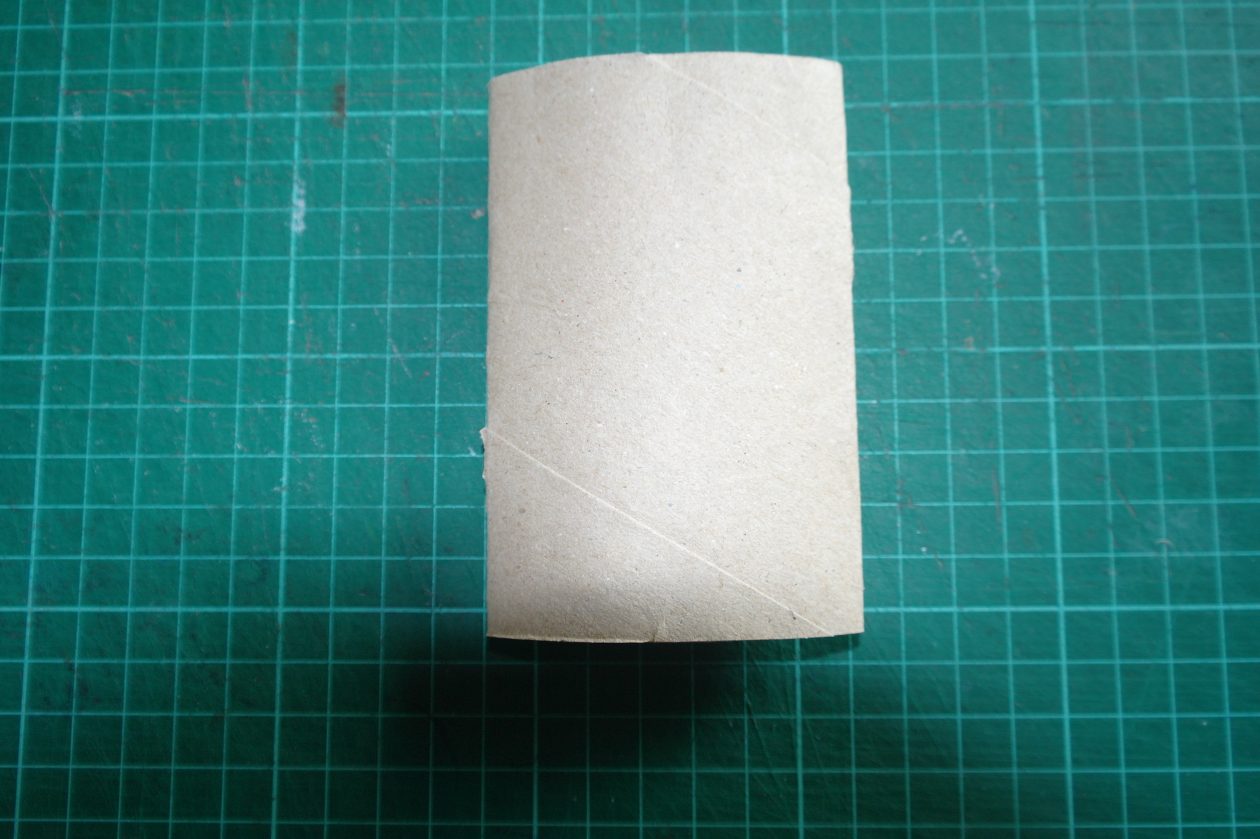
Use your pencil to draw on a fox shape. Draw the head facing upwards and try to imagine the shape you are drawing is half of the front of the face.
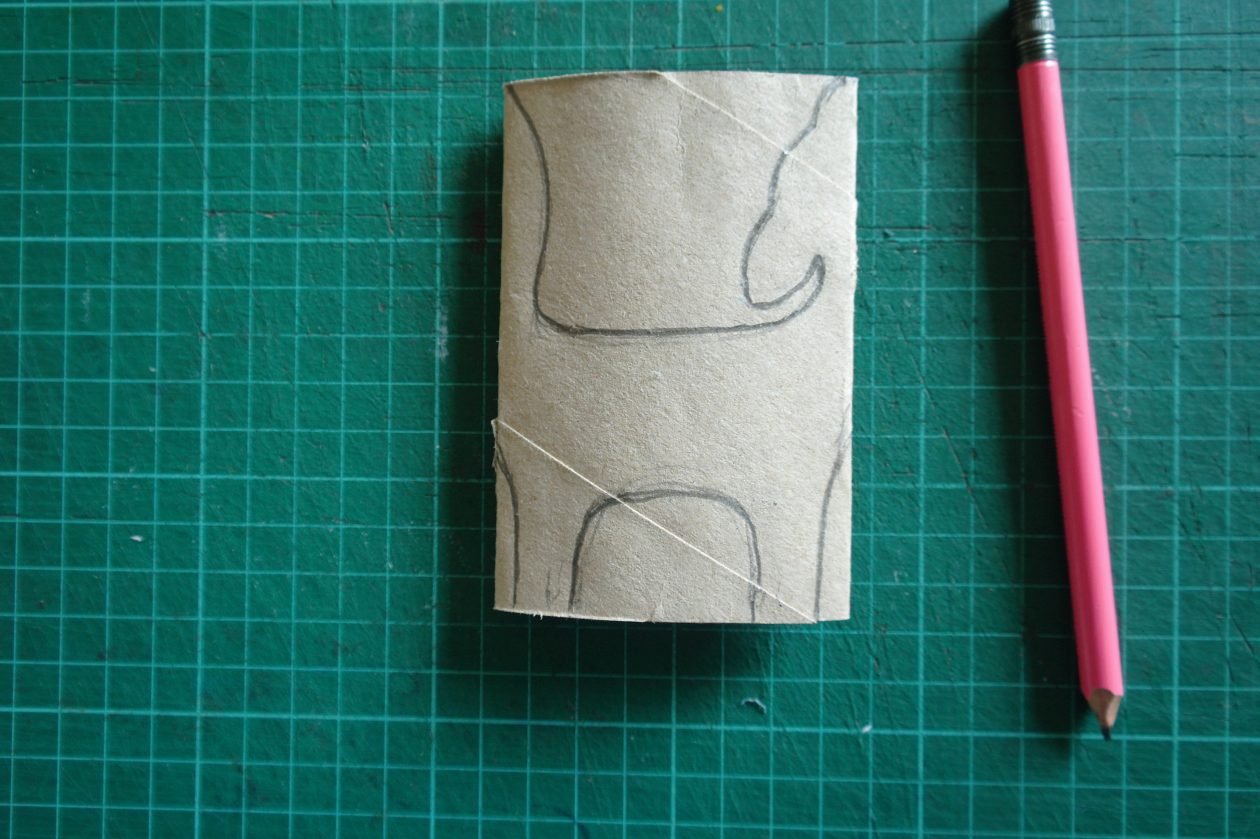
Use your scissors to, carefully, cut around your lines.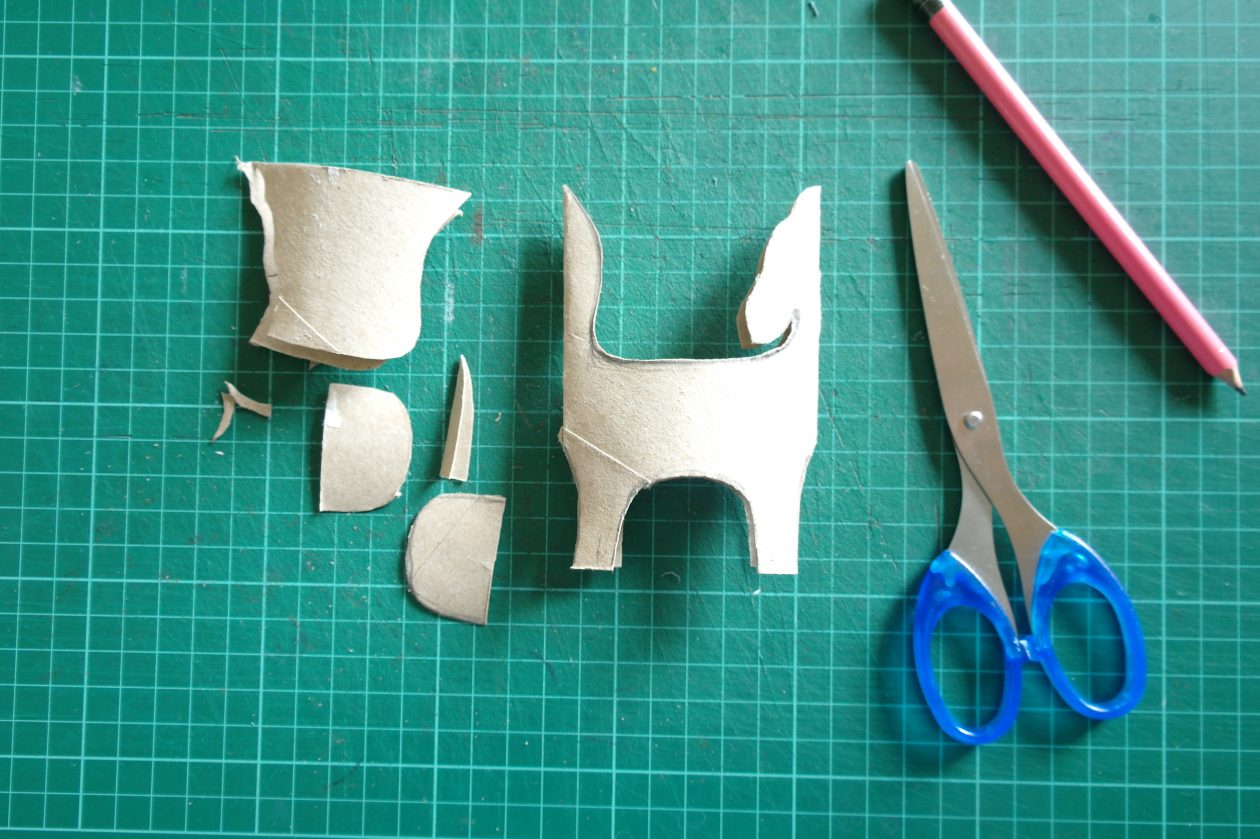
Un-squash your tube and fold the head downwards and the ears slightly forwards.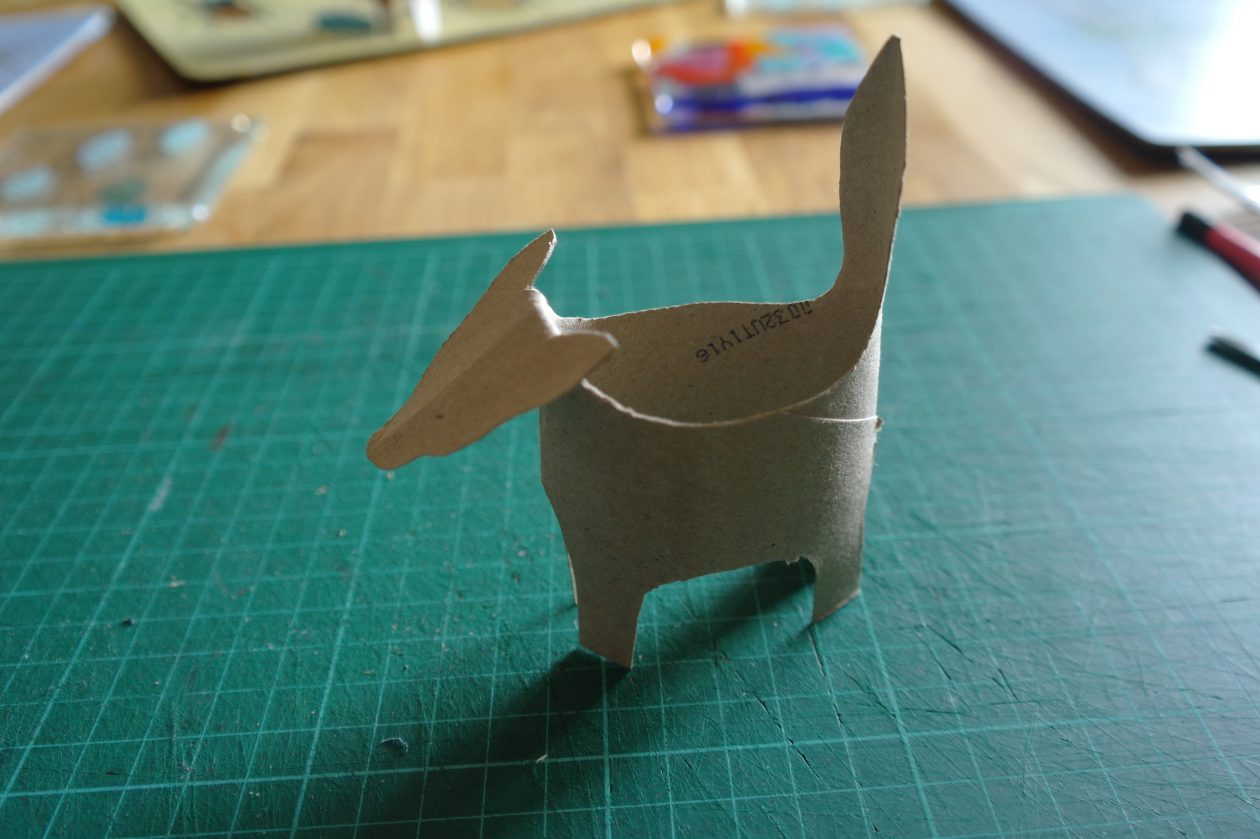
Paint your fox – I used acrylic paints but you can use whatever you have got.
I also made a giraffe from a kitchen roll tube, using the same method. What other animals could you make?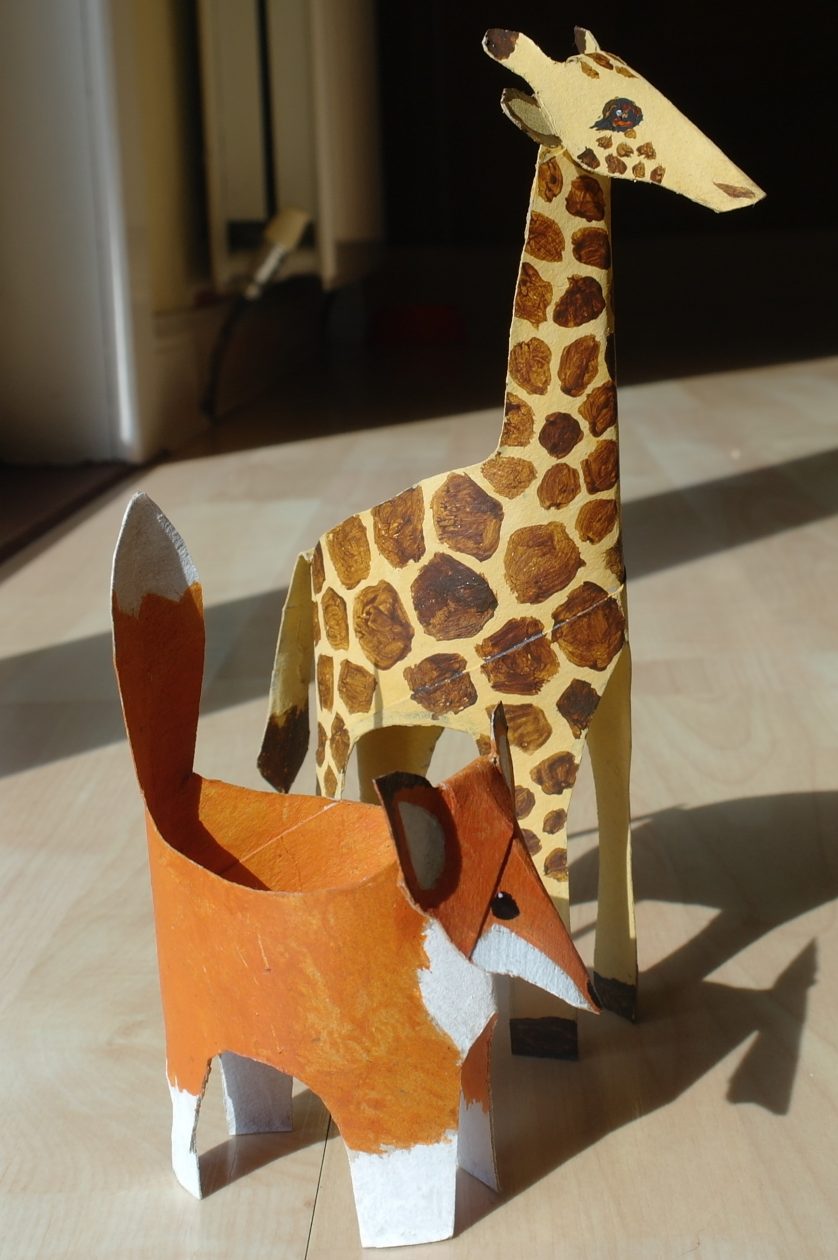
Paper Fish
Miss Dale really likes this fish. I have been making it with the children (and staff) at the emergency childcare hub and I have decided to share how to make it with you.
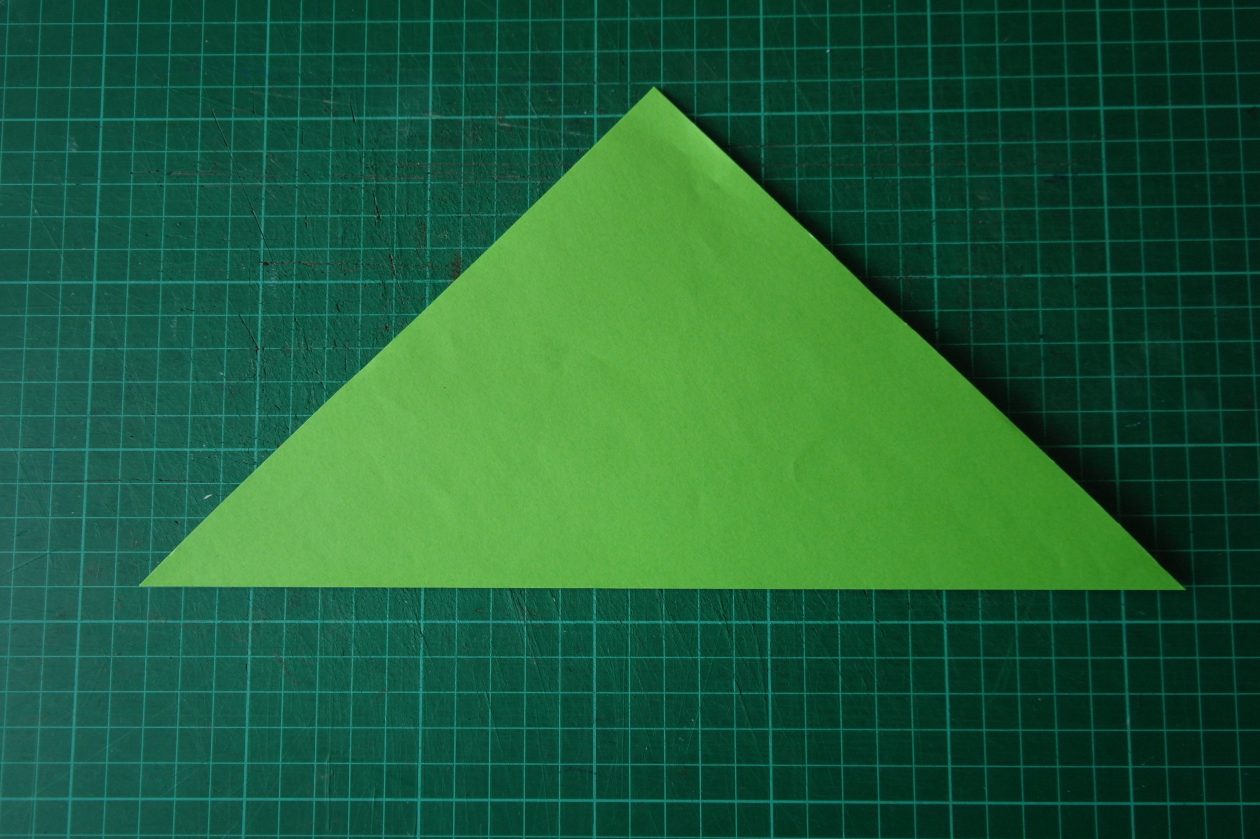
You will need to make a square piece of paper (see instructions for this on my origami animals post), another smaller piece of paper in a contrasting colour, a pair of scissors, a black felt tipped pen, a pencil and some glue.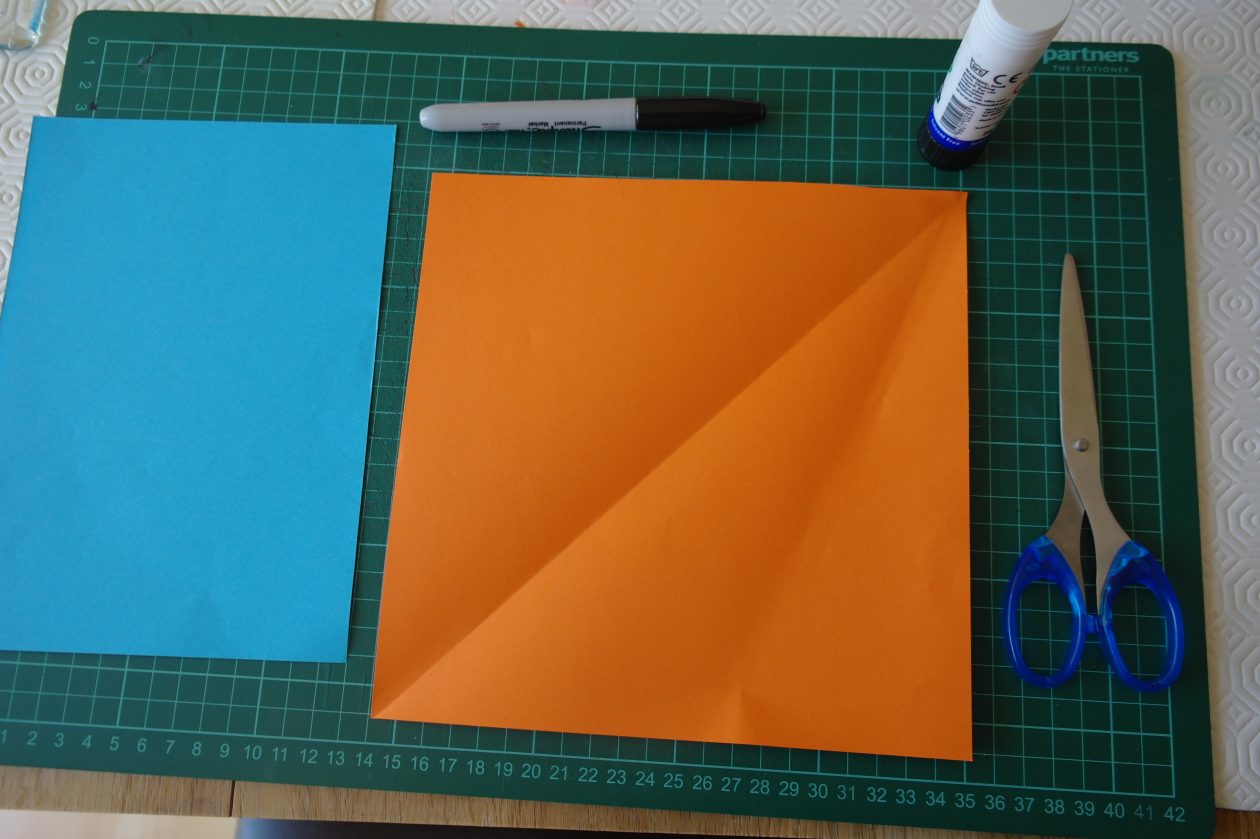
Fold the paper diagonally to create a triangle.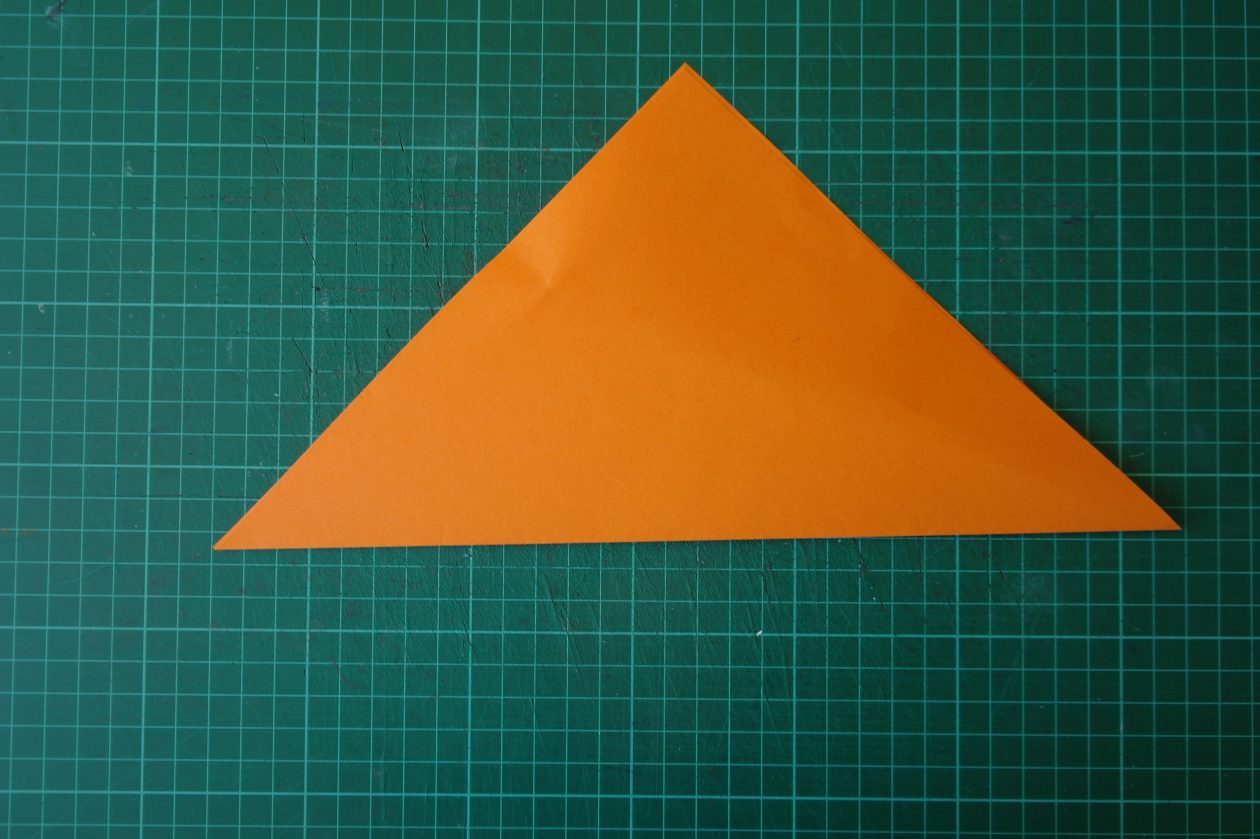
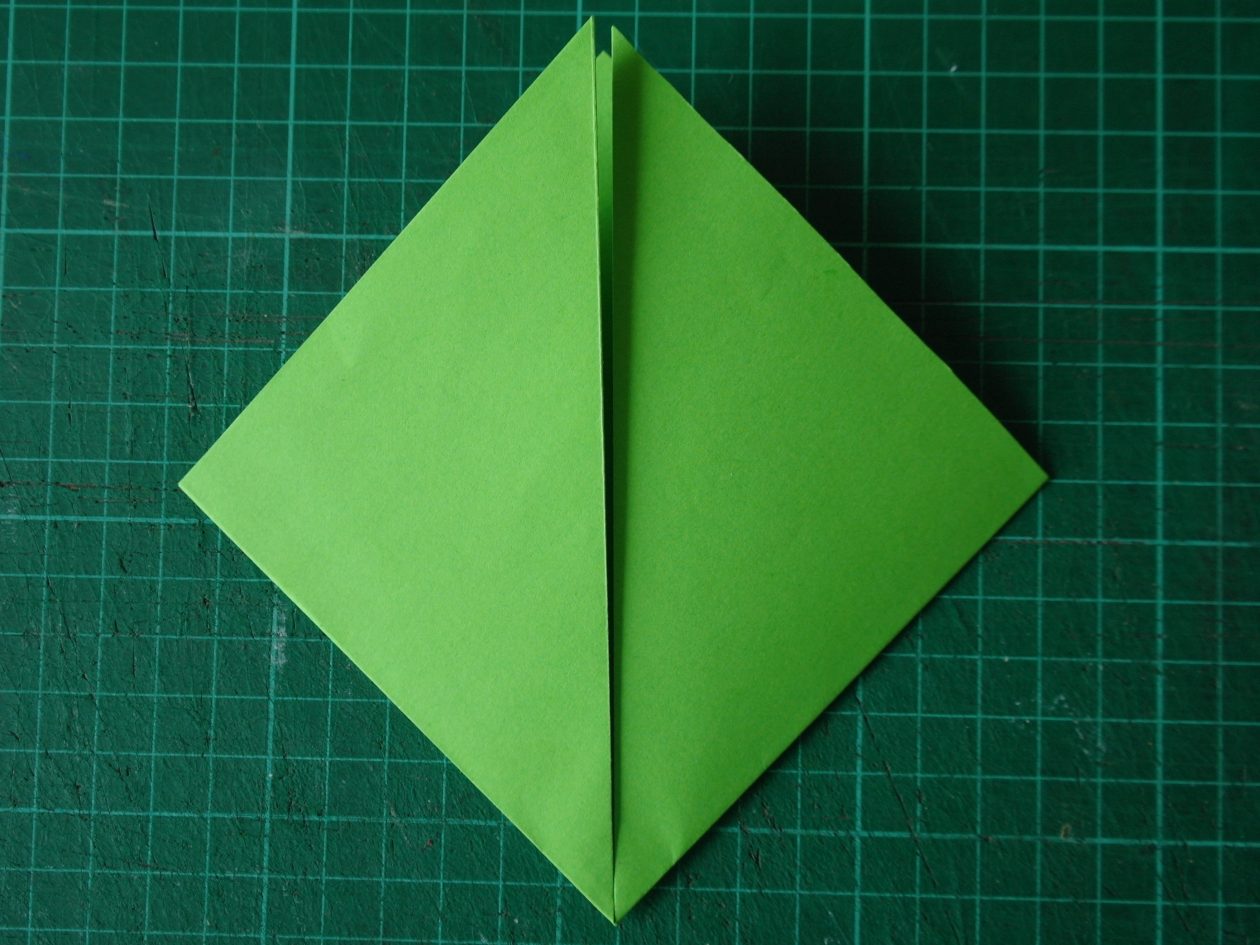
Unfold again and fold the two opposite corners in, lining the edges up with the centre crease to create a kite shape.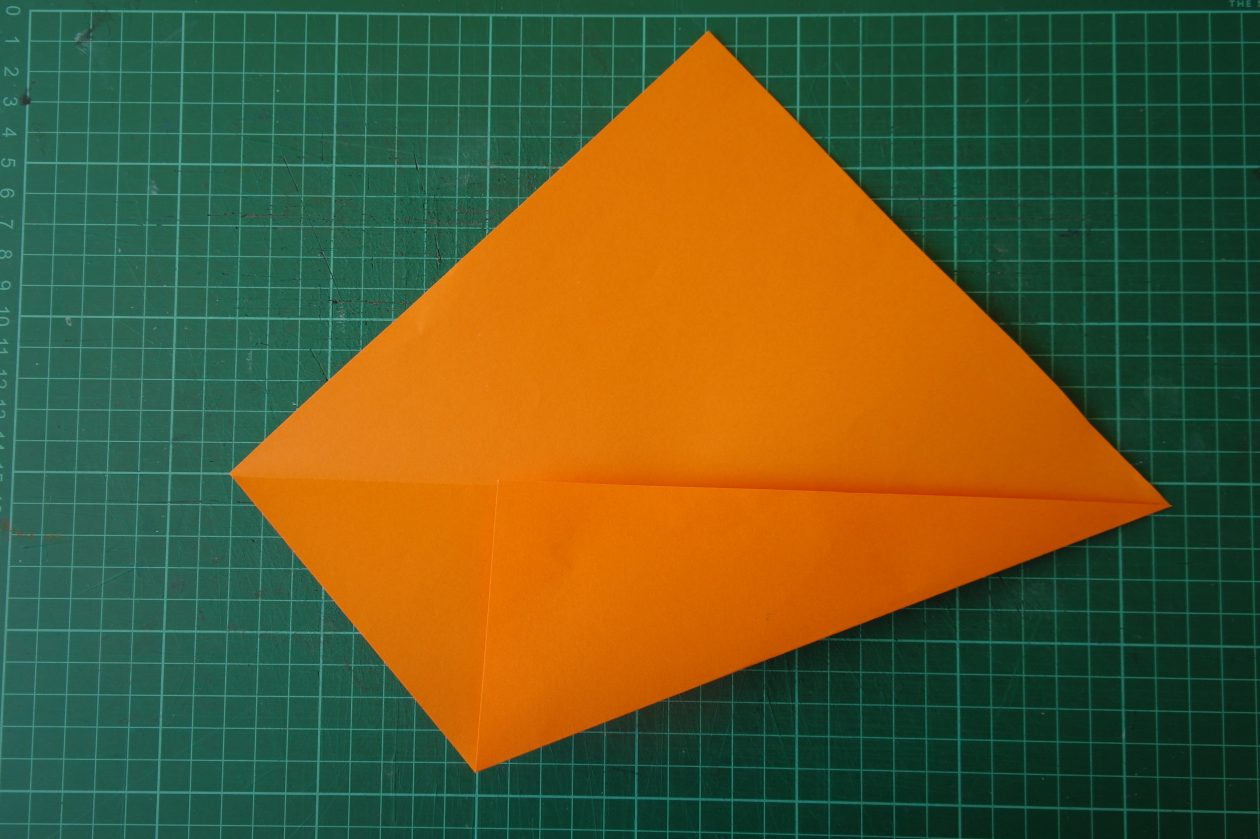
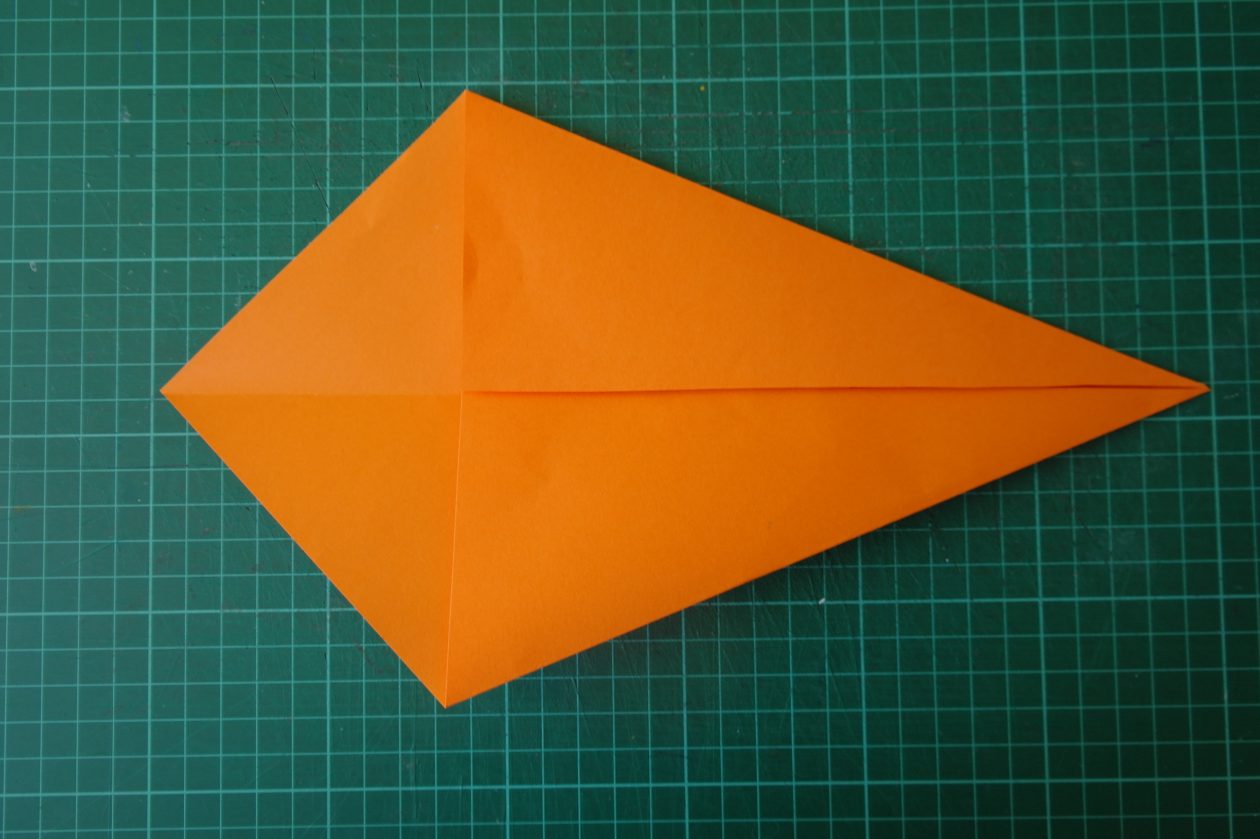
Unfold again to make the triangle again with the long folded edge at the bottom.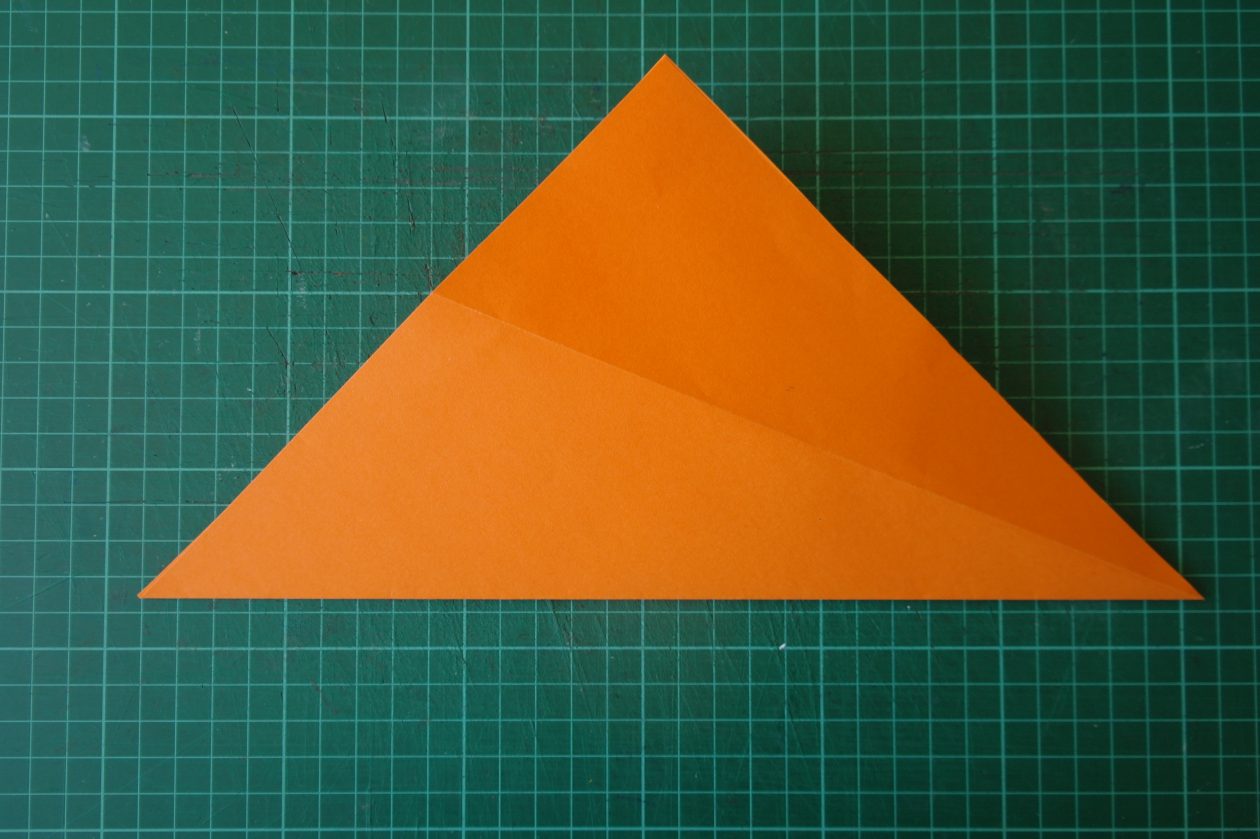
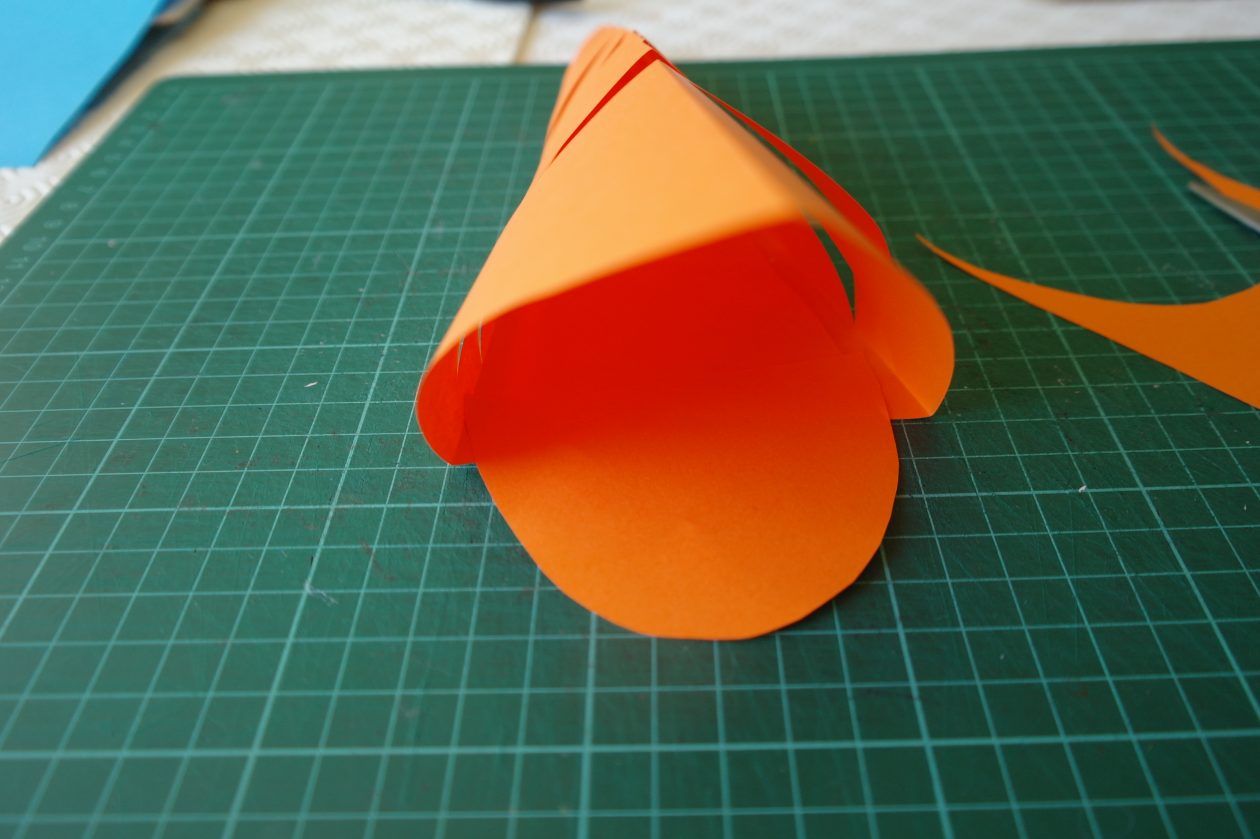
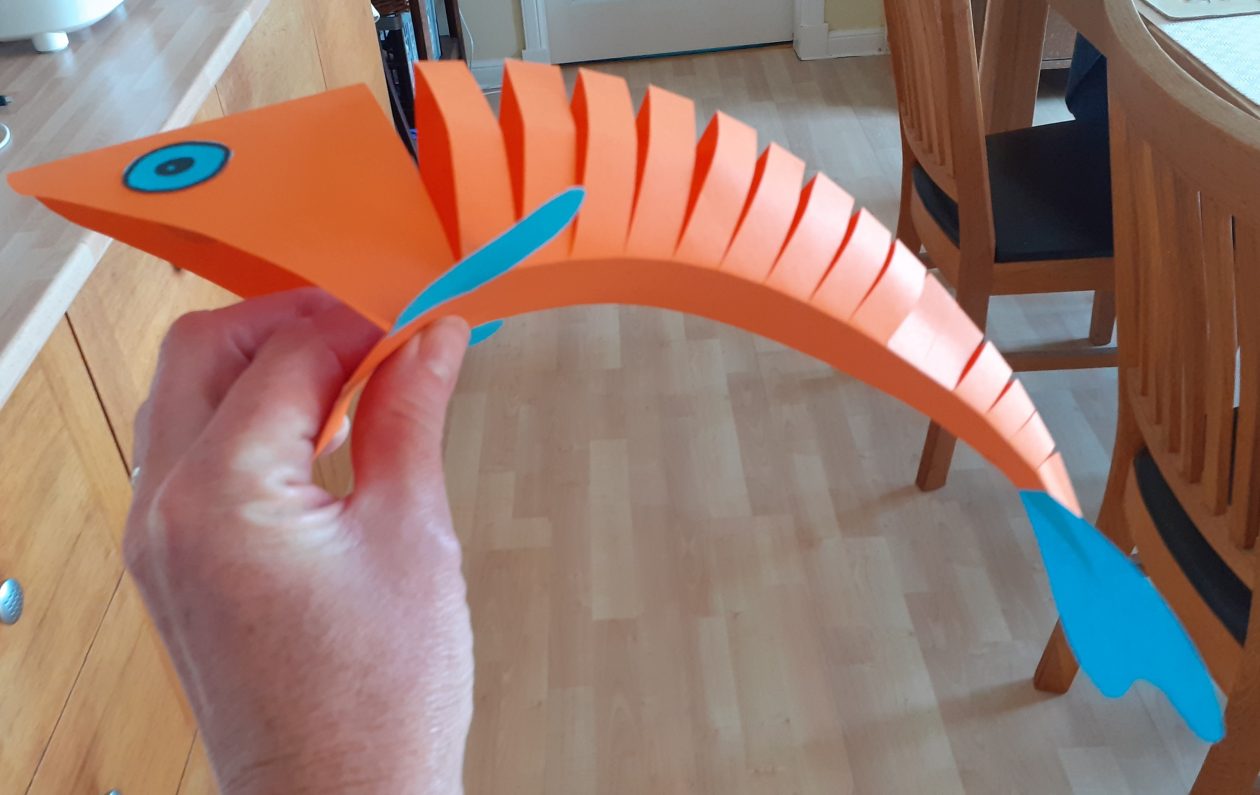
Use your scissors to make cuts from the bottom folded edge up to the creases you have made. The first cut should be 2 – 3 centimetres along from the left corner of the creased edge (this will create the head of the fish). Make the cuts about 1 centimetre apart and leave about 2 – 3 centimetres uncut from the right corner of the creased edge (this will be the tail).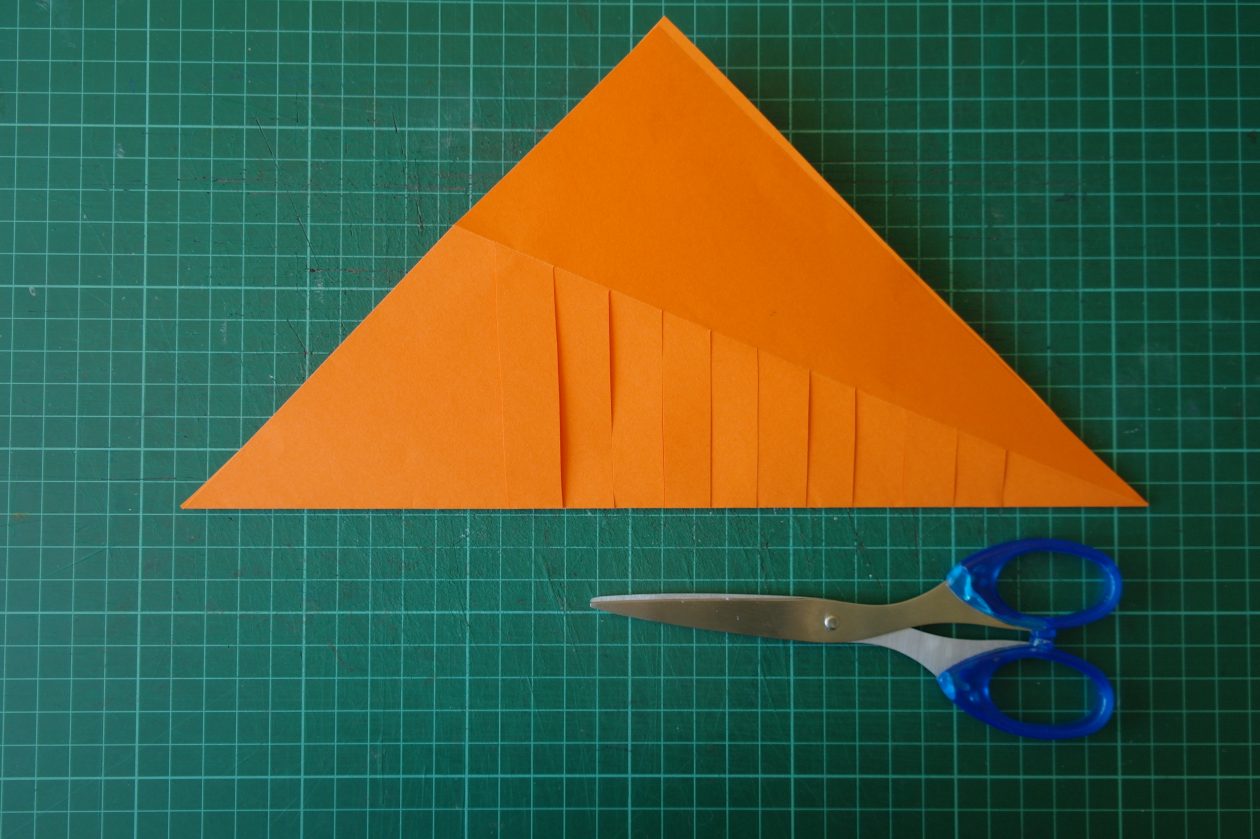
Open your paper out and put glue on one of the uncut triangular sections (I glued the one on the right).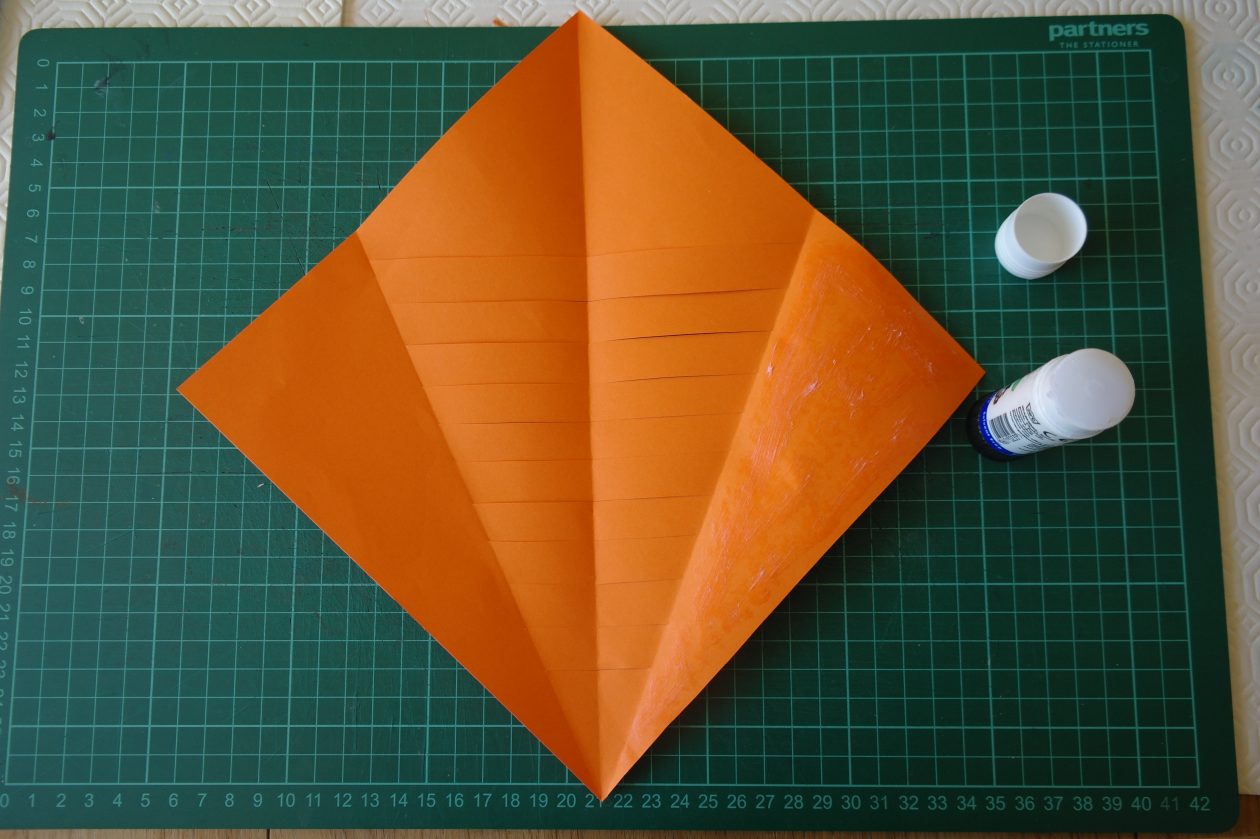
Stick the outside of the left triangular, folded section to the section you have just put glue on. You should now have a triangular ‘cone’ shape.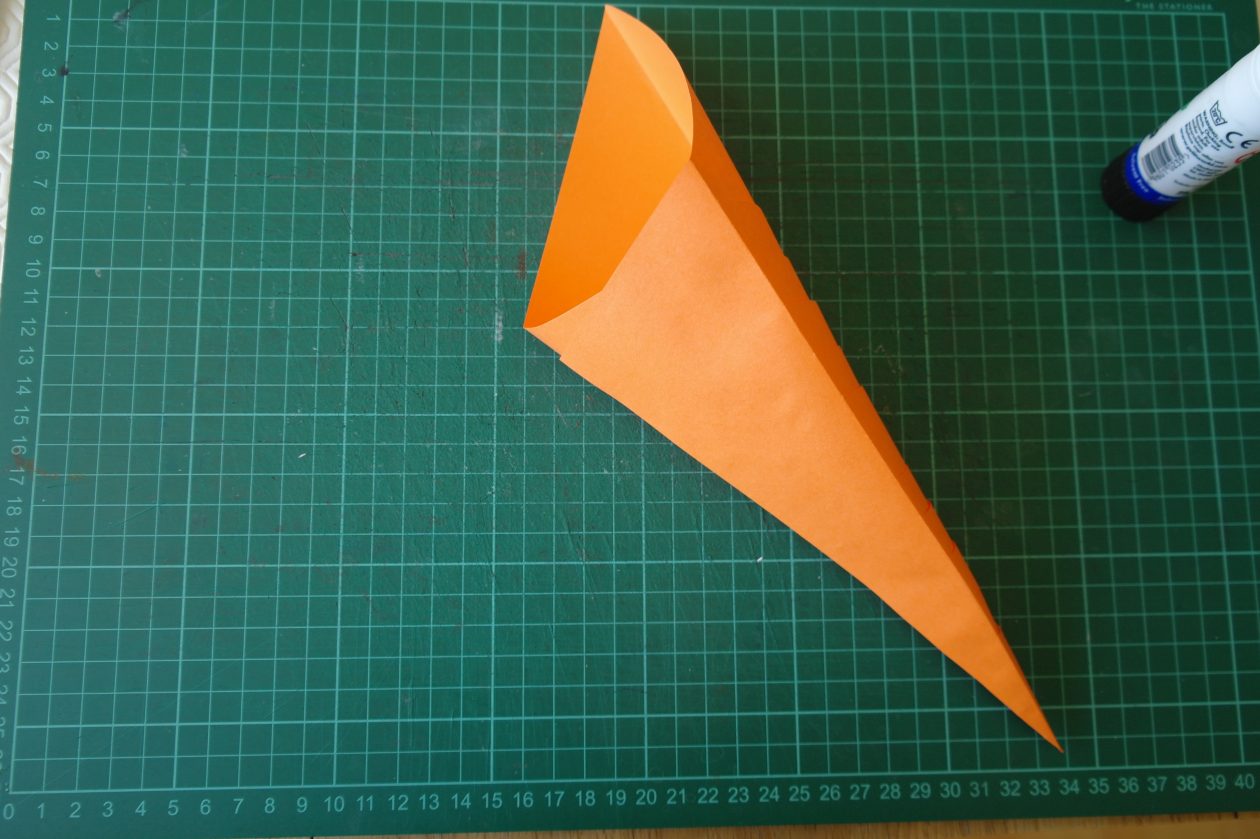
Cut out a semi-oval (half an oval shape) and glue along the edge inside your fish’s mouth.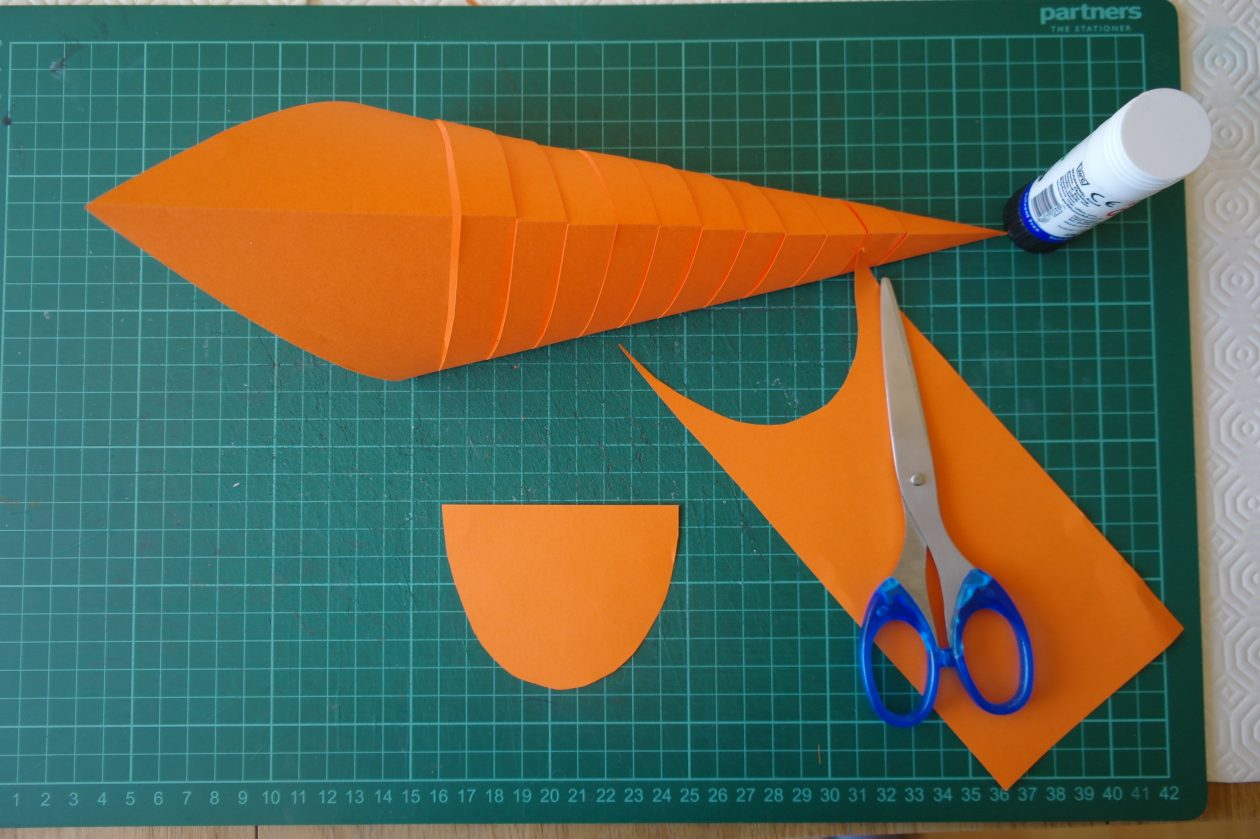
Round off the point at the front of your fish (this will make the nose).
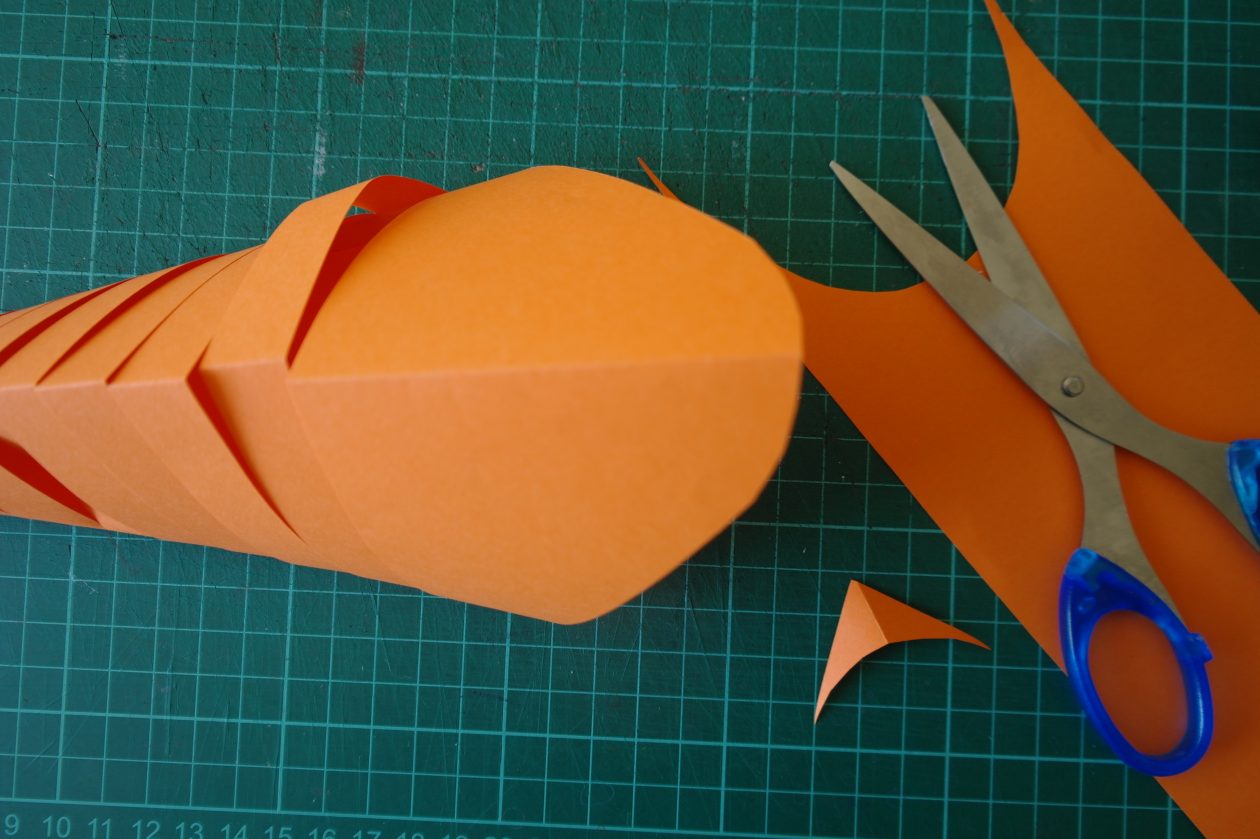
Use your pencil to draw some fins, a tail and some circles for eyes on your contrasting coloured paper, cut them out and stick them onto the fish. Use your black pen to draw on the eyes. Your fish is complete.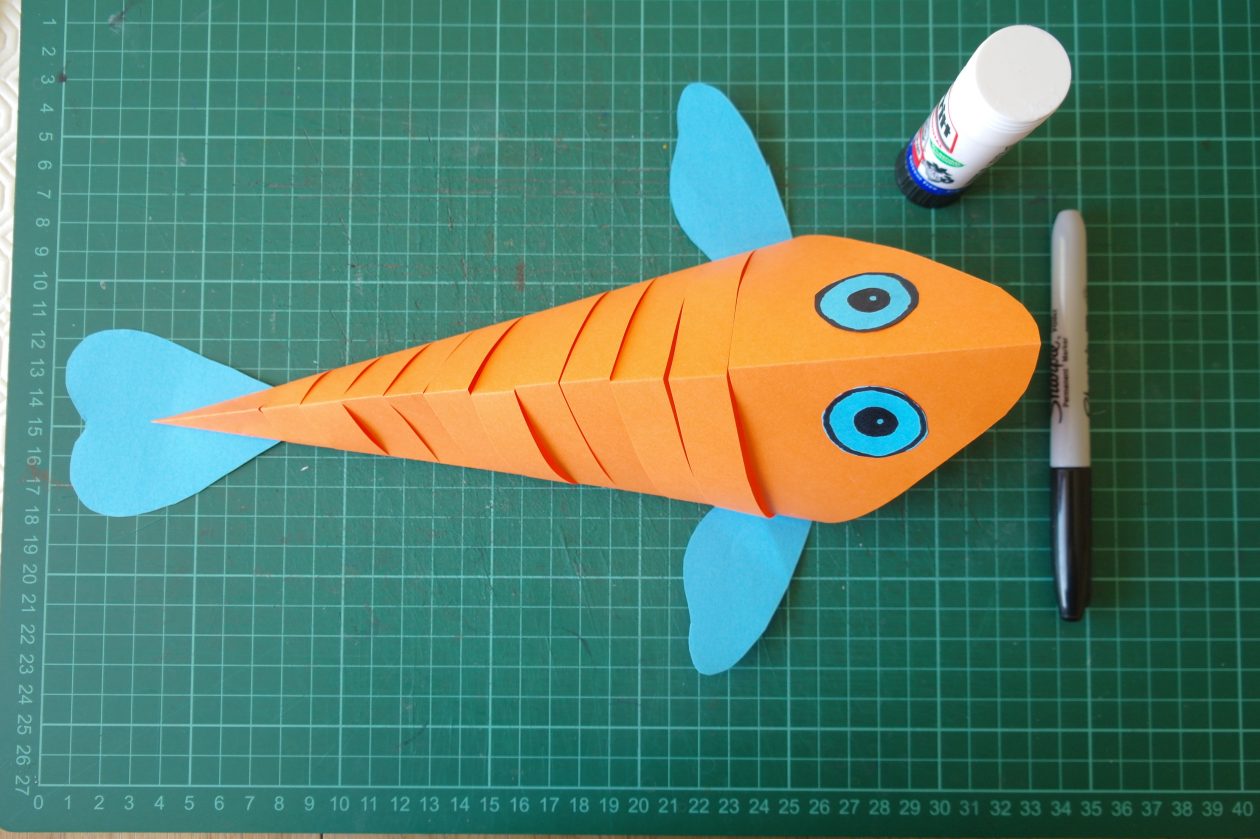
Small Basket
To make this basket, you will need:
- An old cereal box
- a ruler
- a pencil
- a pair of scissors
- sellotape
- a protractor
- a small plate
- a jar lid
- a hole punch
- some yarn or string.

Open out your cereal box and draw around your plate. I used the folds in the box to draw a square around my circle and drew diagonal lines from the corners of the square, across the circle so that I could find the centre.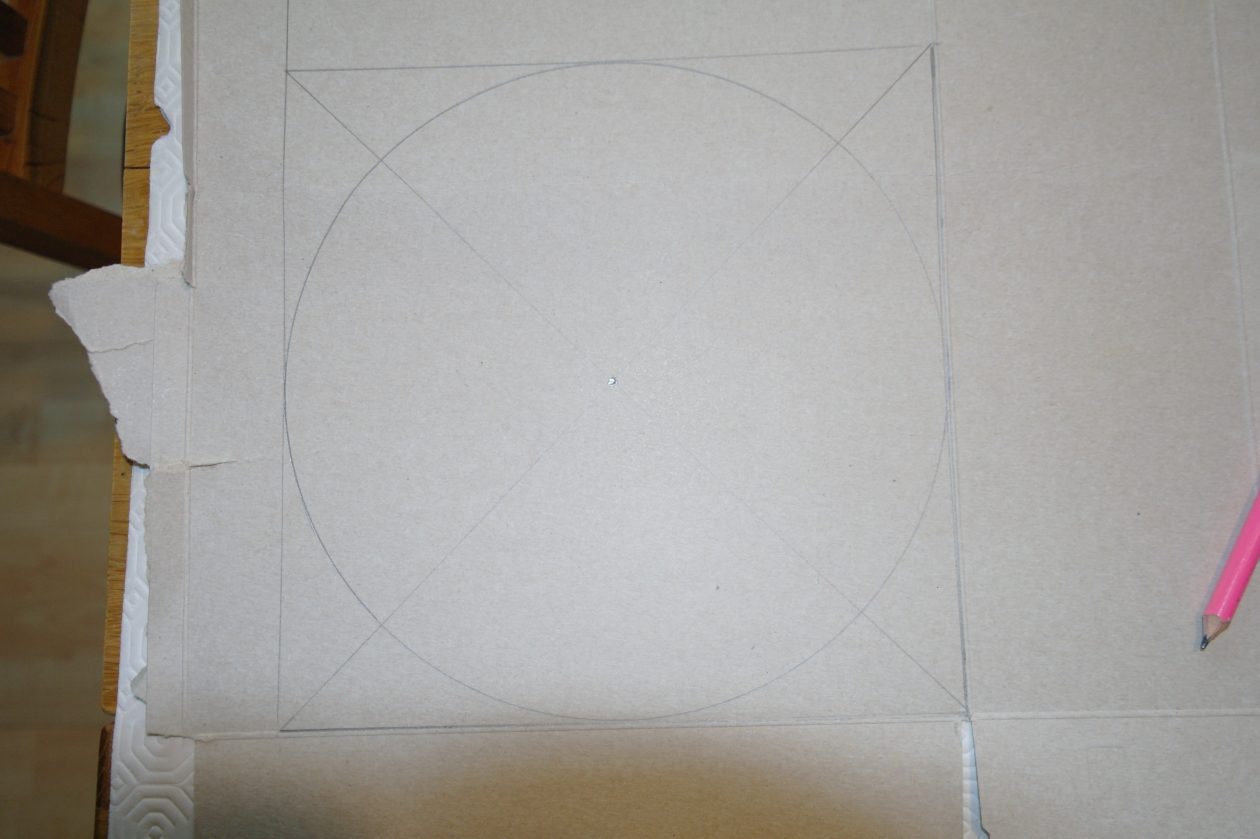
Cut out your circle and place your protractor on one of the diagonal lines with the centre on the cross in the centre of your circle. Draw around your protractor, turning it around to draw the other side of the circle (don’t forget to line up the centre of the protractor with the centre of the circle). Mark the edge of your protractor circle at 2 cm intervals.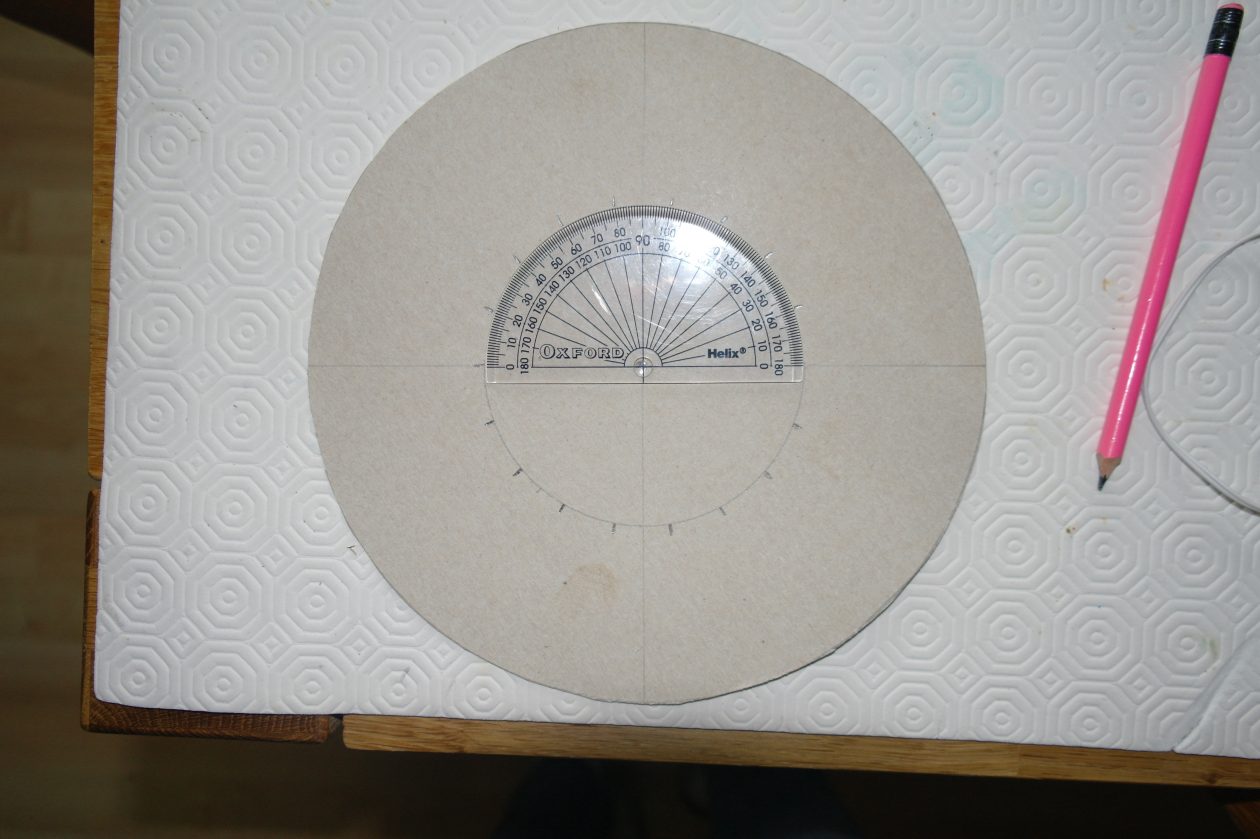
Place your jar lid in the centre of your cardboard circle and draw around it.

Use your ruler to draw lines to from the jar lid circle you have just drawn to the outside edge of your cardboard circle (make sure you line the ruler up with the centre of the circle each time.
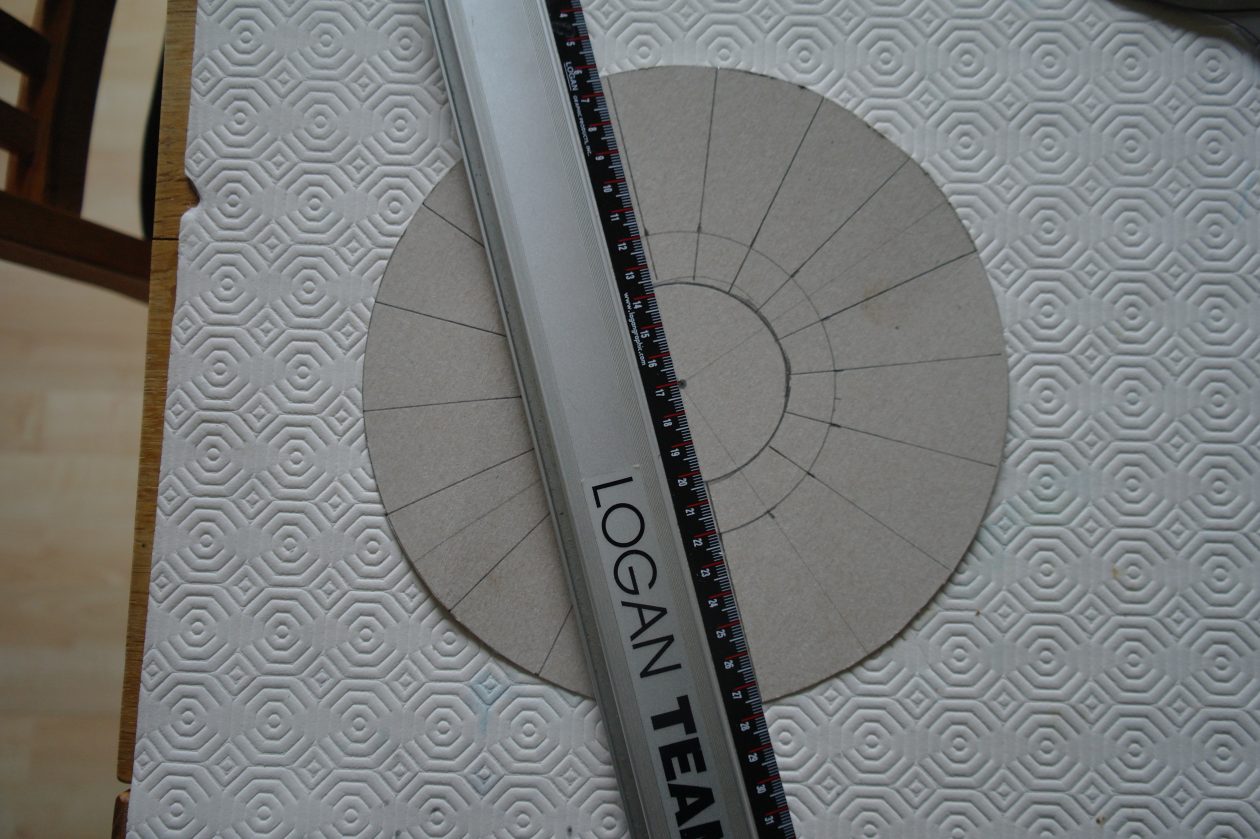
Use your scissors to cut down each line from the edge of the cardboard circle to the edge of the jar lid circle.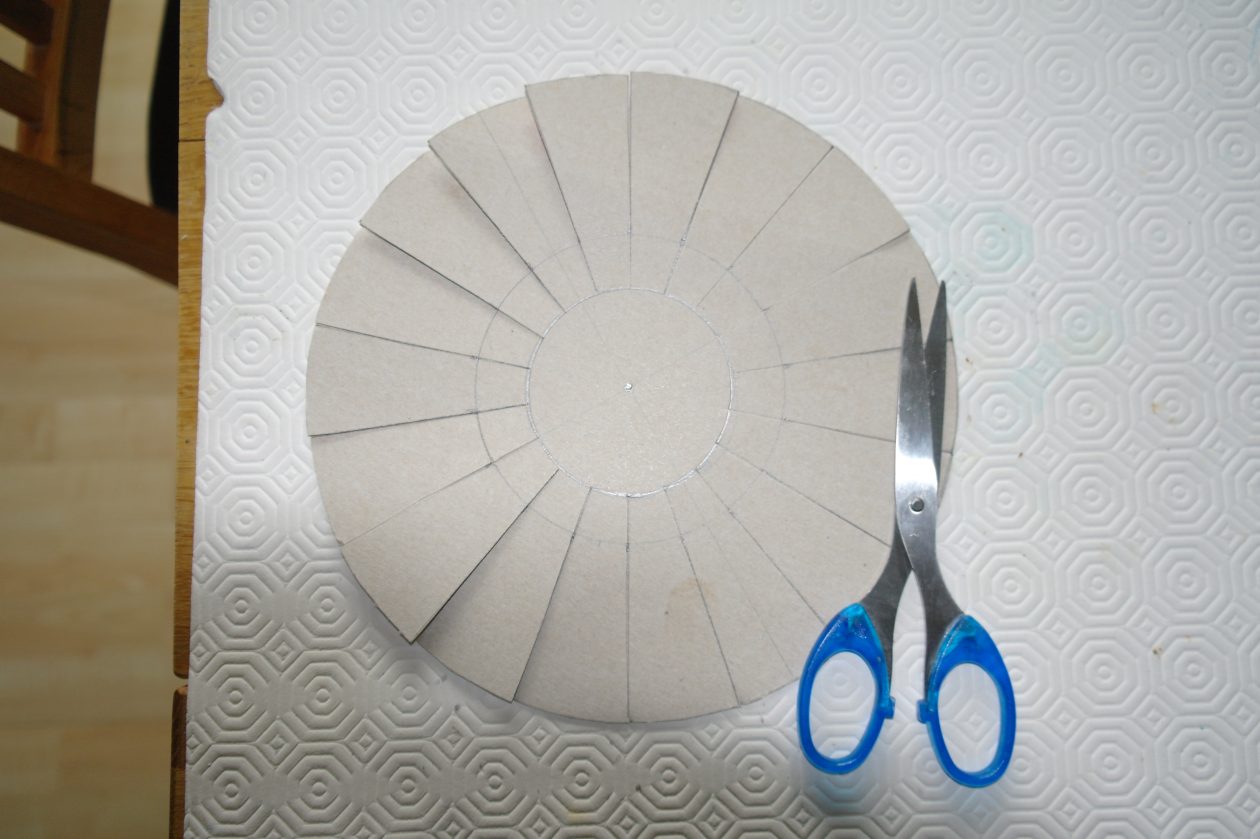
Use your scissors to cut some card from each side of the cuts you have just made.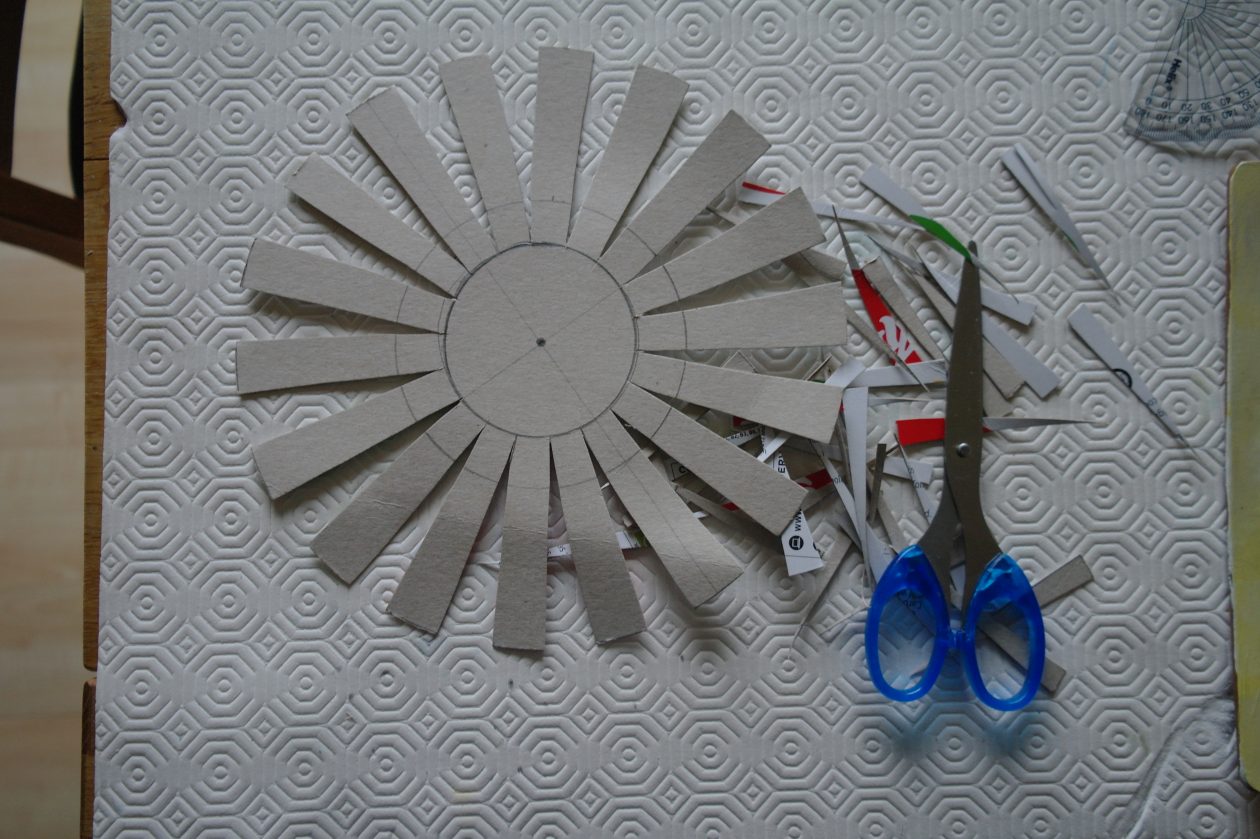
Use the hole punch to make holes at the ends of each one of these strips.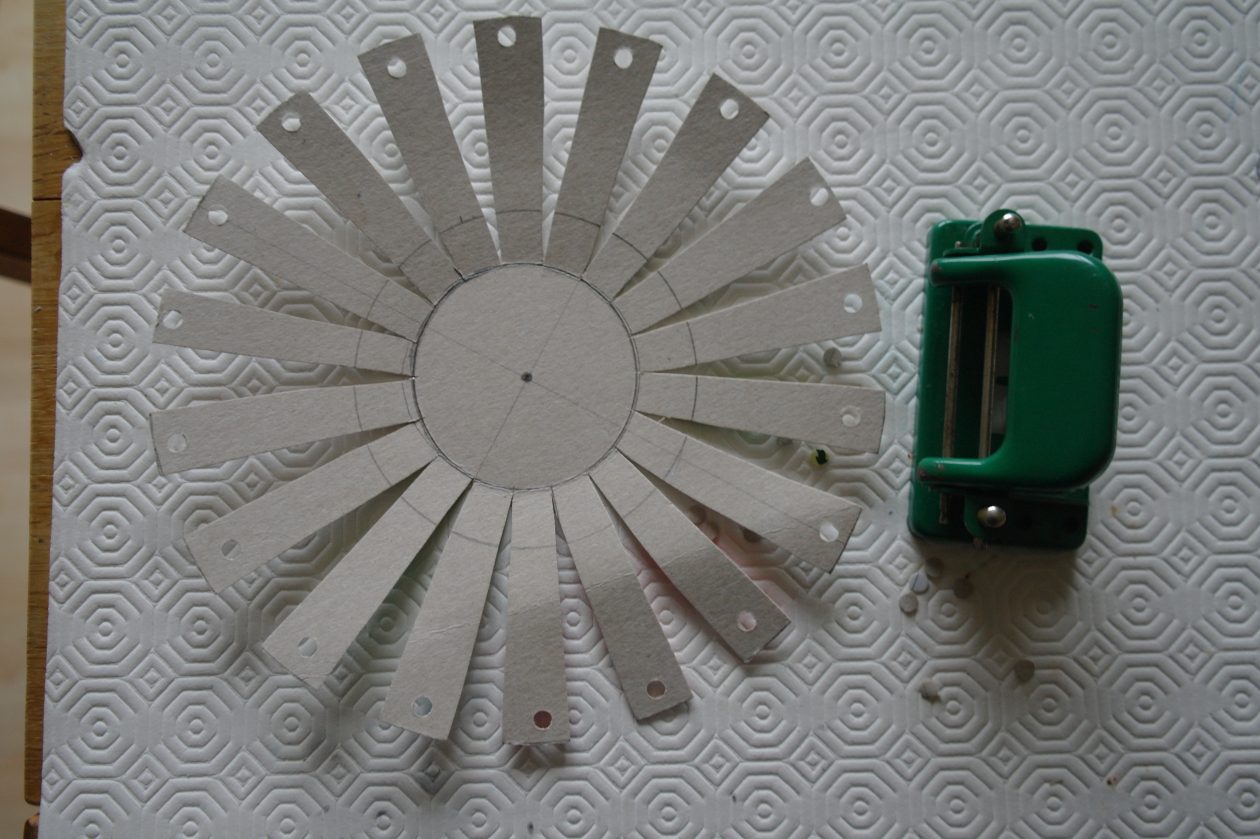
I wanted the printed side of my cereal packet to be on the inside of my basket so I turned it over and creased the strips along the edge of the jar lid circle.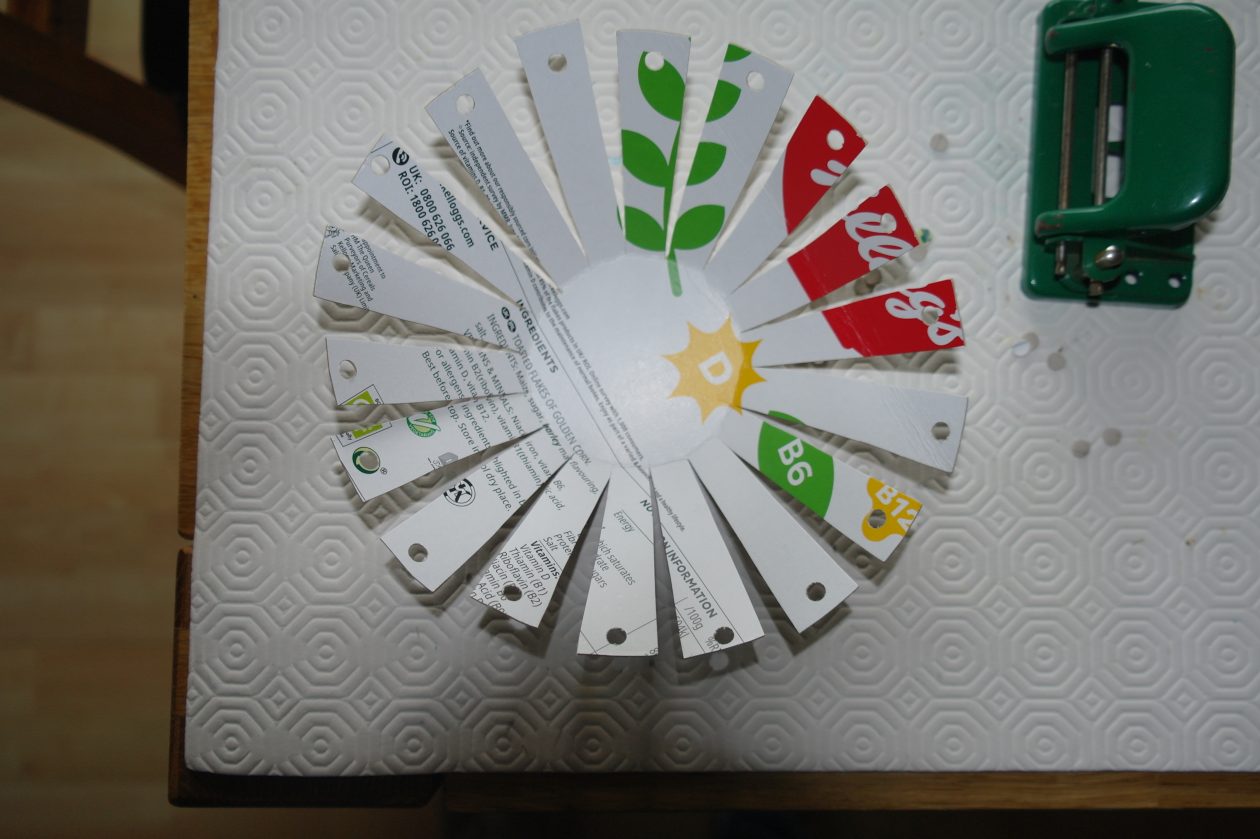
Fasten some yarn at the bottom of one of the strips and start to weave. Make sure you alternate the under and over weave on each row.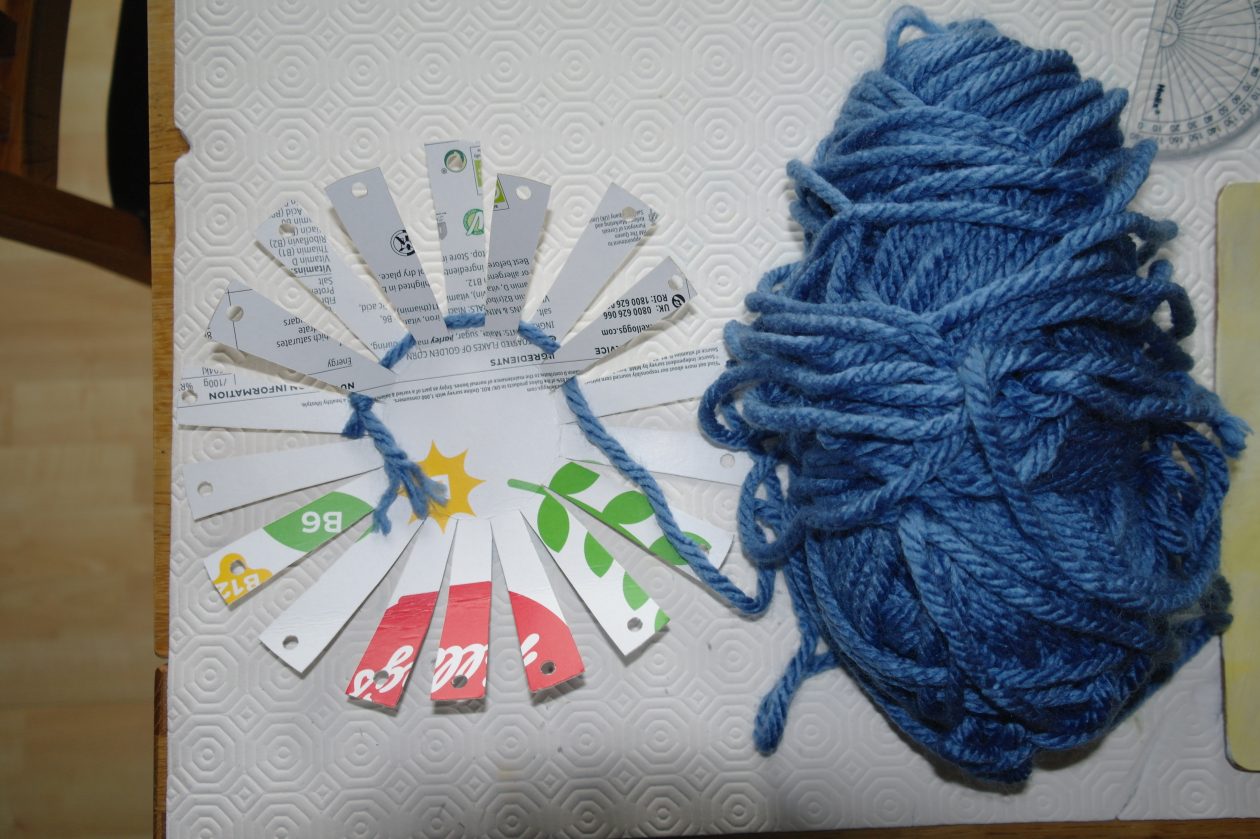
Fold up the cardboard strips as you weave to create the basket.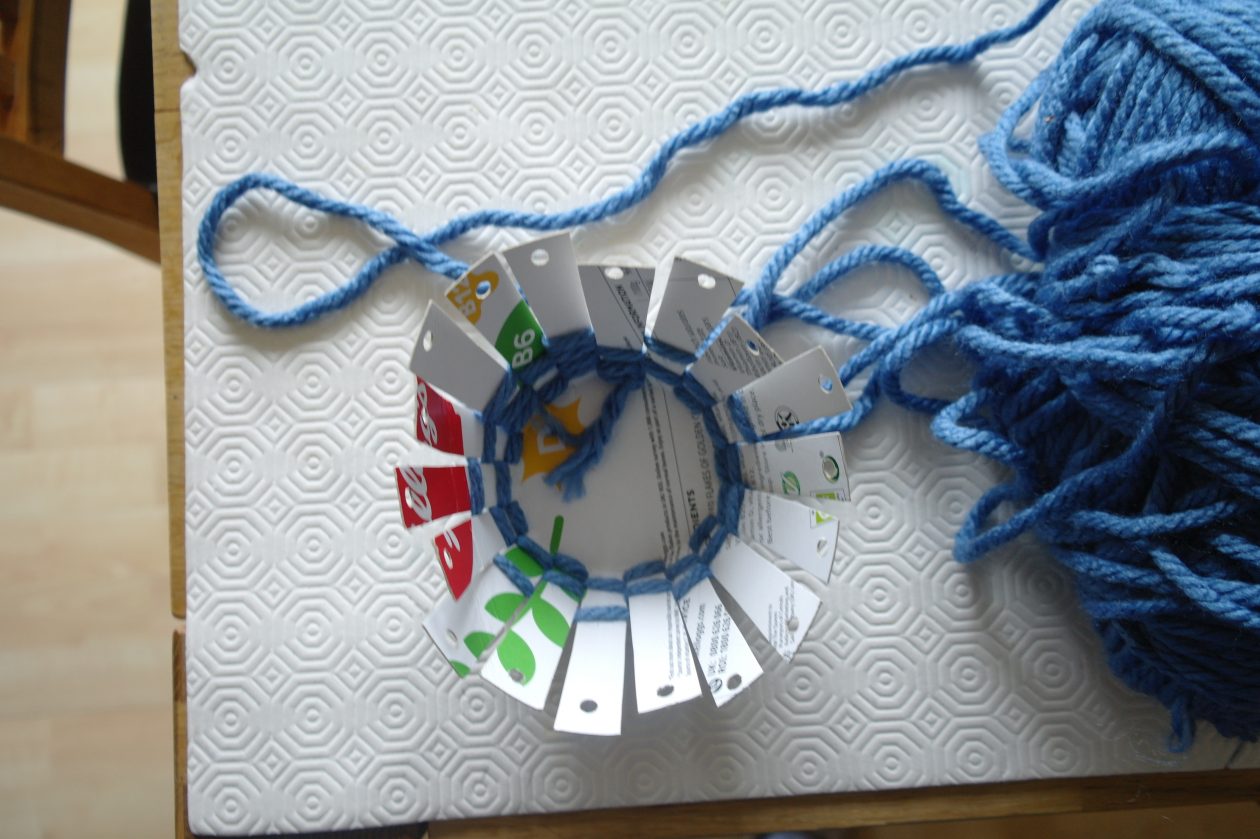
Keep going until you are nearly at the top. Cut off a good length of yarn and put some sellotape around the end of the yarn so that you can push it through the holes at the ends of your cardboard strips. Use the yarn to ‘over-sew’ the top edge of the basket (do a circular motion with the yarn, from the outside of the basket to the inside). Tie off the end of the yarn and your basket is complete. I have used just one colour of yarn to make my basket but you could use lots of different colours. I have also made one using string.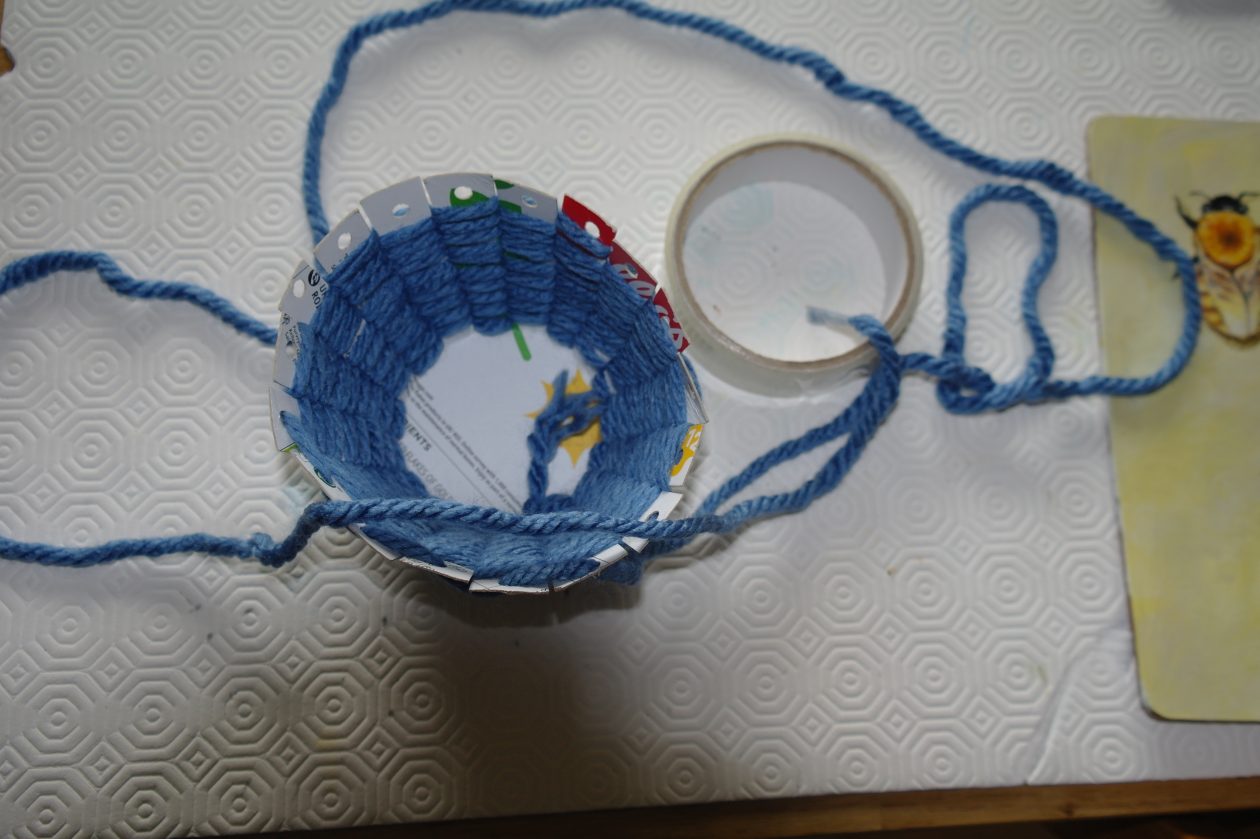

Origami Bookmarks
I know that some of you will know how to make this because you have done it at school but others may not so I am going to go through it step-by-step. You will need a square piece of paper, a glue stick, a white sticky label or white paper, a pair of scissors and a black felt tipped pen.
I started with an A5 piece of paper (that’s half of an A4 sheet) and created a square by lining up a vertical edge with a horizontal edge, creating a diagonal fold (as I showed you in my previous origami blog). Fold your square piece of paper diagonally to make a triangle.
Fold up the bottom right corner of your triangle, so that the corner touches the top corner and the edges line up and crease it.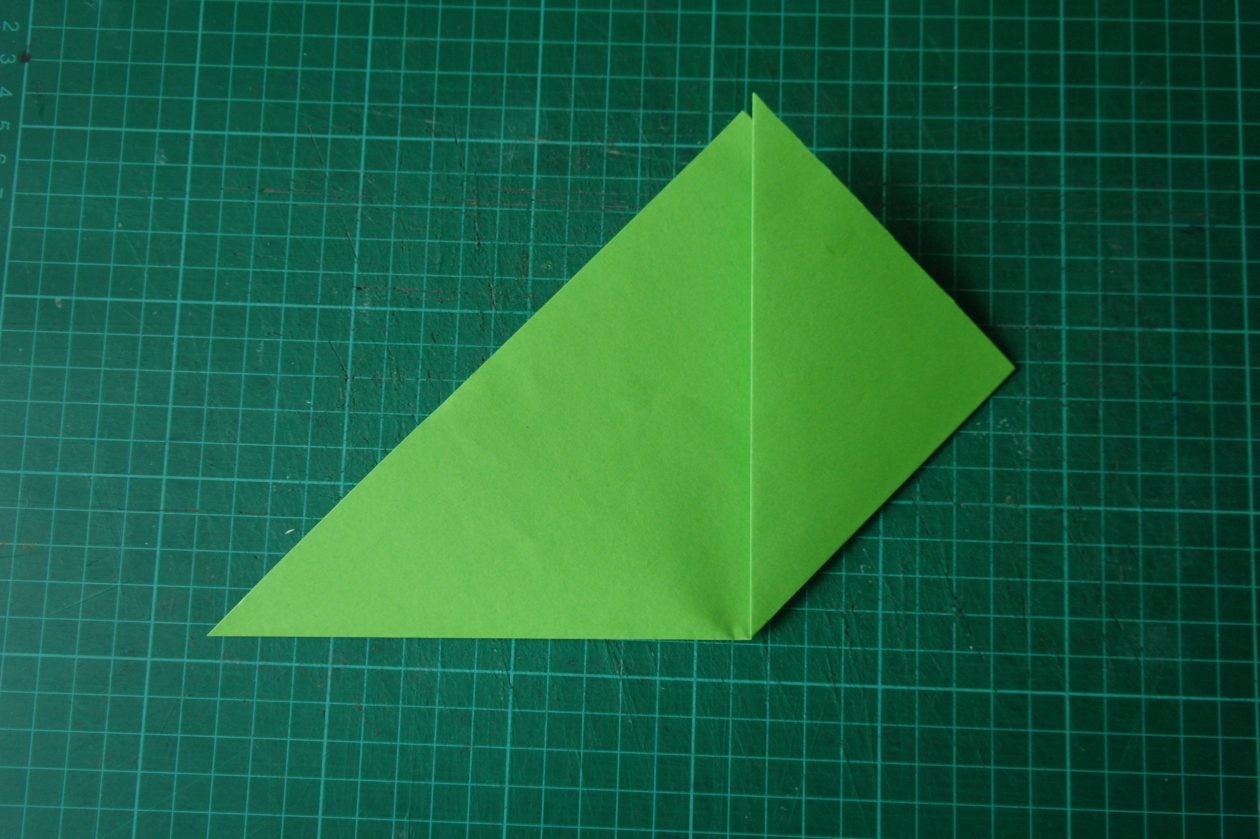
Do the same as above with the bottom left corner of the triangle.
Unfold then fold the top corner of the top layer of the triangle down so that the corner touches the centre of the bottom edge.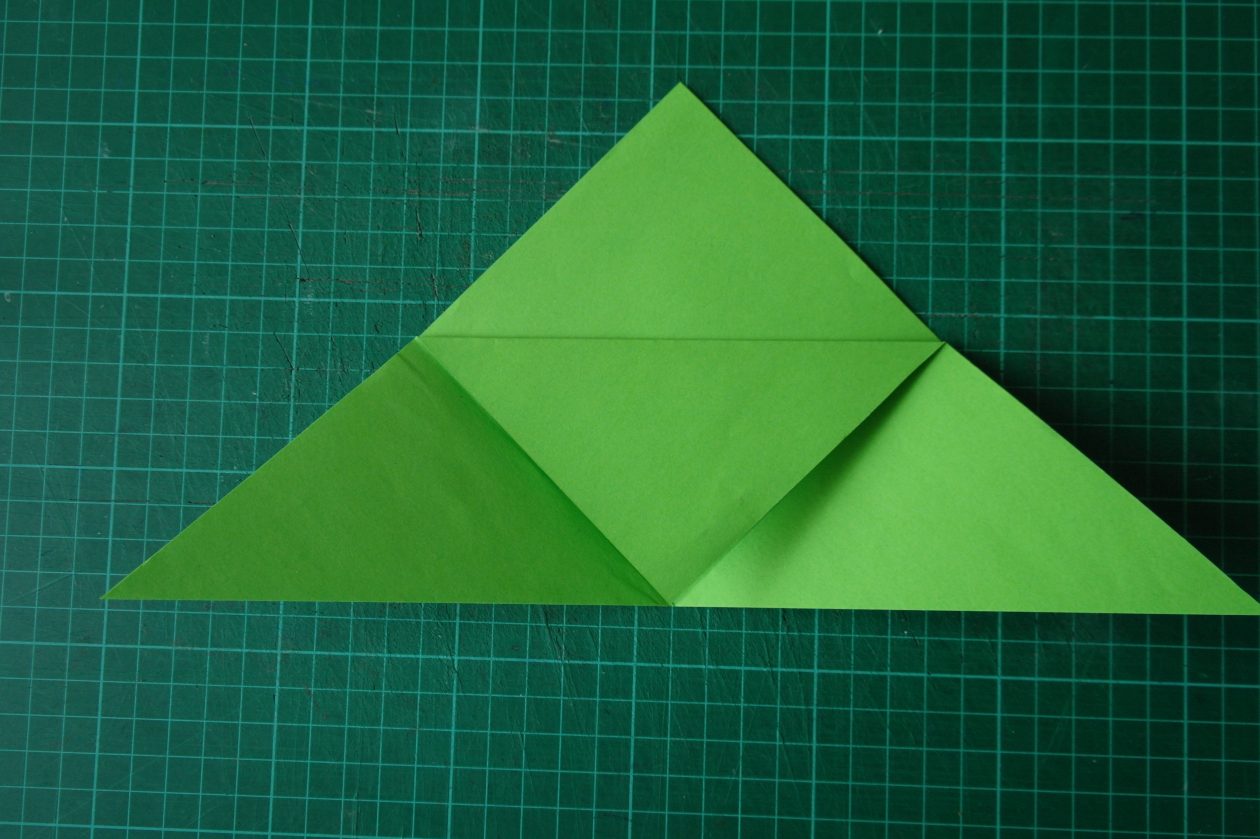
Fold the two bottom corners of the triangle up again and tuck them in behind the fold you have just made and crease (make sure they are tucked all the way in).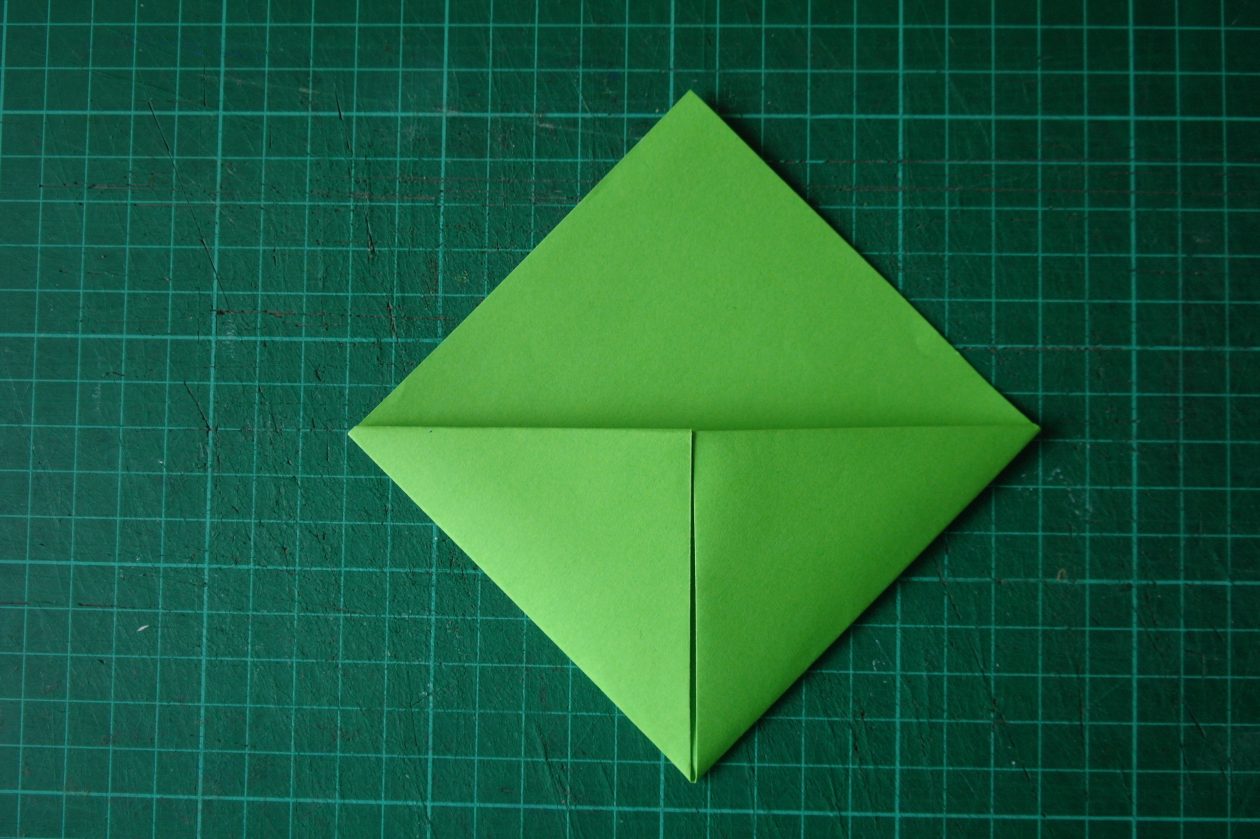
Now you are ready to decorate your book mark. This example is of a frog I made. I cut out two white circles and stuck them onto some green card.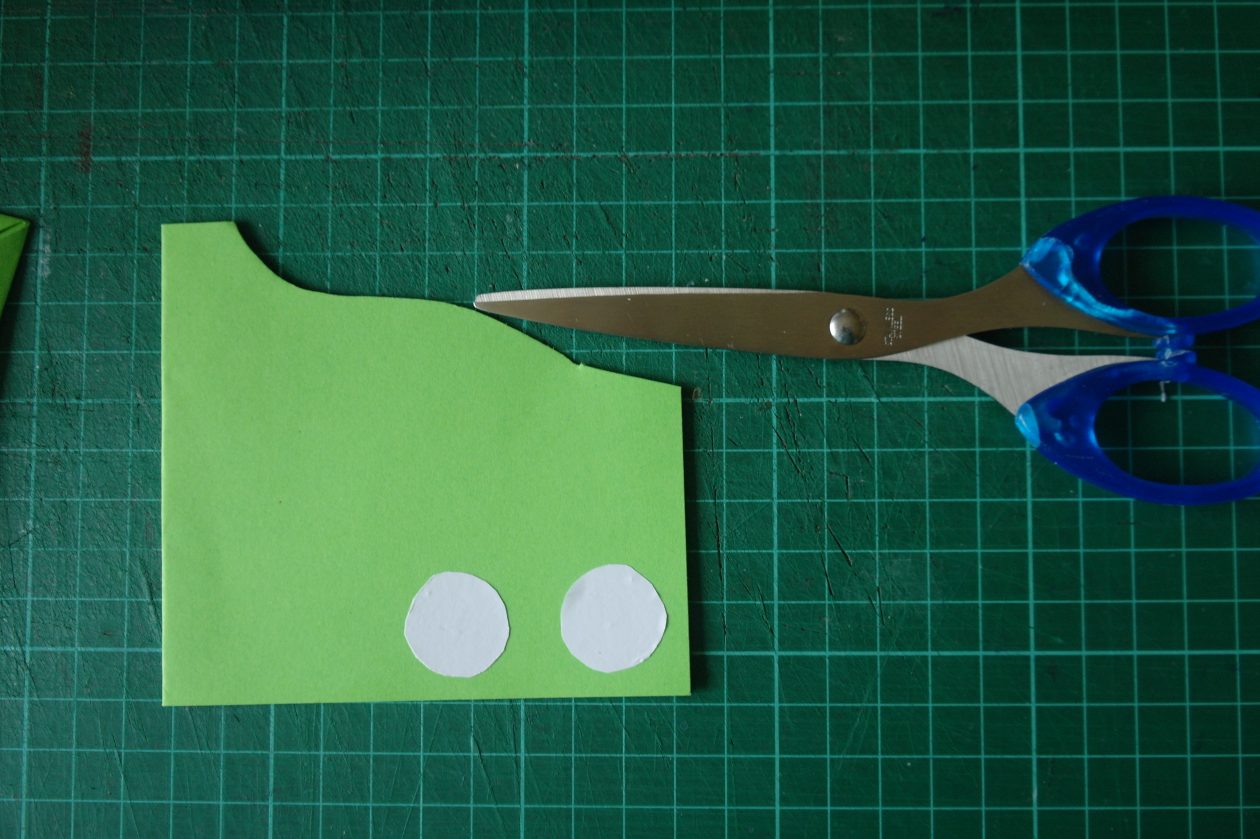
I cut around the white circles leaving some green card showing and drew on some eyes with a black felt tipped pen.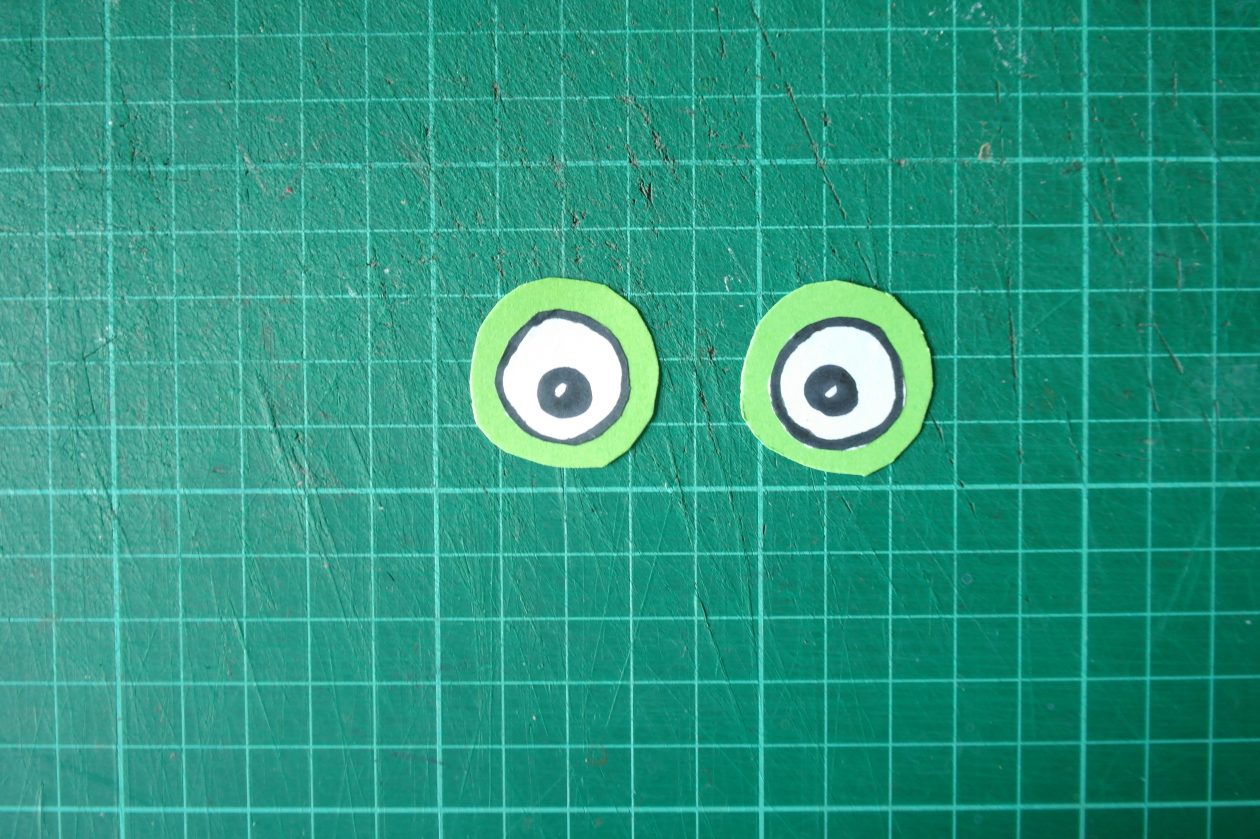
I stuck the edges of the eyes to the back of my bookmark and drew on some nostrils to make the frog’s face.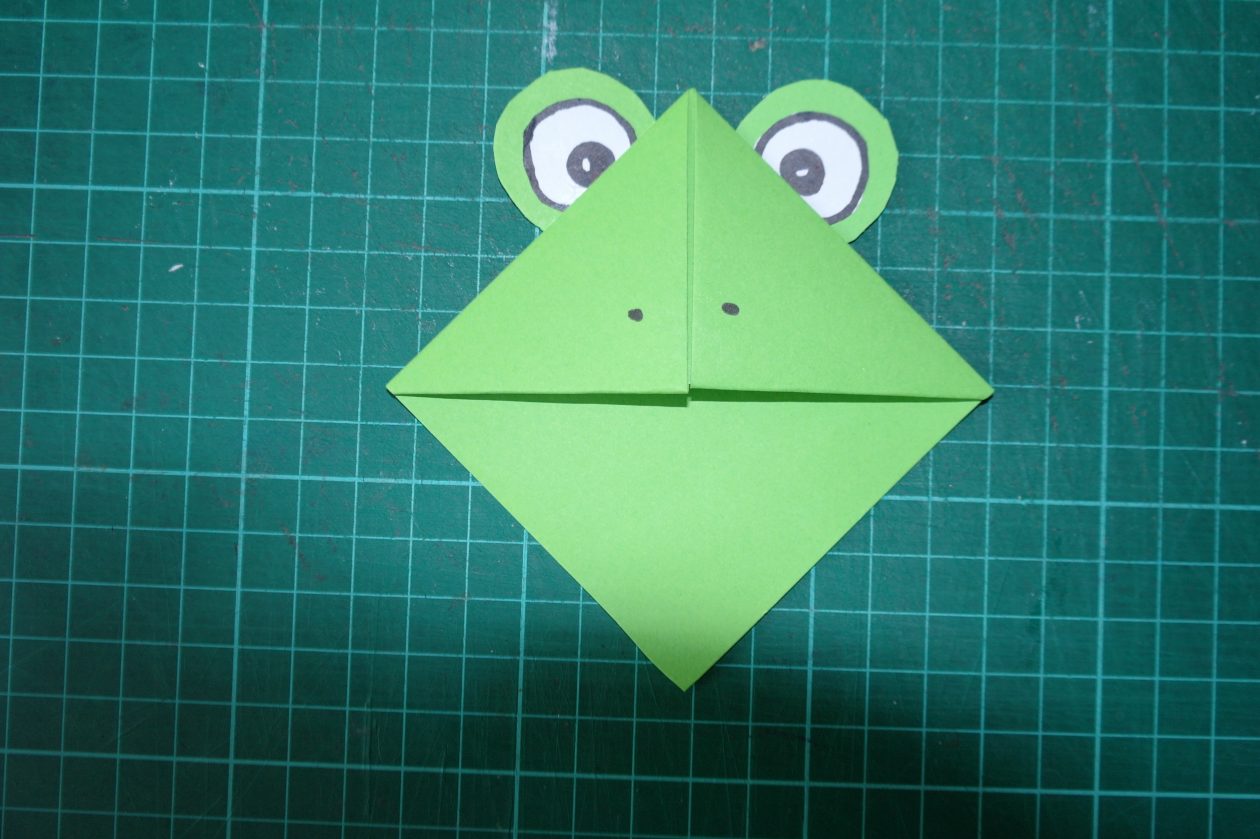
Here are some other examples.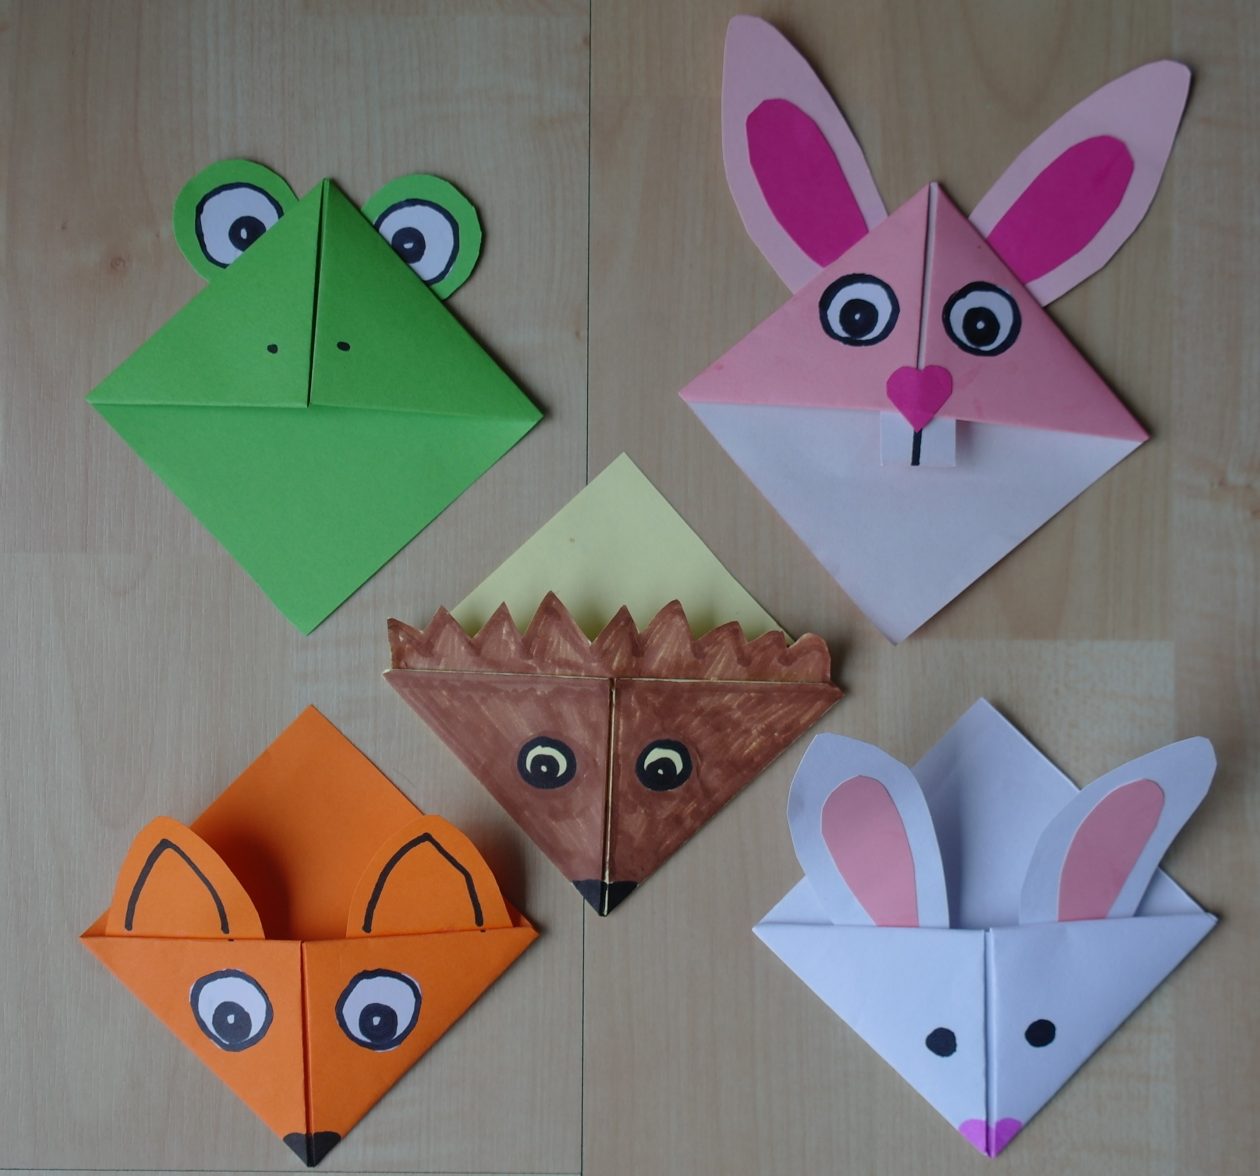
Single Line Portrait Drawing
For this activity all you need is a sheet of A4 paper, a mirror (if you are drawing yourself) and a pencil or pen.
To do this activity properly, you are not allowed to lift your pencil off the paper once you have started. However, you are allowed to draw over the top of lines you have already drawn – it is quite tricky! I drew myself in the mirror and I drew my husband.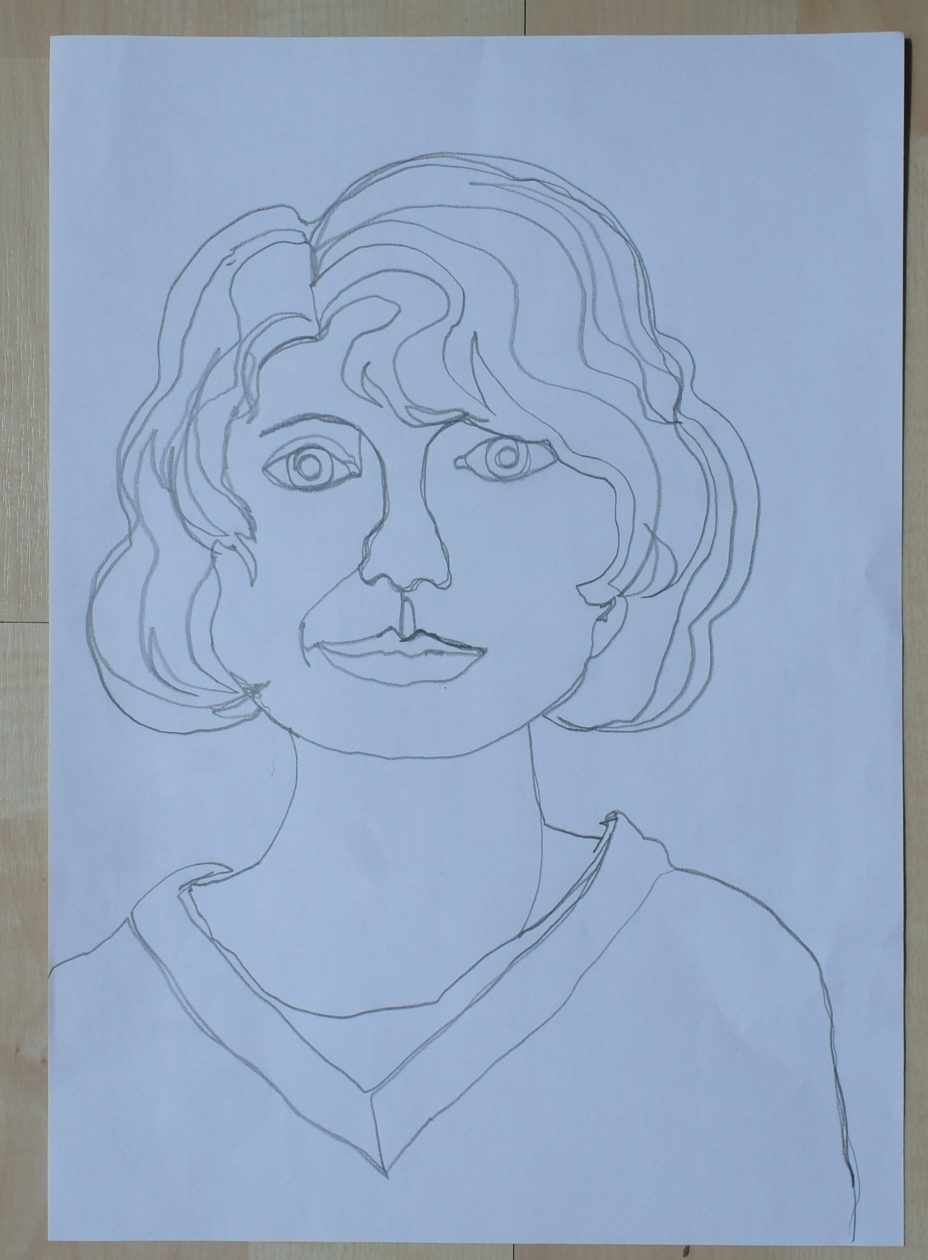
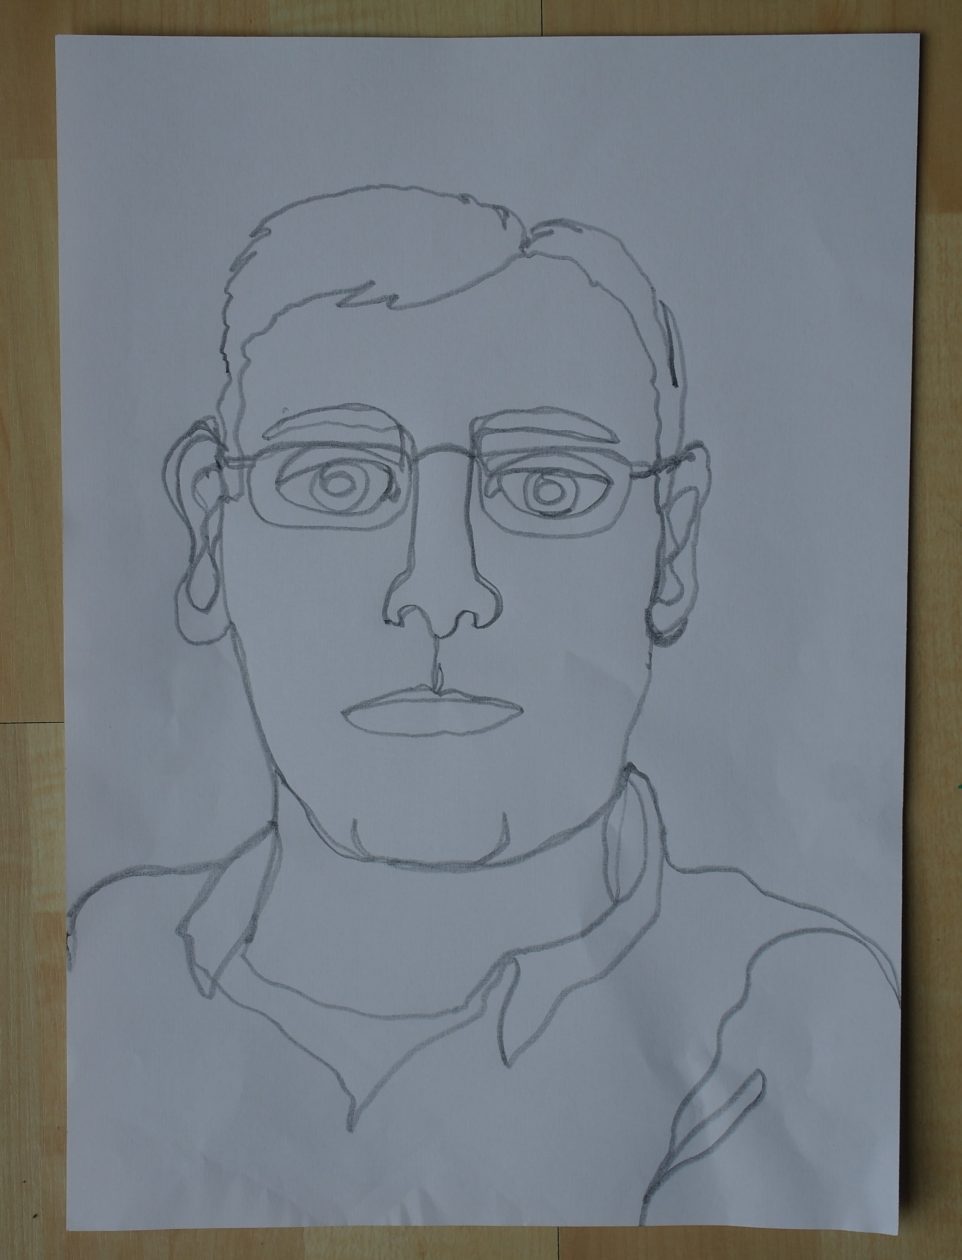
I challenge all the staff and pupils to do this. Top tip: start down the middle of your face (I started with my eyebrow).
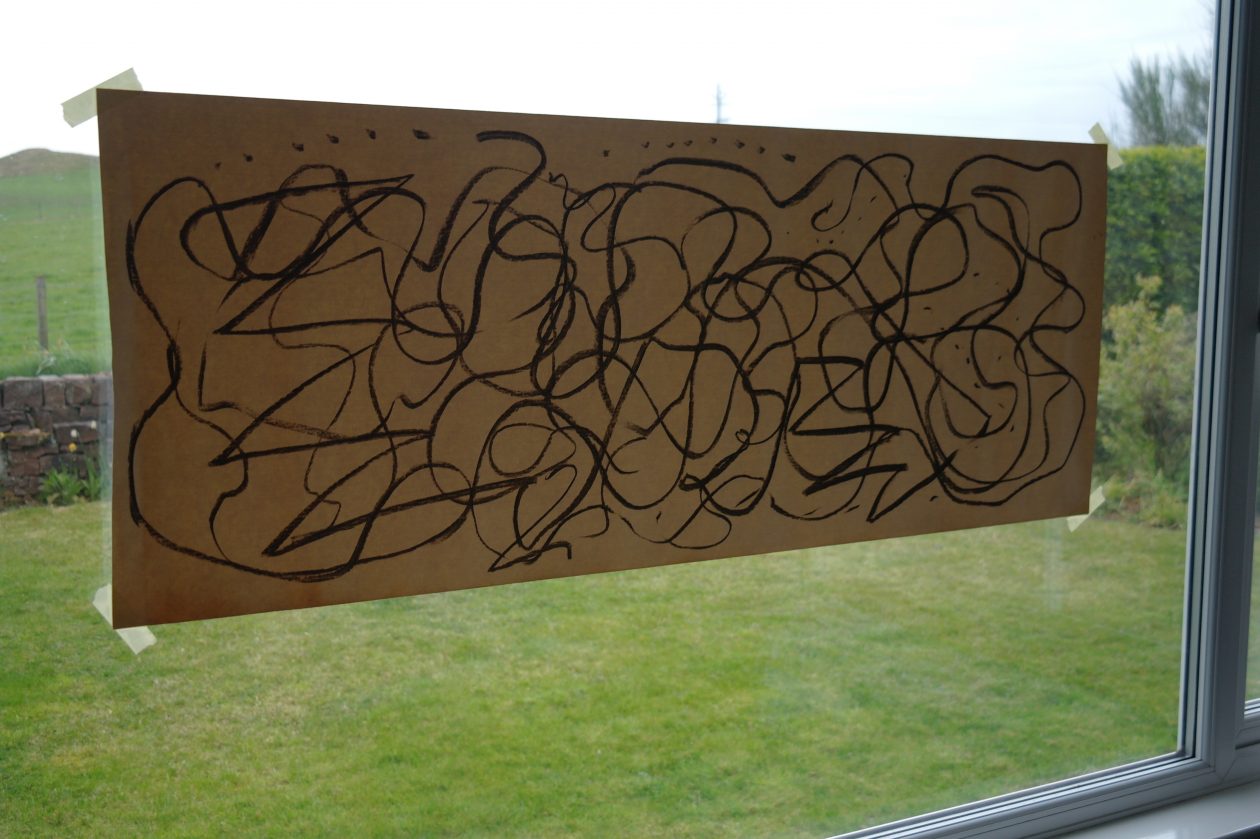
Drawing to Music
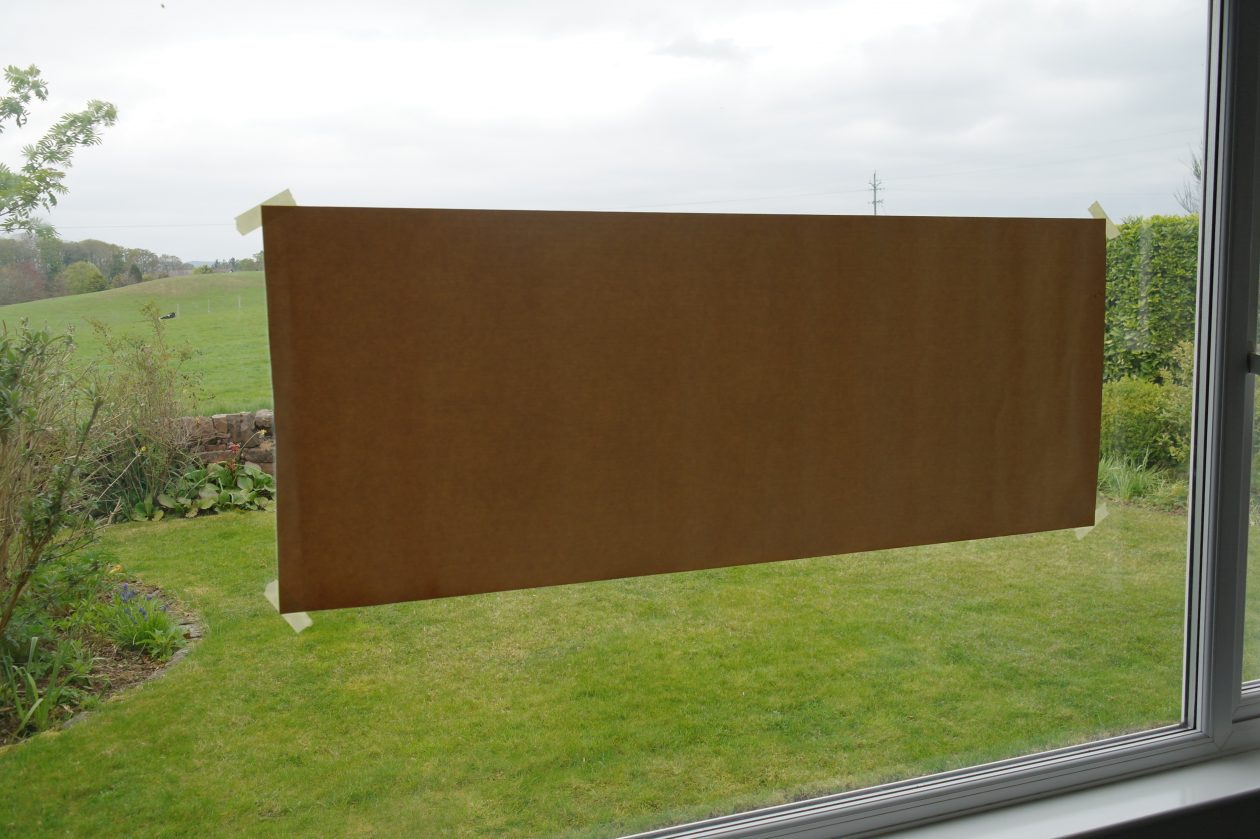
I found some old wallpaper in my garage and I used the back of it to draw on, but any roll of paper will do – perhaps you could use the back of some Christmas wrapping paper if you have some left over. I also used charcoal and chalk pastels but you can use felt tipped pens, crayons or coloured pencils if you like. I chose some classical music to draw to because it doesn’t tend to have any lyrics ( it is better if you choose some music without words that could distract you from the sound of the music).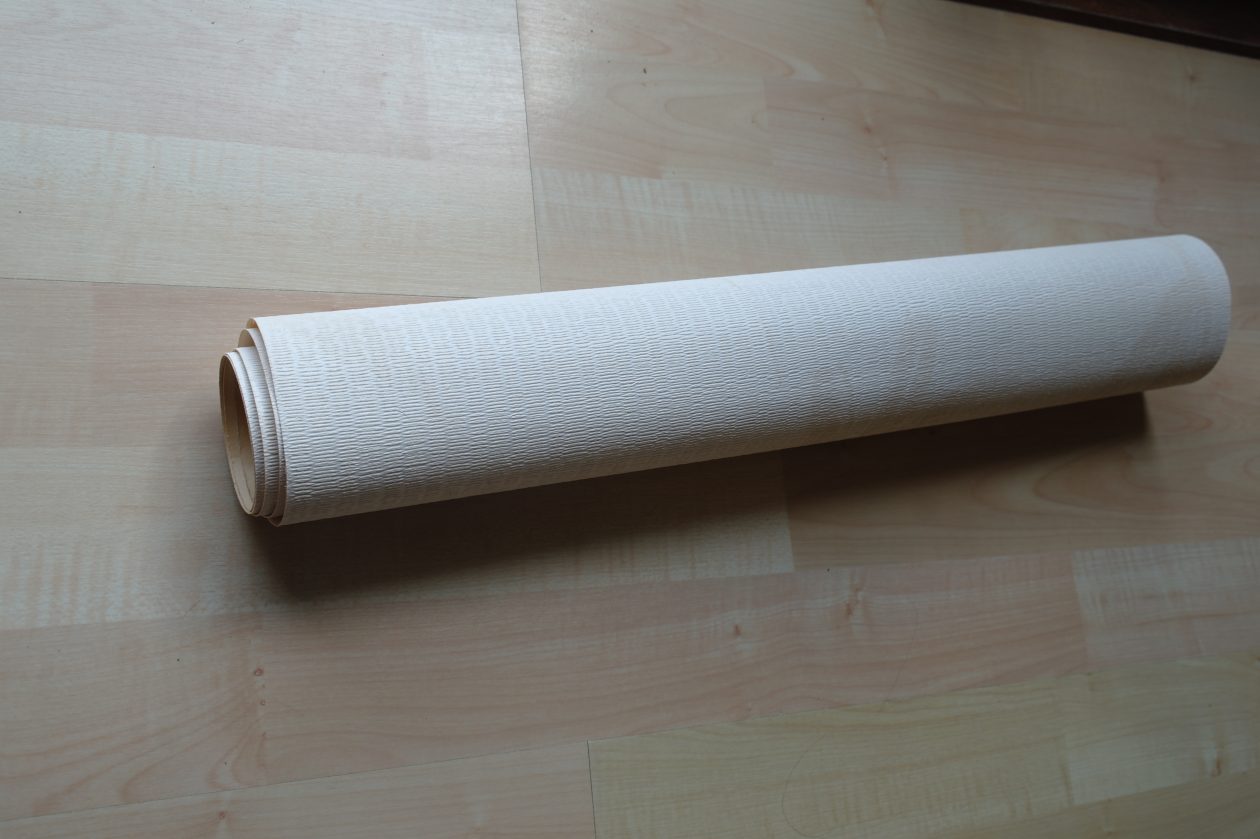
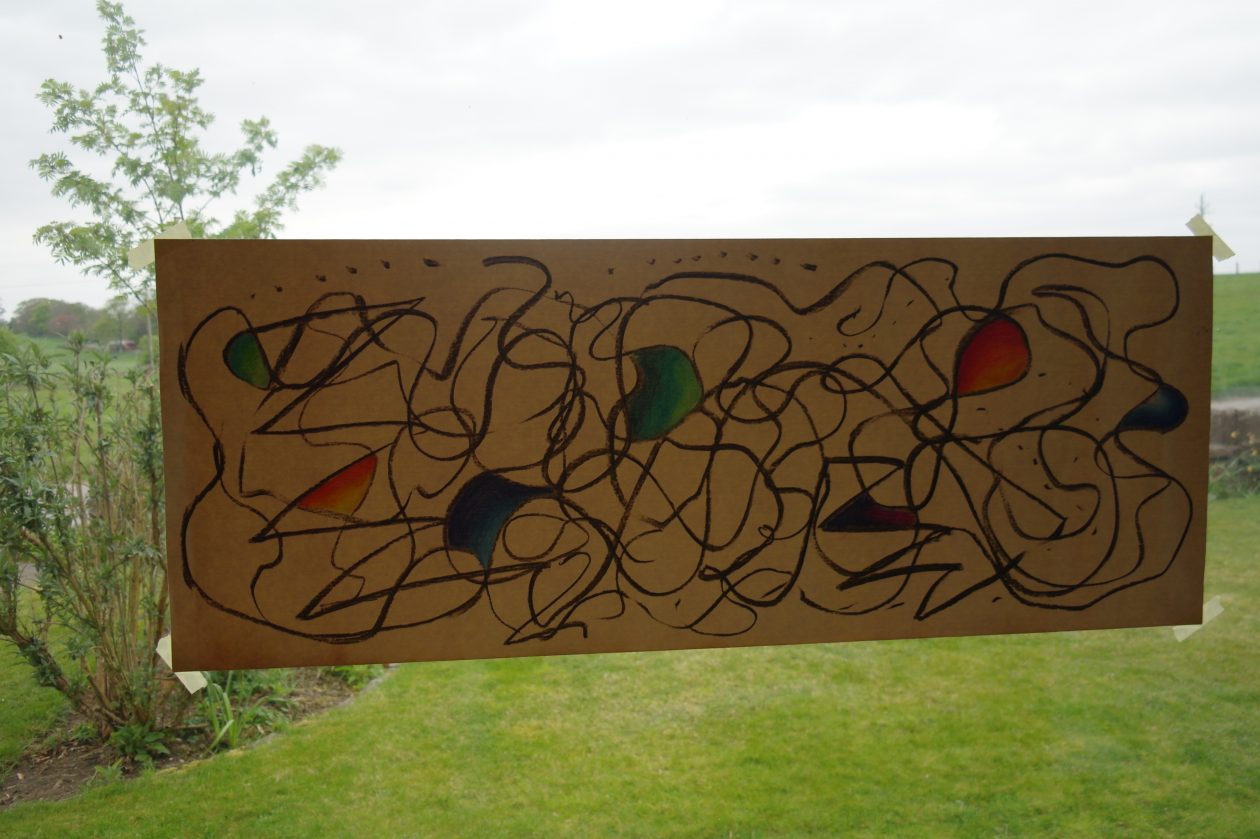
I enjoyed doing this so much that I decided to do another one but to much slower music – this time I chose ‘Aquarium’ from Carnival of The Animals by Saint-Saens.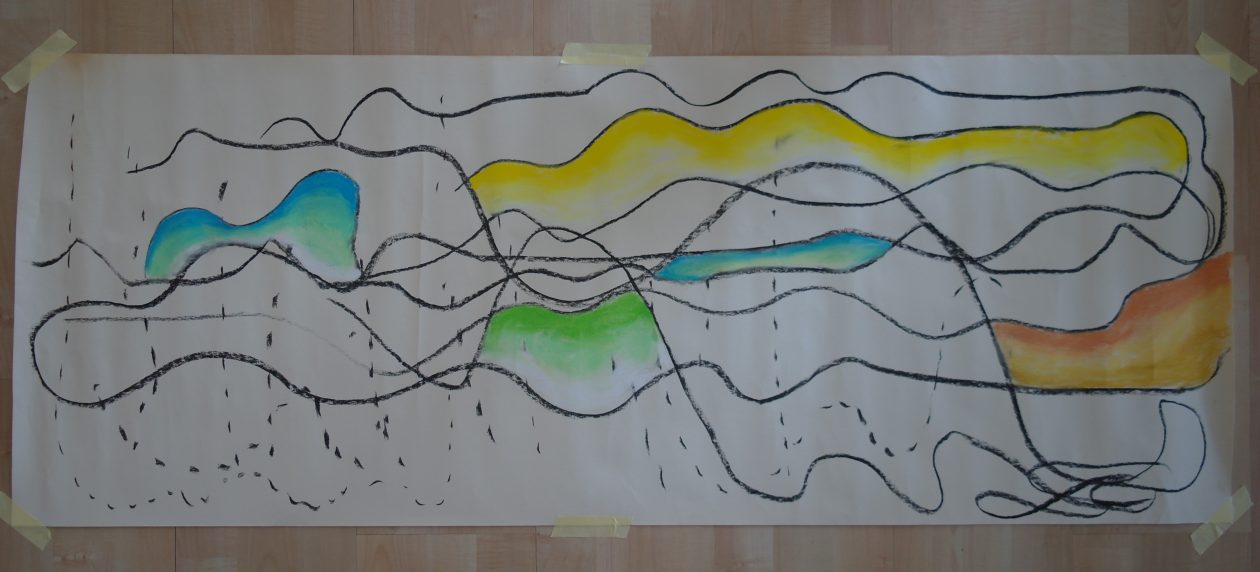
There are quite a few famous artists who have made works of art to music – you could look up: Wassily Kandinsky – ‘Compositions’ series, Piet Mondrian -‘Broadway Boogie Woogie’, Andre Masson – ‘Automatic Drawing’.
Give it a go, it’s fun and easy to do.
To make a U.F.O. You will need:
- Some thin card (I used an old Easter egg box).
- A pair of scissors.
- A pencil.
- A ruler.
- Some sellotape.
- A few drinking straws (depending on how many U.F.O.s you are going to make).
Cut three strips of card of equal length and equal width (I made mine 19 cm long and 2.5 cm wide but you can experiment with different widths and lengths as long as all three are the same). On this photo I have cut enough card for two U.F.O.s.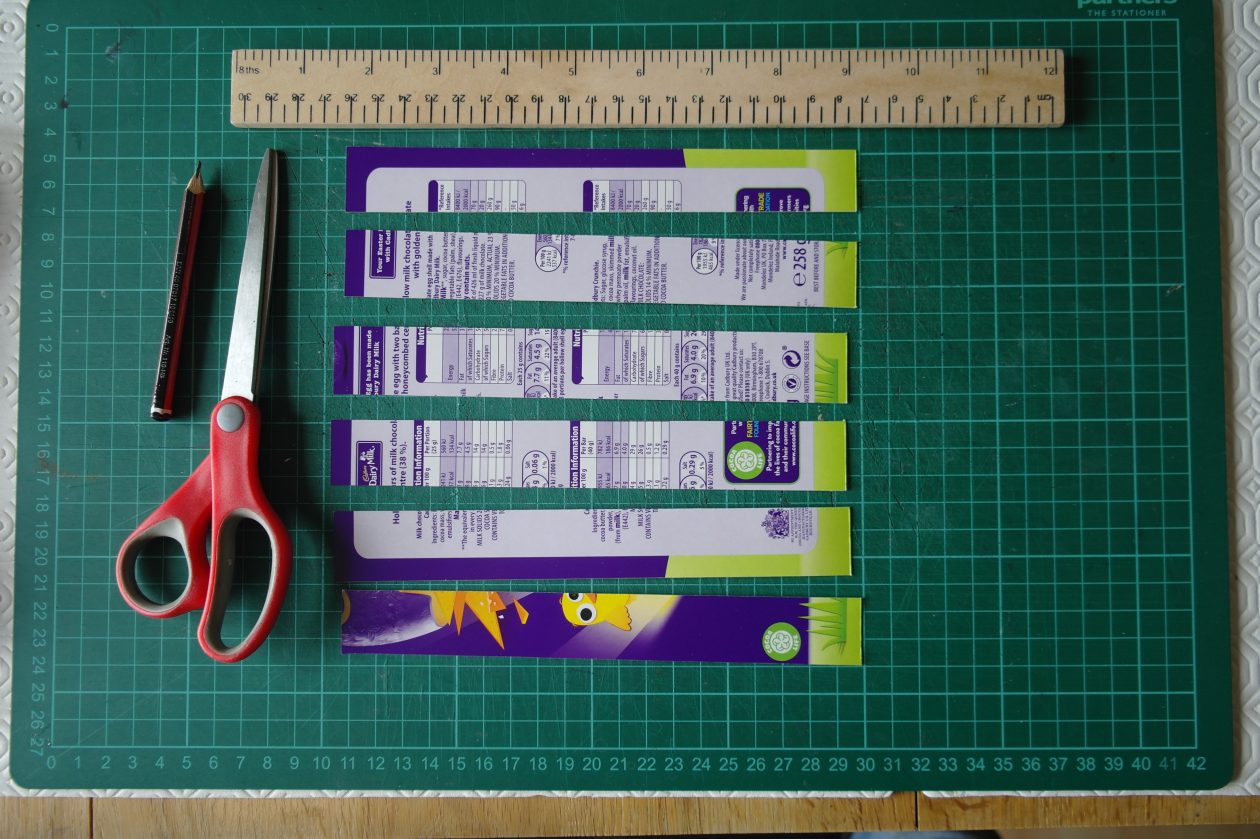
Sellotape two of your pieces of card together to make a longer strip.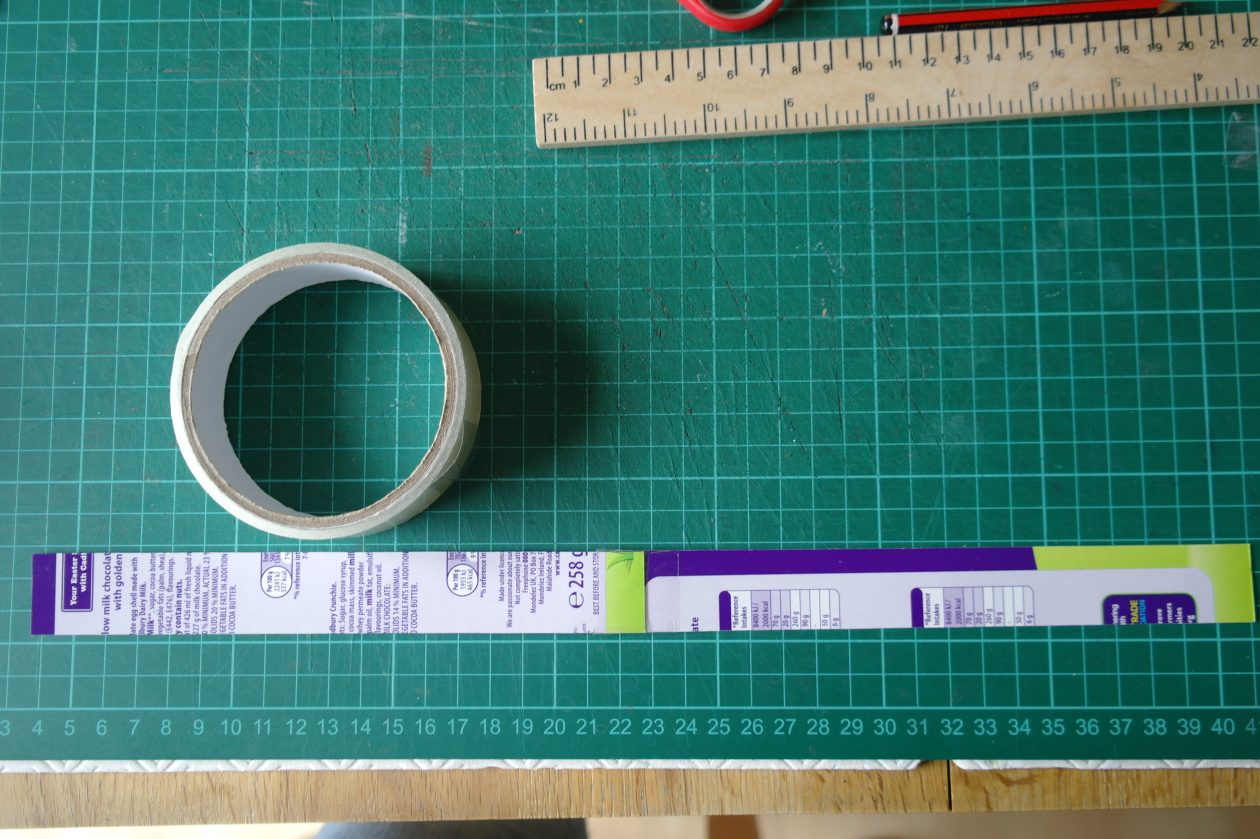
Curve your two strips around to form a circle and sellotape the ends together.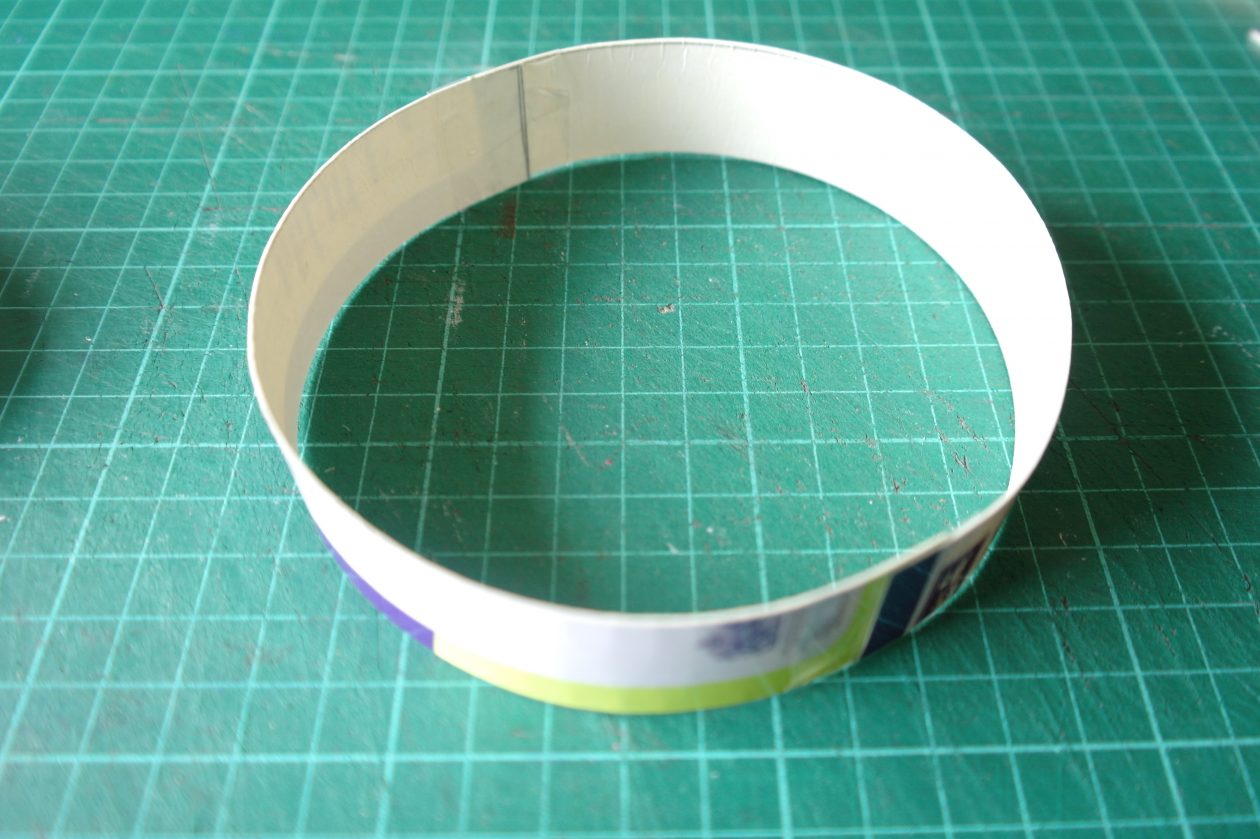
Curve the third strip of card into a circle and sellotape the ends together.
If you have a bendy straw like I did, cut the bendy end off.
Sellotape the straw to the insides of your circles with the big circle at one end and the small one at the other. You may need someone to help you with this as it is difficult to get the circles lined up with each other when you do it on your own. Your U.F.O. is complete, now all you have to do is fly it.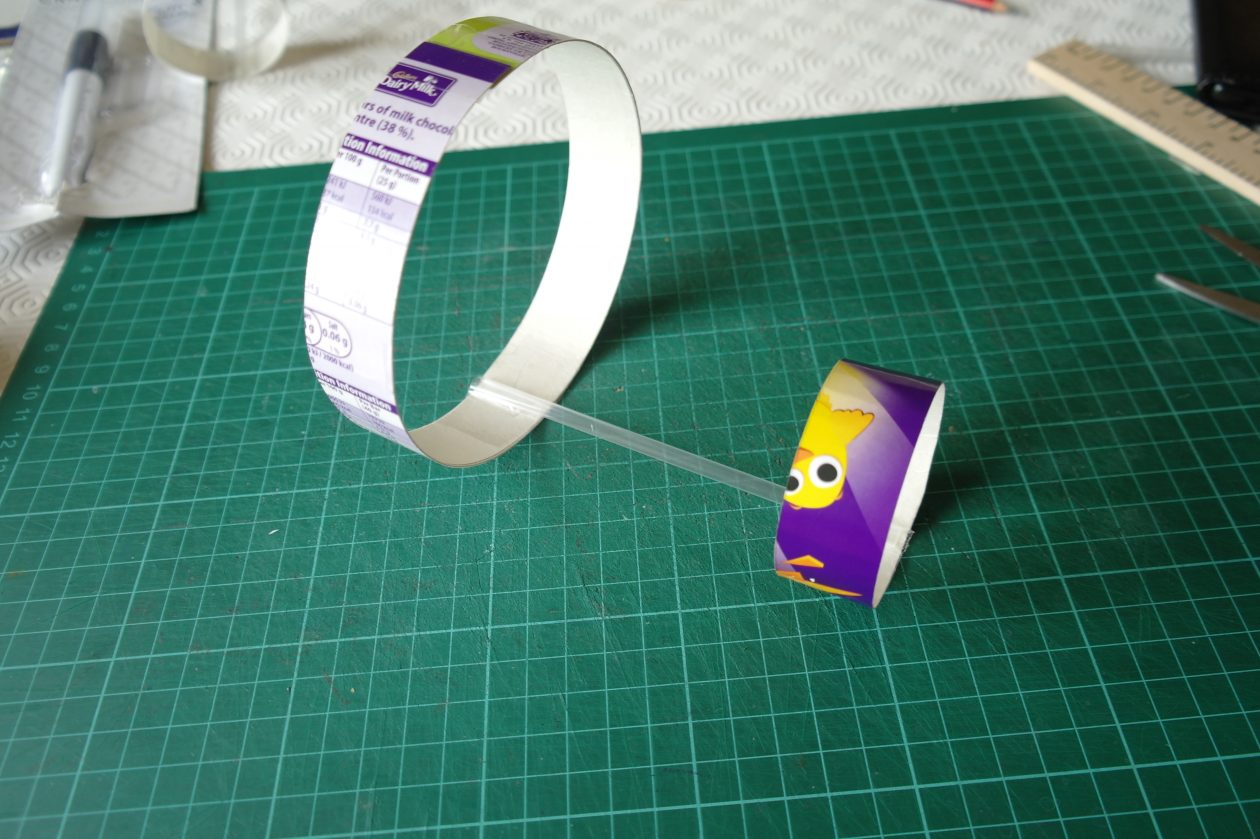
Try experimenting with different shapes and see which one flies best. I’d love to know how you get on – post your photos on the blog and tell me which one of yours was the best at flying.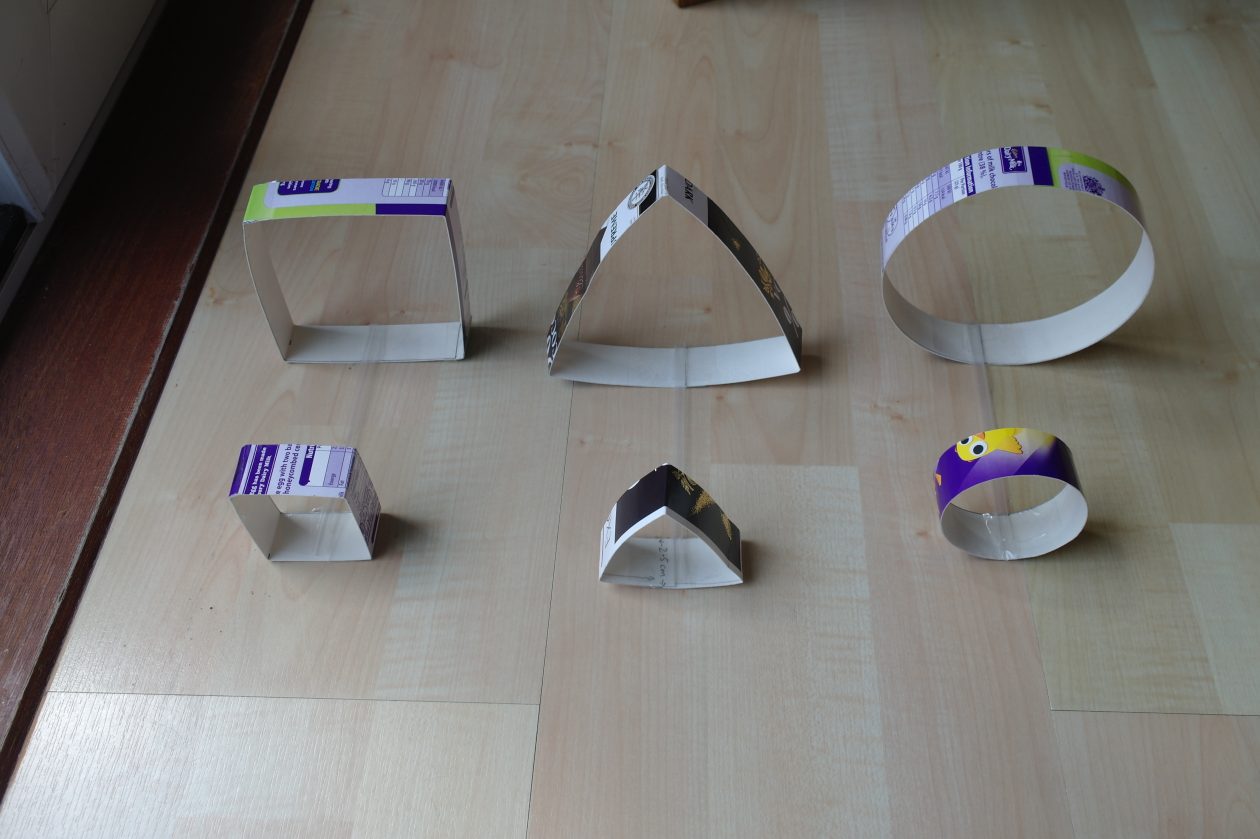
Simple Origami Animals
These are my simple origami animal faces. I will show you, step by step, how to make them. Give them a go and post your creations on the blog – I’d love to see them. 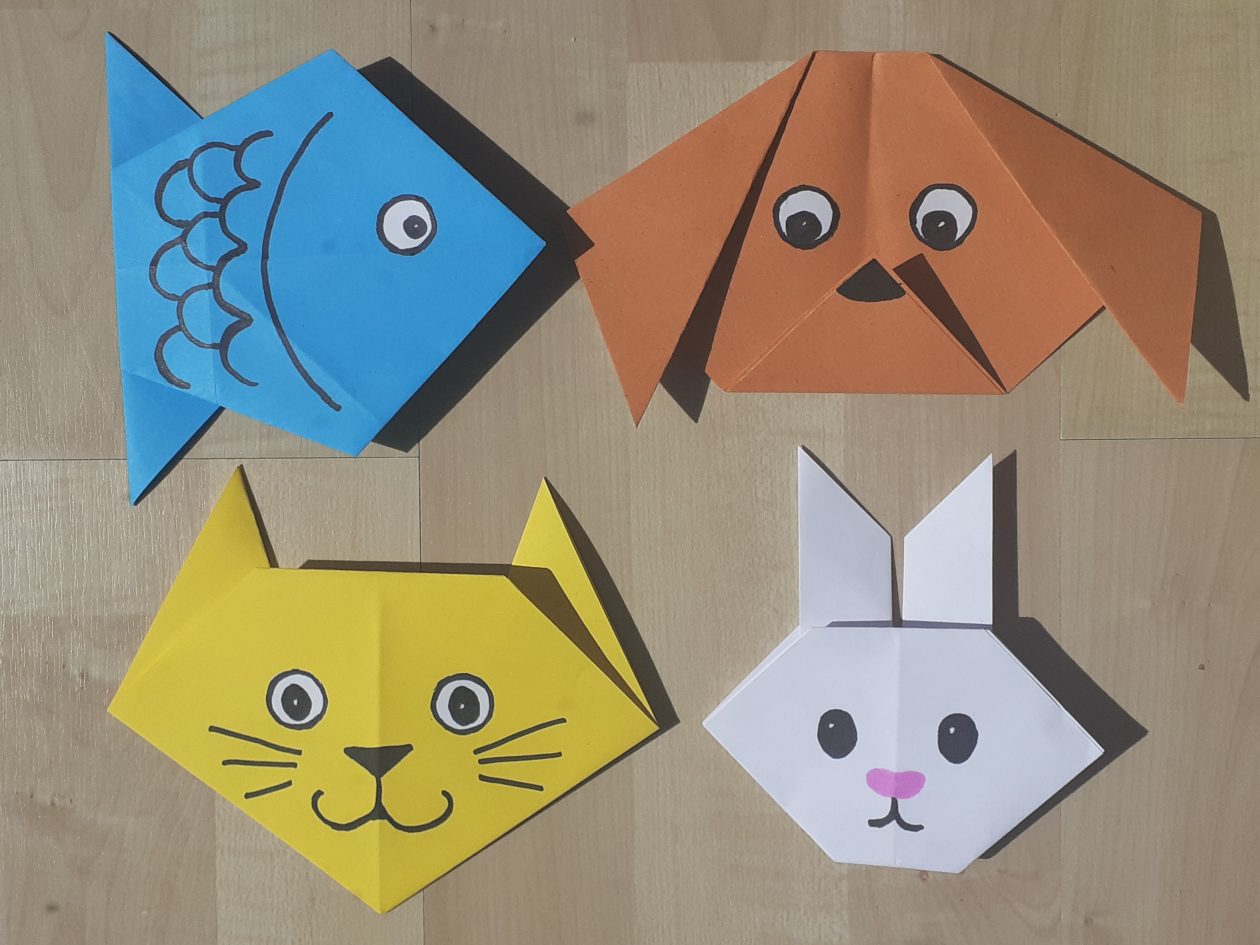
I started with an A4 piece of coloured paper. The first thing you need to do is make a square by folding one corner up and lining that edge up with the top edge of the paper and cut off the excess paper. Do this for all the animal faces (you can use a smaller piece of paper to make a smaller face). 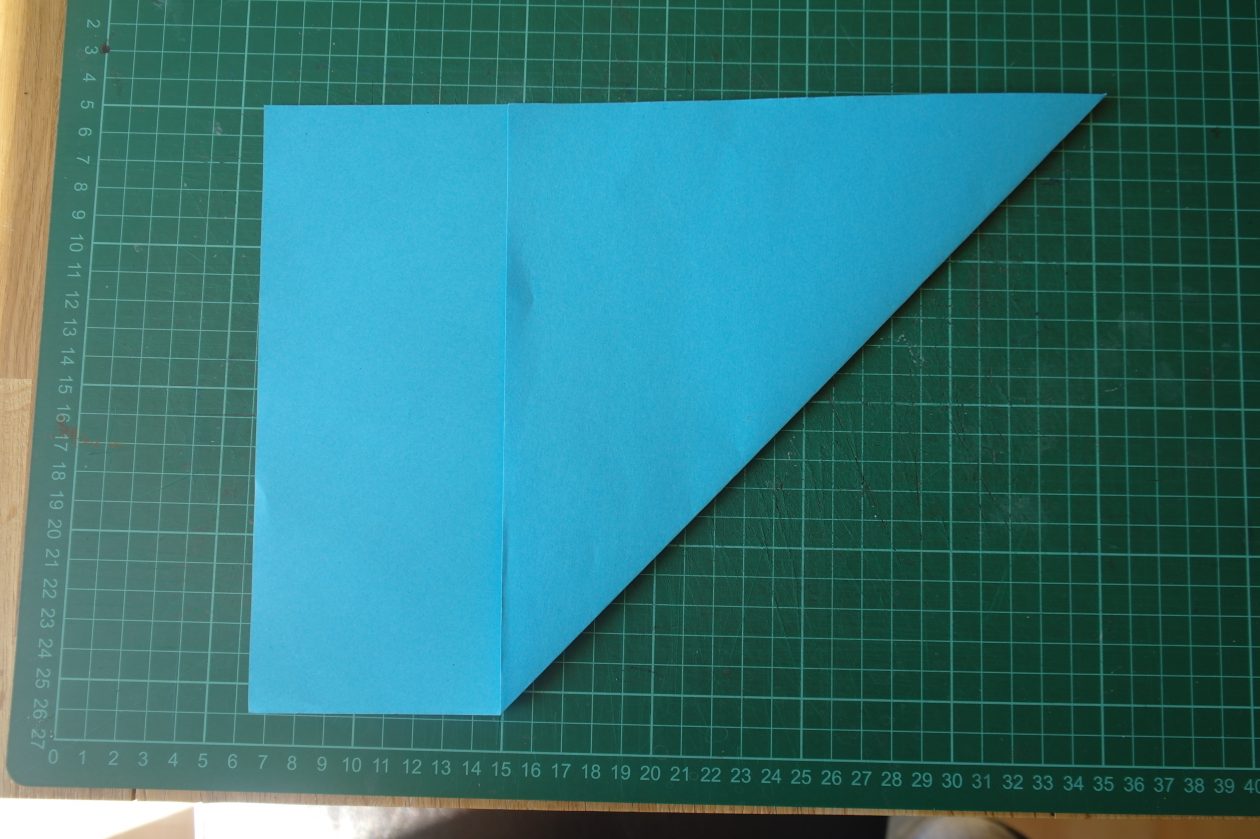
I started with the fish. Fold your square piece of paper in half one way and then the other and crease to make quarters – unfold. 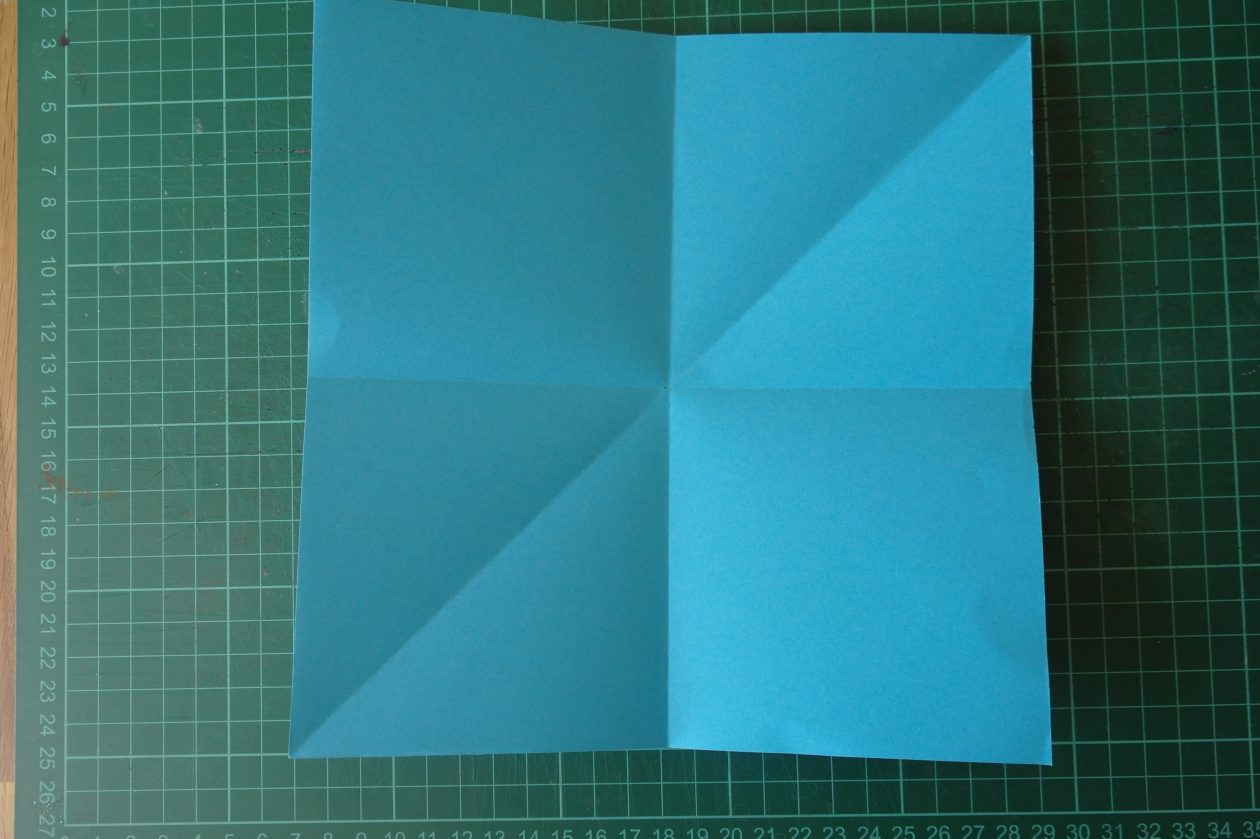
Fold the right top and bottom corners into the centre. 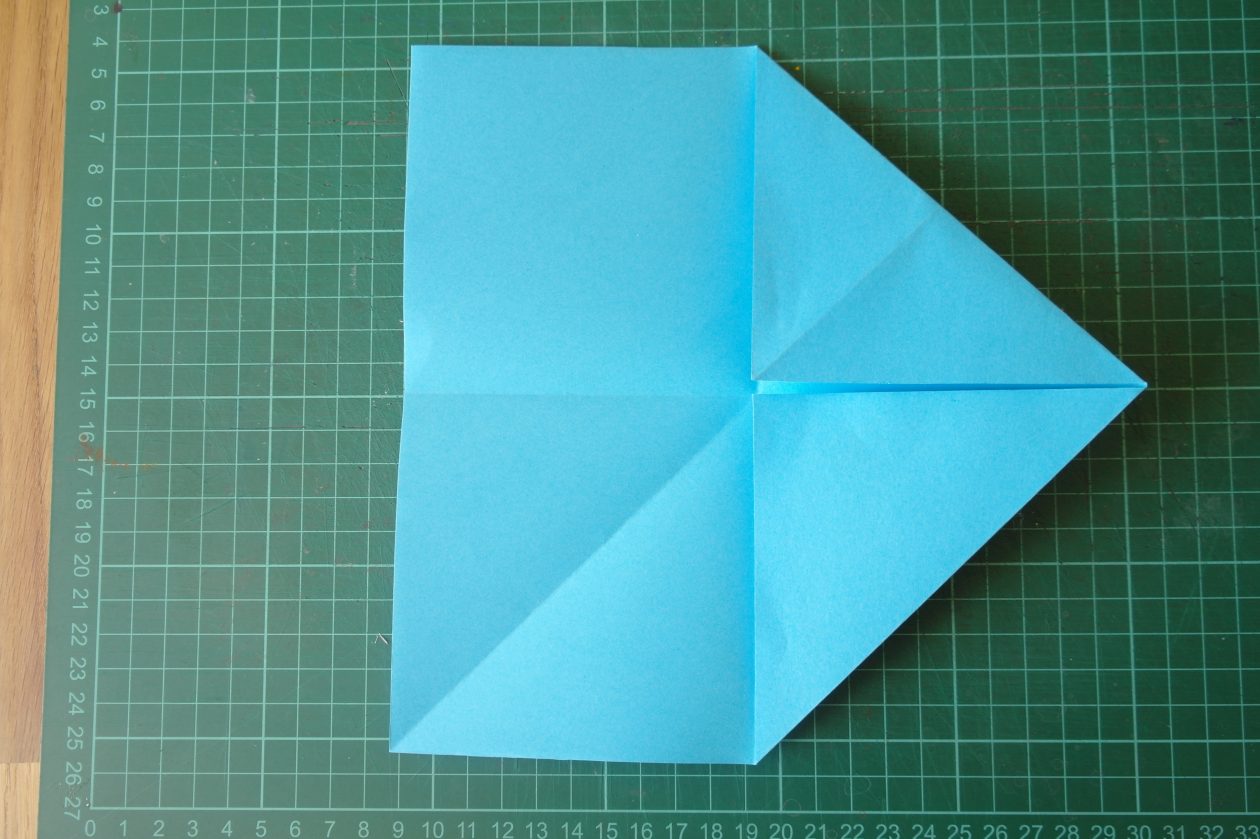
Flip your paper over and fold the left top and bottom corners into the centre.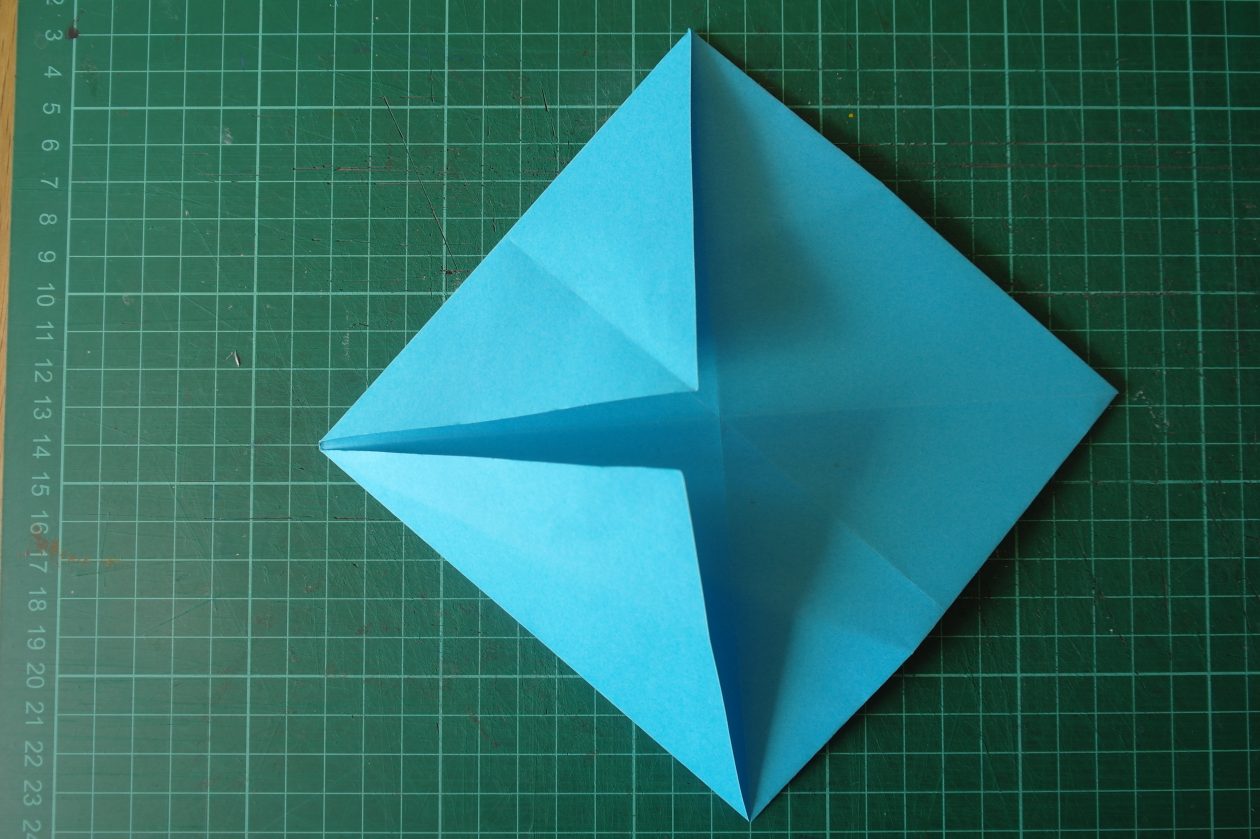
Flip your paper over again and fold the top corner to the centre crease, lining the edge up with the centre crease – make sure the back layer of paper flicks out (don’t crease it).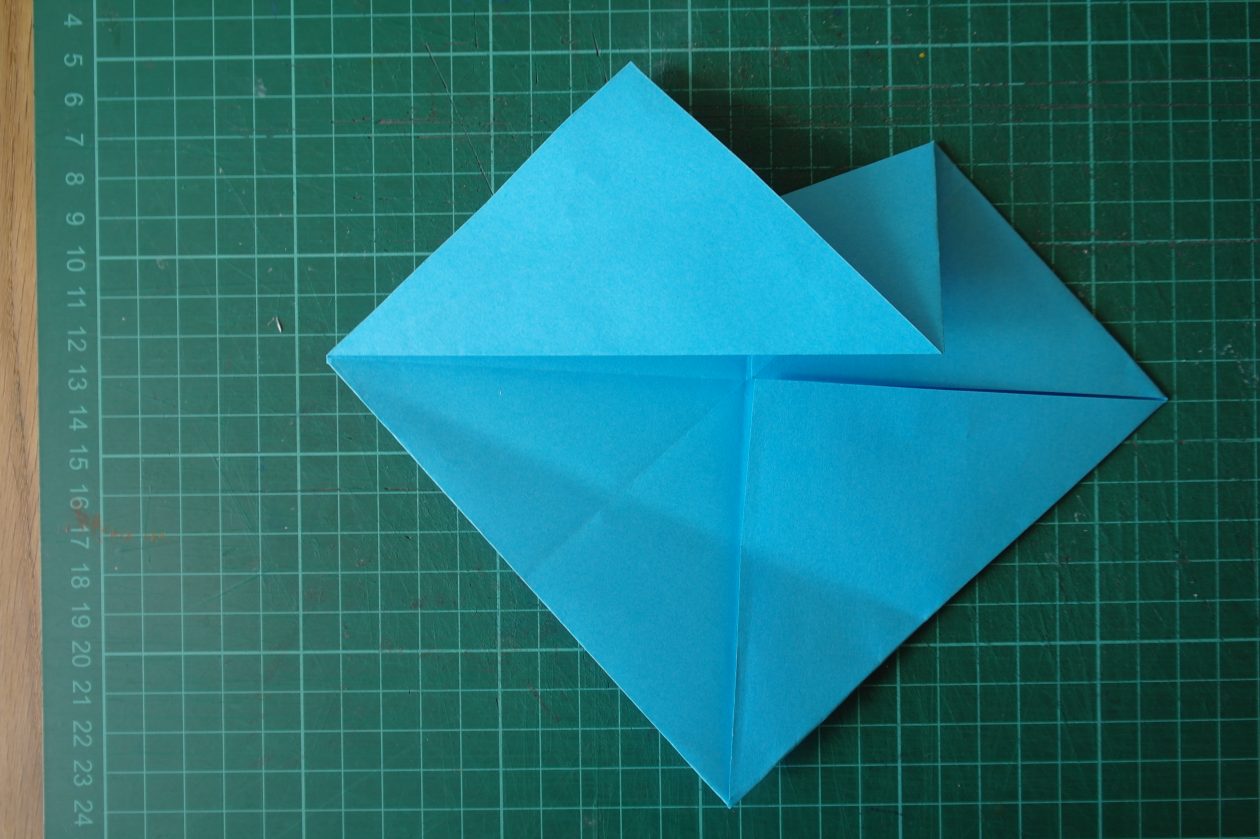
Do the same with the bottom corner.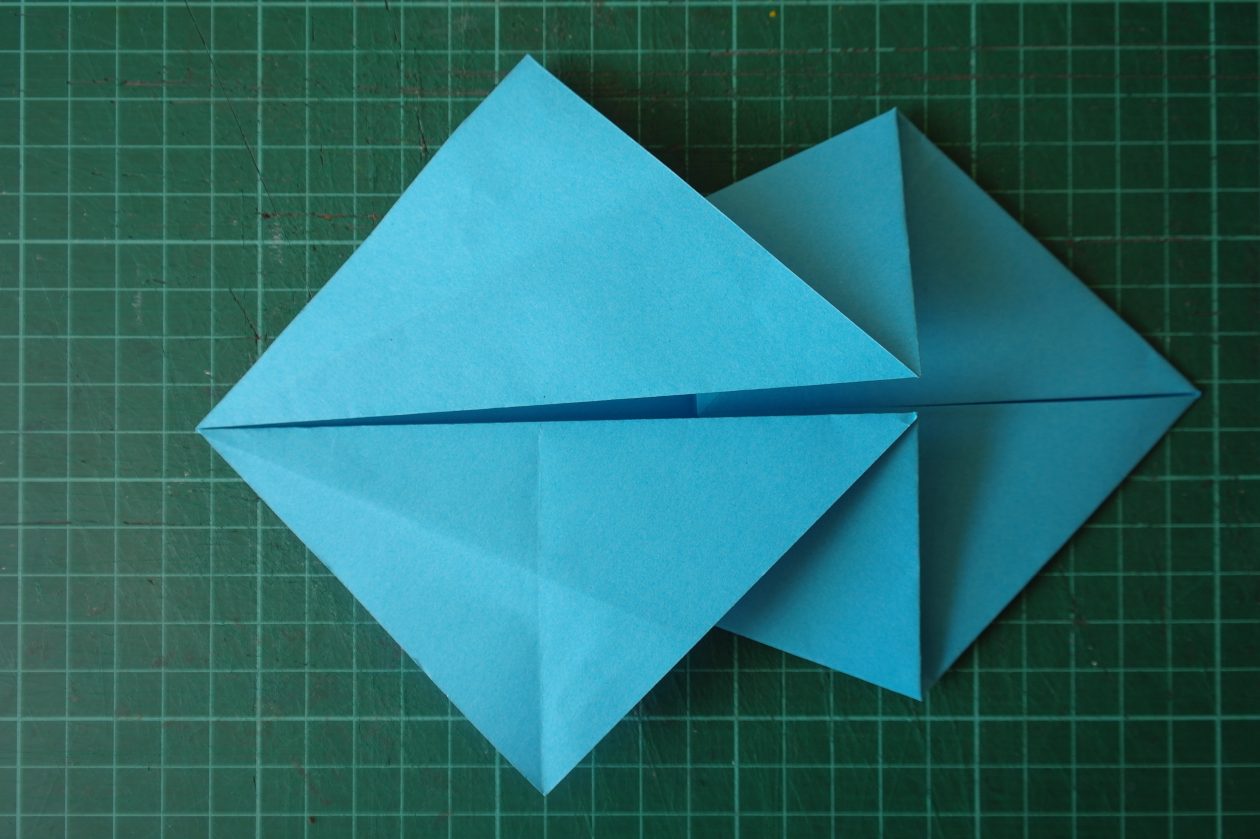
Now fold up the new corner you have created to the centre.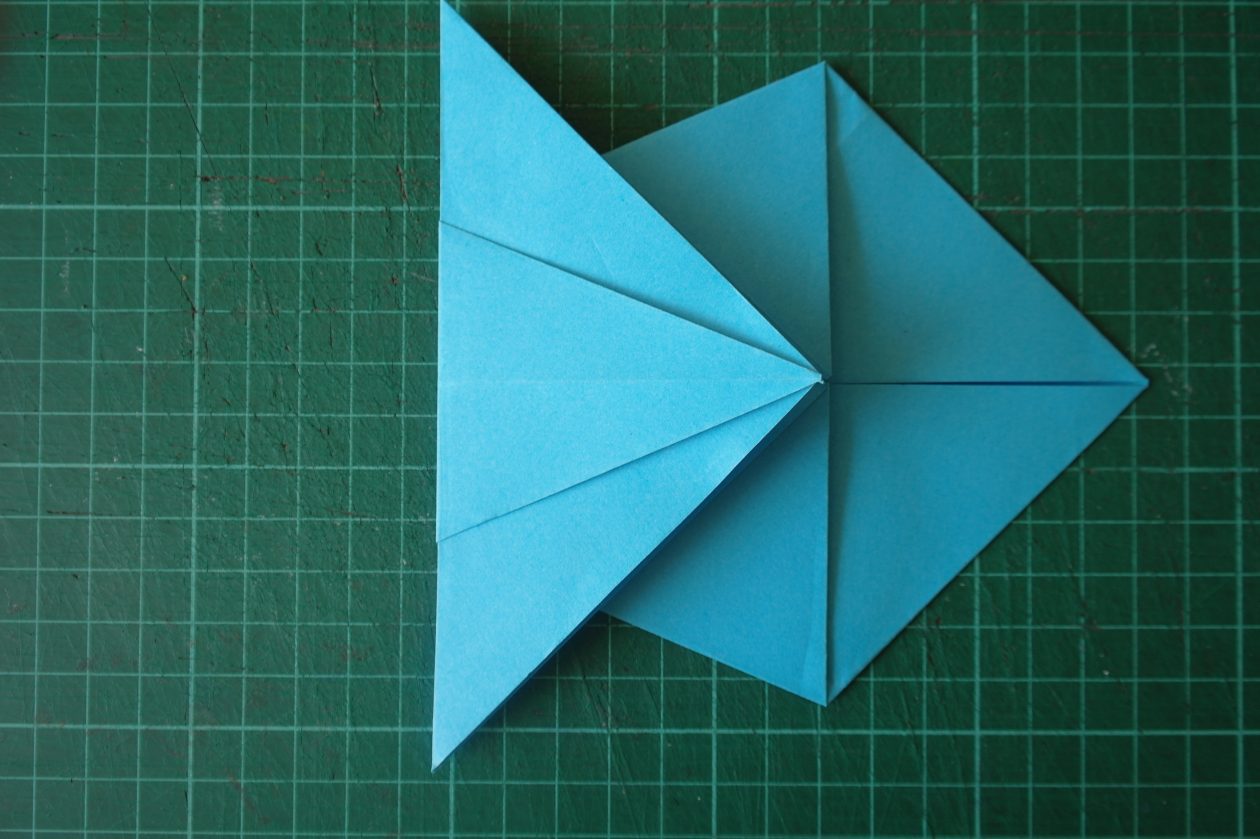
Flip your paper fish over.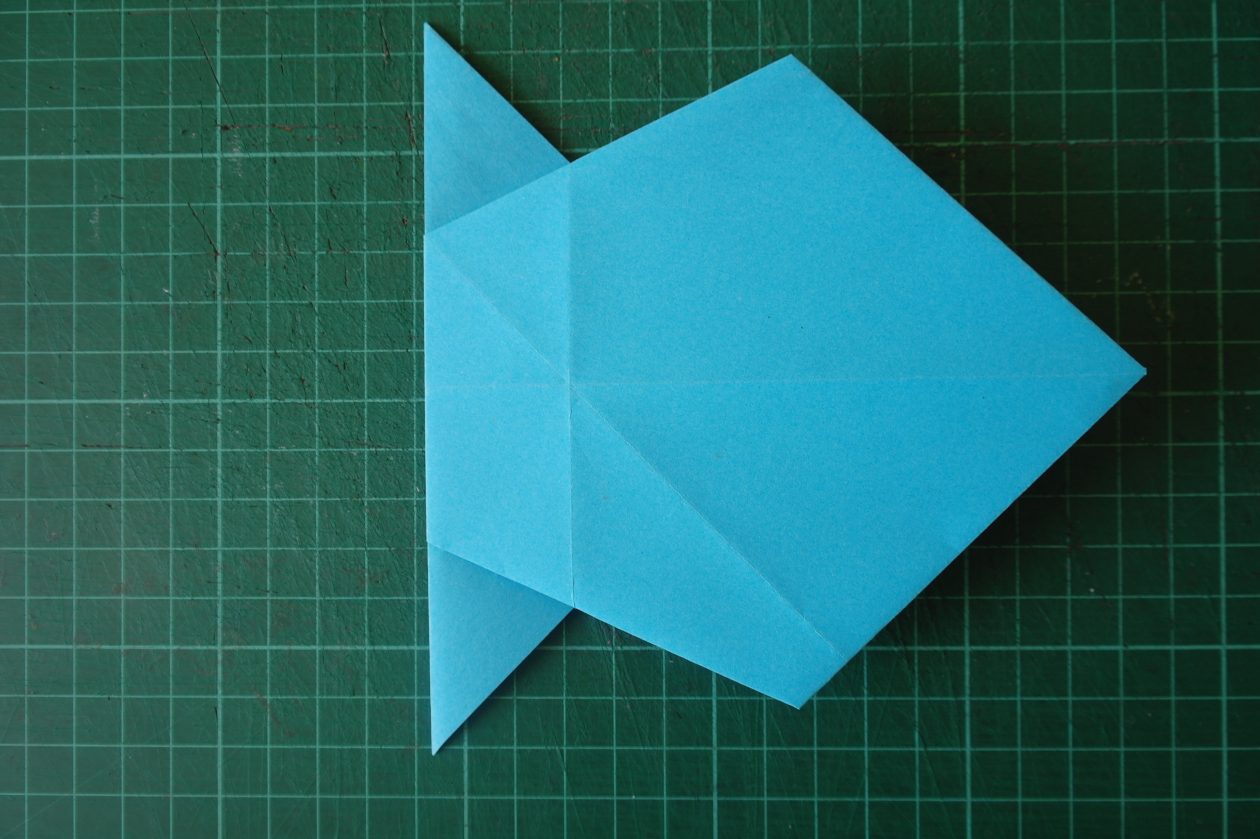
Decorate. I used a white sticky label and cut out some circles for the eyes then I drew on top with a black felt tip pen.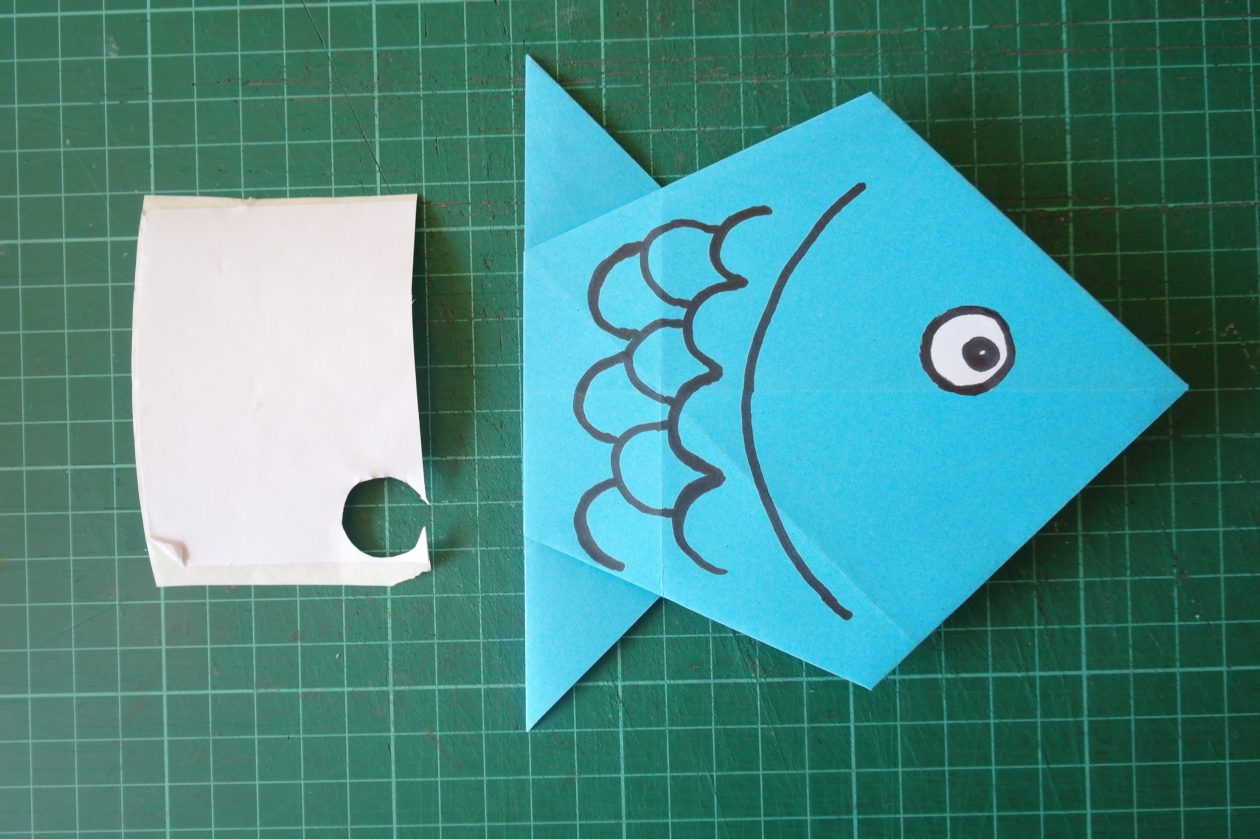
Next I made the dog. I made a square in the same way as I did for the fish.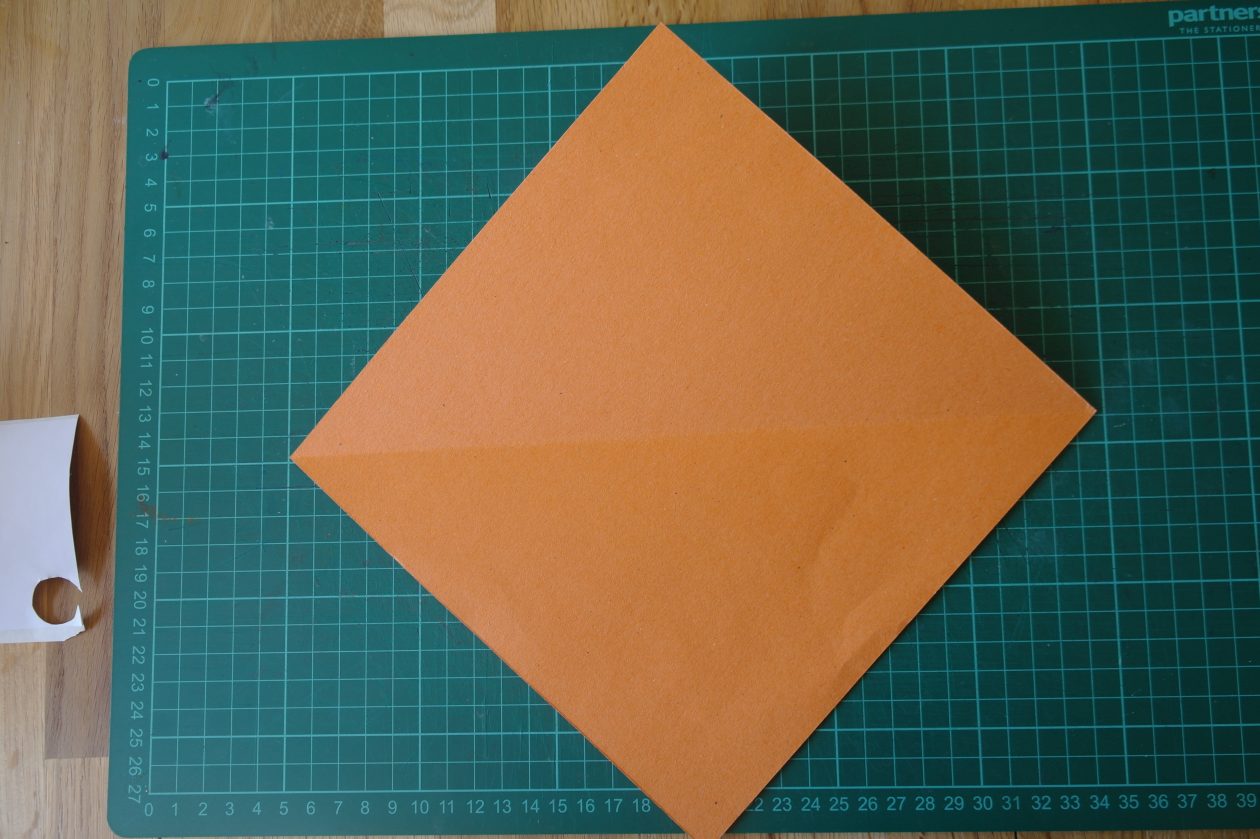
I folded the paper in half, diagonally, downwards to make a triangle.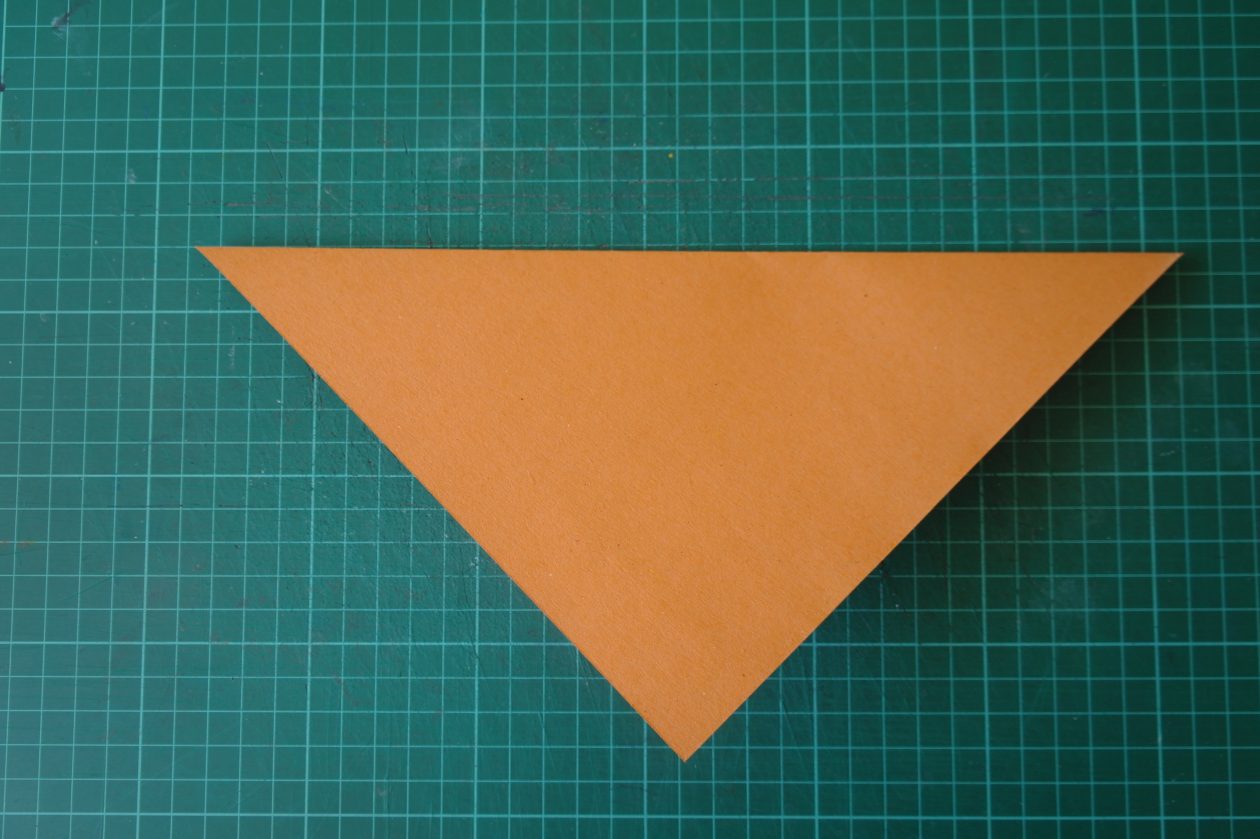
I creased the triangle down the middle to find the centre.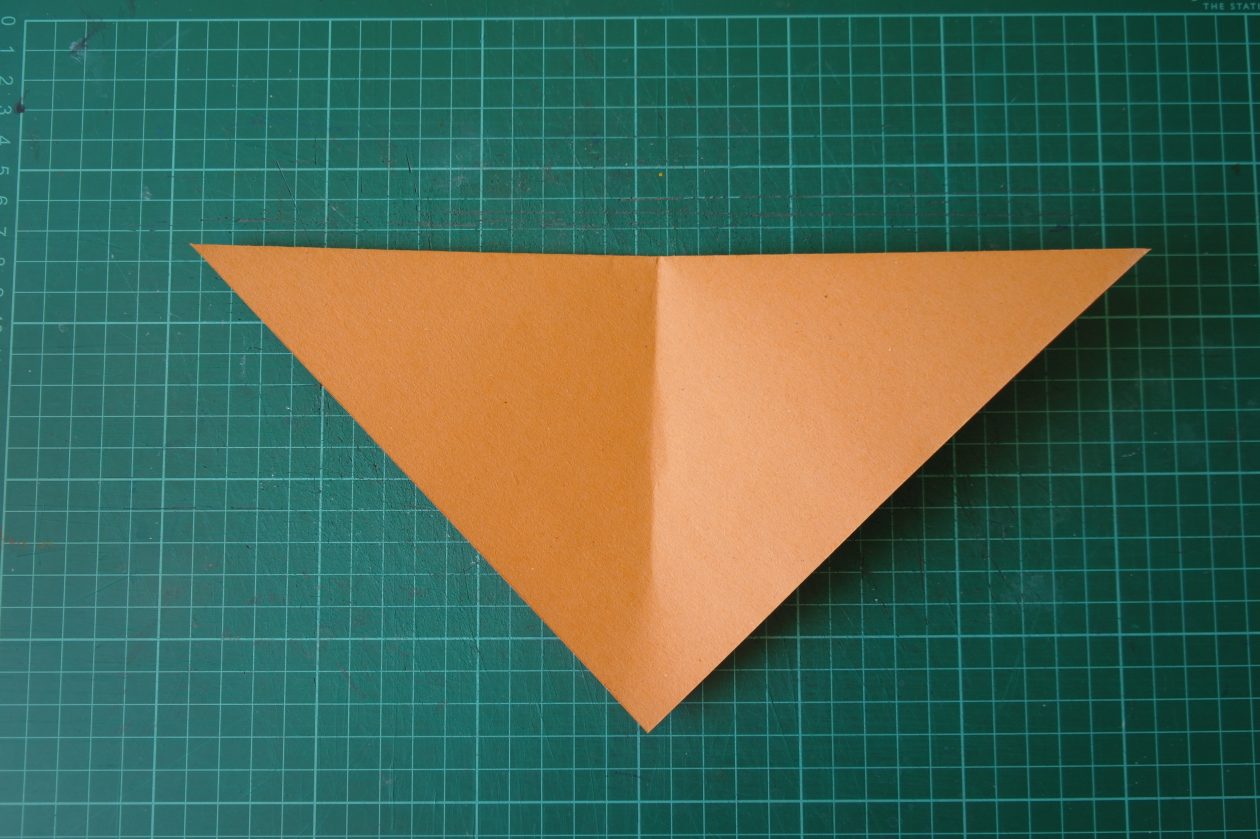
I folded down the two top corners of my triangle, making sure I had an equal distance between the centre crease and the fold – these will be the ears of the dog.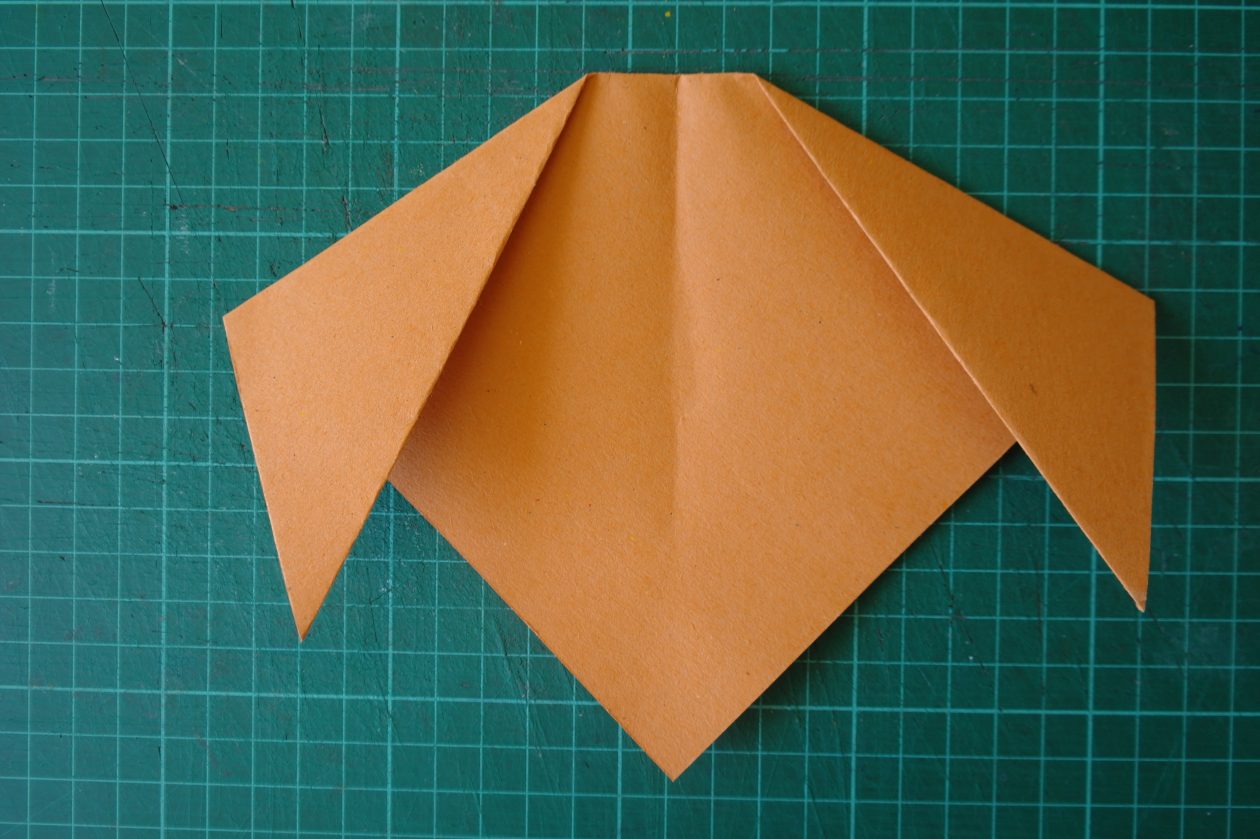
I folded up the bottom corner to make the nose of the dog.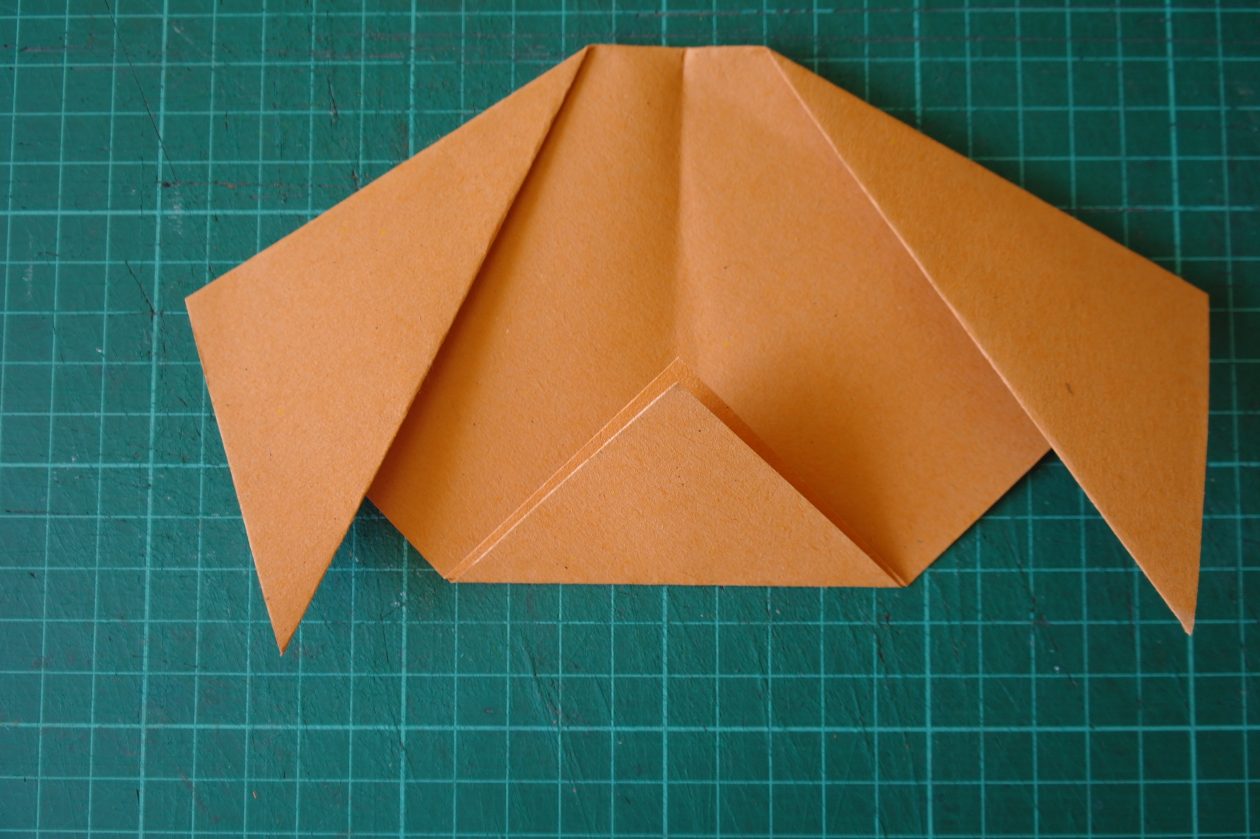
Decorate.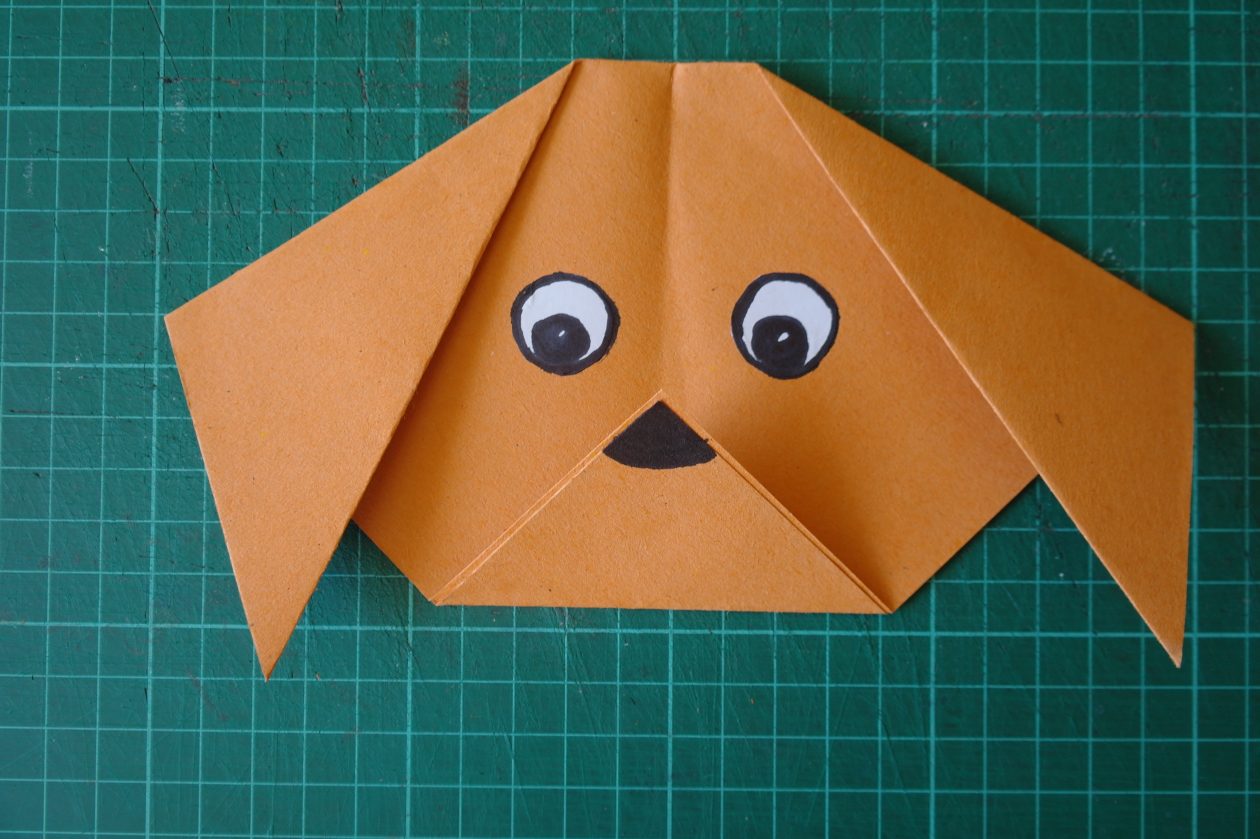
Next I made the cat. I started with a square piece of paper.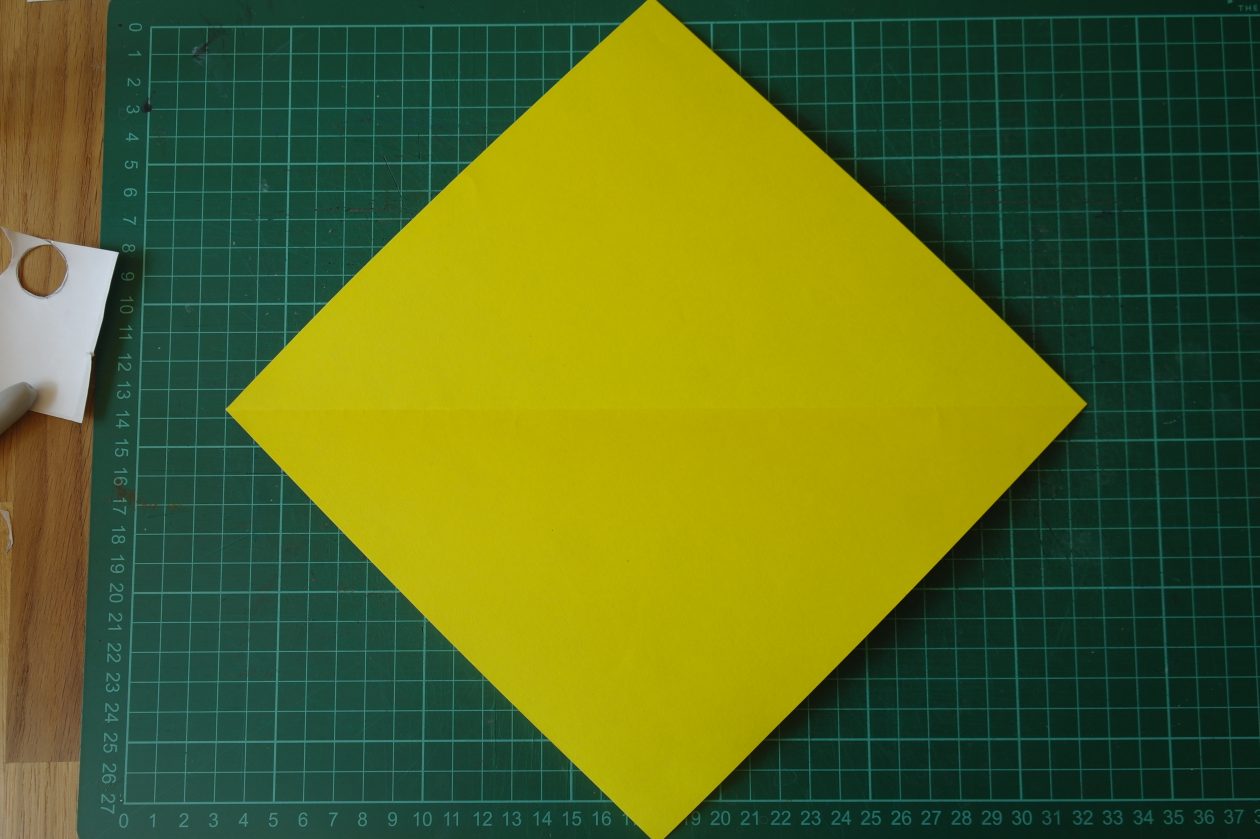
Fold the paper in half, diagonally, upwards to make a triangle.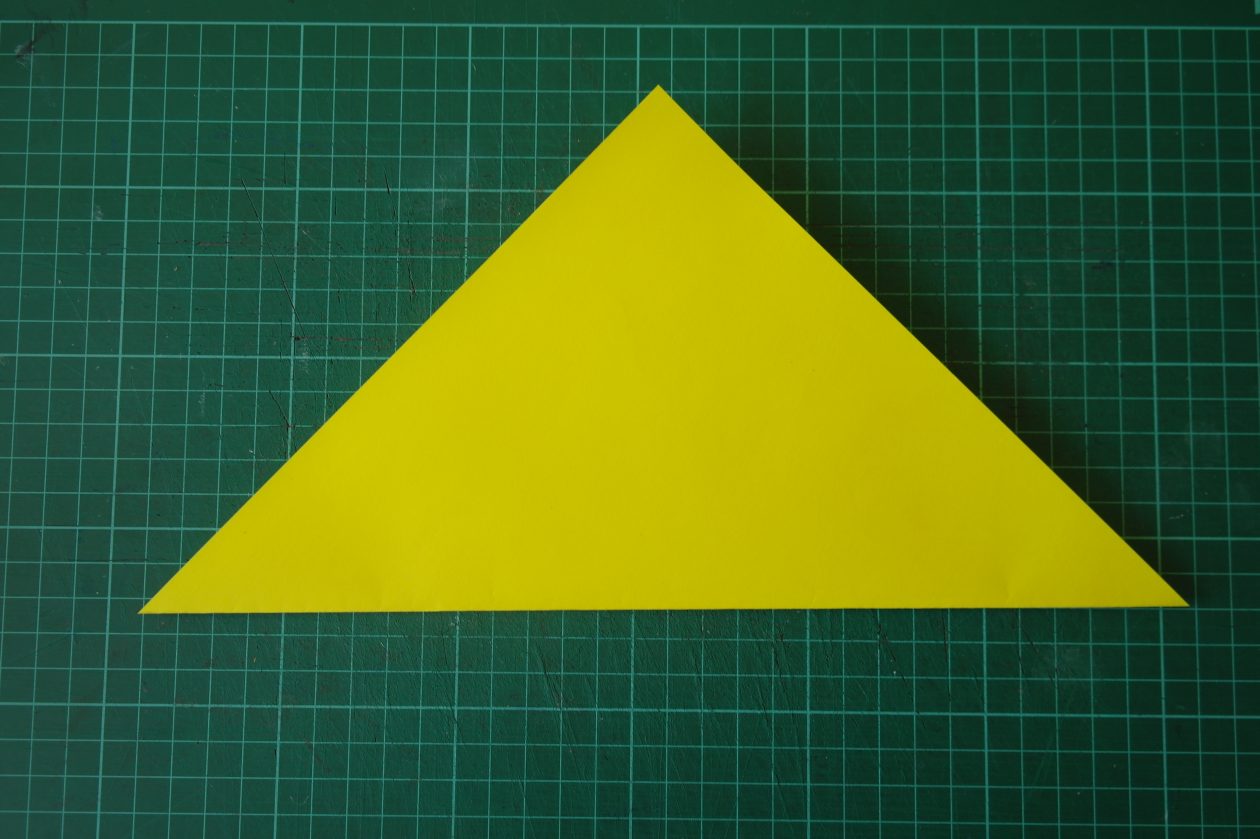
Crease the triangle in the centre.
Fold the two bottom corners upwards – trying to keep them an equal distance from the centre crease so that they are the same size. These will make the ears of the cat.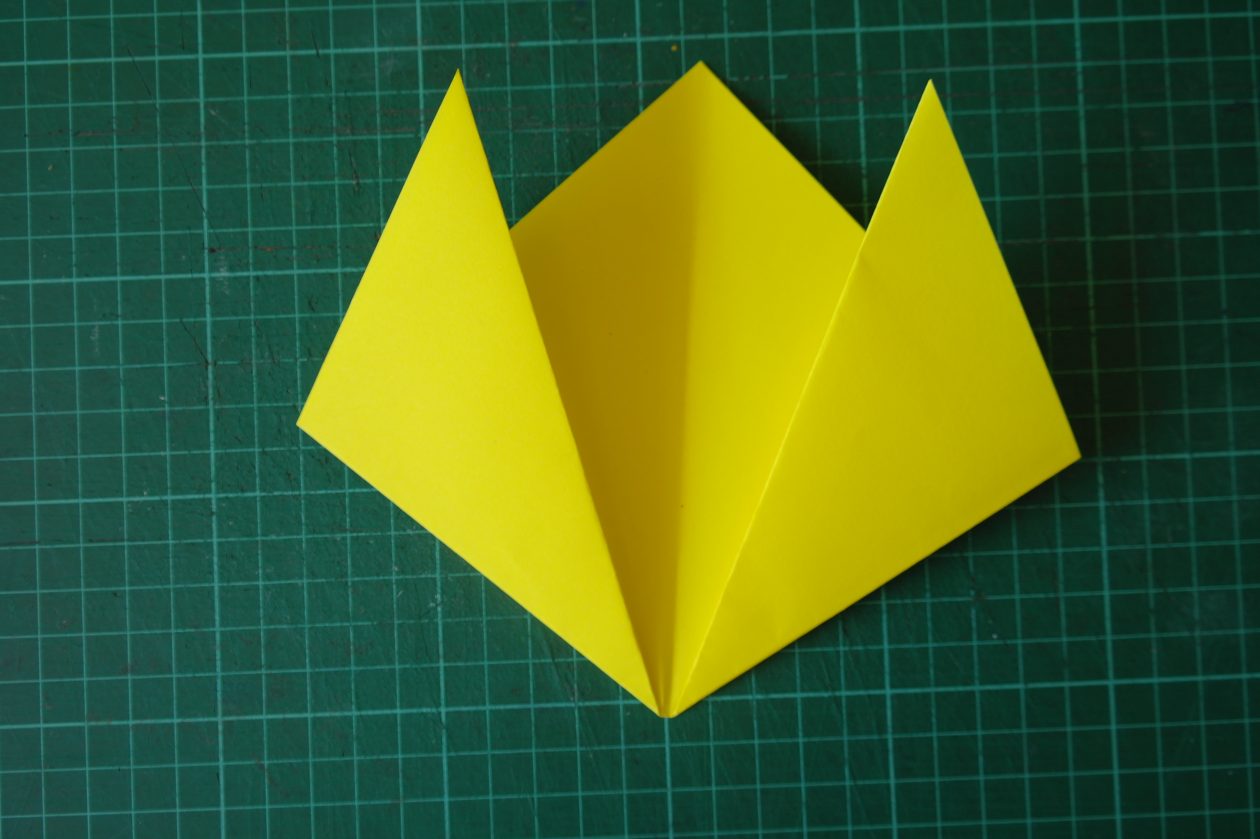
Fold the top corner down so that the crease is level with the edges of the ears.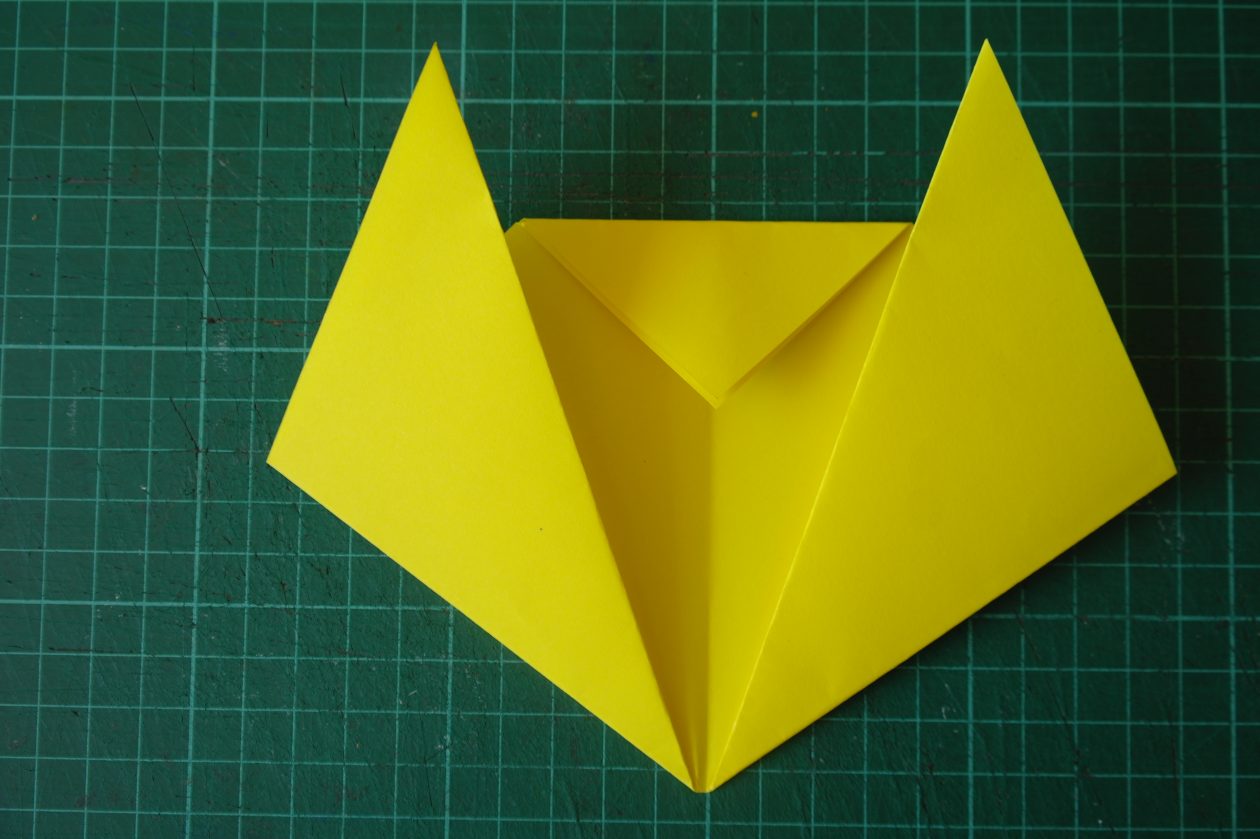
Flip your paper over.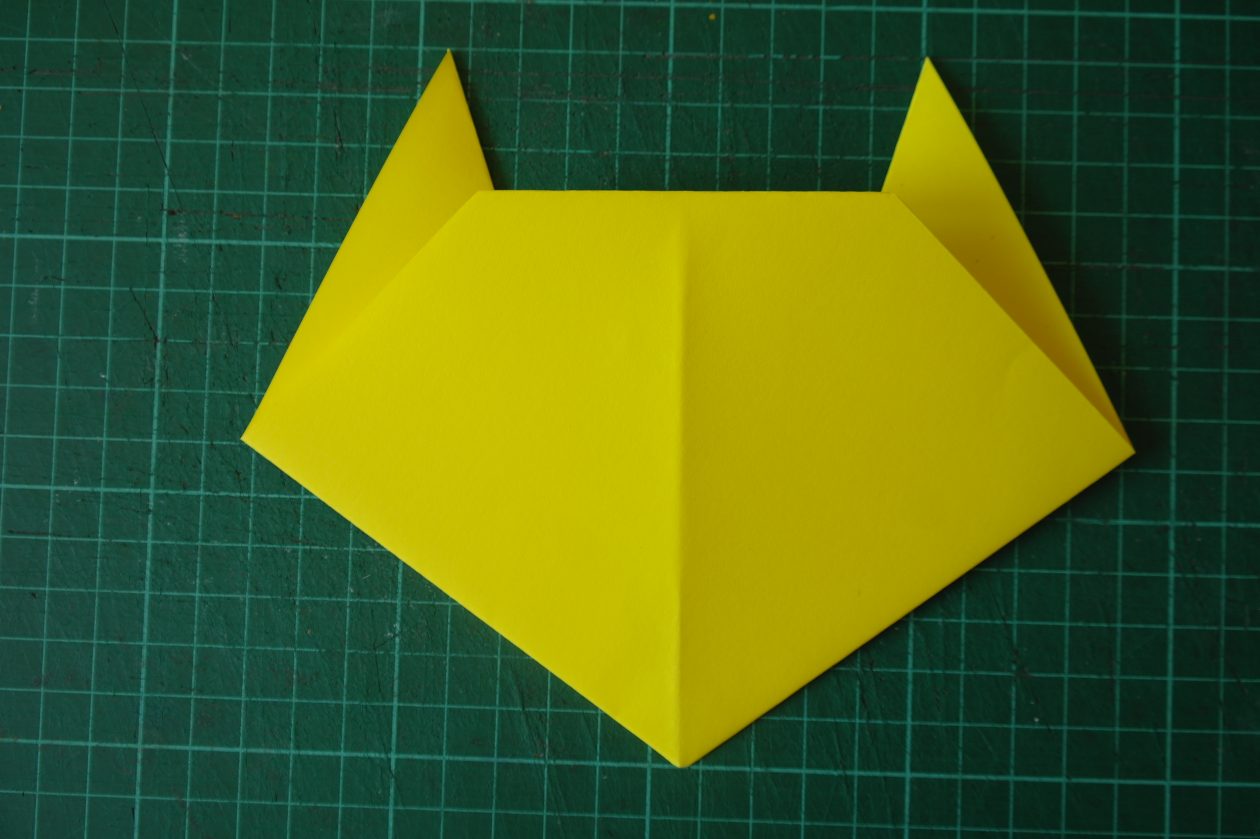
Decorate.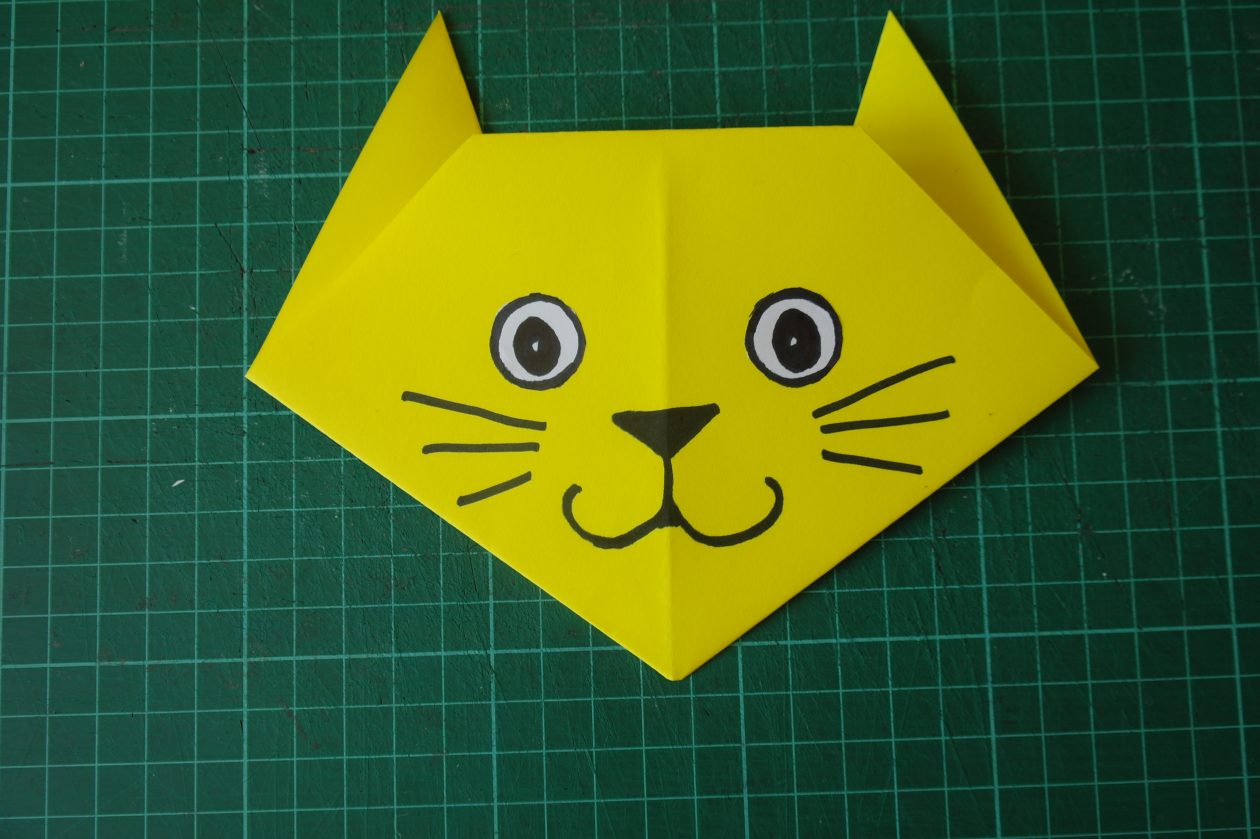
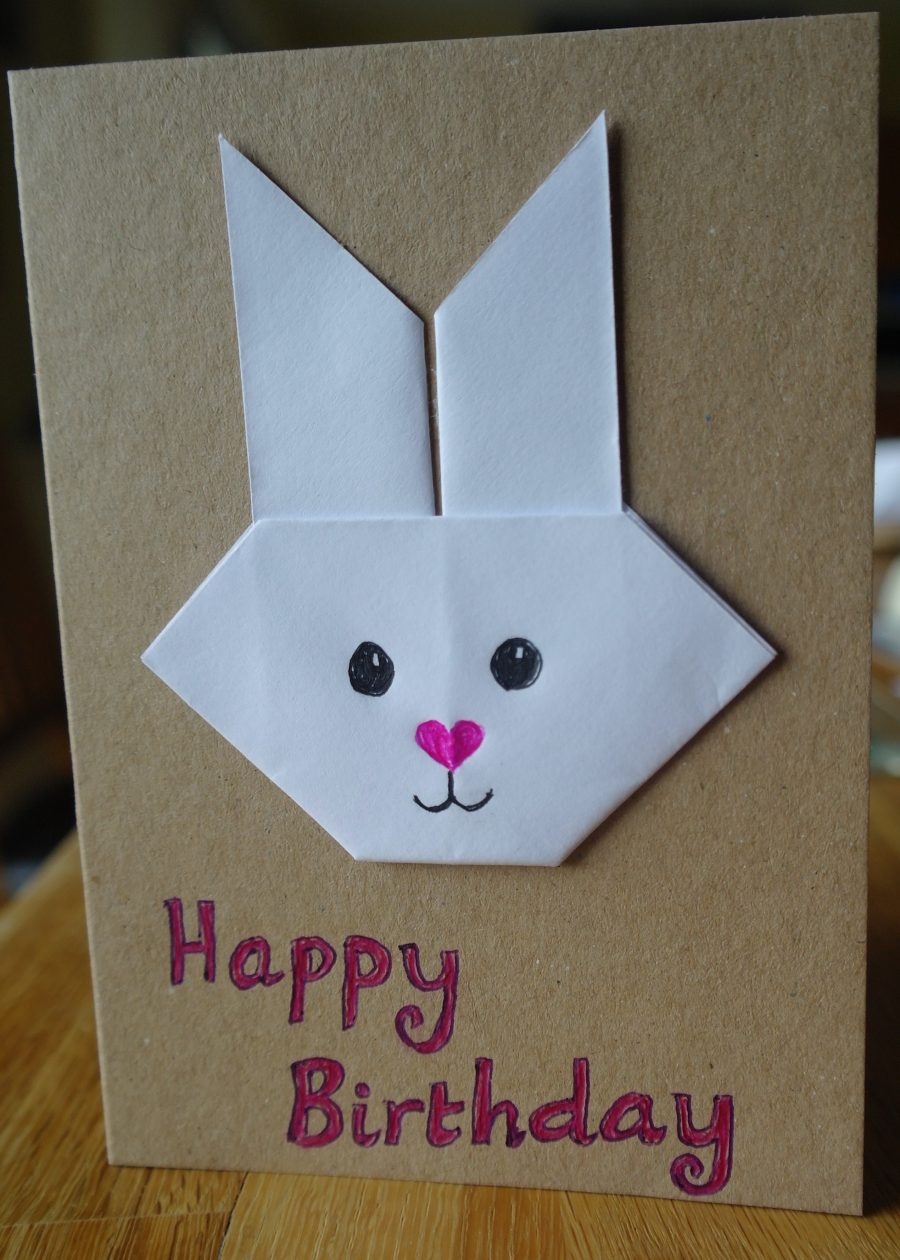
Finally, I made the rabbit. Start with a square piece of paper.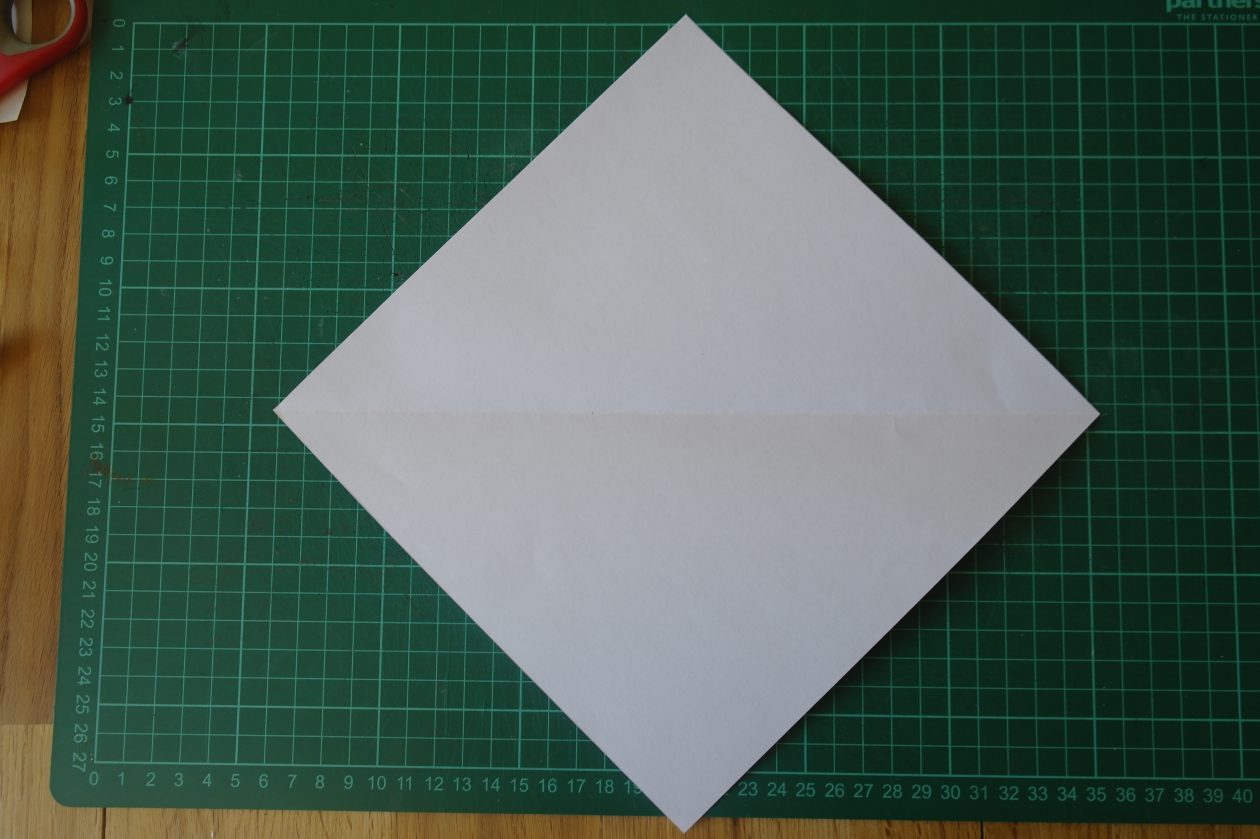
Fold the paper in half, diagonally, upwards to make a triangle.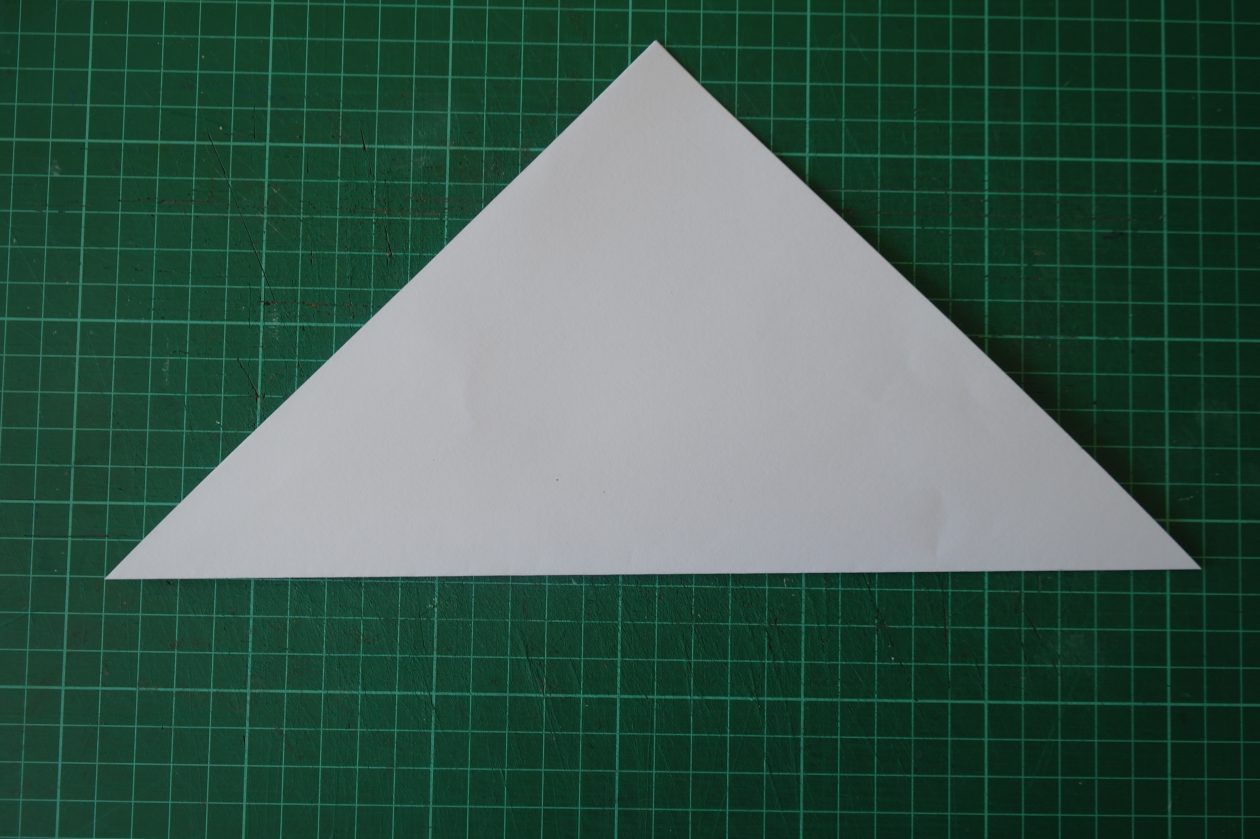
Crease you triangle in the centre.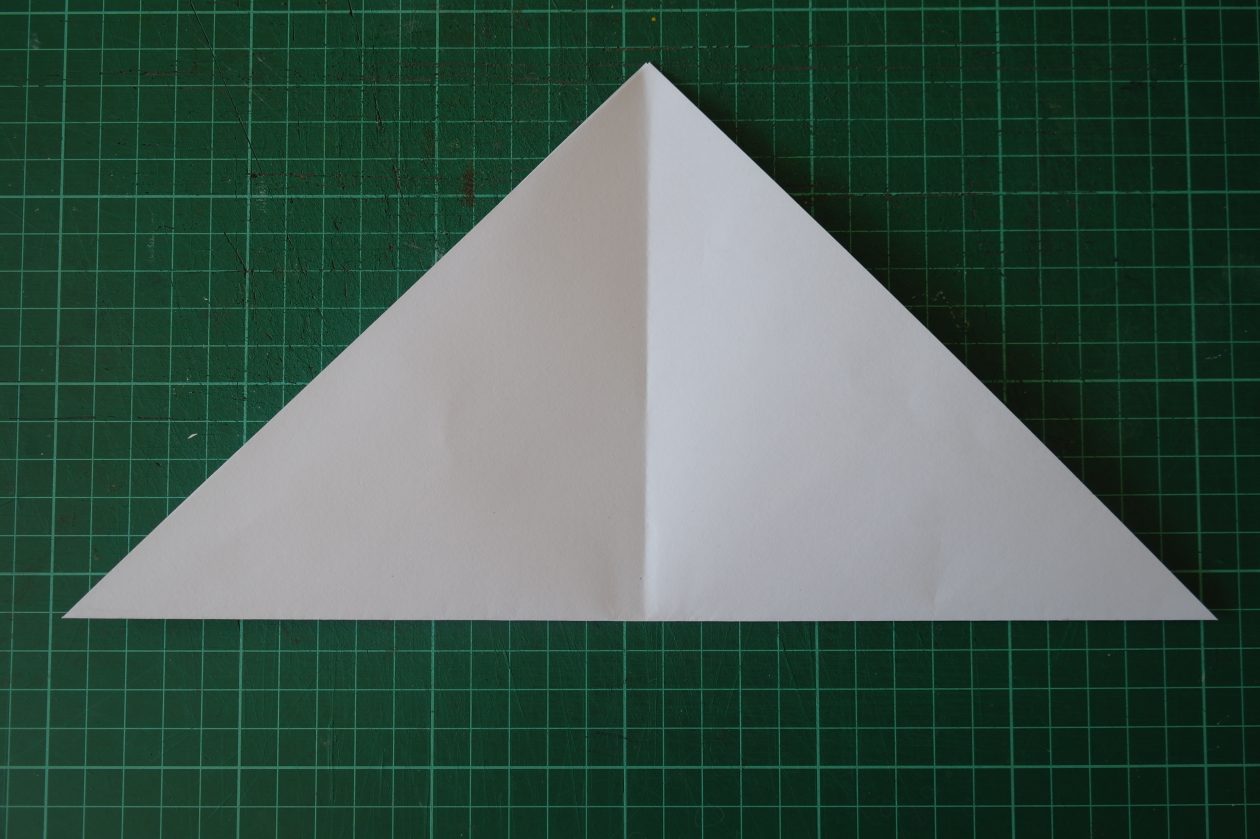
Fold the bottom edge up by about 1.5 – 2cm.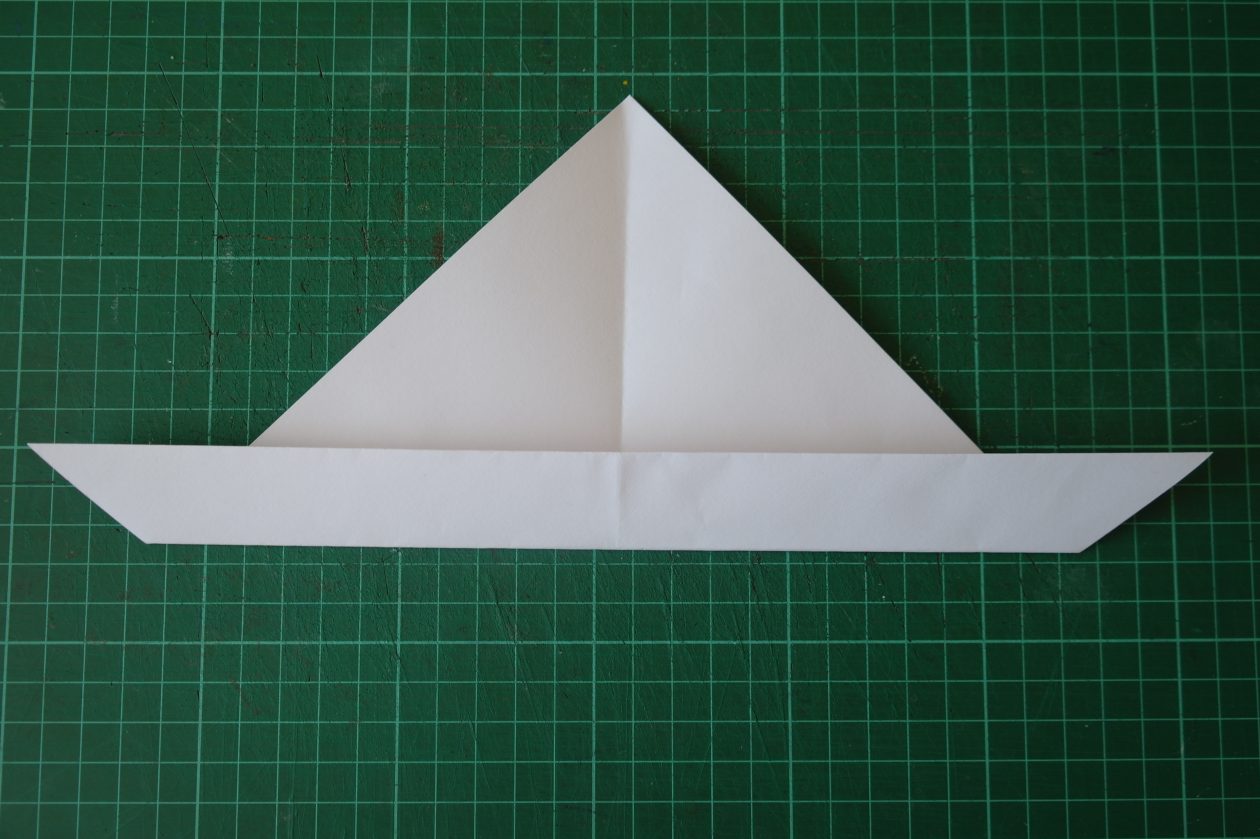
Take one of the bottom corners and fold it up to the top corner, lining the bottom edge up with the centre crease.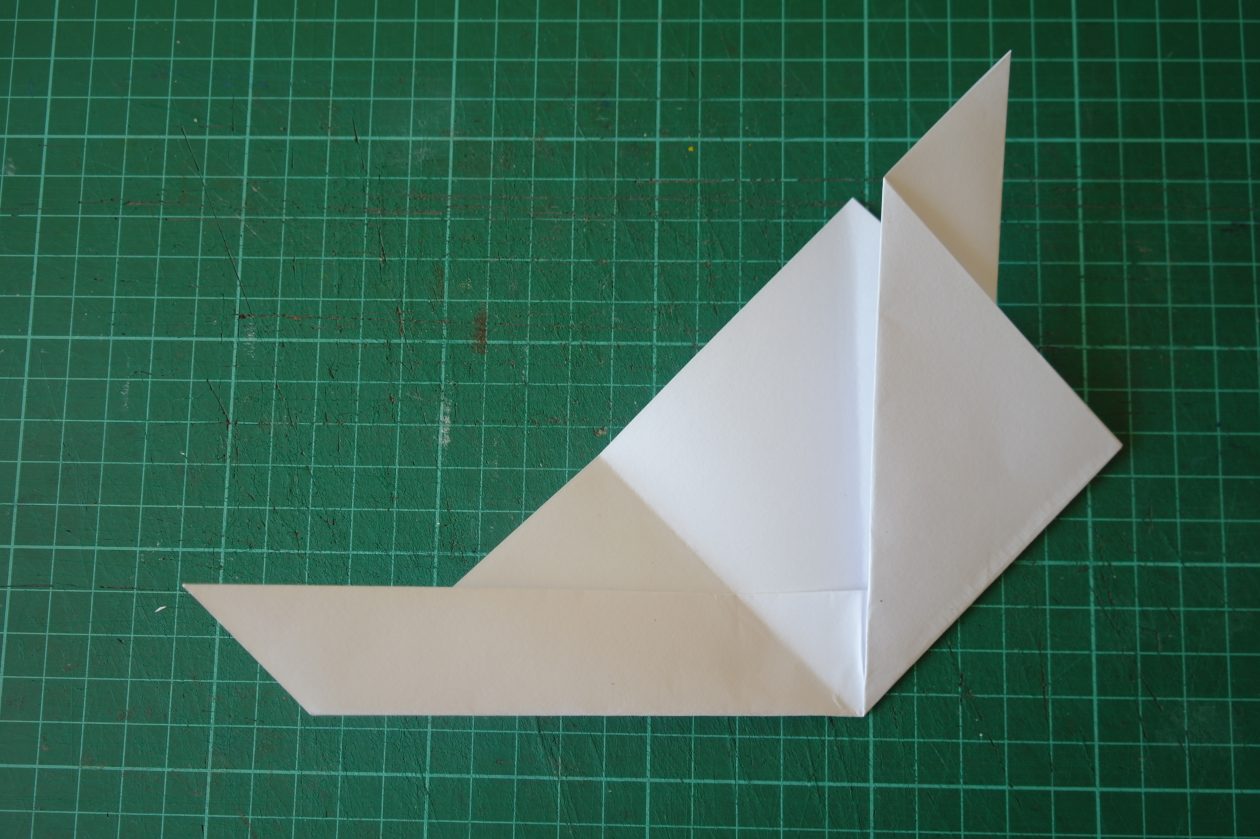
Do the same at the other side.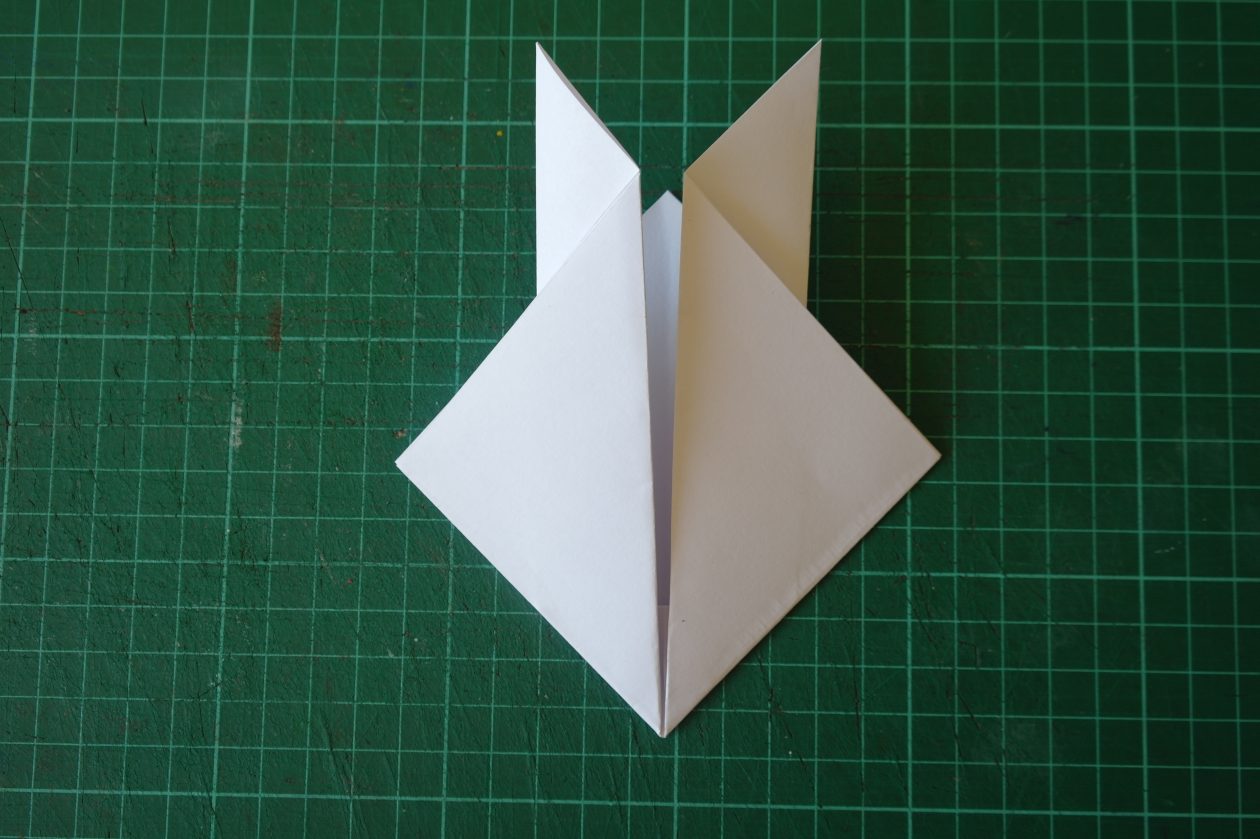
Flip your paper over.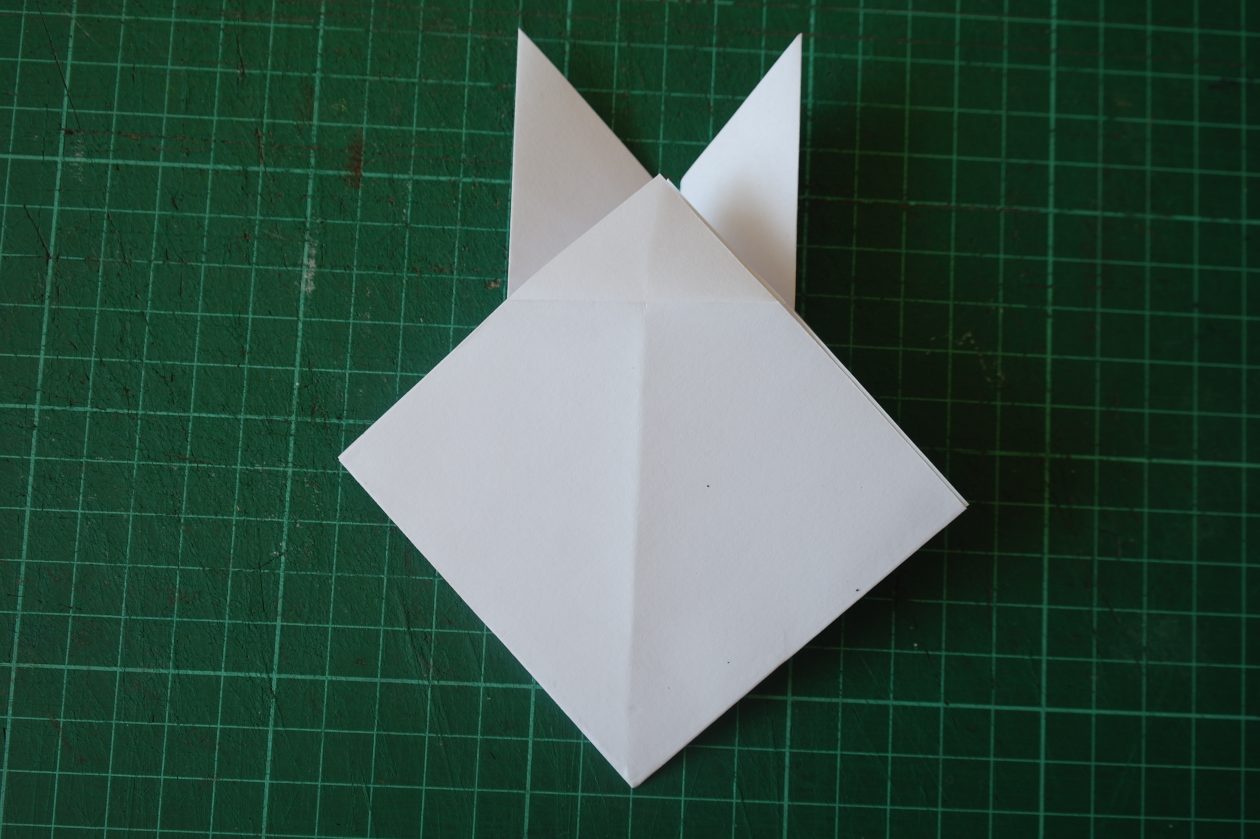
Tuck the top corner down in front of the ‘ears’.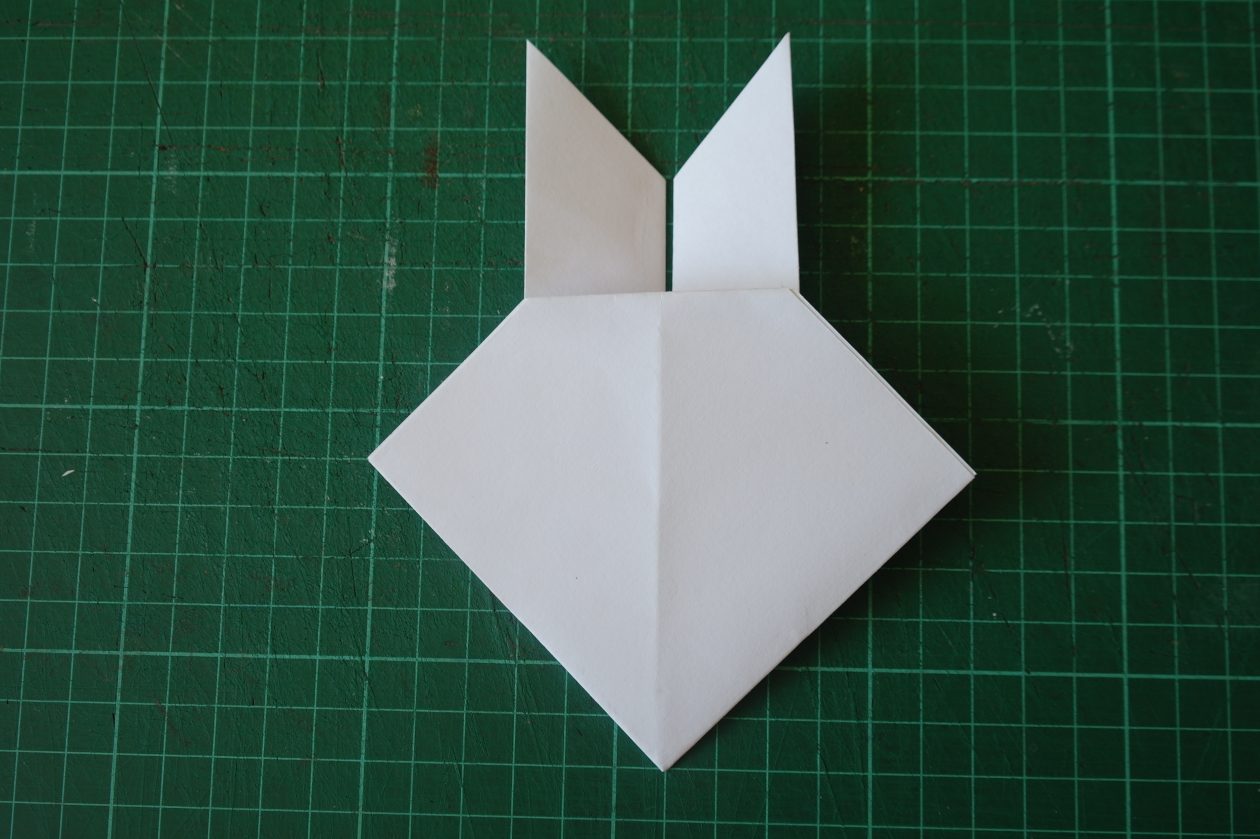
Flip your paper over and fold up the bottom corner (this can be a bit tricky as the paper is so thick).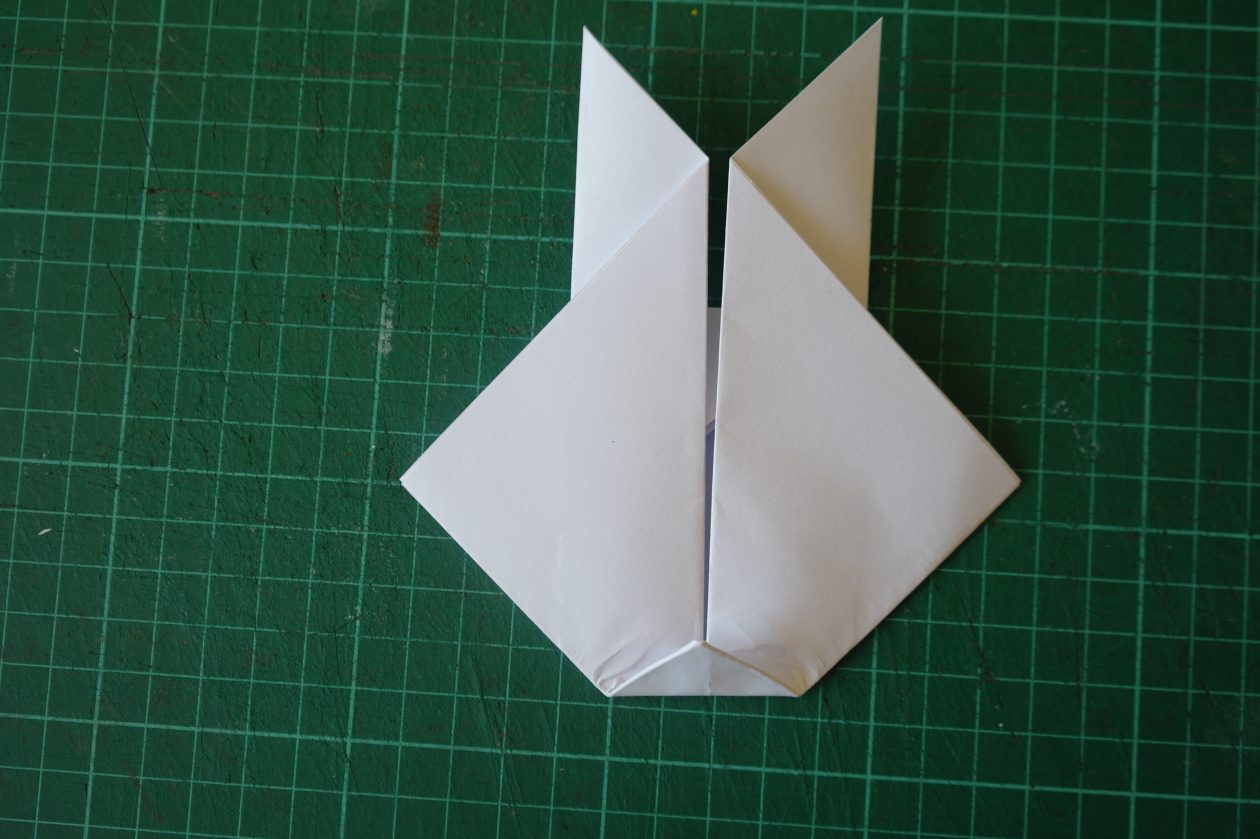
Flip your paper over again.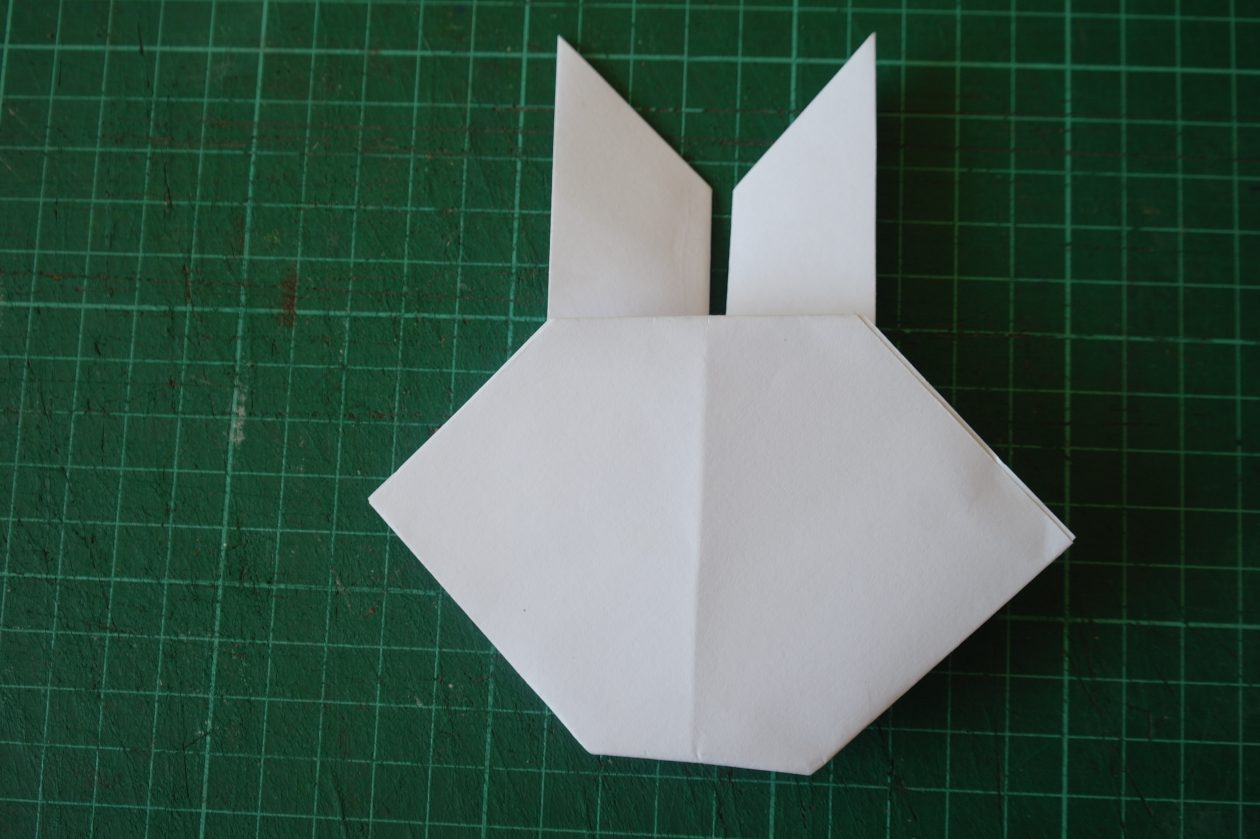
Decorate.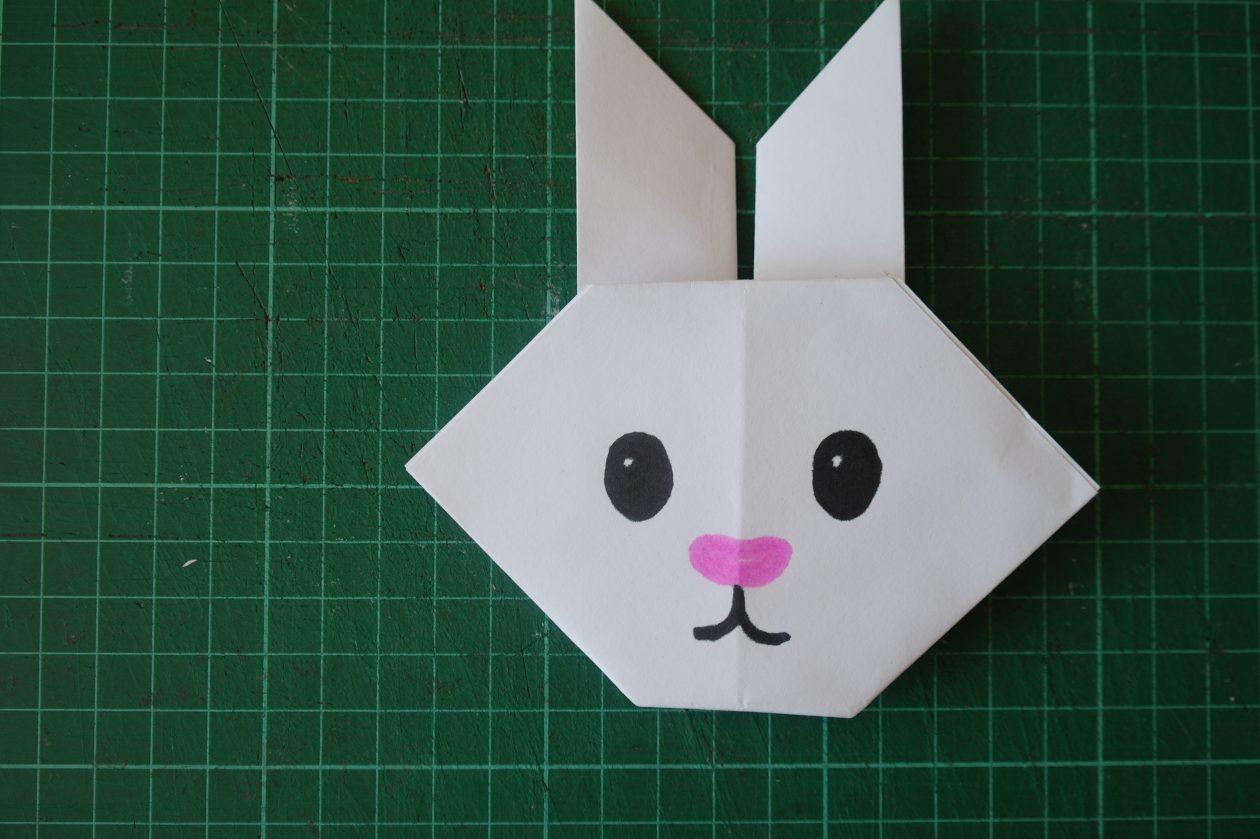
I made a smaller rabbit and turned it into a birthday card for my friend.