
Hello everyone! As you all may be aware, it’s Mother’s Day this Sunday so I thought it would be a great idea to craft something for Mummy Dearest; I’m sure mums will appreciate your effort and thought. So here’s how to make a photo frame and love heart wall hanging. Both are easy peasy and straightforward.
Activity 1: Love Heart Wall Hanging
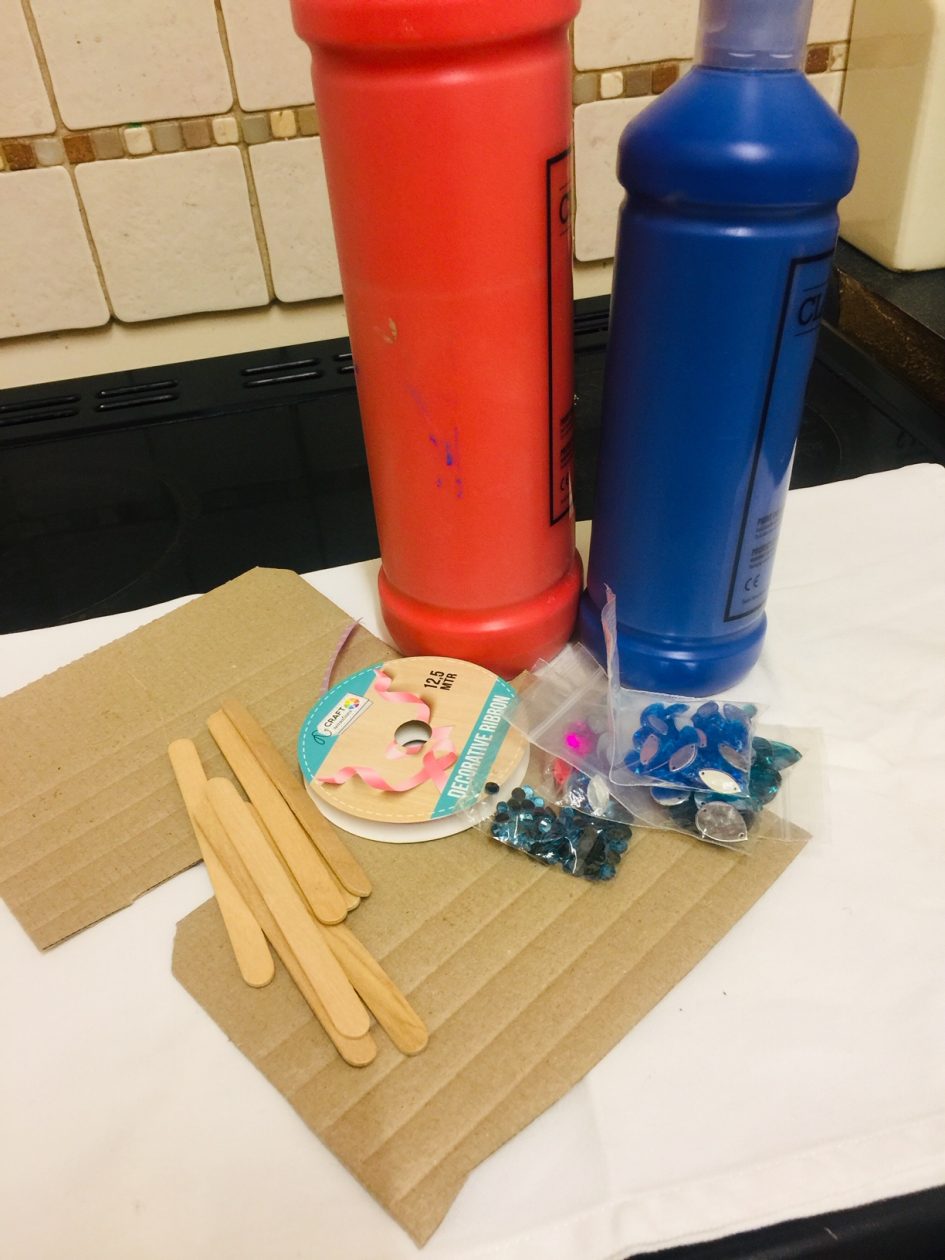
You need:
Steps:
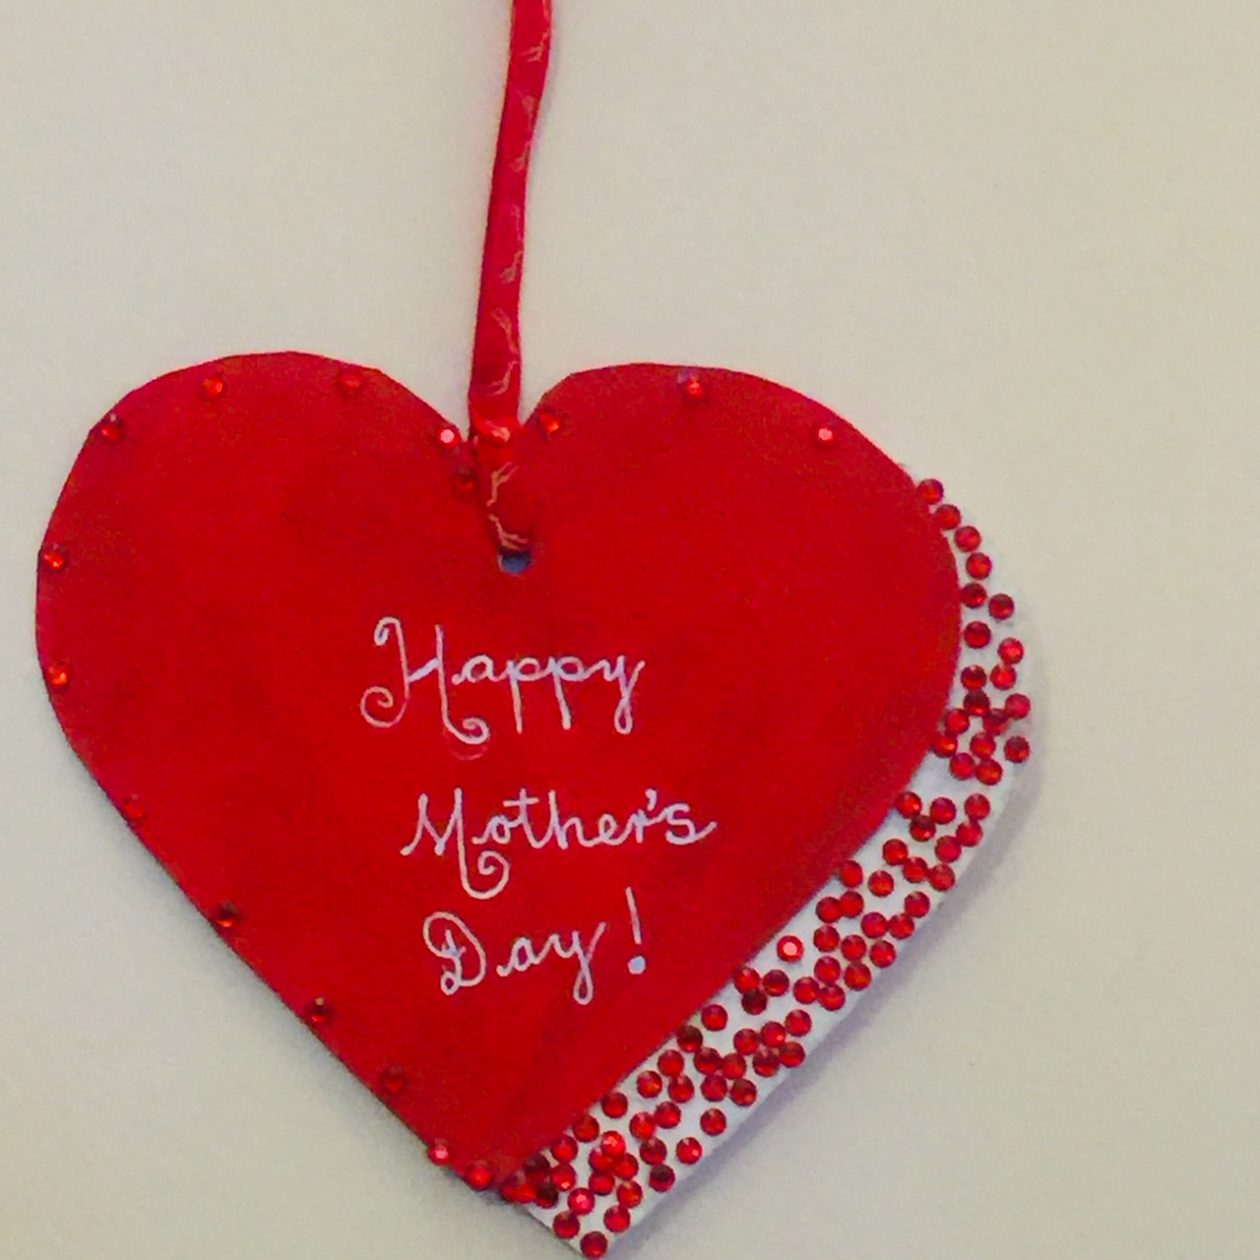
- Draw or print out a love heart template.
- Glue it onto a piece of cardboard and cut out 2 pieces.
- Paint the 2 pieces of cardboard with different colours.
- Overlap the two pieces as shown in the picture below.
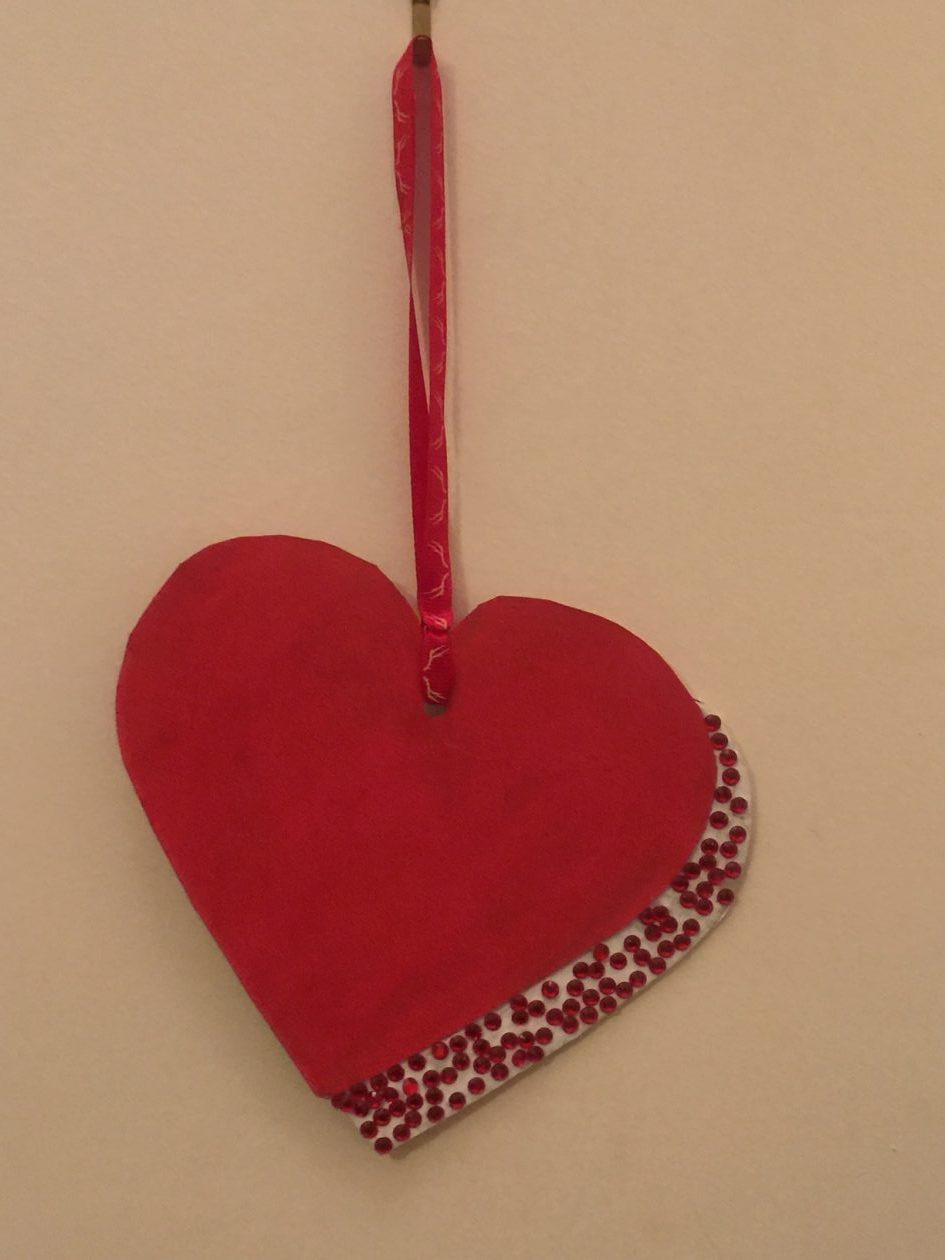
5, Embellish a small section of the overlap with beads, gems, small buttons, or whatever you desire. Dot a few more gems around the perimeters of the heart as shown in picture.
6. Dot a few more gems around the perimeter of the larger part.
7. Punch a hole through the cardboard, in top middle position and thread a 10 cm (or as long as you want it) ribbon through it.
8. Find a good spot in mum’s favourite space and hang it up. Or you can wrap it up nicely and give it to mum on Mother’s day.
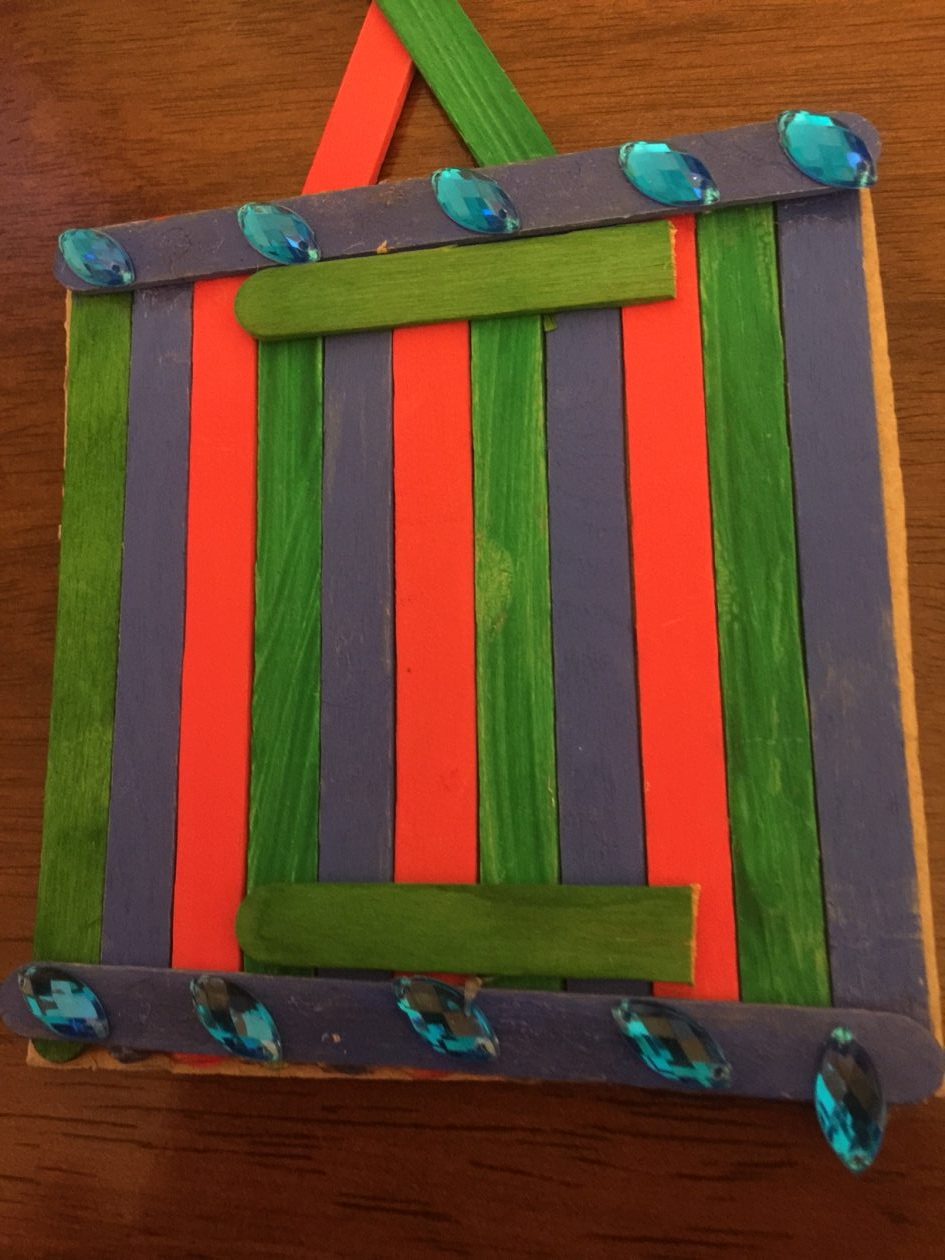
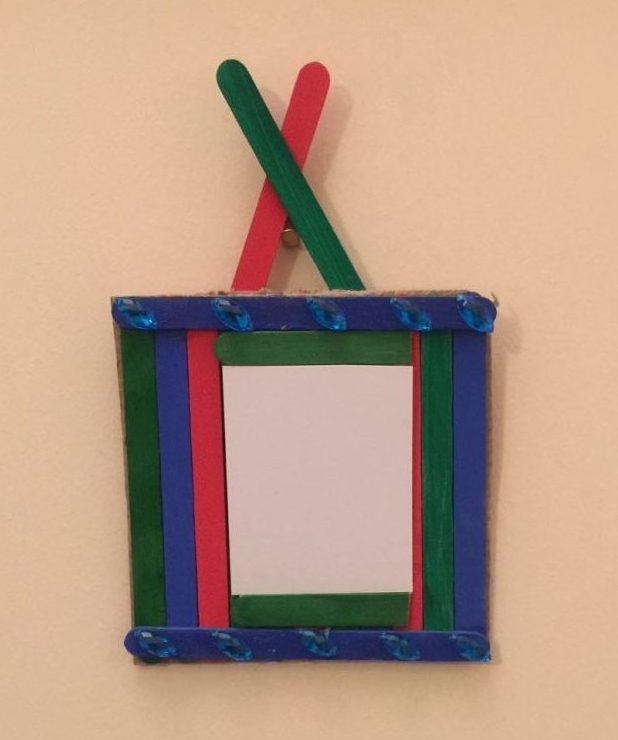
Activity 2: Photo Frame:
You need:
- A few plain lollipop sticks
- Paints
- Glue
- Piece of cardboard
- A passport size photo of … (you decide or leave frame empty for mum)
- A few gems or other decorations you may want.
Steps:
- Cut out a small square of cardboard.
- Count out 11 lollipop sticks. Paint them and leave to dry.
- Spread glue thinly all over the surface of the cardboard.
- Arrange lollipop sticks onto the entire surface of the cardboard.
- Find a passport size photo you wish to use.
- Decide how and where you want to place it in the frame.
- Position it, secure it in place with glue dots.
- Cross two lollipop sticks on the back of the frame to provide a hook. Hang it up.
You need: paints, cardboard, glue, scissors, a few gems, a passport size photo.

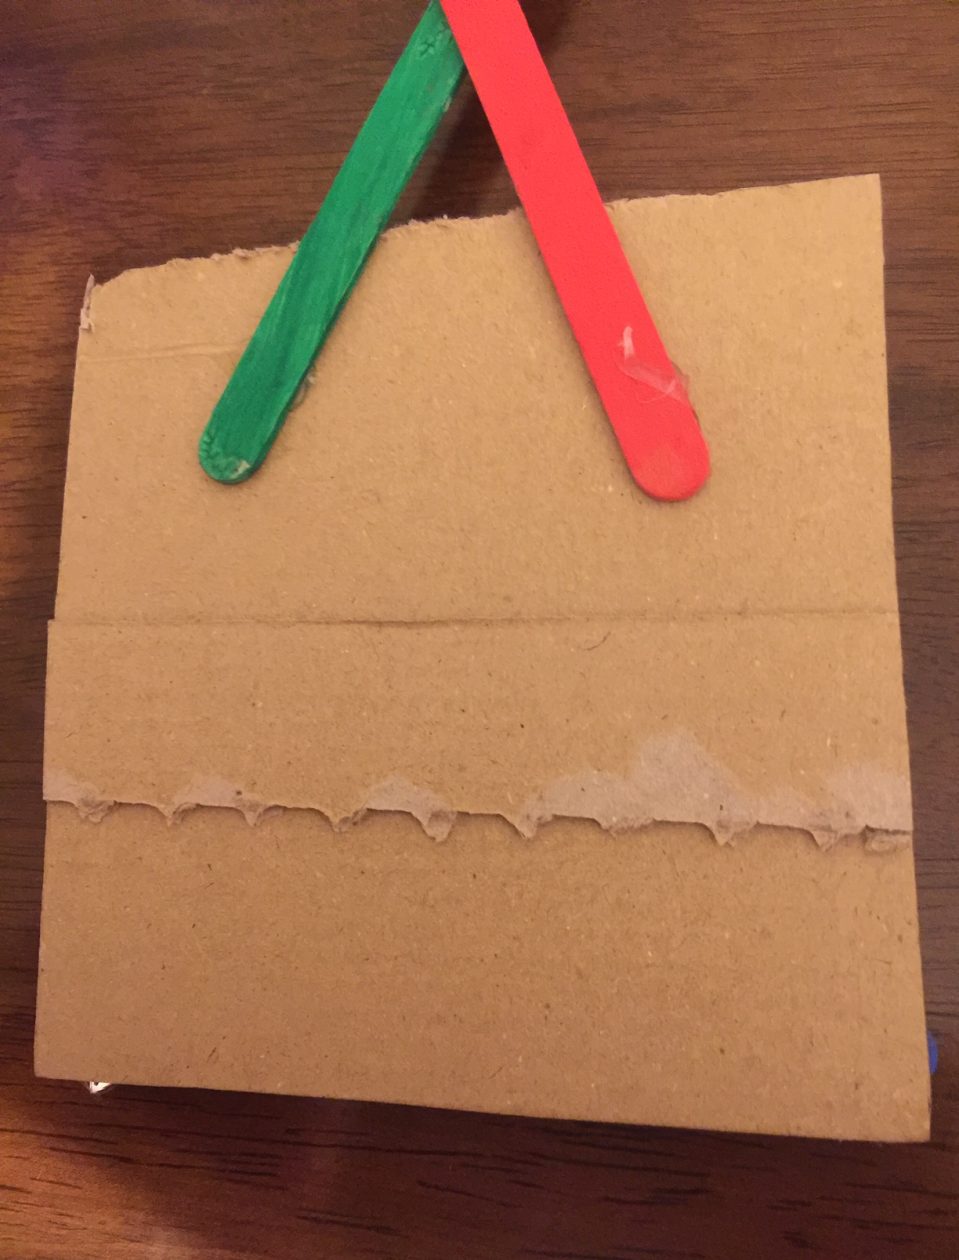
Back view————————————————————————————————
Hi again guys!
I was meant to upload these activities earlier today but things didn’t quite go to plan, but as the saying goes ‘better late than never’, so here we go.
Activity 1:
First is a Crossword Puzzle which I’m hoping some or most of you will have a go at. Puzzles are very good brain food, the earlier you start exercising your brains with puzzles, ( in addition to what you’re already doing) the better for your memory in later life.
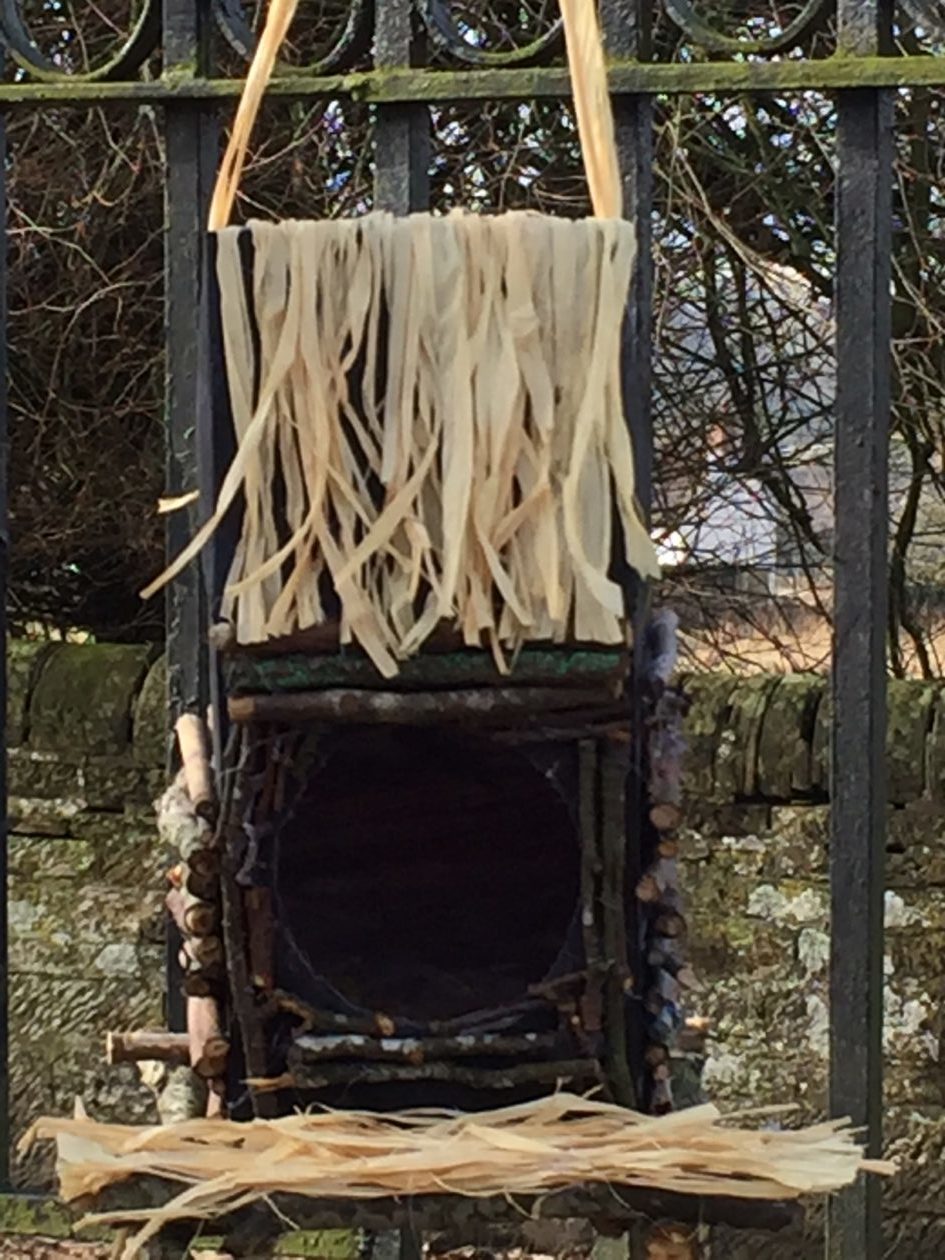
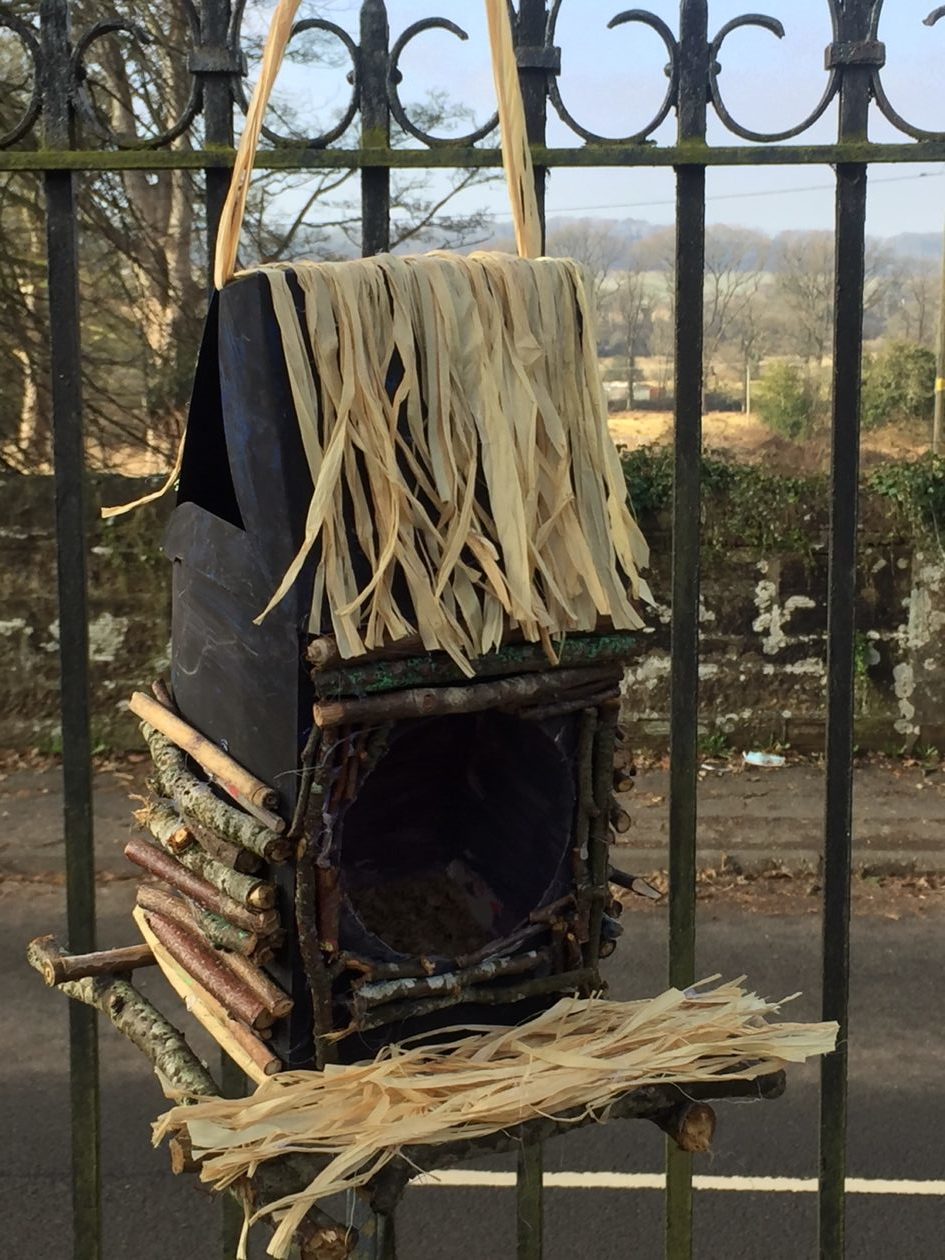
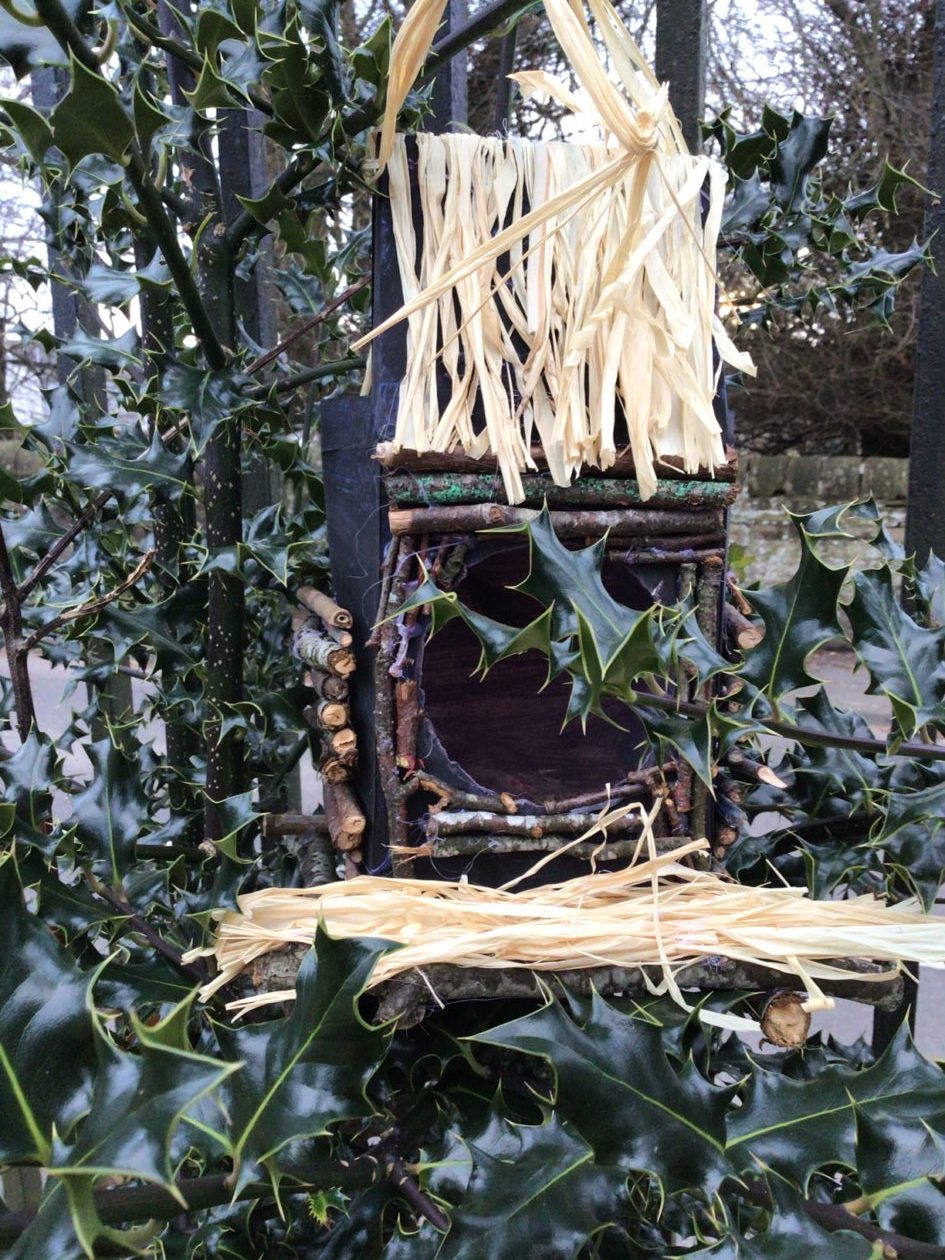
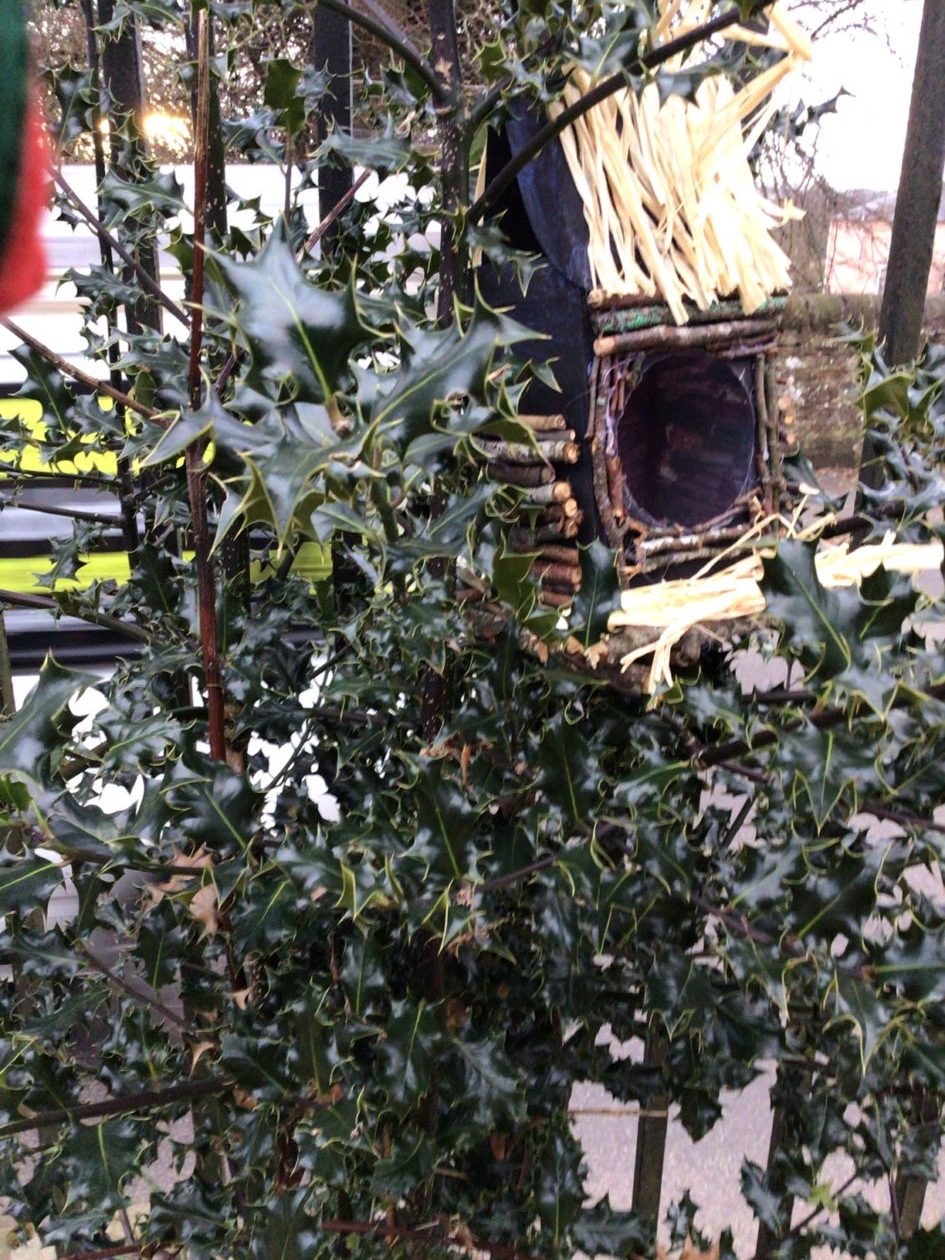
Activity 2: How to make a bird nest from cardboard
Spring is in the air and so are the birds! Here’s how to get them flocking to your garden! This nest, made out of natural materials is sure to attract all our four feathered friends. This is the voice of experience speaking, trust me!
What you need:
- small empty cardboard box ( I used an empty box of teabags measuring 4×4 1/2 “)
- Some dry twigs, sticks, grass (or natural raffia), bits of rotten bark and leaves
- Glue gun/glue sticks or other strong glue
- Strong scissors, Stanley knife or secateurs
Steps:
- Prepare your box by sealing the bottom and all the open spaces in the sides.
- Cut a circular hole in the middle of the box (size dependent on size of birds you want too attract. (as shown in picture below).
- Trim the twigs and sticks to the same size to just fit the area of the panel you’re working on
- Apply glue all over the four sides, one side at a time (or use glue gun)
- Arrange individual twigs and sticks on each of the sides to form walls –
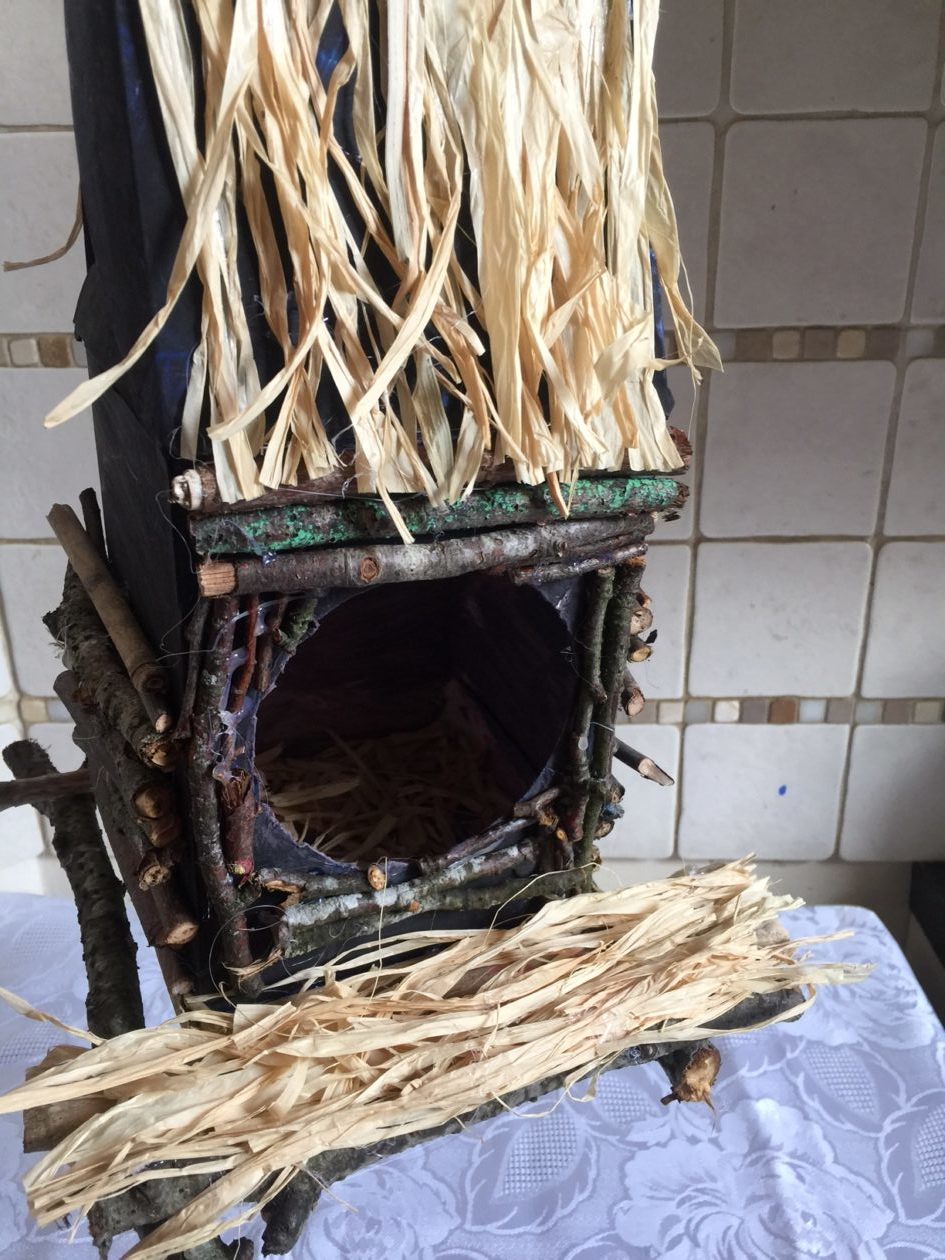
6. Lift the top flaps and join them together to form a sloping roof.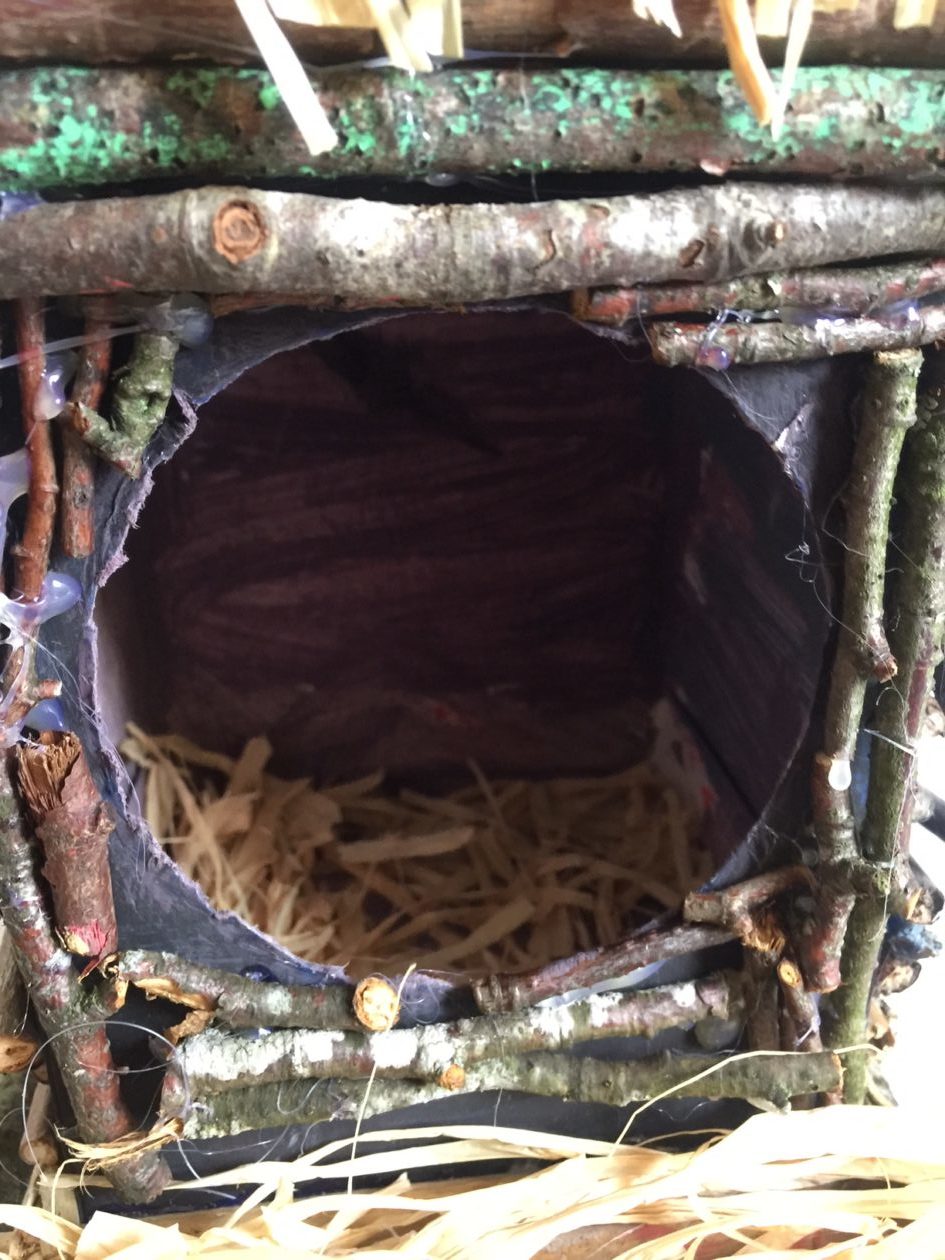
Refer to point #2
7. Spread dry grass, leaves or other natural woody materials on top of the ‘roof as in pictures below
8. Lastly, fill the inside of the nest with lots of grass to make it cushy.
You are now ready to go out into the garden to find the perfect spot for your bird nest. The birds will thank you for it!
Testing location
______________________________________________________________________
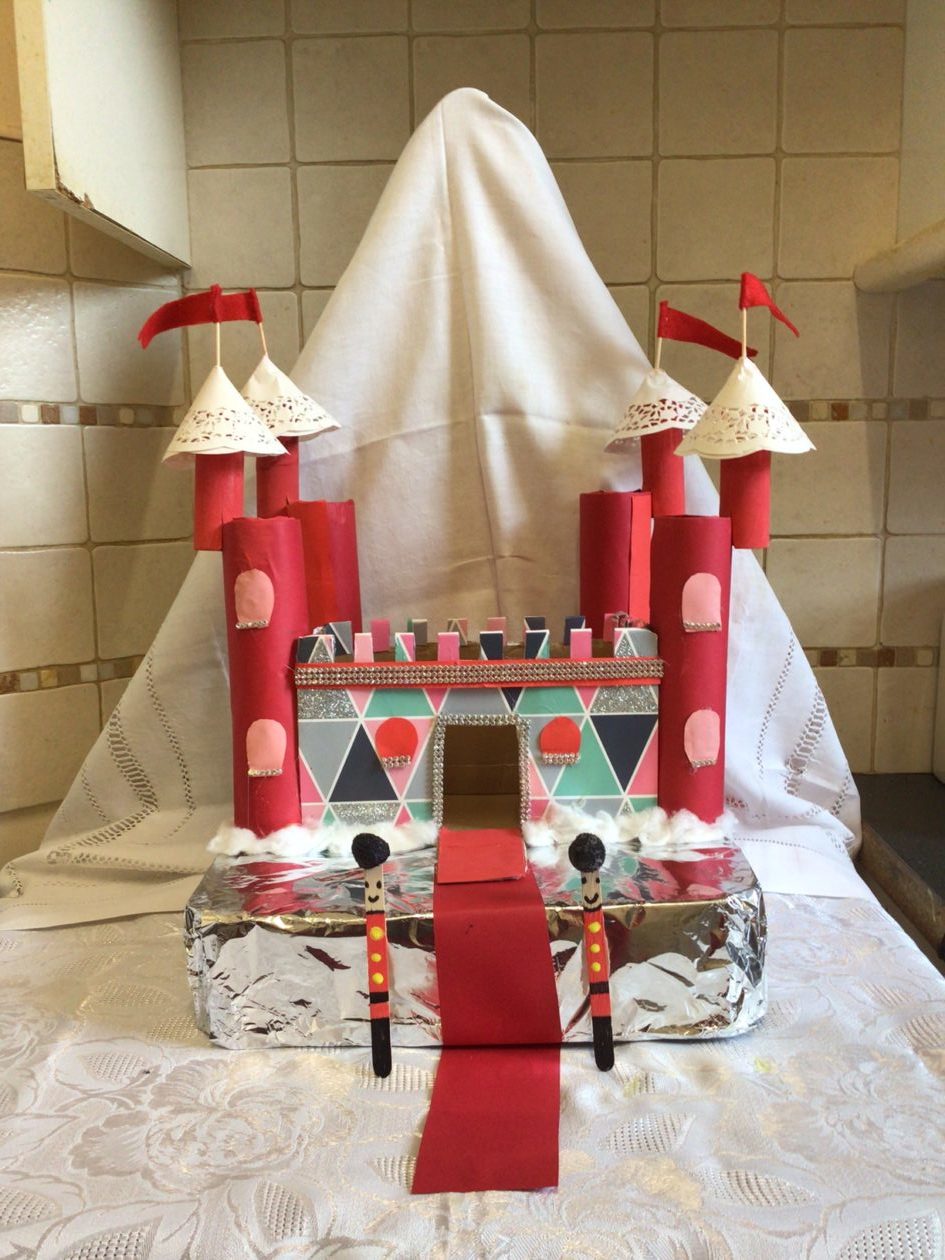
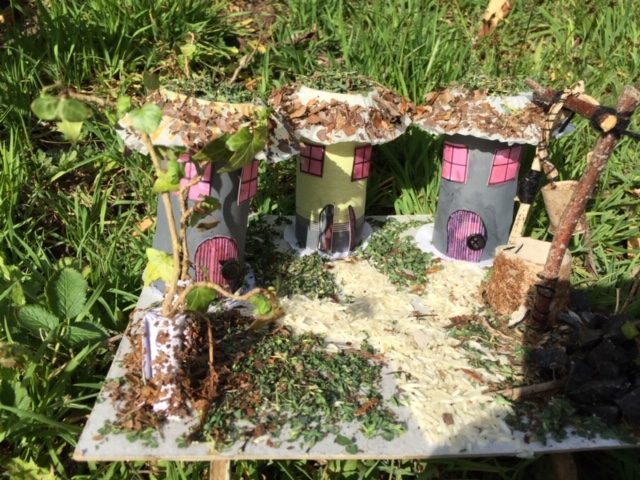
Next week is World Book Day and I imagine that you’ll all be looking to bury yourselves in your favourite books. Some of you will no doubt lose yourselves in the magical world of fairy tales. Hence the idea to make a castle so you can see the home of some of your favourite characters.
The model isn’t complicated to make. Improve on this one using your own design and choice of materials.
What you need:
- 1 medium size carton box ( 16 x 11 cm) to sit the castle on once made. Cover in foil.
- 1 small – ish box for the actual castle (8 x5 cm)
- 4 kitchen roll tubes ( for the towers )
- 4 toilet roll tubes for the turrets
- some plain/coloured or patterned paper
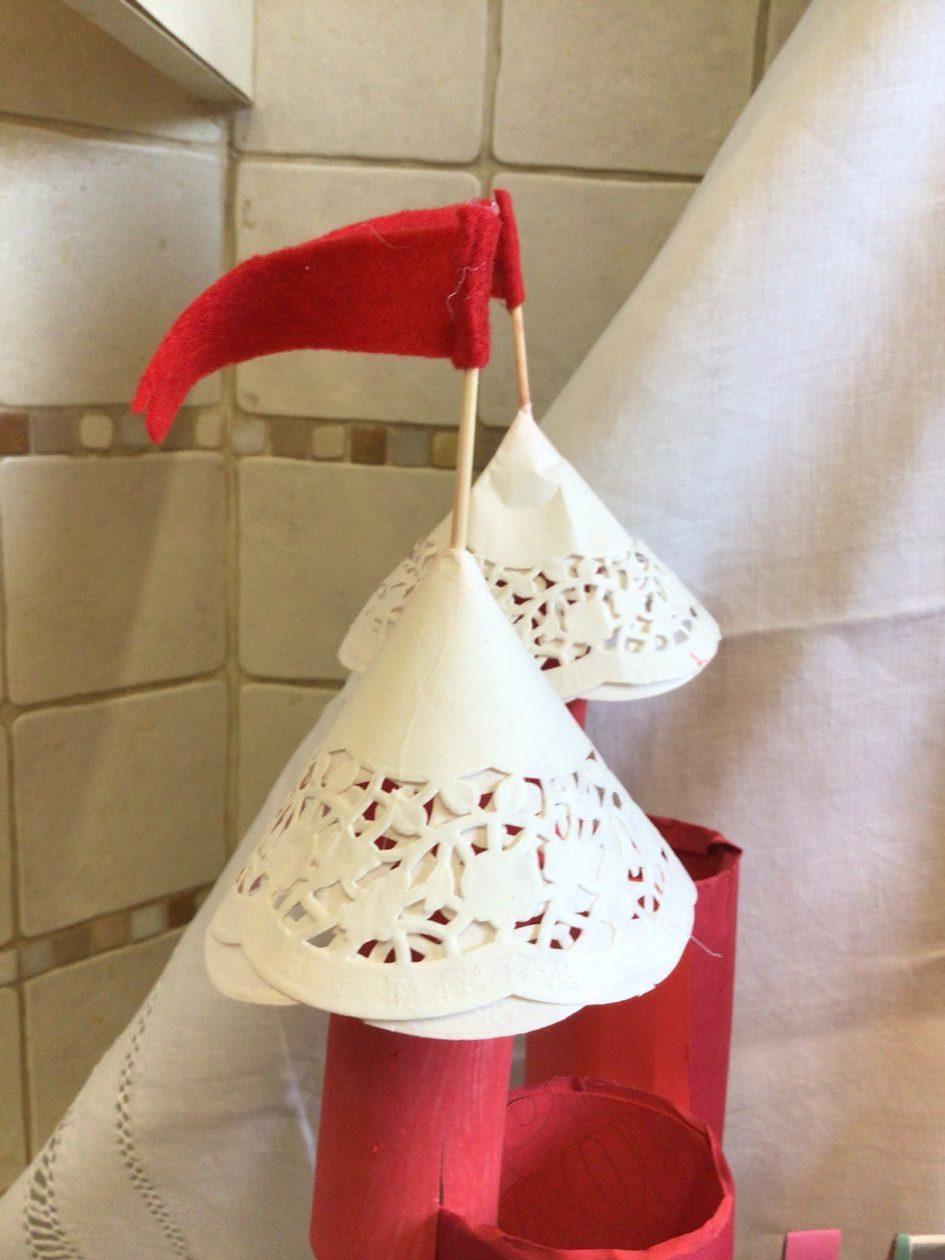
- 4 cocktail sticks (for the flags)
- 4 paper doilies ( for the turrets)
- some bling to line under the crenulations and windows at the entrance of the castle
- liquid glue
- glue gun and glue sticks
- 2 lollipop sticks (for the royal guards)
- 2 pompoms (for the heads)
- a tablespoonful of red, black, and yellow paint ( for the guards’ uniforms)
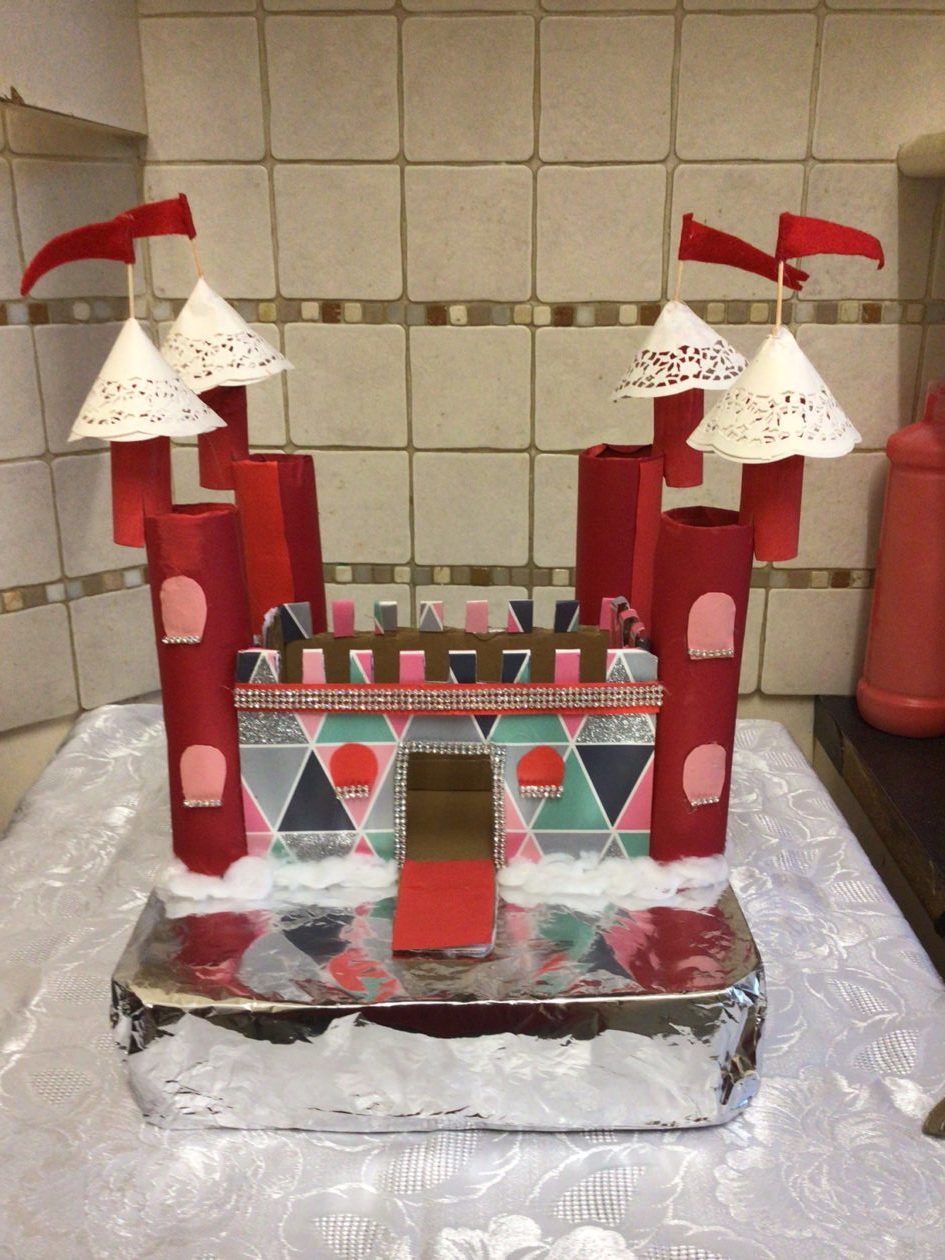
Steps: Refer to image:
- Prepare the ‘castle’ by cutting all the four flaps of the box off. Cover the outside of the box with plain or patterned paper. Secure with glue. ( you can also use paint)
- Cut or make crenulations along the top of each of the four sides of the box.
- Cut out a door as shown in image. Cut out small shapes for windows as well.
- Decorate the entrance with Swarovski jewels or other jazzy bling to bring out that princey or princessy look and feel.
- Wrap the kitchen roll tubes in plain coloured or patterned paper of your choice (you can also paint them ).
- Secure the tubes at each corner of the ‘castle’ box, using glue gun – these are the ‘towers’.
- Wrap the toilet roll tubes in same way; make two incisions, about 5 cm deep and 2 cm apart ( see image). These are the turrets.
- Secure these to each tower at an angle, by clipping the flap over the rim of the towers as shown in image.
- Draw and cut a circle using plain or patterned paper. Make a slit in the circle and make a cone to go over the turret. Use glue to secure it in place.
- Make the flagpoles using cocktail sticks and strips of cloth or paper. Stick the cocktail sticks through each of the cone shapes, as shown in image below.
11. Make the guards using lollipop sticks, paint and pompoms.
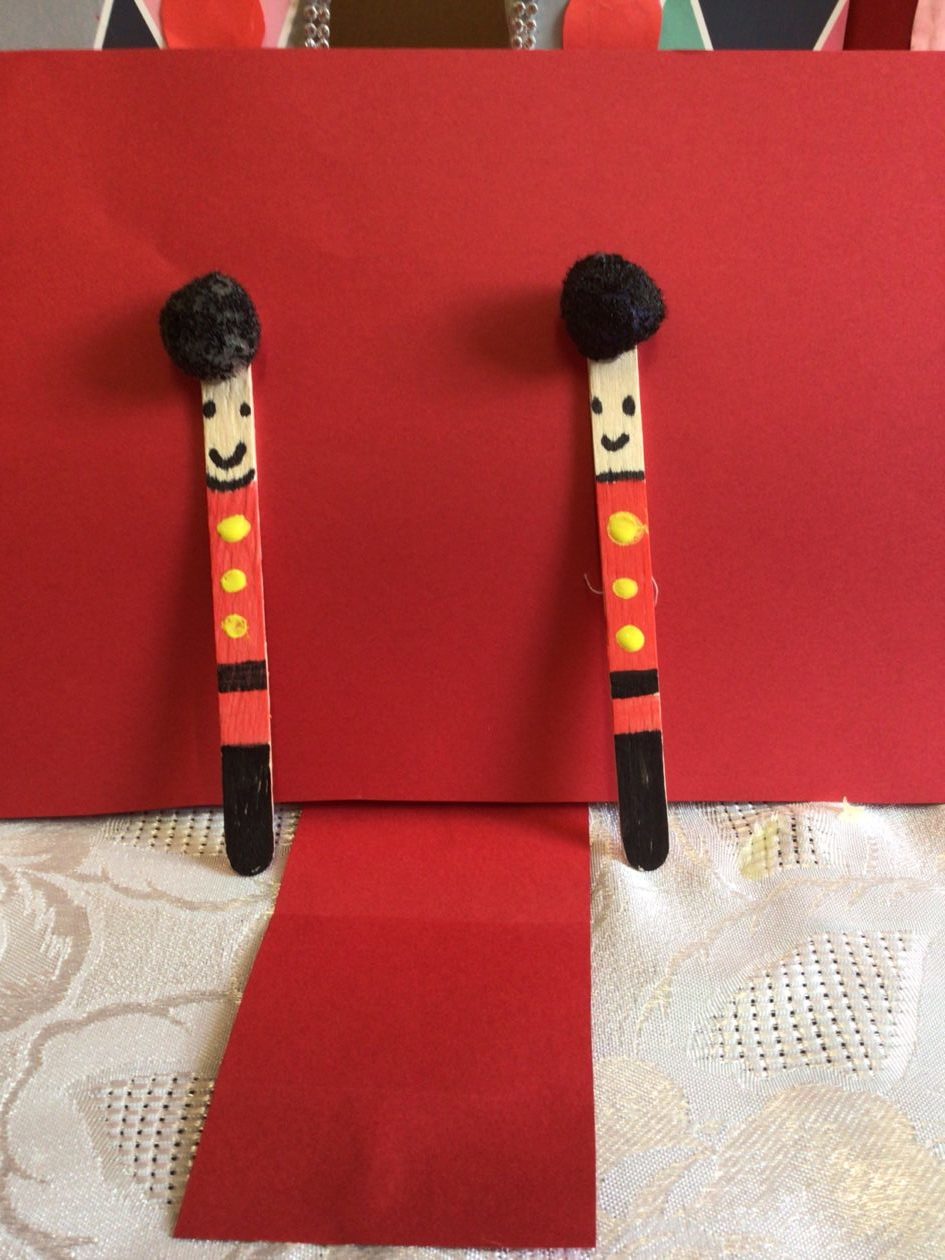
Finally, let the guards take their positions as in picture on the right.
Now for the trivia quiz:
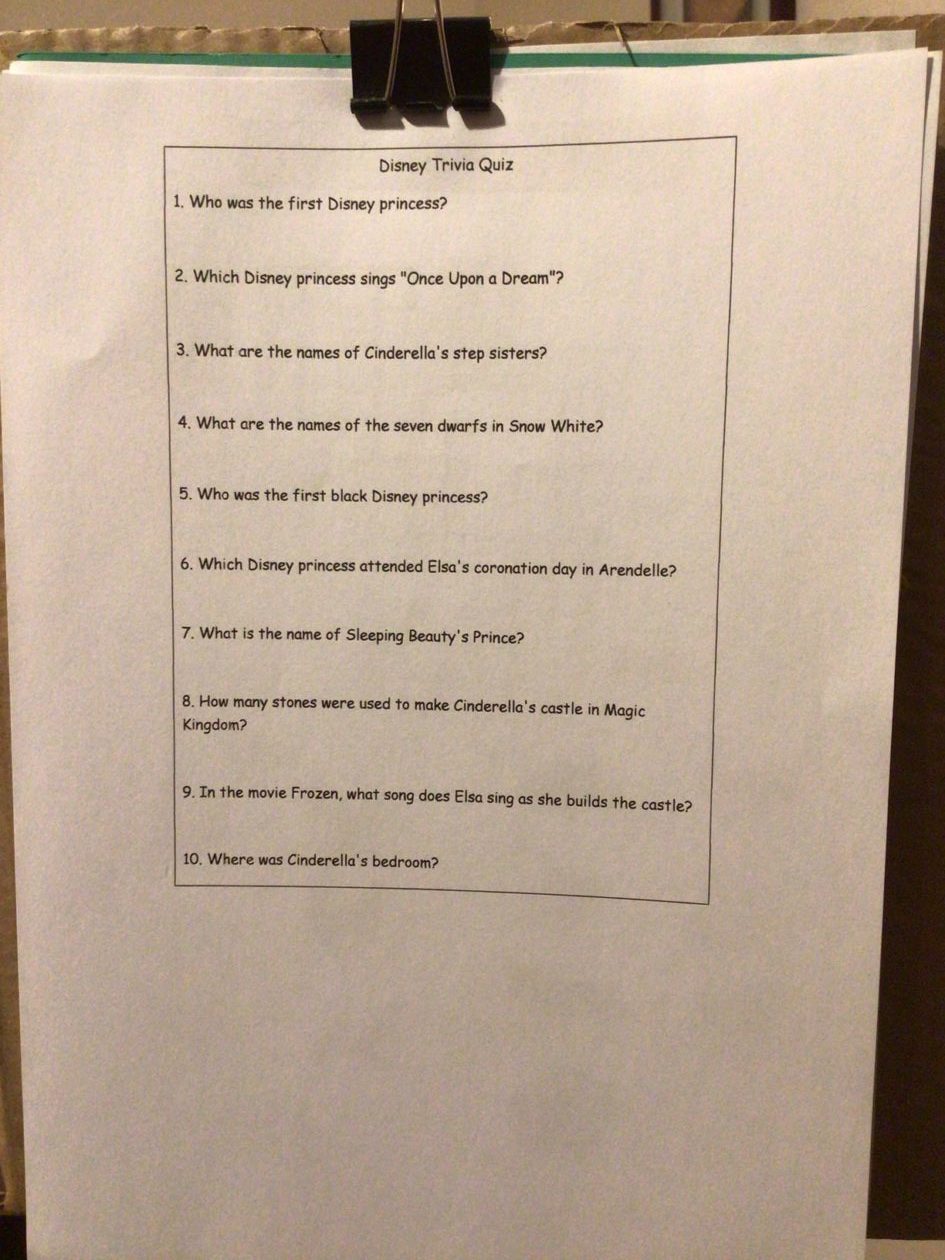
Have a go at the quiz to test your knowledge of fairy tales. Answers will be provided next week.
______________________________________________
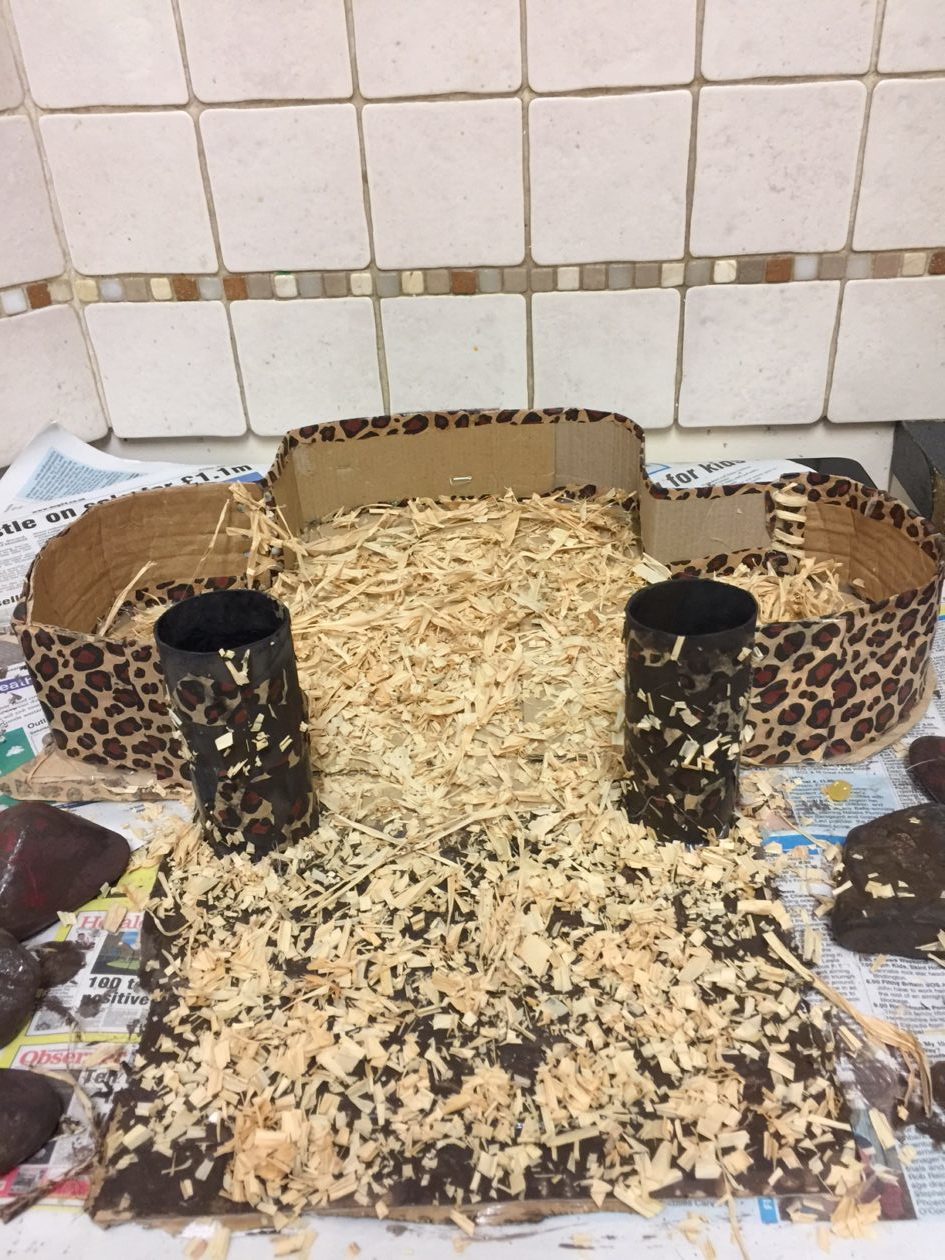
Hello everyone! Over the last few weeks, and in the course of your project on the Arctic region, I have read some blogs in which some of you have expressed concern over the possible loss of wildlife in the region, due to a number of commercial activities by big corporations. One example given was oil drilling. I also recall someone mention ‘animal sanctuaries’ as one way to protect and conserve wildlife. That gave me an idea for this week’s activity:
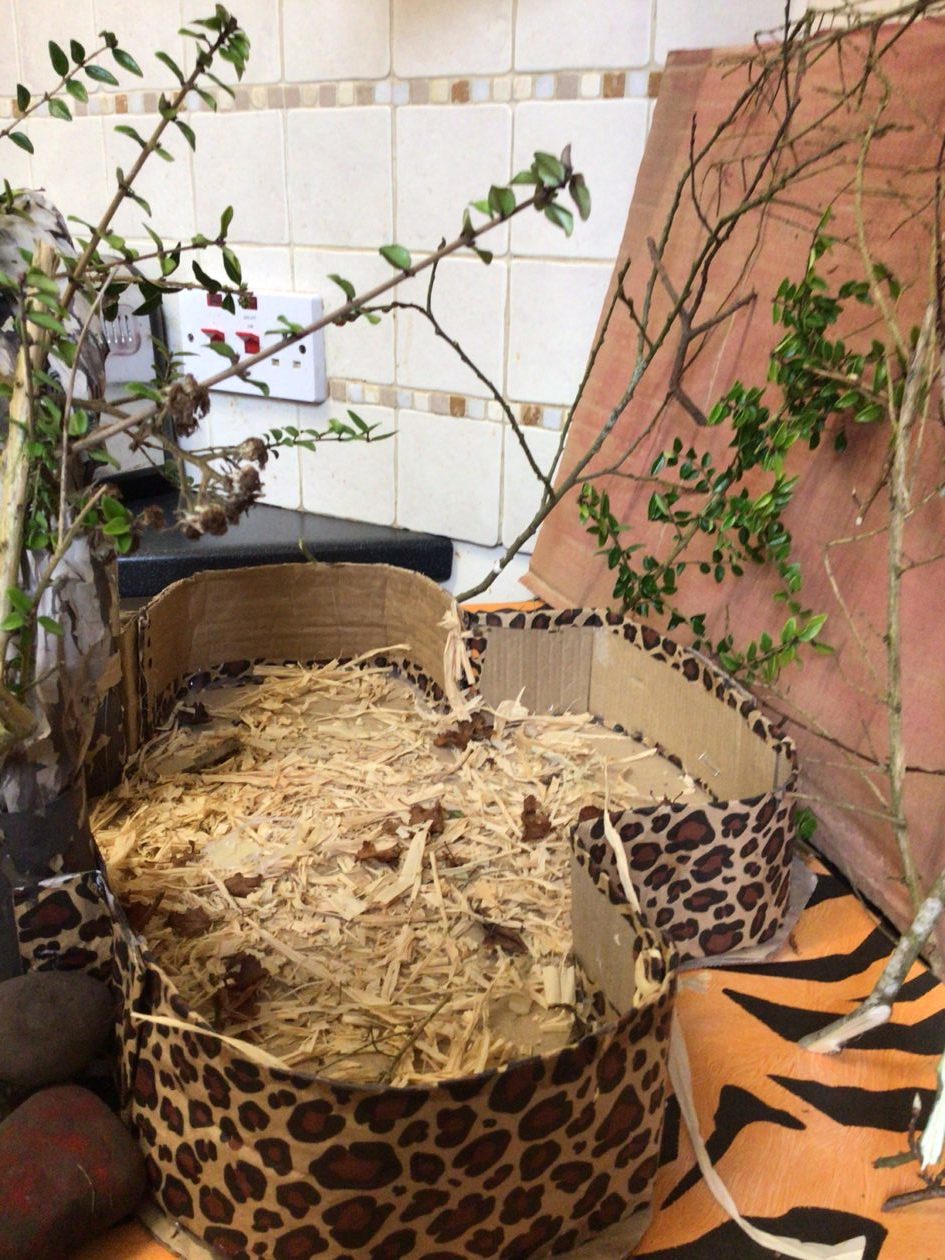
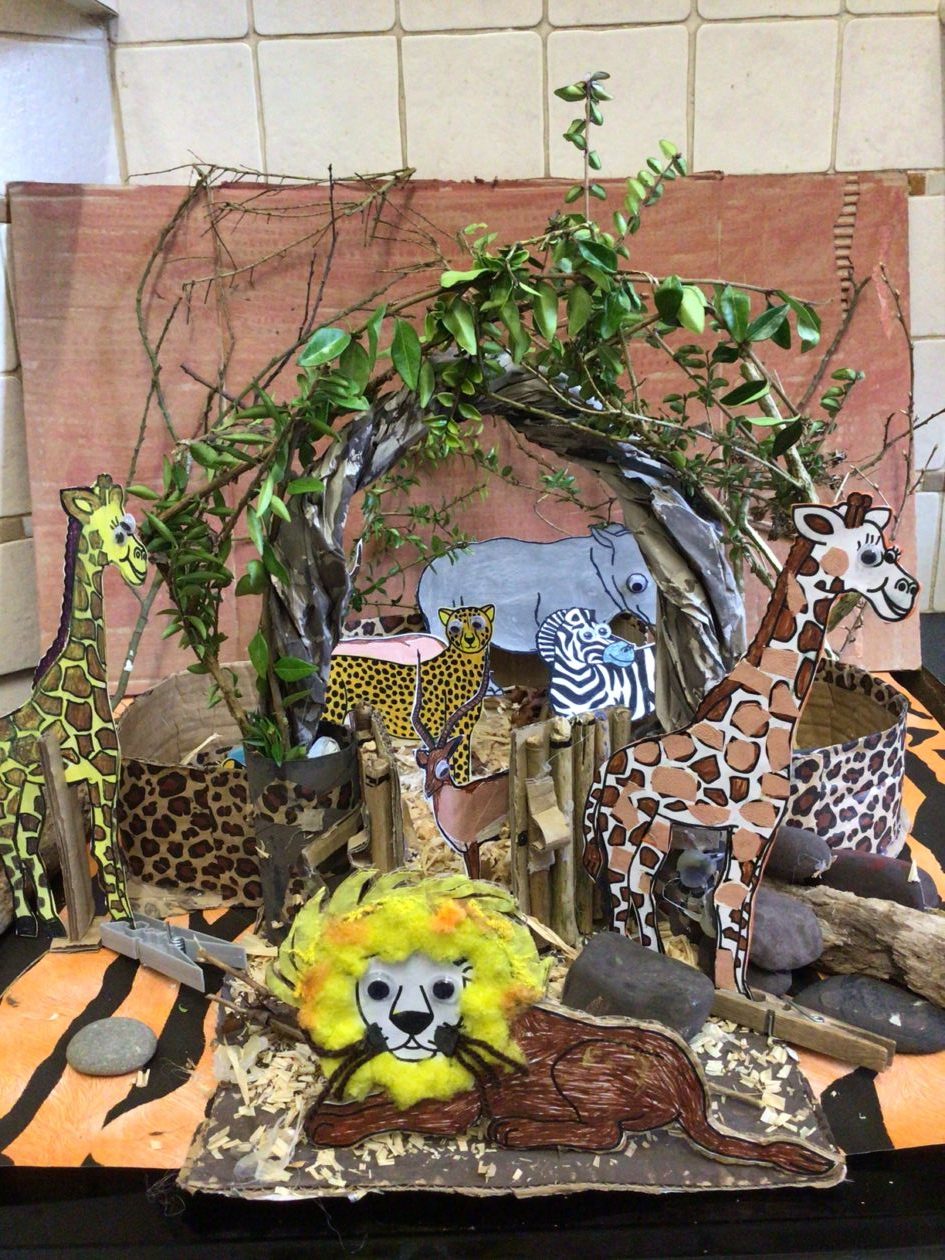
HOW TO MAKE AN ANIMAL SANCTUARY/RESERVE PARK/ENCLOSURE/HABITAT
MATERIALS:
- Cardboard from a box
- Dry sticks , twigs , leaves, shrubs, grass
- Fresh branches and vines
- Natural Raffia
- Some bamboo sticks
- Some stones (small rocks)
- Paints , scissors, glue,
- Some old newspaper
- 2x toilet rolls
CONSTRUCTION:
- Design your enclosure; think about the type of animals, their needs, behaviour and characteristics and plan accordingly.
- Cut up an 18 x18 cm size cardboard for the base (or floor); paint it in a colour that’ll reflect the animal’s natural habitat. Leave to dry.
- Cut a long and wide strip off the same cardboard to enclose the base. The measurements will depend on your design.
- Use paint or suitable material to cover the cardboard strip; this should resemble the natural habitat to make the animals feel at home, secure and happy.
- Position the strip onto the base and attach using glue (I used a glue gun)
- Secure a toilet roll at each end of the strip, as in picture below. these will form the gate posts.
- Spread natural raffia, grass or dry leaves on the ‘floor’ of the enclosure.

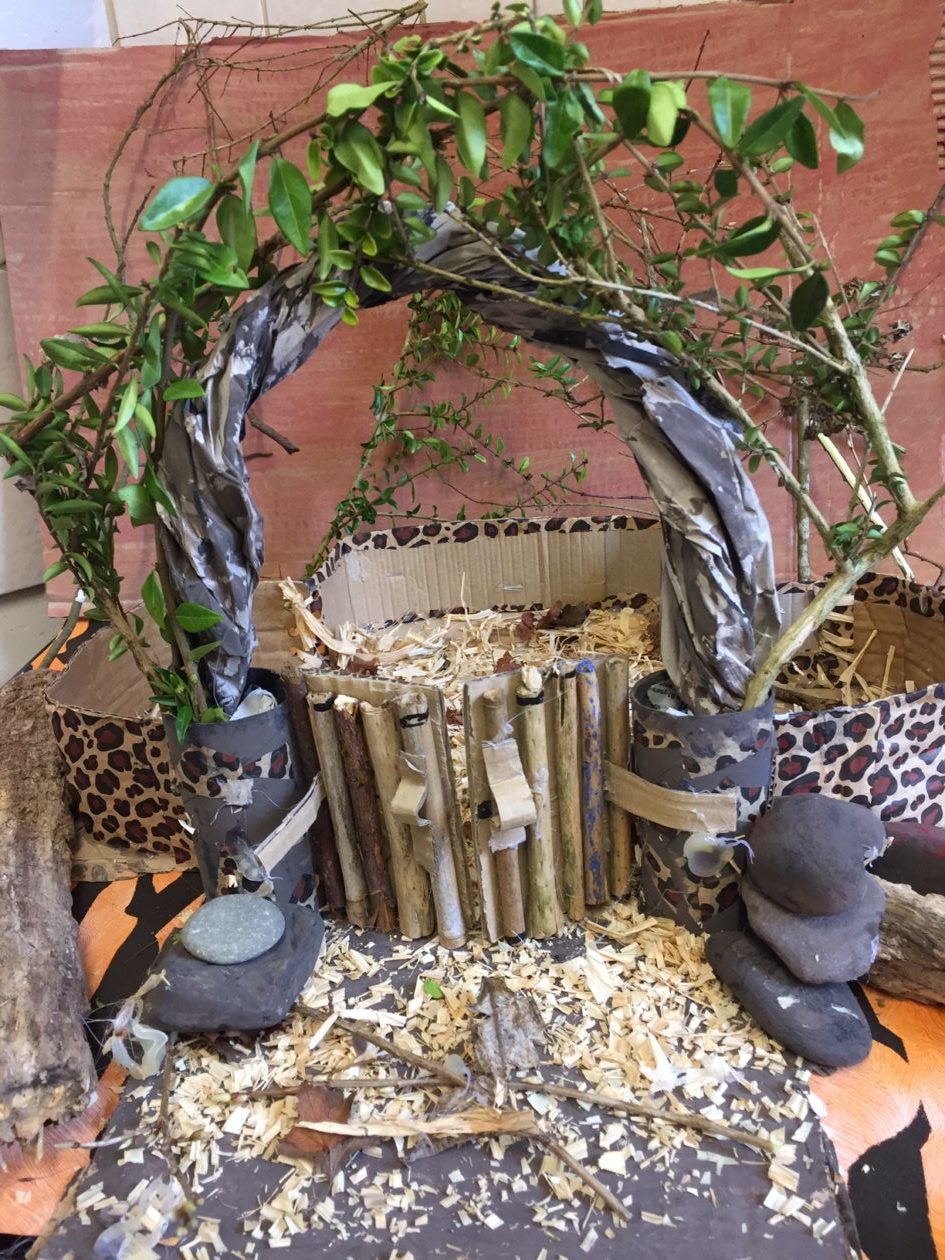
THE GATE:
- Cut up 2 pieces of 9×9 cm (specific to this model) cardboard to make the panels for the gate.
- Cut up a few bamboo sticks to fit on one side of each of the panels. Glue into place. (See photo below)
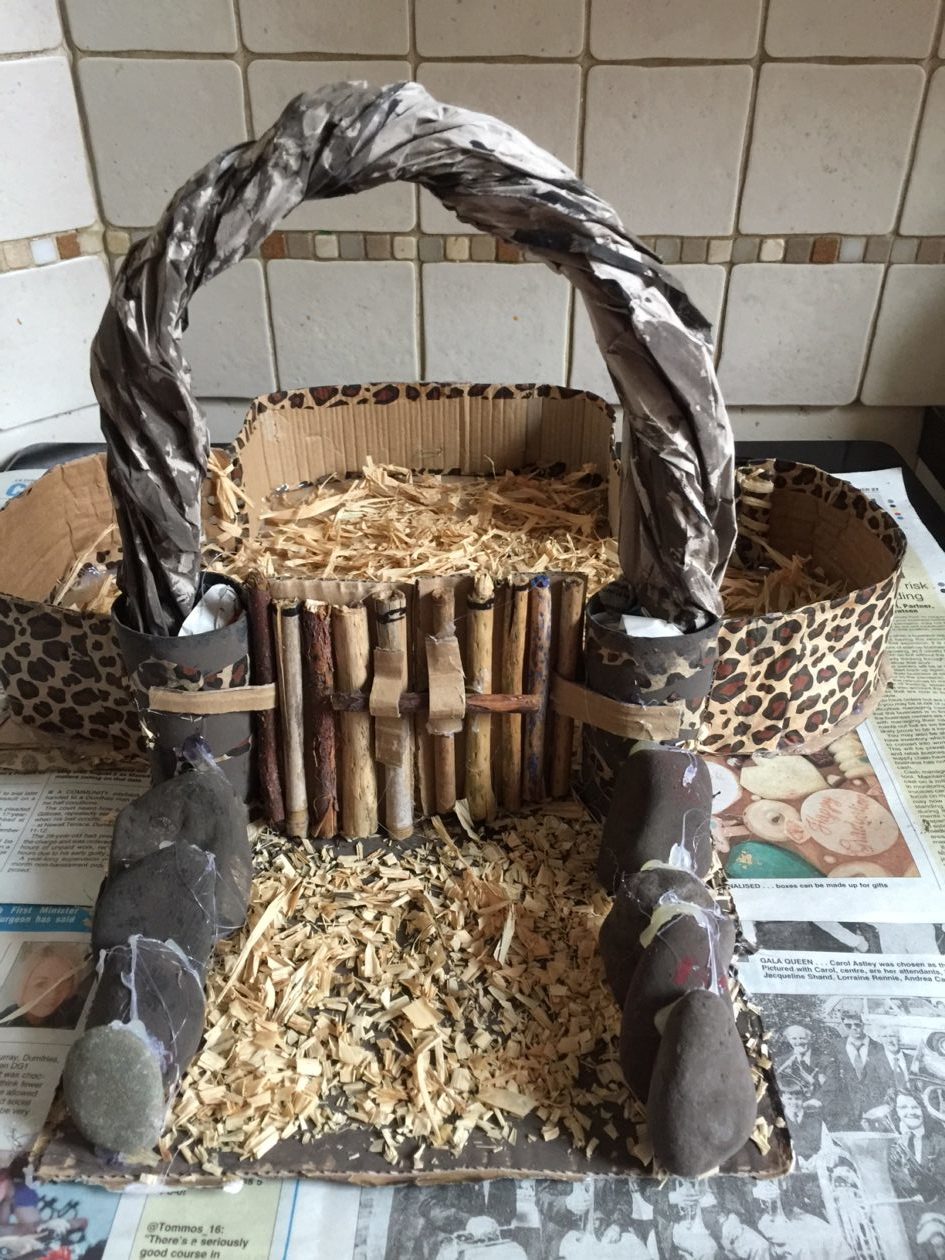
- Secure the panels to the posts as shown in photo.
- Add bolts and a latch bar to enable locking and security when animals are out.
And finally…
Summer is around the corner, you might want to bring your hamsters, guinea pigs and others out for a bit of sunshine; so why not build them a sanctuary in your garden?
See you next time…Adios!
—————————————————————————————–
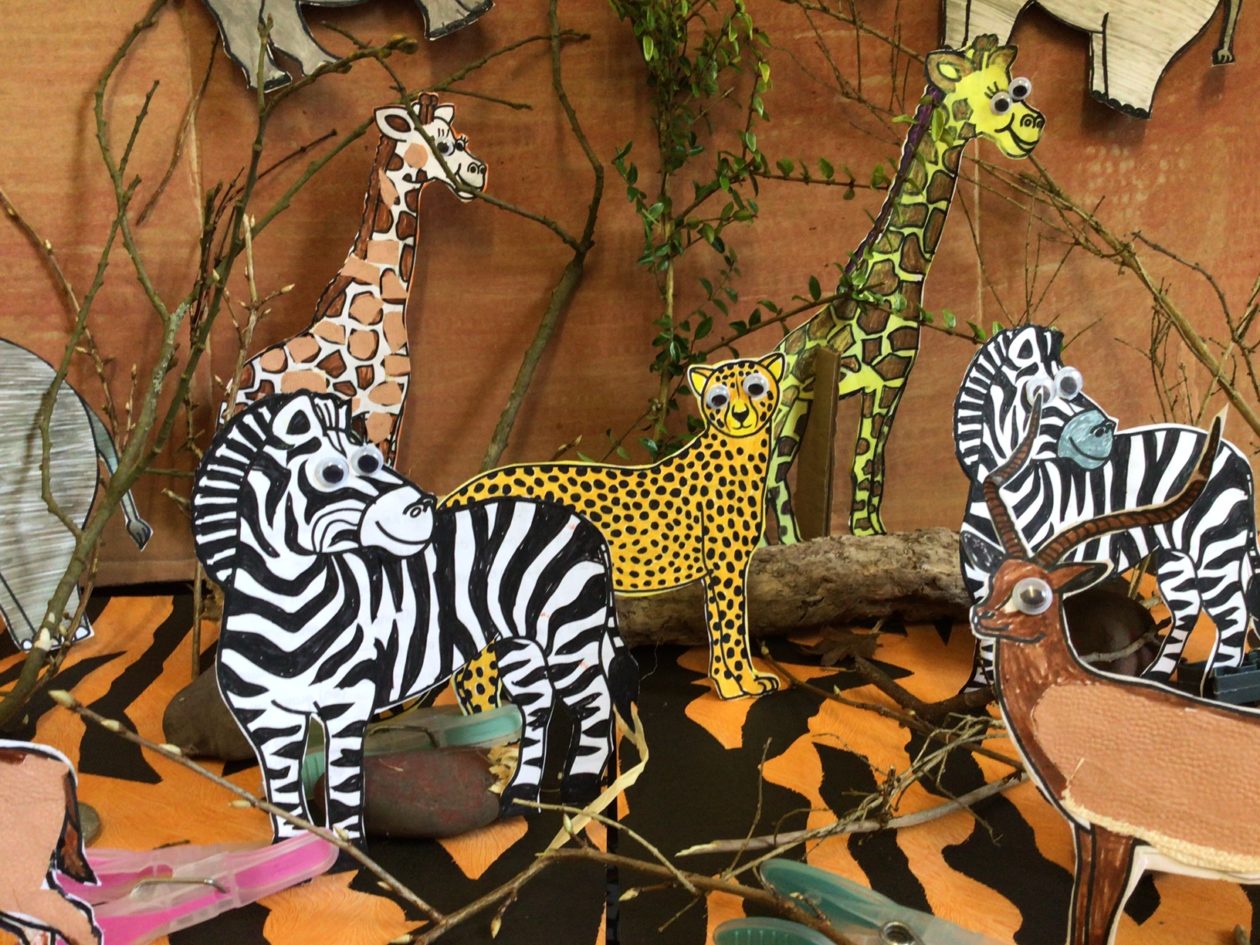
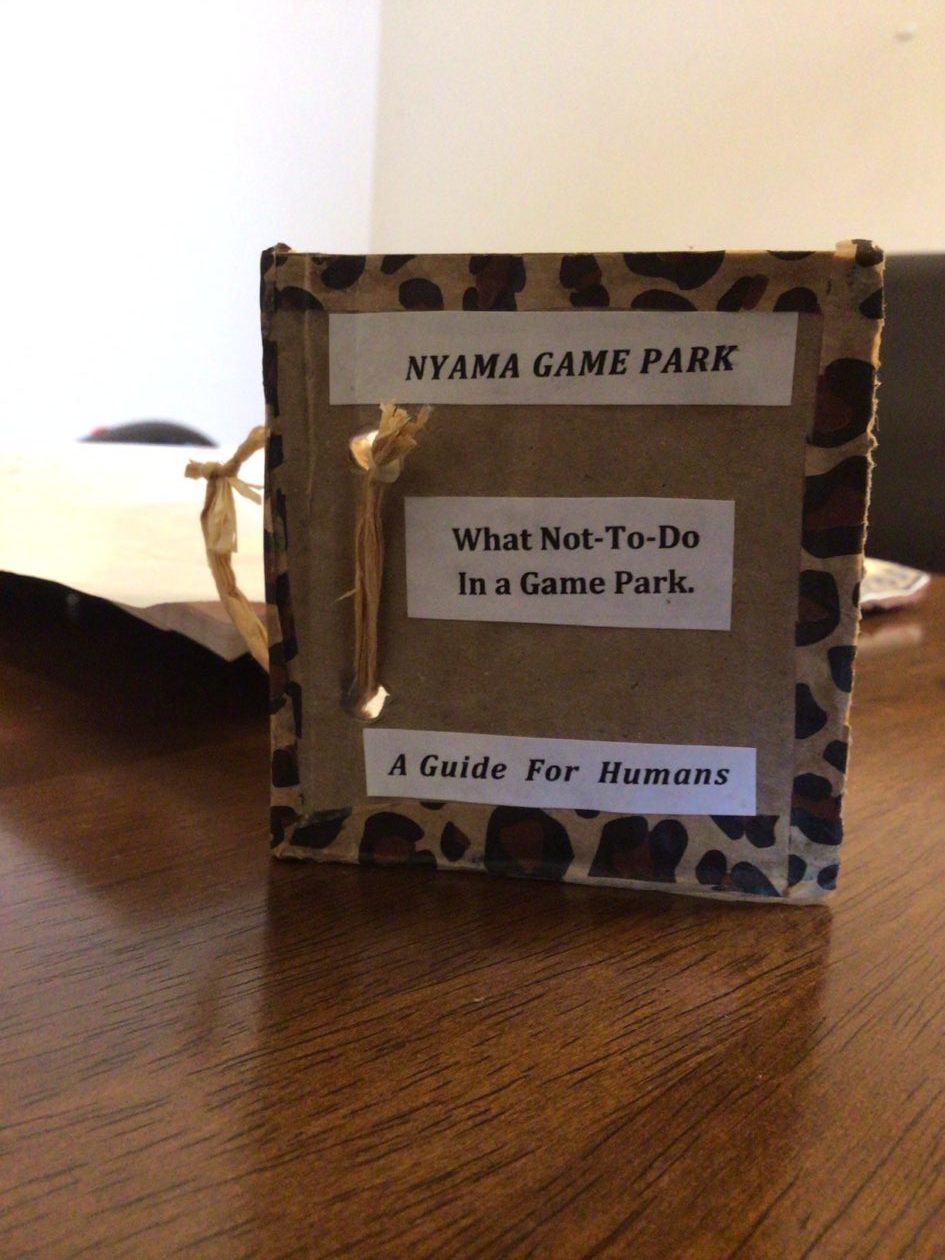
This week, the activity is for you to guess the identity of the animal from its own description. In the photo shoot below, there’s a selection of some of Africa’s most iconic animals; here, the chosen ones describe themselves in their own words, you must identify which animal it is, based on the description.
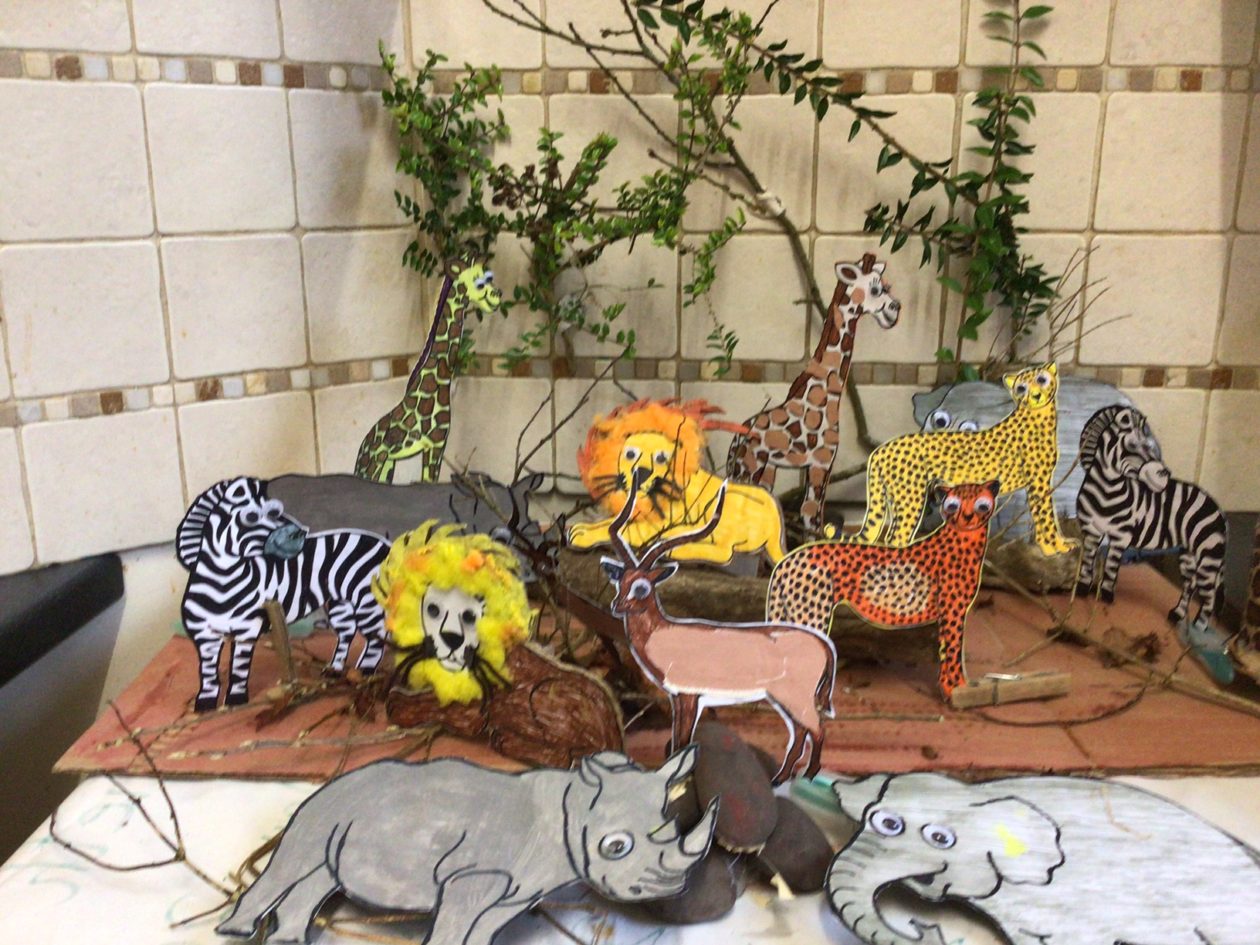
1. With my looks, elegance, long lashes, and taste for the finer things in the wild, I’m sure I was a super model in my past life or will be one in the next life.
I’m a vegan; and very picky about my food. I only eat the finest, freshest, and literally ‘top of the range’ foods.
I spend nearly all of my life standing up, even when I eat.
Who am I?
2. I am very famous! I’ve been in countless movies. I’m strong, proud, majestic looking, graceful in my movements and FEARLESS! I come from the royal family. I have long hair that covers my face. I’m a hunter by nature so meat is a huge part of my diet. One weakness I have though is that I’m quite lazy, I think. I sleep a lot, up to 20 hours, preferably under a tree with a lovely shade. I call it resting; I prefer to work at night.
Who am I?
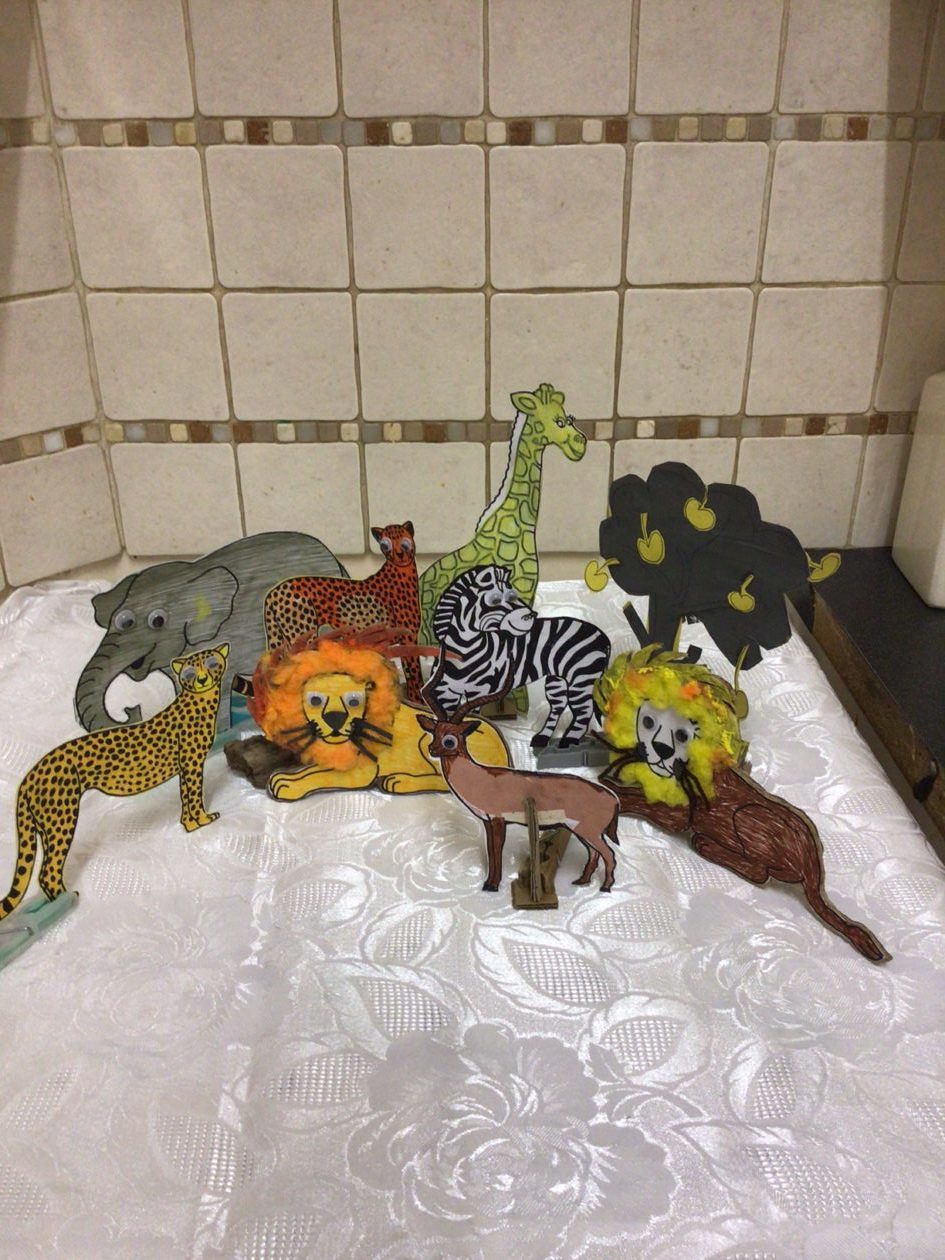
3. I am elegant, graceful and beautiful and a little shy, I think. Well, some people say, anyway. Generally, I’m cool, calm, and collected but see when danger approaches, Ms. Brockie Donald would be proud of my gymnastic moves! I can jump and make dramatic leaps as high as 10 feet into the air, and jump distances of up to 33 feet to escape predators. I’m a fleet runner.
Who am I?
__________________________________________________________________________
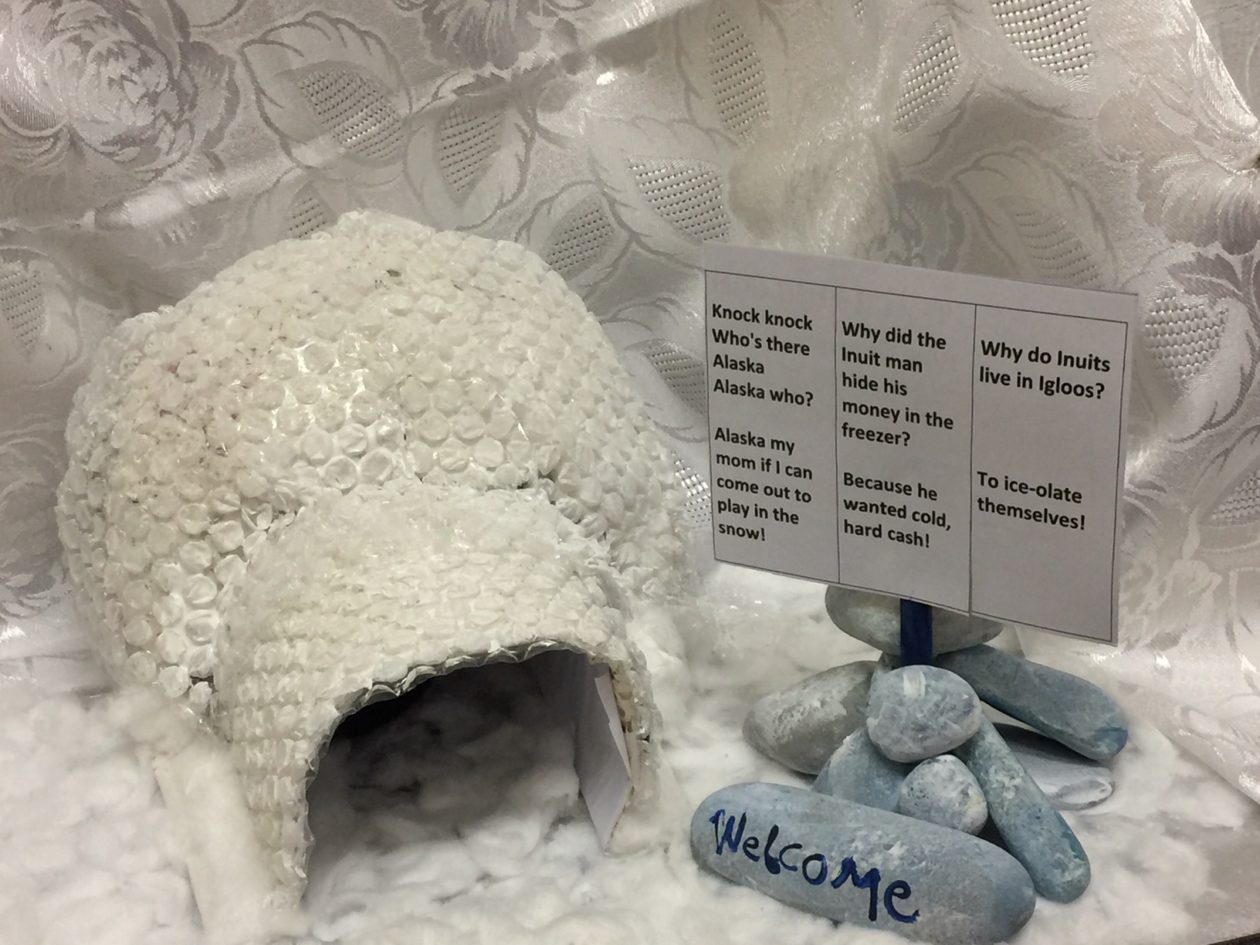
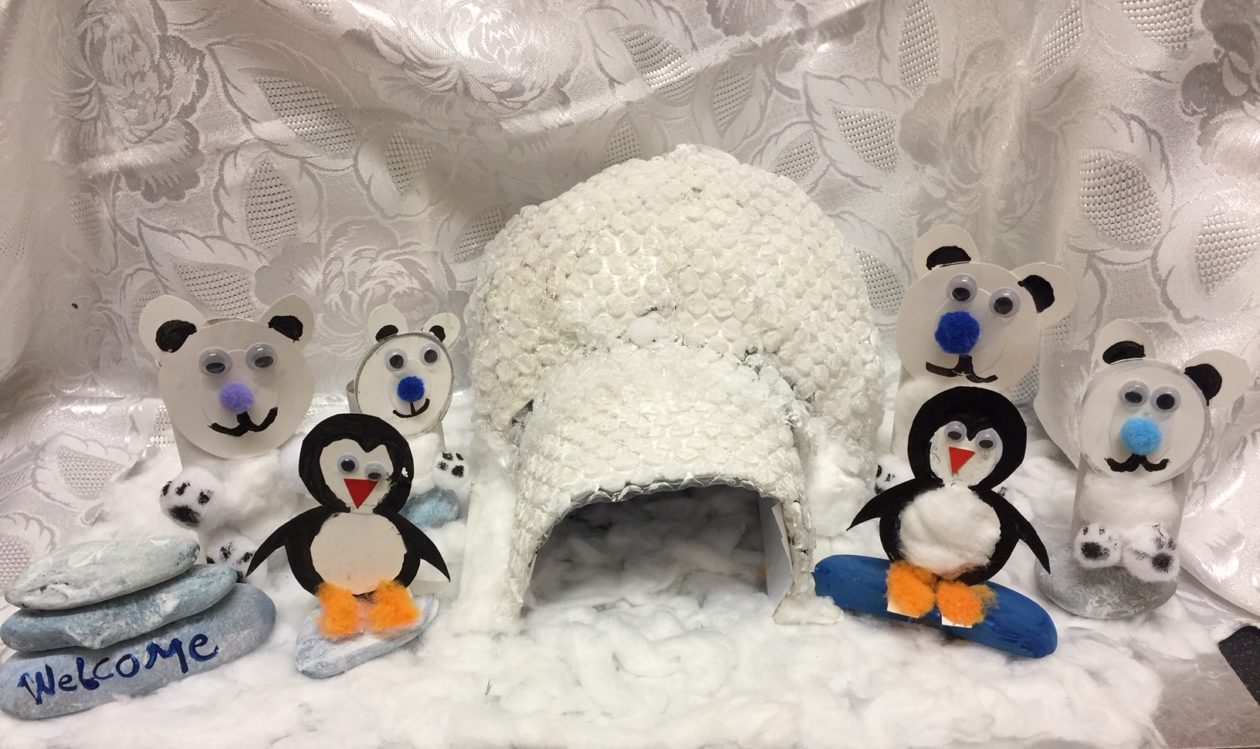
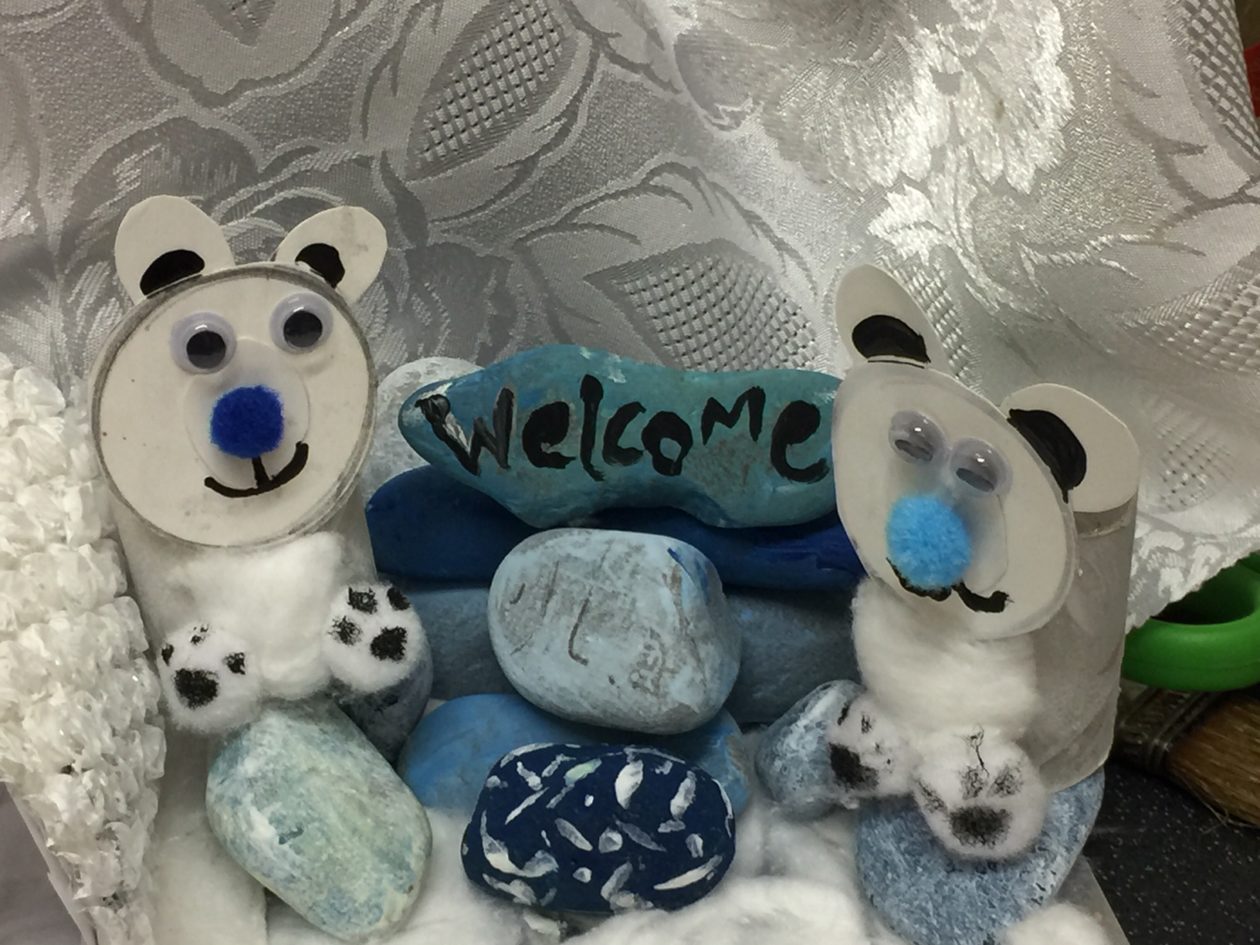
Inspired by the work you guys have been doing on the Inuit people, I thought it would be fun to try and make a model village. Found loads of videos on YouTube for ideas on how to make an igloo. I’m hoping you can also make your own Arctic village.
Materials used:
- 6x toilet rolls (for entry/door, bears and penguins)
- 1x balloon to paper Marché for the main part of the house ( see YouTube for many other ways
- some bubble wrap to plaster the whole house (optional; could use plain white paper if you want. I used bubble wrap for the ‘brick’ effect)
- some white acrylic paint and brushes
- packet of cotton balls
- glue, hard card paper
- some pom-poms (for the feet)
- googly eyes, scissors
- small pebbles/stones (optional)
- white cloth for the background
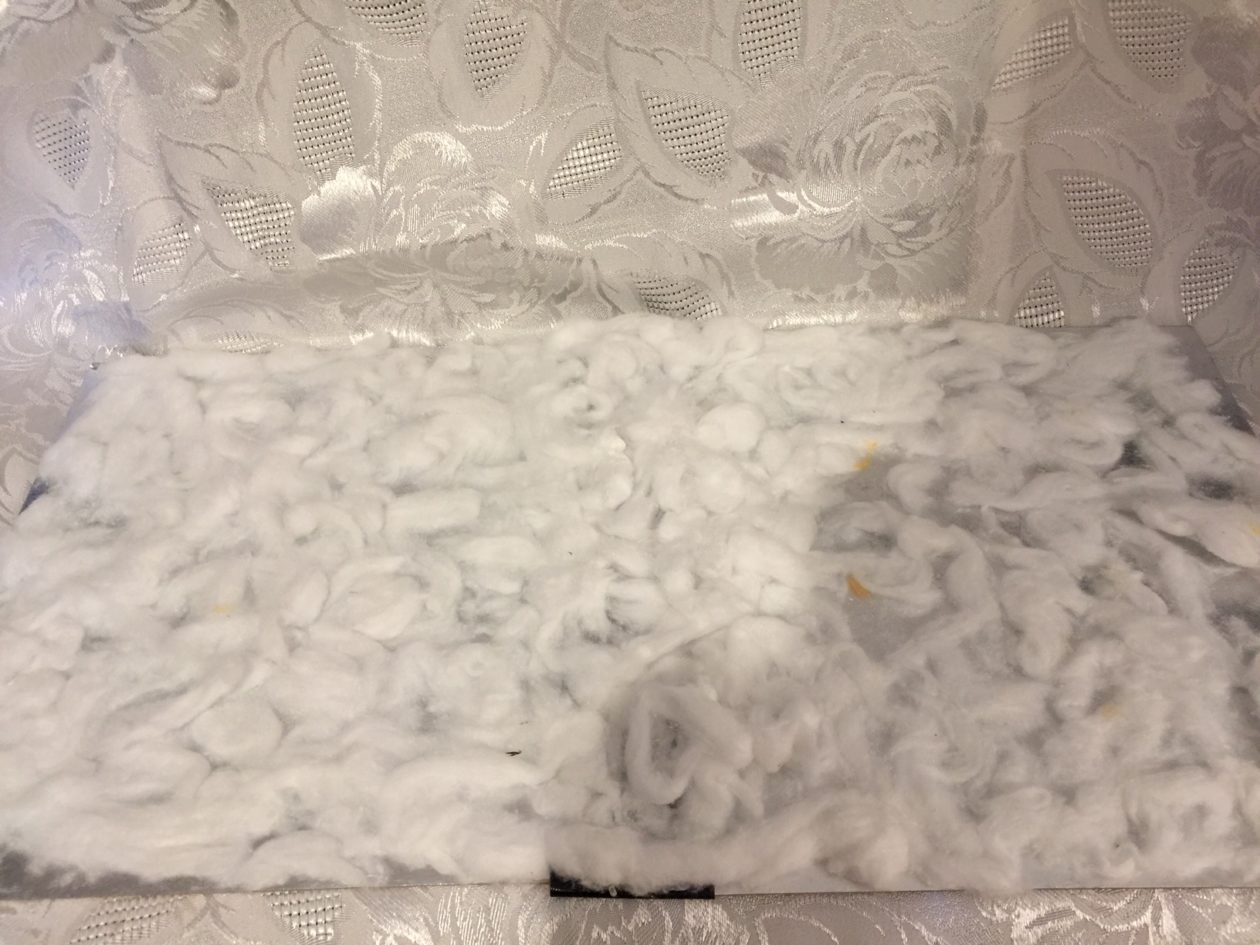
- hard cardboard for the base (dress with cotton wool for snow effect)
Once you have all you need, think about how you want the setting to look and get constructing!
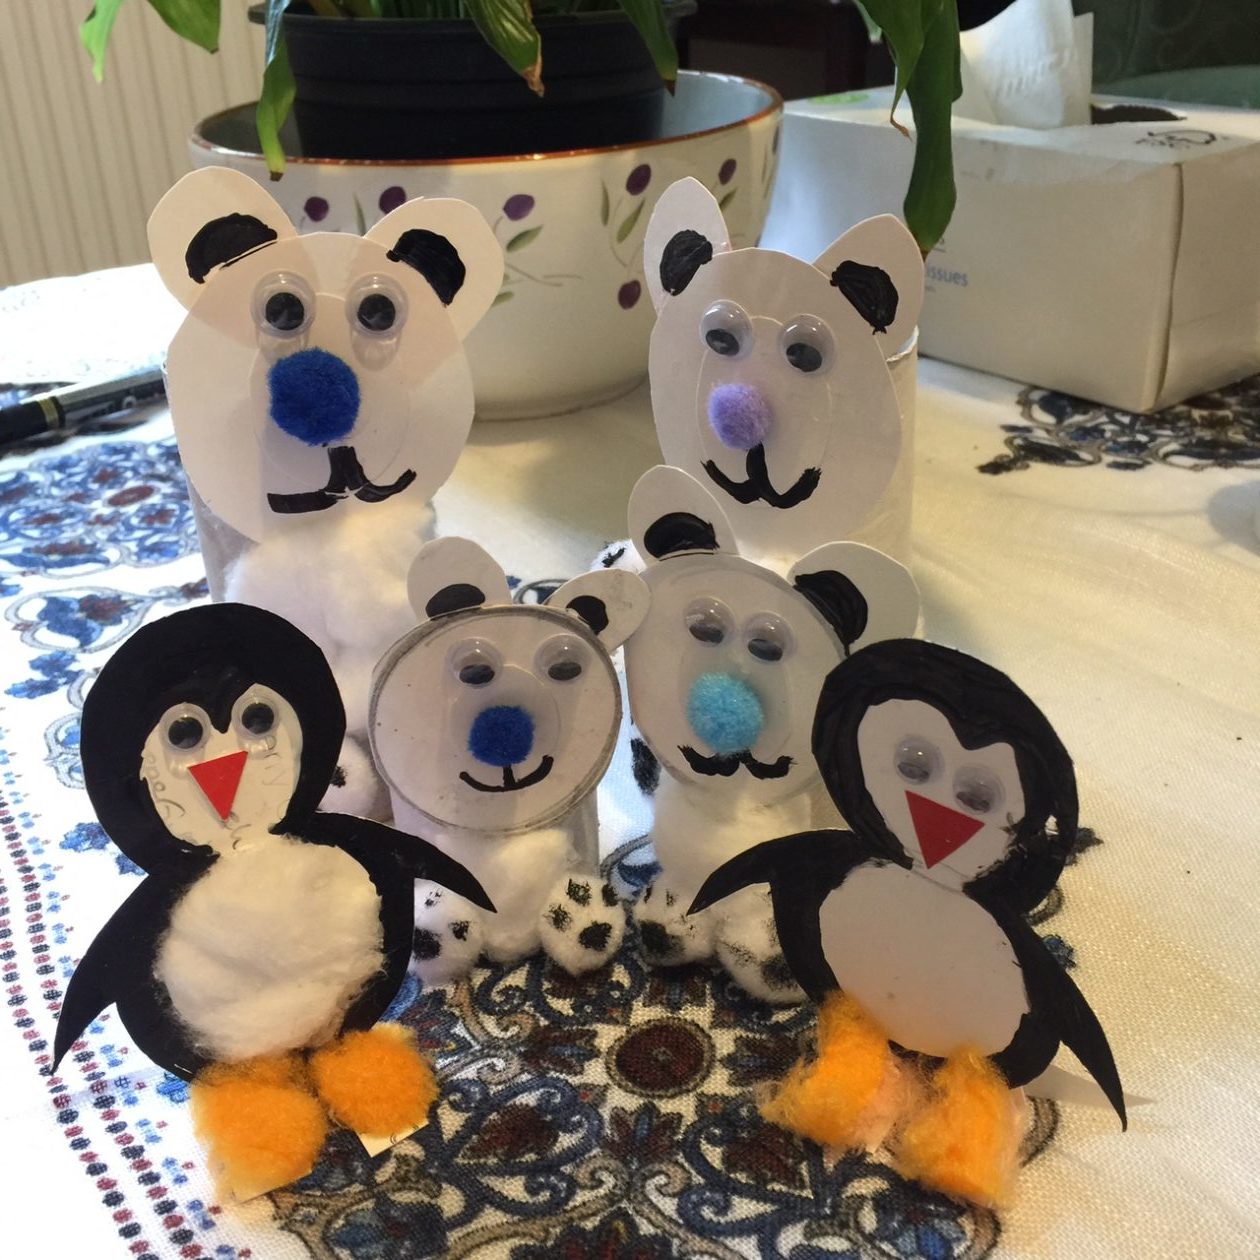
Here is how you can make your own model of our house using the materials and information listed below:
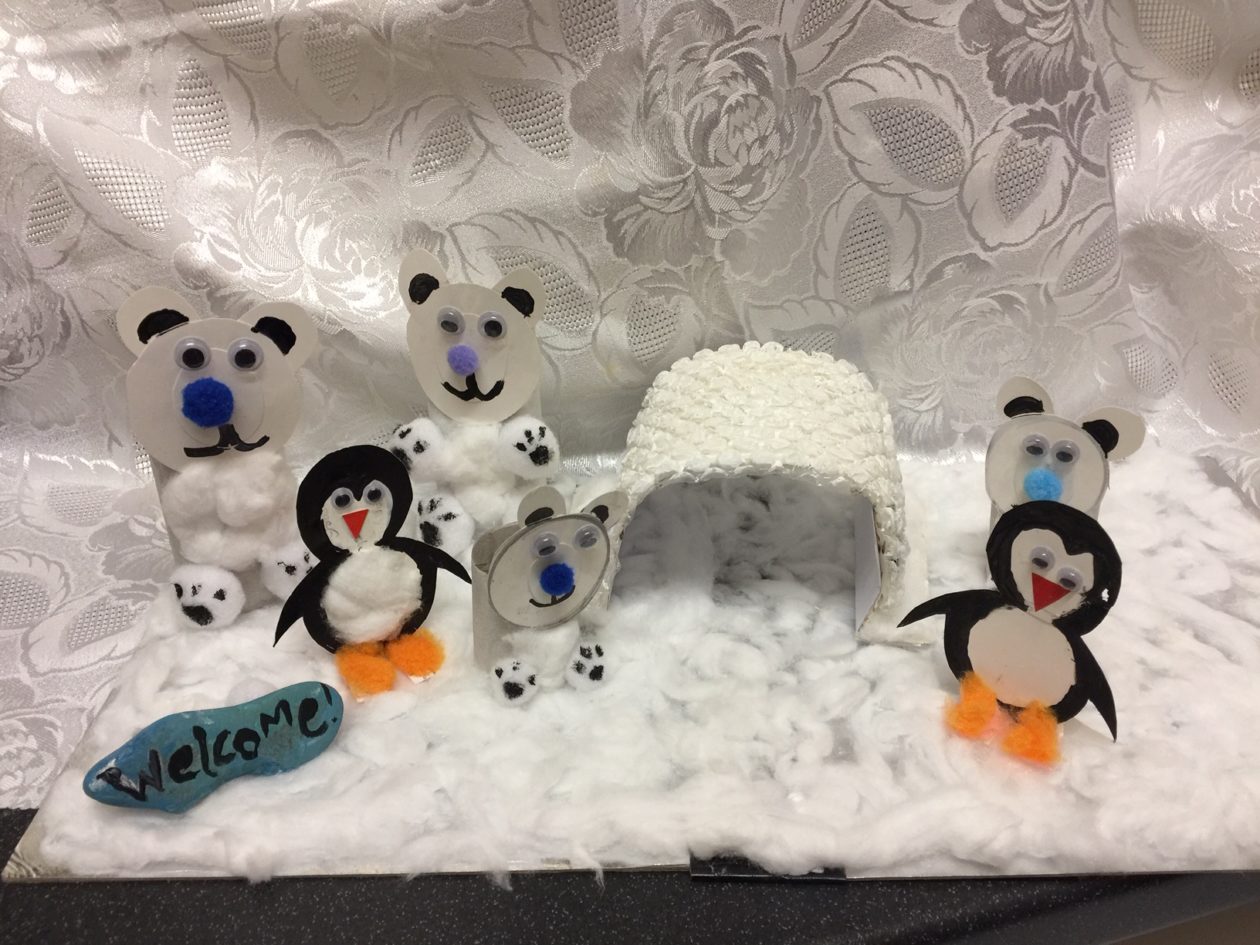
It ‘snow’ joke that we live in so much snow. But it’s a n-ice life!
———————————————————————————–
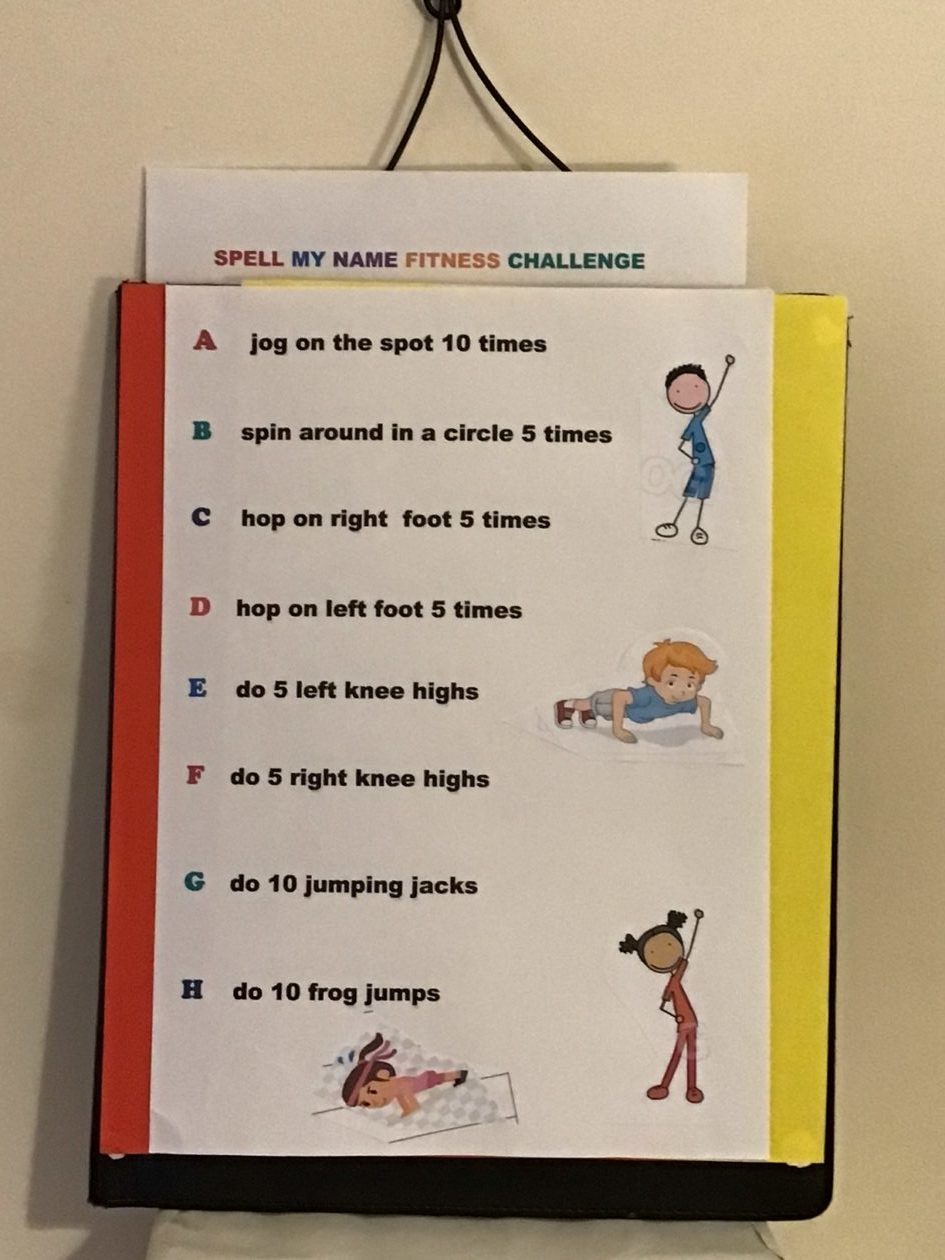
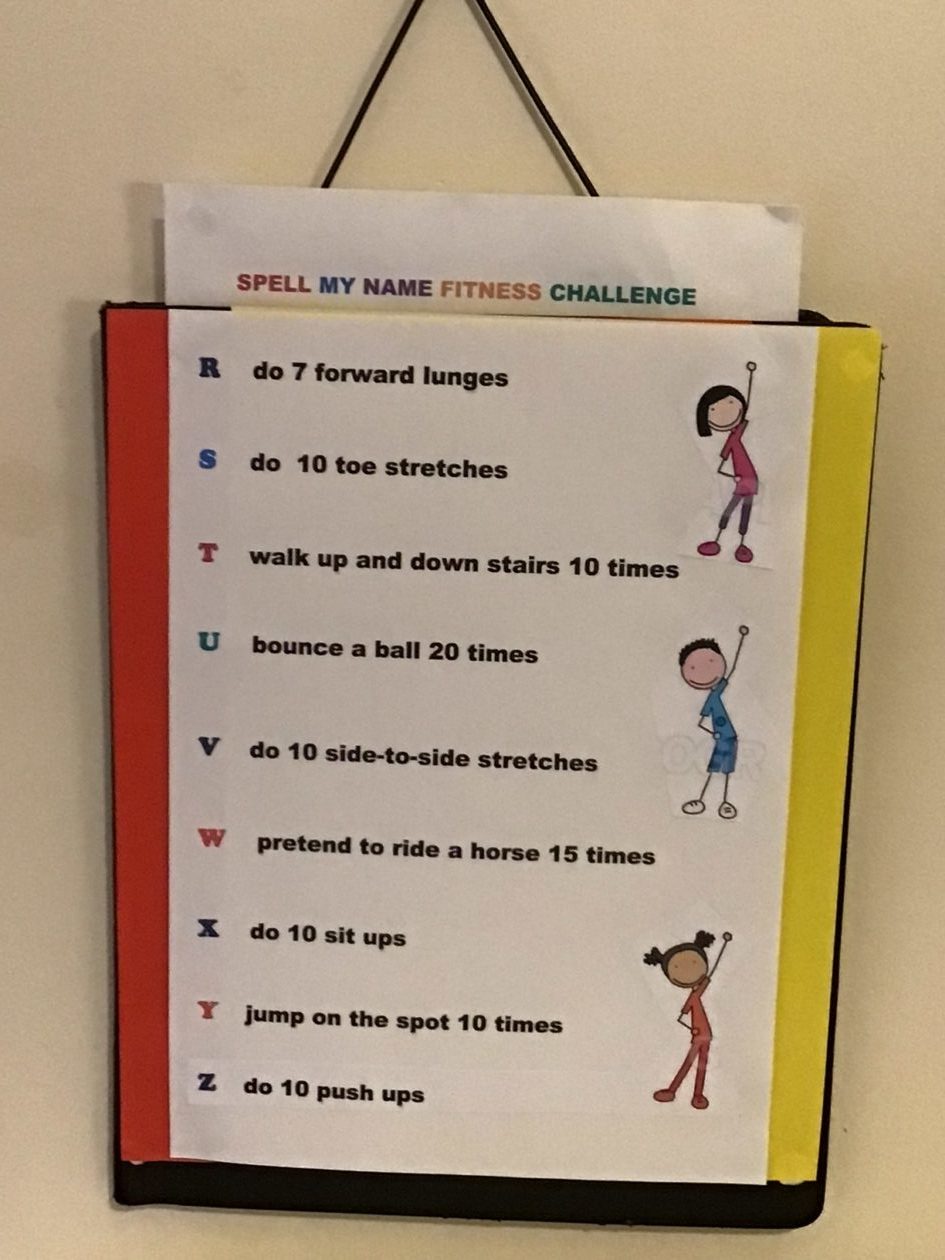
22-01-2021: Spell My Name Fitness Challenge
Hi guys! this is an easy fitness challenge tailored to your own name.
Take short breaks in between your work to refresh and re-energise your mind and body.
All you do is spell out your name and do the activity listed for each letter. The longer your name, the more exercise you’ll get and the fitter you’ll become.
Have fun!

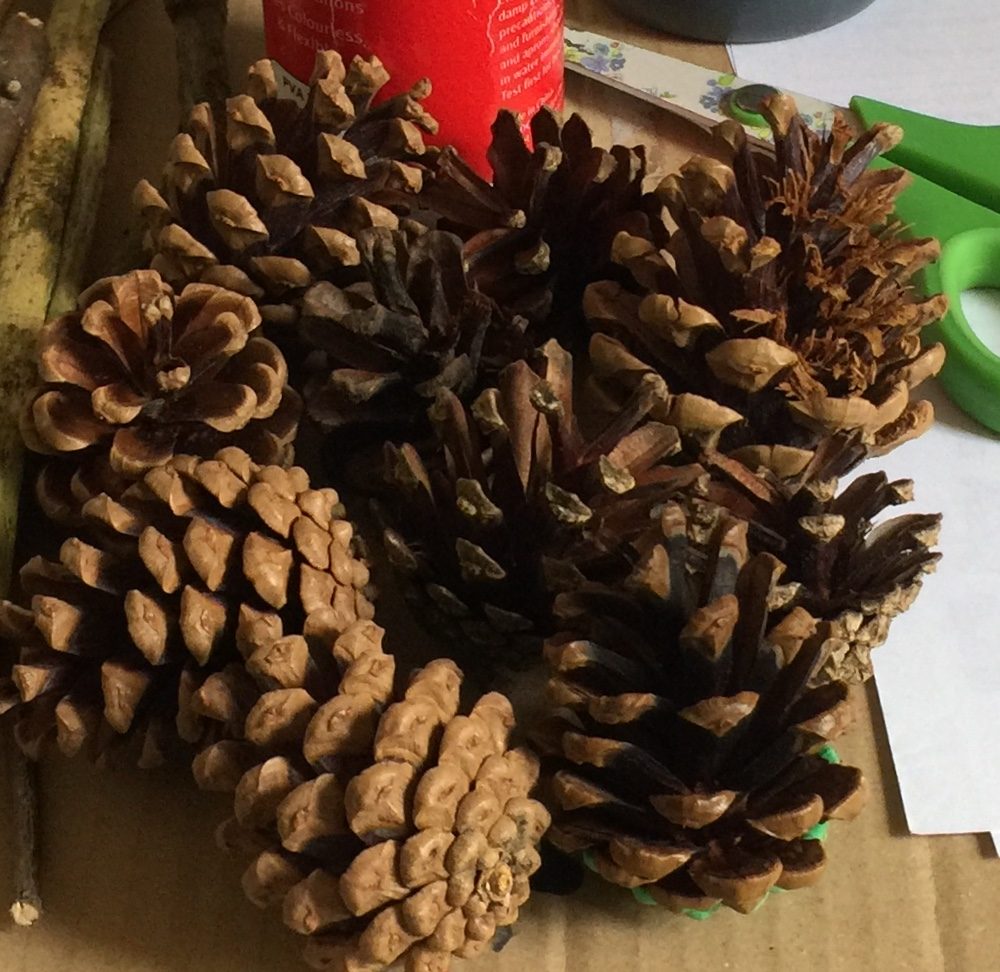
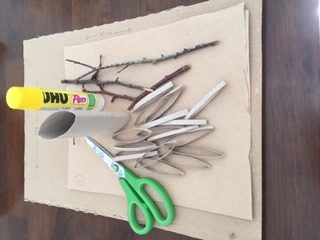
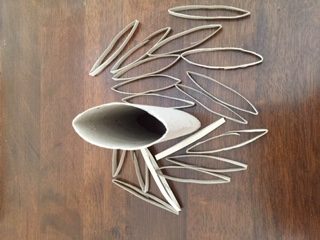
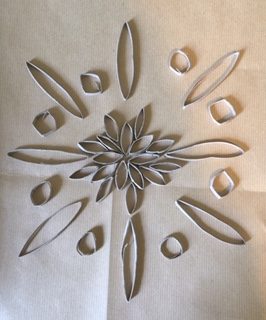
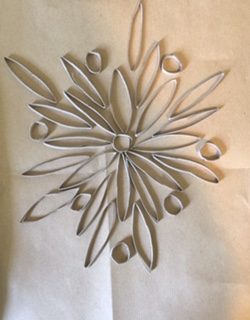
You’ll be relieved to know there’s no paper mache anything this week; instead I have a very simple piece of ‘art’ (roll your eyes here), using materials from your garden or nearest woodland. We’re making a Pine Cone Art Wall Hanging! You’ll never look at pine cones in quite the same way again after this. What I realised as I went along is that the quality of your cutting tools is important or you’ll struggle with cutting the pine cones into the shapes and sizes you may want.
Let’s get started…
PINE CONE WALL ART
You need:
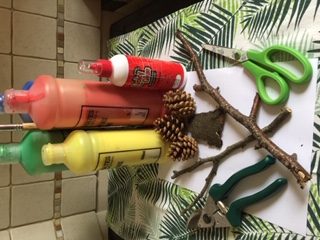
acrylic paints and paint brush 2. Y forked twigs/branches 3. pine cones 4) piece of tree bark 5. strong glue/hot glue gun 6) pair of strong scissors or secateurs 7) piece of cardboard (23 x 35 cm) and A4 sized colored paper
STEPS:
- Trim each pine cone down to size by removing some of the scales. You’re aiming for a flat-ish bottom to create a flower
- Cut the pine cones into sections . This is the hard bit and you need the right tools to make the job easier.
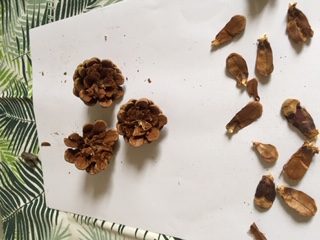
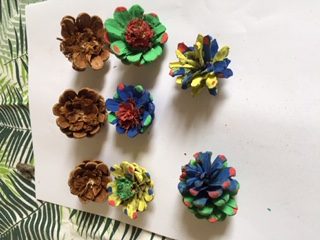
- Paint the cones as you wish and leave to dry
- Get the cardboard and mark off ‘borders’ along the top, bottom and sides, using a ruler. Paint the borders to create a frame
- Get the colored paper and place it in the center of the cardboard. Use glue to hold it down in place
- Get the dry twigs and branches and lay them on the colored paper. Arrange the pine cone ‘flowers’ onto the twigs to create a tree – sort of
- Try out a few arrangements to decide on your final look. Once you are happy with a design, you can go ahead and work with the painted pine cones
- Punch holes in the border of the frame and push through string. Secure the string by tying knots at both ends.
- The framed pine cone art is now ready to grace the wall. Do the honours!
_____________________________________________________________________
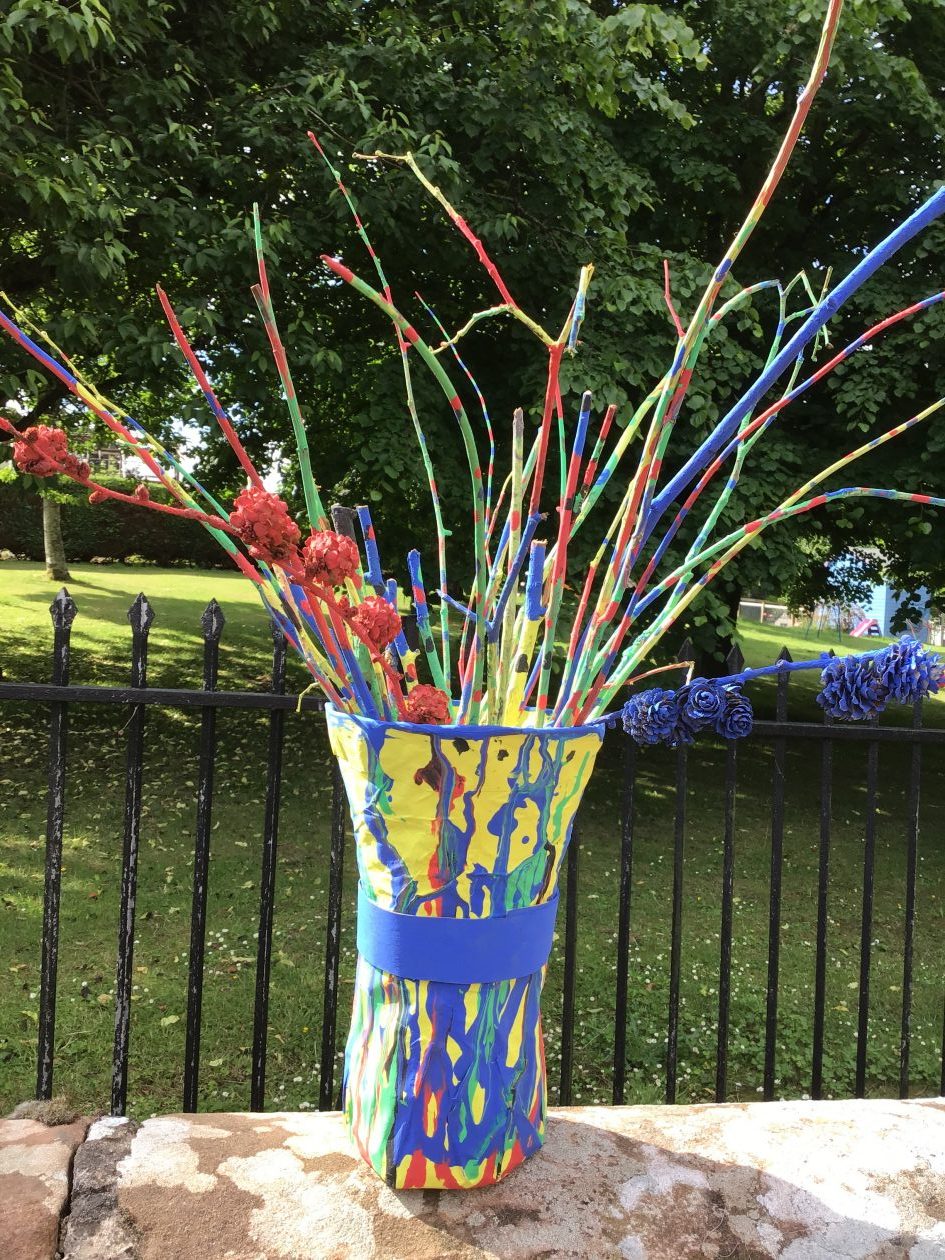
I’ve got two crafts for this week; a paper mache (yes, again! sorry) vase and a painted twigs bouquet to go with the vase. And because you are all so good at paper mache-ing and painting, I’ll summarise the process with use of pictures and captions for each one.
I used a glass vase for the form. But obviously there are as many options for what you can use as there are individual tastes and likes. Dare to unleash the Picasso in you and see what happens…
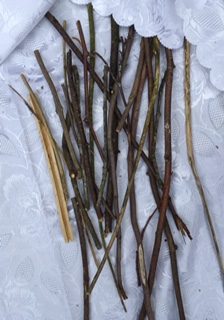
The woods are awash with all manner of dry twigs, sticks, tree bark, driftwood, leaves etc, right now. Collect a bundle of assorted twigs and sticks. Think about the size and design of your vase and pick your materials accordingly.

Clean the twigs and sticks to remove mud and similar blemishes. Trim them as necessary so they’re all neat and tidy looking. Have a mental image of how you want your ‘bouquet’ to look and get painting accordingly. Once painted, leave them to dry. I painted mine in in stages adding patterns each time the twigs dried.
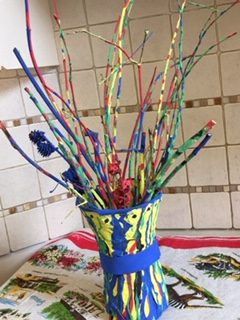
Arrange the twigs and sticks, one by one into your vase. You want to end up with a dramatic looking arrangement that ‘ll sit on your favorite window sill, corner, or shelf. It’ll look better where there is light as that makes the colours look vivid and vibrant.
And there you have it, a cheap and cheerful product!
______________________________________________
Hi everyone!I imagine you’re all now recovered from Sports Week, and what a week it was! You all excelled in your various activities and it was great to see the enthusiasm with which you took to the task.
With the scorching temps we’ve been having and more to come, thought a sun hat might be a good idea. Low cost, easily accessible materials and fun to make. Here’s how to:
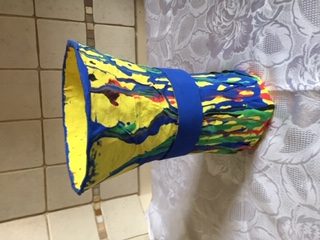
MAKE A PAPER MARCHE SAFARI/SUN HAT
You need:
- Bowl (I used this instead of balloon)
- Cardboard
- Newspaper/recycling paper cut up into strips
- Paper mache past
- Glue
- Scissors
- Gift wrap paper
- Accessories for your hat
- Foil or plastic wrap (to keep the paper mache from sticking to the form
You guys are so familiar with working with paper mache so we’ll cut down on the written instructions and show the steps in pictures, instead.
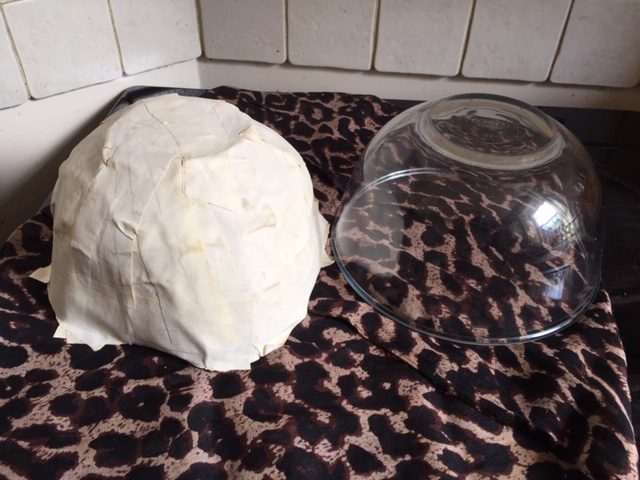
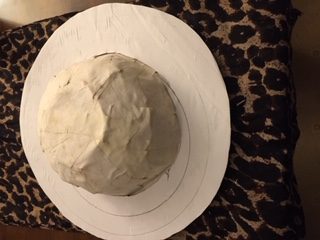
- Find a bowl that fits around your head and has the shape you want for your hat. Grease outside of bowl with oil. Turn bowl upside down and cover with foil, allowing a little extra at the base. Grease the entire outside of foil with oil as well.
- Make your paper mache paste. Cut/tear pieces of recycling paper and dip them into the paste. Remove excess paste and stick on entire form, overlapping the strips. Smooth the edges to remove any lumps and bumps. Make about 3 layers and leave to dry, turning it around occasionally.
- Once completely dry, remove the foil carefully , holding it at the base. Separate it from the paper mache form and trim it at the edges.
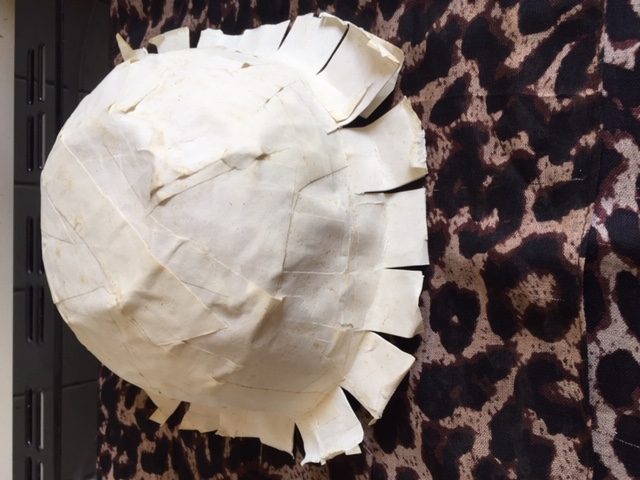
4. Cut slits and turn them down as in picture here. This will make it easy to attach the top part to the brim part of the hat.
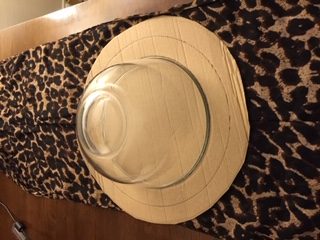
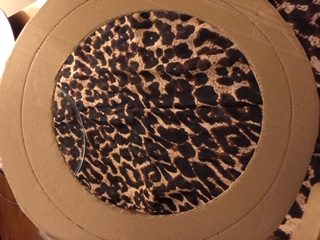
5. Get cardboard and place bowl upside down on it. Draw around the bowl to create an inner circle. Draw another circle outside to create what will form the brim part of the hat.You can decide how wide you want your brim to be. My bowl circle was 21 cm and the outer circle was 27 cm. I used a dinner plate.
6. Apply glue to the tabs made in pic 2 above. Slip the brim over the top part so that it rests on the tabs. Press down to secure the two parts firmly together.
7. Apply glue to the entire hat and get your wrapping paper and smooth it in place over the hat. I used light brown wrapping paper.

8. Use accessories (if necessary) to bring your hat to life. I used animal print wrapping paper to finish off.
Voila! Good to go – bring on the sunshine!

Hi everyone! It’s been good to see many of you outdoors doing all sorts of interesting things. Like you, I’ve been outdoors admiring beauty of nature and that’s how I got this idea…wasn’t sure what, in the beginning … but watch and learn…
WALL ART
What you need:
- Sturdy cardboard paper measuring 40 x 28.5 cm
- Light brown wrapping paper measuring 55 x 60 cm
- Toilet roll tubes
- Twigs and some twig or wood shavings
- Glue
- Scissors
How to…
- Get the cardboard piece and wipe off any dust and other particles
- Apply glue ( glue stick better) all over cardboard on one side
- Wrap brown paper all around the cardboard, smooth out any wrinkles
4. Flatten toilet roll tube into an oval shape; cut it up in 1/2 cm oval pieces using scissors
5. Arrange these cut out bits into a pattern on the cardboard. See examples here
.

6. Use glue to stick the shapes onto the cardboard
The next step is optional; you may wish to stop there or go further and personalize your artwork by adding extra features like twigs and filling the spaces with paint drops, gems, gold dust, twig shavings etc. I chose twigs and twig shavings. Apply drops of glue into the spaces to hold your add-ons in place.

The artwork is ready to take pride of place on the wall!

_____________________________________________________________________
How to make a pair of binoculars.
Hi guys!
Have any of you noticed that while we’ve been in quarantine, the wildlife have been having the time of their lives! I’ve seen more birds, deer, rabbits, ducks, squirrels than I ever did before.
So, if you’re spending a lot of time outdoors exploring, a pair of binoculars is a ‘must-have’ accessory! And this is how we do it…
:
You need:
2 toilet roll tubes, glue, scissors, decorative paper/paint, cord/ribbon/string or shoelace, single- hole paper punch.
You also need to cut a small strip of cardboard 7 x 1.5 cm to hold the tubes together but separately (see (2) above).
Steps:
- Cut 2 rectangular pieces of your wrapping paper, each measuring (11 x 18.5)
- Take one at a time; apply glue all over and wrap it around the toilet roll tube
- Trim off any excess at both ends of the tubes
- Take the small strip (7 x 1.5 cm) of cardboard; fold 1.5 cm at either side
- Apply glue to each folded bit and attach it to each tube to hold them together, but separate
- Punch a hole in each side of the tube
- Thread a piece of string/ribbon/cord through the two holes to create a neck strap; knot both ends to secure it.
Voila! Your fabulous binoculars are ready.
 S
SSlip the binoculars over your head and off you go!

Have a good weekend! I’m off to the woods!
_______________________________________________
Calling all soccer fans!
Hi guys! the Covid-19 has robbed us of our dearly beloved soccer games, whether played in our school grounds or in the community at weekends! So this week I thought: ‘if we can’t go to the footie, let the footie come to us’ ! Make and host your own LIVE game this weekend!
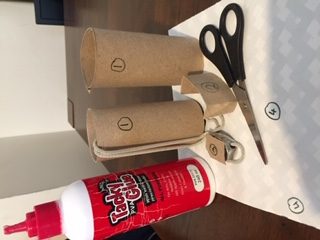
It is simple and straightforward, as you can see from the pictures. You’ll need:
- cardboard box (size depends on yourself and your team)
- 4 bamboo canes (or more depending on size of team)
- some strong string
- 16 pegs/players ( number dependent on size of team )
- some paper, small cloth or sock ( to make the soccer ball
- paint/paintbrush (optional, unless you want to personalize it with
- your team colours ).
- Glue
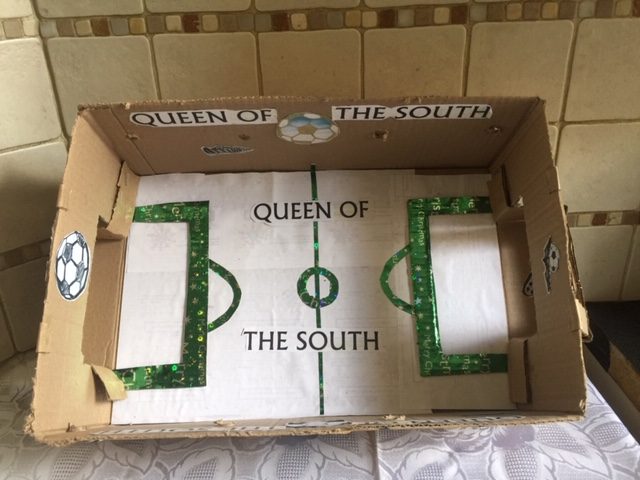
Choose size of cardboard box; model is 25 x 38.5; height/depth: 13.5
Prepare the pitch with markings as shown in image above.

Poke 4 round holes, 11 cm apart, in either side of the box as shown in image above.
Insert the cane sticks through the holes; peg your players onto the cane sticks, as shown.
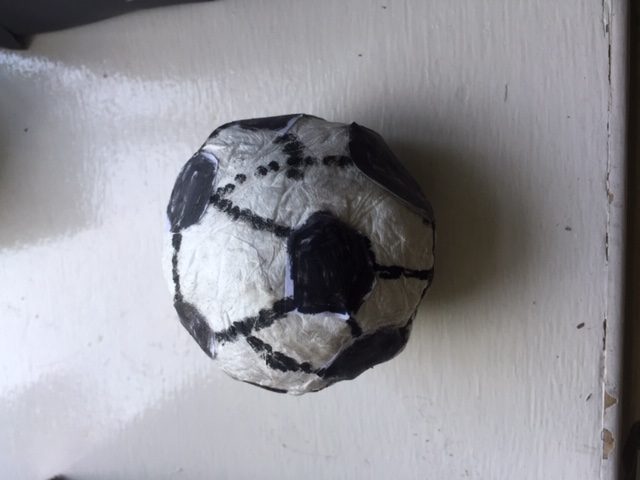
To make your football:
scrunch up some paper, small cloth or sock, ideally white. Shape it into a smooth, round ball. Use string to hold the shape together by tying it around the ball several times.
Finish off with a plain white surface; use a black marker/paint to design the pentagon and hexagon shapes on it and turn it into a real DJ Sports look-a-like ball .
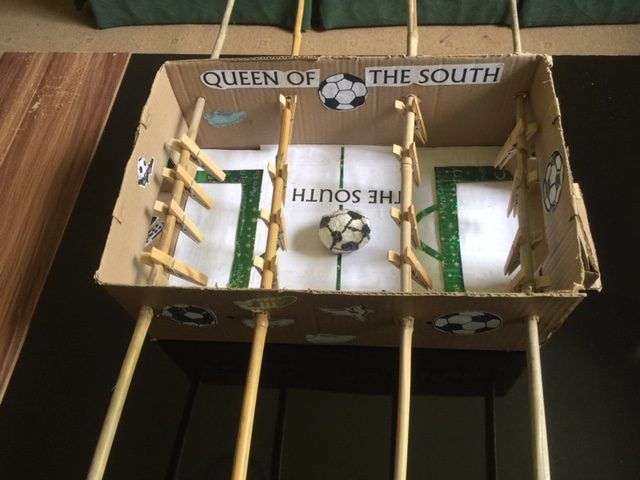 With your cane handles and players in place, the soccer ball in position, you are good to go!
_____________________________________________________________________
Grand Designs:
Here’s your chance to create a simple, unique, environmentally friendly, sustainable, and low impact dwelling/homestead. Model below is in part based on traditional huts known as ‘rondavels’ in Southern Africa.
You need:
- cup cake cases for the roofing
- toilet roll tubes
- sticks/twigs
- grass/straw/leaves for the roof
- wrapping paper/mud/ for the walls
- little stones/gravel for
- rope/jute/raffia to use in construction of water well
 Water well. The community uses ground water from the well. The bucket is lowered into the well and brought back up filled with water.
 The village in its natural setting; a beautiful green environment.
 The village in its natural setting; a beautiful green environment.
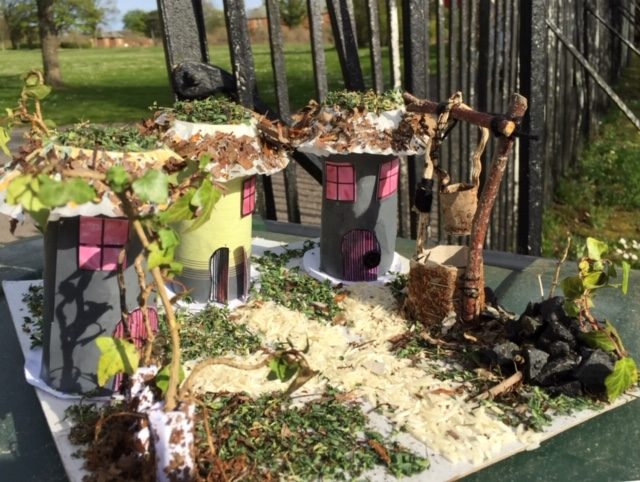
Guys, I think the pictures speak for themselves; I’ll spare you the instructions.
How to make a desktop/pencil organiser
Hello guys! You’ll all be busy writing, colouring, designing etc. You’ll need to have all your writing materials and other bits in one place and close at hand. That’s where this simple and easy desktop/pencil organiser comes in. You can use any number of roll tubes to suit your requirements.
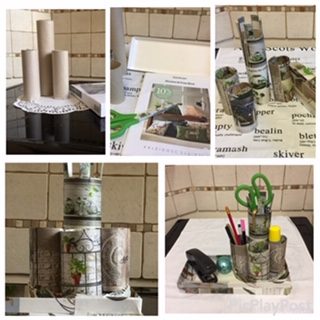
You need:
3 toilet roll tubes, 1 kitchen roll tube
Glue stick
Scissors
Flat cardboard, small/medium size cardboard for the base/stand (I used empty box of chocolates
Your favourite cartoon/footie magazine or wrapping paper to cover the tubes
Method: see images above for guidance
Choose paper you want to use as outside covering for each tube
Cut out a rectangular piece of 19 cm x 21 cm
Lay it flat on a surface and apply glue all over
Take one cube at a time; starting at the edge of the paper, roll the tube down the length of the paper to cover it
Tuck in the excess bits at both ends and smooth them against the inner walls of the tube for a smooth finish. Do the same for the base
Arrange all the covered tubes on the base in the way you want; be creative! Have fun!
_____________________________________________________________________
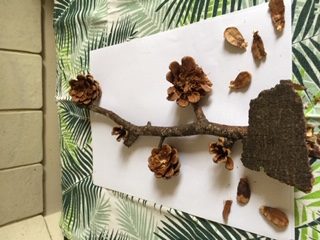
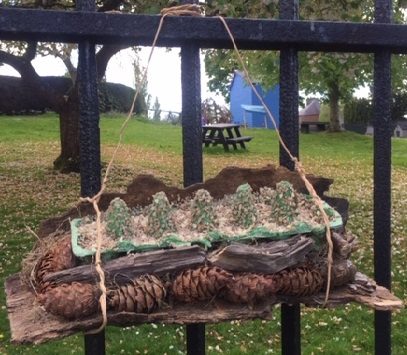
HOW TO MAKE A BIRD FEEDER WITH EGG CARTON AND WOOD PIECES
Hi everyone! so good to see so many of you posting such interesting news about your activities! I’ve recently taken to taking ‘nature walks’ and I must say it has opened my eyes to the beauty of the wildlife and nature. And that is what inspired my activity this week; to make a bird feeder using most of the materials collected on my walks. It’s very simple and straightforward, why don’t you have a go?
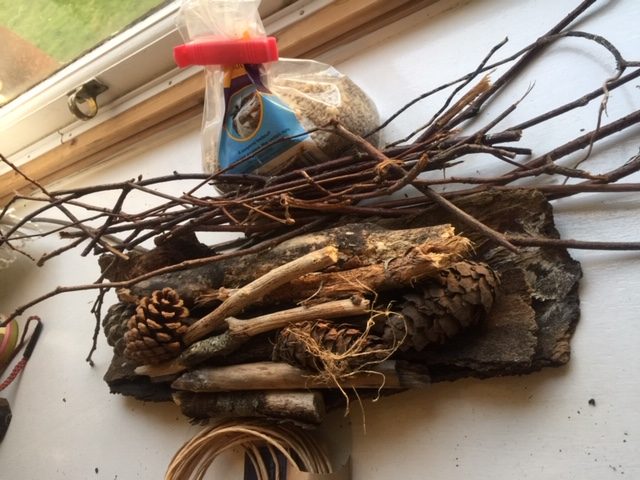
Materials:
- a large piece of dry firewood bark
- some pine cones, twigs and pieces of driftwood
- packet of bird feed
- craft twine or other strong string
- some strong glue
- empty egg carton
Method:
- place the egg carton in the center of the piece of bark
- arrange all the woody bits (i.e. pine cones,twigs, driftwood) around about the egg carton to support it and make it secure
- empty half the bird feed into the egg carton and spread it out evenly
- cut a length of twine/string to secure both ends of the feeder
- find a suitable location to hang up the feeder
Sit back and watch your garden turn into ‘The Usual Place’ for birds.
