
 I had an amusing experience at a recent digital-themed meeting. A colleague from another establishment sat down beside me before we started and said “You watch, there’s going to be at least one geek here who opens up their MacBook, takes notes on their iPad with their apple pencil, sets a reminder on their Apple watch and just talks about the importance of code. You wait. I didn’t wait – I took out my MacBook, opened up Good Notes on the iPad Pro with my apple pencil at the ready (and for good measure set a reminder on the apple watch). Sure enough, my role in the meeting was also to talk about what progression in ‘coding’ looks like in Early years and primary. I just loved that the colleagued just sighed and had a good chuckle about it.
Sure, I’m a geek and proud – and following on from that, today, I’m looking at another Apple product – Keynote – and why I use it over PowerPoint each and every time. I am not, however, saying it is better than PowerPoint. PowerPoint is a phenomenal and powerful tool, and many of the things that I describe below can be done using PowerPoint – however, as Glasgow is undergoing a digital transformation where learners will be working with iPads on a 1-1 basis I feel that its an important tool to really get to grips with. Hopefully, by the end of this blog post, you will have found new, creative ways to use Keynote (and perhaps PowerPoint) not just to create presentations, but as a tool for learning across the curriculum.
I will be focussing on the iPad (app version) of Keynote. The Mac version has additional features and a slightly different layout, but it is less likely that your learners will have macs instead of iPads…
Here is a breakdown of what I aim to cover in this post:
- An overview of Keynote
- Presenting from Keynote in the classroom
- Creating a ‘links only’ presentation
- Photo editing and making creative montages using ‘Instant Alpha’
1. An Overview of Keynote
What is Keynote?
Simply stated, like Microsoft PowerPoint, Keynote is presentation software. Apple says this about Keynote: “With its powerful tools and dazzling effects, Keynote makes it easy to create stunning and memorable presentations. You can even use Apple Pencil on your iPad to create diagrams or illustrations that bring your slides to life. And with real-time collaboration, your team can work together, whether they’re on Mac, iPad or iPhone, or using a PC. (view source)”
Getting started
Instead of using picture guides, there are lots of great YouTube videos available on using Keynote. Here is a series of videos that are very clear and just focus on ‘getting started’. Please note that the content is not created by me, but is publicly available on YouTube. If you like the videos, please support the creator, WCPS, by giving their videos a ‘like’, sharing their content and/or subscribing to their channel.
Creating a Keynote Presentation
One edit from the above video: to delete a slide or select options, tap on the slide icon (instead of hold) so that it highlights in blue and then tap again – this is easier than first holding.
You will notice that it still feels very much like a ‘PowerPoint’ at this stage, and it is fantastic to use. Keynote and PowerPoint are also interchangeable – you can open your previously made PowerPoints in Keynote, and you can save Keynote presentations as PowerPoints if you wanted to use it on a school computer.
Adding Content
Modifying Content in Keynote
2. Presenting from Keynote in the classroom
Linking to the projector
There are different ways that you can link to a projector in class. The easiest is if you are lucky enough to have ‘Apple TV’ set up in your classroom and Wi-Fi – however, this is unlikely so I will skip over this.
Alternatively, you can purchase an iPad (lightning) to VGA adapter which will allow you to plug your device into the wire that normally connects your laptop to the projector. Apple’s own lightning to VGA adapter is very good, but unnecessarily expensive. There are much cheaper versions available on Amazon or similar. *Please note that I am not affiliated with any products I mention, and am only doing so to note examples, but am not recommending any of these products as better than any others.* A search on amazon for lightning to VGA brings up some good results – make sure that you do select one that has a lightning (not thunderbolt) connector and is compatible with VGA (it may also have an additional HDMI or other post – that is okay).
I do have my own adapter, but the school have also purchased some as they are well used not only for presentations, but for modelling how to do different things on the iPad that we are teaching the children (e.g. using Garageband, Book creator, Pages etc.)
Presenter mode
With the iPad connected to the projector with a wire, it takes away from the ‘portability’ of the iPad. Fortunately, Keynote has presenter mode through which you can not only control the Keynote from your phone/another iPad, but you can read your presenter notes on your second device while the students only see the presentation.
Using presenter mode is easy once you’ve done it once. The very first time that you connect the devices, you need to be using WiFi or cellular, but thereafter you don’t need to be connected to WiFi or cellular (I don’t know if this is true for two iPads though – I use my phone and my own iPad for this – my iPad is not connected to WiFi when I use it and does not have cellular.)
To use presenter mode, open the presentation on the iPad that you wish to display your presentation and also open Keynote on the device that you want to control the presentation from. I normally use my iPhone for this.
If you have previously paired your two devices, then follow these steps to remotely control your presentation.


If you can’t find the iPad that you wish to control (it won’t say ‘play’ if this is the case) click on ‘devices’ as below and then choose ‘add a device’. To add a device for the first time, you should make sure that they are both connected to the same WiFi or cellular connection – thereafter they do not need to be connected (at least, I’ve not had them connected after this point).


Once you’ve used presenter mode, I can guarantee you won’t want to present in any other way, especially if you use all of the extra features like presenter notes and the laser-pen simulator / drawing tools!
3. Creating a ‘Links Only’ presentation.
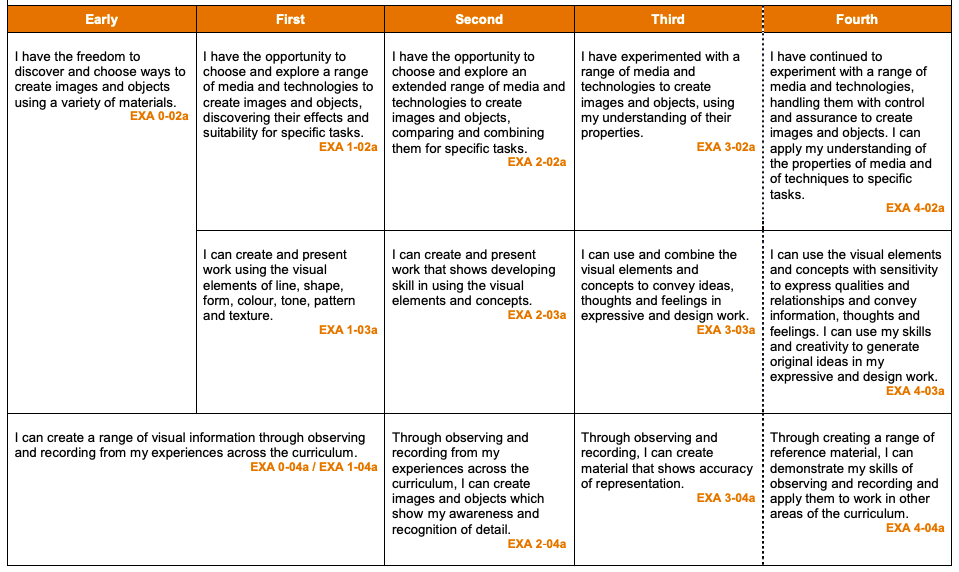
I did this as a workshop in Strathclyde University for student teachers as it is a fab tool. For older children, they could create interactive textbooks and study guides. In the past I’ve used it to create ‘branching narrative’ style interactive stories. There are lots of ways to use ‘links only’ and create links to external sources and also internal slides.
Here are some of the tweets prior to and from our #MPTechTeam trip to Strathclyde University:
The focus for our @MossparkPS #MPTechTeam visit to @UniStrathclyde with @StrathDigitalEd will be raising attainment across the curriculum using digital technologies. We will be starting by looking at creating interactive branching narrative stories using Keynote! pic.twitter.com/F6Zm4b4aHC
— Mr F 🏴🙋🏻♂️ (@mrfeistsclass) March 23, 2018
Two of our #MPTechTeam wanted to share their ‘practice’ interactive branching narrative stories, created in Keynote, in preparation for their visit to Strathclyde Uni to work with student teachers! pic.twitter.com/NDUpYgZjPX
— Mosspark Pri & NC (@MossparkPS) March 24, 2018
Our #MPTechTeam have been busy showing #StrathPGDE how to create hyperlink buttons in Keynote. pic.twitter.com/3xiWCsMV5N
— Mosspark Pri & NC (@MossparkPS) March 29, 2018
4. Photo Editing and Making Creative Montages using ‘Instant Alpha’
For years, I’ve been using photoshop for this very thing, but it is available on our iPads for free and is surprisingly powerful!
Truthfully, until ‘Everyone Can Create: Photo‘ came out, and I read through the chapter on using Keynote for photography – making scrapbooks and montages etc, I hadn’t even realised that this was a feature or just how amazing it was.
Instead of trying to describe the process, in the below tweet is a video of a simple creative montage in action on Keynote – whilst watching, just think about the ways that children could use it creatively for art & design, or advertising a product, or for bringing stories to life in literacy etc.
*Images used in this video are stock images purchased through Adobe Stock*
Nearly finished putting together this evening’s blog, but here’s a wee video that I’m using for part 4 about ‘instant alpha’ in Keynote. Just think about all of the amazing uses that it can have. Other great ideas in the ‘Everyone Can Create: Photo’ publication on Apple Books! pic.twitter.com/AtXitsLebm
— Mr F 🏴🙋🏻♂️ (@mrfeistsclass) November 18, 2018
Hopefully this has been a helpful insight into using Keynote and why I now use it for everything!
Sorry this blog is late, I had hoped to finish it before performing in Edinburgh today, however, that wasn’t to be! A great day though, with an audience in the tens of thousands our boys did phenomenally well – you can see what we were up to on the choir twitter feed or facebook page.
As always, please get in touch via twitter with feedback / suggestions etc
Thanks again!
Donald


 Since November 2016 the ‘Read to Me’ tool has been one of the most powerful features (in my opinion) of this fantastic app. When it was launched, I had a new EAL learner with an ASD who was struggling to settle into the class. Her language barrier was a huge issue, and her ASD caused great anxiety in the mornings and after break/lunch. She didn’t want to have to try and speak to anyone as she became very anxious that she wouldn’t understand or be able to respond.
 This then became her routine – come into class before the line, get her designated iPad, put on her headphones, listen to the previous words and add new ones.
 Creativity is a huge aspect of learning, and applications that are fairly static and don’t allow much creativity really don’t engage our learners as much as those that do. Book creator allows children to design every page as they want; from the background colour, to the positioning and size of text boxes, to adding their own drawings, or inserting media it really is powerful, and children want to create their own books using it – I’m yet to find a child that hasn’t engaged with it.


 Below the daily usage bar, there are four controls that can be activated. In setting up screen time, you are asked if this is your device or your child’s. If you select that it’s your child’s you will be automatically taken through each of these controls by default.
 Monday’s challenge was an introduction to coding. This lesson has been tried and tested hundreds of time, and even formed part of
  Tuesday was my first example of how coding can be taught across the curriculum. Digital skills are officially becoming ‘core skills’ in the next update, and so will be a responsibility for all. I have long believed that computer science should not be taught as a discrete subject, as the skills developed are transferrable to almost every aspect of the curriculum and life. This set of resources were aimed at giving ideas for ways to teach aspects of music through computer science. The featured resource was ‘Code your own musical instrument in scratch’, but I also published a breakdown of composition in Scratch and a ‘name that tune’ challenge card. You can find all of the resources from day 2
  Day three was my maths day (although, I did post an additional maths resource for #MathsWeekScotland on Twitter prior to coding week – you can find that resource
  Whilst lots of my learners like creating their own games, many just want to allow their creativity to shine as they bring their stories and scripts to life. You can do that in Scratch! I used to love, as part of the children’s learning in literacy, to have the children write their own stories, establishing characterisation, and then bring scenes from their stories to life in Scratch. The power of Scratch in creating animations is only limited by the children’s own imagination and their understanding of code – you literally can make anything happen, from characters teleporting, to animated talking, to importing your own drawings and bringing them to life. Whilst they could have filmed each other acting out scenes, this can be limiting and also isn’t always inclusive as there are children who find that situation intimidating. With scratch, everyone has a chance to create fantastic animations. Day 4’s resource is a quick guide to creating a simple animation that includes dialogue. The full resource can be found
  Variables are a tricky concept to get to grips with. Scratch does make them fairly easy to work with, however, learners need a lot of exposure to them in order to fully grasp how and when to use them. By taking the maze game – a game that the children are already familiar with (from lesson one) we can extend the game and add challenge to it by using the variable ‘time’. This is a great way to introduce the concept of a variable as ‘time’ (in addition to score) are the most commonly used ‘visible’ variables in gaming, and the children will be used to seeing them in the games that they play.
 I love exit tickets and collecting feedback and data from plenaries. What I didn’t love was the sheer volume of paper / photocopying that I used to use to do them. Snap assessments to see how well my class had understood a topic, exit ticket post-its to give quick feedback about a lesson, plenaries to gauge understanding – SO MUCH PAPER! Sure, there are ways to gather the same information without using loads of paper – thumbs for feedback for starters – but often I can’t track changes in understanding over a period of time for more than just a handful of children as it requires remembering who said what.
 Despite being new to Plickers myself, it is definitely the app that I want to start with when looking at fantastic ways to go paperless when using exit tickets or giving plenaries. It does even work for assessments. Truthfully, their own description on
  Truly one of my, and my class’, favourite tools. Furthermore, with the iPad rollout across Glasgow City Council and similar initiatives for 1-1 device access within schools, this will almost certainly become a tool used on an almost daily basis by many classes. Powerful and easy to use, this does require children to have their own devices in order to take part in quizzes / assessments etc, however, it can easily be done that children are timetabled to access a smaller number of devices and work their way through the assessment/quiz etc in a more flexible time period.
 There are many other applications, tools and websites out there that give you as much power and flexibility as the above, however not all of them are free. Many educators will swear by