Category Archives: Blog

Creating a School Website for FREE!

Welcome to the ‘Example School Website’!

Today, we are tackling something that I’m asked a lot – how do I create a school website on GlowScot blogs.  It is free and lots of schools are doing it.  For an example of a school website created for free using GlowScot blogs, look no further than my own school’s website.

This week is more of a vlog than blog, as I have created 9 short videos to help you learn how to create your own school website.  Each video is annotated so that you don’t have to listen to my voice!

I do hope that they’re helpful.

Have a great week, and as always please tweet me any feedback/suggestions to @mrfeistsclass

Donald

1. Getting Started with Glow Blogs


2. Customising Your Website


3. Adding Pages to Your Website


4. Creating Drop-Down Menus


5. Adding Content to Pages


6. Add a ‘Latest News’ page


7. Adding and Editing Widgets


8. Add Your School Twitter Feed


9. Make Your Website Public

The most versatile tool

Over the last two weeks, I have been mainly focusing on the ‘Everyone Can Create: Music” publication, available for free on the apple book store – looking at how we can use digital tools (with a heavy focus on GarageBand for iPad) to achieve music experiences and outcomes.  Whilst this week I am moving away from music, I would like to stick to the “Everyone Can Create” series, as one of the other publications in the series as I am currently reading each book, and they are fantastic.

This week we are looking at the most versatile tool available to us – the camera.  Of course, “Everyone Can Create: Photos” is the publication that I will mostly be referencing today, however, a physical camera (potentially combined with a computer program) or any device with camera function will enable you to achieve much of what we will look at today.

The Camera – ways to meet EXA outcomes.

I think the value of the camera is often understated in education.  Yet, it is a tool that can be used for so many different aspects of learning before we even begin to look at some of the amazing creative ideas outlined in ‘Everyone Can Create: Photos”.  With iPads/tablets/phones/class cameras, children can photograph / document aspects of their learning that they are proud of for saving digitally and sharing electronically home.  Children can capture aspects of peer performance that they like and use this for feedback.  They can capture and edit images creatively, creating montages of their learning, or IDL posters.  They can use them to capture images that will enable them to promote enterprise projects.  Really, the possibilities are endless.

However, all of this is mostly about ‘capturing’.  Photography itself is also an expressive art, and, considering this children can also create using cameras.  Take the below EXA outcomes for art and design.  All of these can be met through photography as well as by ‘drawing’ or ‘sketching’.

Let’s look at some of these to se how we can use the camera.

  • “…comparing and combining them (photos in this case) for specific tasks.”   For this one, children could capture images on a theme, combine them in a collage-maker app, or in Keynote/Pages for a different task – e.g. poster / story etc.
  • “…line, shape, form, tone, colour…” edit images creatively in mark-up or the inbuilt editor, playing with saturation, hue, white balance, lighting.
  • “…to convey ideas, thoughts and feelings…” capturing ‘mood’ in photography, looking at composition, colour choice or more.

That’s just a very quick snapshot of some of the ways we could use cameras.  It’s versatile, reliable, relevant and simple to use from nursery age right through to further and higher education.

Everyone Can Create: Photos

I do love this publication, and will be using it with my school camera club (see below for tweets from them) over the coming months.

The guide aims to teach us how to do the following, using a combination of the camera, photos, keynote and pages apps.  Even if your school doesn’t have iPads though, I’d strongly recommend you check out this fantastic publication as it does have so many great ideas that could be taken and used on different software available in your school.

  • A personalised picture
  • A portrait from the past
  • A story in a single photo
  • A moment in motion (using the iPad to create slow shutter speed images)
  • A personalised collage (using Keynote and the mask tool)
  • A photo documentary (and thinking about photo journalism)
  • A portfolio of your favourite photos

As I say, I really rate this publication and will be using it with my school camera club and also in classes.

Mark-up with younger learners

Something I love to do with younger learners is not only capture images, but to edit and personalise them.  The iPads have a fab built-in app called ‘mark up’, where children can add drawings to their pictures.  This covers digital outcomes in addition to some of the above EXA ones, so well worth doing with your learners (and they love it!)

For the below demo, I will use a stock photo from Adobe Stock.

  • Take a photo using the ‘camera’ app, or open a previously saved photo from the ‘photos’ app.

  • Select the blue ‘edit’ icon in the top right hand corner

  • There are lots of different options now that can change the lighting etc – it’s great for older children to experiment with these and get a feel for what they do.  For our younger learners using ‘Mark-Up’ though, select the ‘three dots’.  Please note, I have additional applications in this option that may not be installed on your iPad so won’t appear by default.

  • Children can then add their own annotations/drawings to edit their image creatively.  A cheap stylus is a bonus if you have one (or an apple pencil if you can!) but children can also just draw with their fingers!

  • Click ‘done’ when finished to save the image.

Other apps

There are, of course, lots of apps out there that work in a similar way to mark up, or that can be used for more advanced photo editing, but I love the sheer simplicity of mark up for our youngest learners, and have used it with P1+ in the past.

Other free apps I like to use are:

  • Keynote and Photoshop Mix (for creatively mixing images together)
  • PicCollage for children to select their favourite images and creatively put them together for display/sharing
  • Notes and pages for annotating images
  • Greenscreen apps (such as DoInk – although this is not free) for using the images as a background for a news report etc

#MPCameraClub

This year I have started a photography club in my school, mainly because a P7 wants to be a photographer when she’s older and I thought that this would be a great way to help her develop her skills – however, I’m finding that it is so beneficial and is developing such good creativity that I think it will be one I keep running for years to come!  It is open to children in P7 only, and runs after school.  The reason I mention it is that we will be starting to use the ‘Everyone Can Create: Photos” resource, mentioned earlier; but have been using the ‘camera’ creatively (funnily enough!)

I will add three of the tweets below detailing what we have done so far, but do follow us on twitter using #MPCameraClub – tweeting from @mrfeistsclass and @MossparkPS – to see more.


I hope that this blog has been helpful.

As always, if you have any comments/feedback/ideas for future blogs please do get in touch on Twitter.

Have a good week,

Donald

Using GarageBand loops to teach music

Before we should begin, I should make one thing clear.  I do not believe that technology is the only way to teach music.  The National Youth Choir of Scotland (through which I gained most of my musical education – learning about music theory and singing through the Go For series that uses Kodaly methodologies) have done incredible work in promoting music education through singing.  The only thing that I have always felt that it lacked was the creativity of composition.  I loved creating music when I was young, but never really knew how to do it, as I didn’t have the skill to compose or even understand musical notation.  GarageBand changes that.  Combined with other musical learning, GarageBand is a tool to bring creativity back into the heart of music education.

There are so many fears and concerns that music is being lost in the curriculum, and it’s true. Alongside digital literacy, it is an area that many colleagues feel unconfident in delivering effectively.  Hopefully, this blogpost will give you the confidence to experiment with GarageBand and allow your learners to do the same.  Many aspects of musical learning can be taught through GarageBand, and it also is one of the best ways to achieve the ‘musical technologies’ outcome in CfE.

Getting started

The biggest problem with GarageBand is, as it’s such a powerful program that can be used by beginners and professionals alike, its interface isn’t the easiest to navigate.  Fortunately, there are many tutorials and guides online to help, the best of which is Apple’s own “Everyone Can Create: Music” available in the apple book store for free on iOS devices.

I have put together a few slides below to help you with the interface.  I have used GarageBand with learners from P2 upwards, so it is very useable with a little bit of understanding about the main features.

Here is how to create a new piece, and a little about the main menu:


Learning through live loops

For this post, I am mainly ignoring the ‘instruments’ that you can play in GarageBand, as we can do this with real instruments anyway.  Of course, children should be shown them and allowed to experiment and record with them, but this is not what makes GarageBand so fantastic and useable at a young age.  The thing I will focus on is ‘Live Loops’.  Again, I have put some slides below about how to use live loops but I’d strongly recommend looking at the Everyone Can Create: Music, which allows you to download a live-loop version of Can’t Stop the Feeling by Justin Timberlake, to demonstrate teaching points about structure etc.  Everyone Can Create: Music is a fully comprehensive teaching and learning tool, and can be used as a script for lessons even!

Here is the basic overview of how to use live loops:

Important learning in this section is:

*Tempo

*Dynamics (using the mixer – drag the small bar beside the instruments to the right to access this)

*Key signature

*Time signature

*Beats and bars


Getting creative

This is more advances, and I’d only use it with upper primary – secondary.  Children can create their own loops from scratch, or at least select pre-recorded loops from the vast expanse of GarageBand loops to create their own music that hasn’t been pre-arranged.  Creativity at it’s best!  They can use the instruments in GarageBand or even their own voice to record loops if they like – but, even just selecting pre-recorded loops and thinking about structure is hugely valuable.

Here’s how to do it:


P6 and P7/6

This term, I am doing a music project with P6 and P7/6 in Mosspark PS every Wednesday using GarageBand (and the Everyone Can Create: Music resources).  You can follow us on Twitter using #MossparkP6 and/or #MossparkP76, or by following @MossparkPS to see what we are doing.

Conclusion

I love GarageBand.  No guide that can be made can ever be fully comprehensive in its use, as it is so powerful that its limitation is truly the imagination of the user.  I hope that this blog has helped you to get the confidence to experiment with GarageBand.  Even experimenting will show you just some of the potential of this incredible app in the classroom.

Please do send me a tweet if you have any specific questions about how to do certain things in GarageBand and I will get back to you ASAP!

Have a great week

Donald


Learning about music through technology.


Let’s talk about ‘that’ experience and outcome; the one that is so rarely met in its entirety due to “Music Technology”.

I remember being introduced to Sibelius – a program for musical composition – when I was studying music, but rarely, if ever, did I get to use music technology creatively, let alone to experiment with (and therefor, learn through play) music.  However, as technology has evolved, so has our ability to create and experiment with music through technology.

This term, I have planned a progressive music technology lesson series with P6 and P7/6, so look forward to blogging about how that goes towards the end of the term.

Everyone Can Create: Music

Being an Apple nut, I think it is always inevitable that I will talk about their products first – however, when it comes to music technology and education, I truly believe that they are leading the way.  I was thrilled to be at a conference recently where they revealed Apple’s latest series of teacher guides: Everyone Can Create.  Available in the Apple Book Store for free, these books cover teaching expressive arts with iPads, and how iPads can truly transform children’s ability to learn creatively.


I have already read ‘Everyone Can Create: Music’ and have really been impressed with it – indeed, I am basing the P7/6 and P6 lesson series for this term on it, and I can’t wait to explore the other ones.

Find out more about the ‘Everyone Can Create’ series here.


I couldn’t recommend the ‘Everyone Can Create: Music” enough, and I genuinely believe that it will transform your teaching, and confidence in teaching, music.

GarageBand

Everyone Can Create: Music is based on using GarageBand.  I realise, initially it is a daunting app.  I started using it a few years ago and quickly stopped as I didn’t get it.  Now, however, I use it with P2 upwards.  Once you get past the initial fear of what everything does, you soon realise that it is not only one of the best apps for creating and recording your own music, it is also right up there for creating a virtual band and playing instruments in a classroom.  For children in councils/schools that are investing in 1-1 iPads, GarageBand becomes a tool for your children to enjoy exploring and understanding music as well as creating their own compositions.  As there is a huge amount to GarageBand, next week I will do an in-depth guide to using GarageBand.  In the meantime though, I recommend reading, or at least glancing through, “Everyone Can Create: Music”.

Audacity

Audacity is a free open-source program for PCs and laptops that (with a microphone or other input device, or by downloading and inserting audio [be aware of copyright laws when doing this]) allows you to record and edit your own music in multiple layers, or tracks.  This allows children to better understand how music recording works.

It can be a bit tricky to get sued to at first, but there are many online guides to using Audacity.

Here is a great YouTube video on how to use Audacity for beginners by Mike Russell:

Others

There are other apps; a search for ‘apps for composing music’ for example bring these to you.  Some that come highly recommended (I don’t know if they’re free/paid though) are in this blogpost

Sorry it’s been a short post today, but it is the first of a number that look at creativity on the iPads.  Next week I will bring you an in depth guide to using GarageBand and look at how I’ve used it with children from P2 upwards.

I hope you have a good week

Donald

Book Creator – creating, sharing, learning

One of the most powerful apps in education is Book Creator.  It is a paid app, however, at £4.99 it is truly worth it.  From sharing learning, to creating books and comics, to making videos and supporting children with ASN/EAL; book creator truly is the tool for the job.

Here is a quick PowerPoint presentation about how to create, read and share books in Book Creator:

Read to Me

Since November 2016 the ‘Read to Me’ tool has been one of the most powerful features (in my opinion) of this fantastic app.  When it was launched, I had a new EAL learner with an ASD who was struggling to settle into the class.  Her language barrier was a huge issue, and her ASD caused great anxiety in the mornings and after break/lunch.  She didn’t want to have to try and speak to anyone as she became very anxious that she wouldn’t understand or be able to respond.

Until the launch of ‘read to me’ on book creator, she had a system where she would come in and read one of her bilingual books or try to use worksheets with pictures to learn new words.  Whilst this worked to an extent, she did find it tricky as she couldn’t ‘hear’/pronounce some of the words.  With the launch of ‘Read to Me’ in book creator, though, I knew that we were on to a winner.  She built her own dictionary on book creator by drawing (with the pen tool) a picture of the word that she was learning, and typed the word that she chose from her worksheets, class work or dictionary.  E.g. if she had the word ‘tree’ she would draw a tree, type the word tree and then move on.  This would have been the same as what she had already been doing on paper, however, she couldn’t easily pronounce the words previously without myself or a member of support staff sitting with her and reading the words, and this was something that made her feel uncomfortable as she didn’t like that the children could hear her learning new words.  With the ‘Read to Me’ function, she was able to put on headphones and listen to all of her words each morning and after break/lunch.

This then became her routine – come into class before the line, get her designated iPad, put on her headphones, listen to the previous words and add new ones.

It worked!

She soon started writing small sentences that she wanted to use in class, like, ‘please may I go to the toilet?’ I remember the class getting so excited the first time she put up her hand and asked a question, and she was so proud.

I know this is a very specific example of a child with many needs, but, there are so many times in learning environments that book creator can be a hugely powerful tool.  I wish that I had the ‘read to me’ function in the year that I taught a non-verbal child, as I imagine it would have transformed the way that he could communicate with me and the other children.

One of my colleagues is currently using book creator with her class and said that the children are very good at using the ‘read to me’ function to check their learning. She noted comments such as “no, that doesn’t make sense” when they hear it being read back to them.

Design and layout

Creativity is a huge aspect of learning, and applications that are fairly static and don’t allow much creativity really don’t engage our learners as much as those that do.  Book creator allows children to design every page as they want; from the background colour, to the positioning and size of text boxes, to adding their own drawings, or inserting media it really is powerful, and children want to create their own books using it – I’m yet to find a child that hasn’t engaged with it.

The design and layout options are really simple to use and navigate between, and are noted in the Presentation at the top of this post.

Sharing

Children can save their work to their iPad’s book store, as a PDF for printing, or even as a video file that could be put onto the school twitter feed, saved to their Glow OneDrive or even emailed home.

Let me know!

Book Creator genuinely does excite me, and I’m looking forward to sharing its potential with my colleagues in a CPD training this week.  If you already use Book Creator, or will be starting to use it, please send me a tweet and let me know how you use it with your learners, as I love being inspired by the Twitter community!


iOS 12 – an update for education!

It’s rare that I actually get excited about an iOS update.  Sure, performance is introduced, and new features are added – but it’s rare that those new features excite me.  iOS12 is the exception to that rule.  As an educator, it is a gift.  Of course, there is still so much more that can come – there always will be, but my lord this is a step in the right direction.  And not just for educators; for parents who want a little more control of their children’s use of tech and want to be able to monitor it more effectively, iOS12 really goes a long way in a very positive direction.

This post is a little different; but as a teacher in Glasgow, where children are receiving iPads on a 1-1 basis as part of our digital transformation, it is something that I really want to look at.  For parents of children with iPads, I think aspects of this blog will also be really helpful.

Let’s look at some of the features that have been introduced and can have a really positive impact in the classroom:

Screen time

This is mostly beneficial for parents, but for schools would be a great thing to share with parents and implement, especially if we are encouraging children to use devices at home.

This is a huge move in the battle to cut down on ‘screen time’ for our younger users – but to fully appreciate this, we need to think about what ‘screen time’ actually is.  Screen time can be both a positive and negative experience.  Negative screen time, is time where children are not interacting or engaging with cognitive benefits – for example, playing games that have no depth of learning behind them.  There are many games that can be beneficial – ones that encourage problem solving and critical thinking for example, but in excess even these can be addictive.  For younger children especially, excessive individual screen time should be discouraged, but time with parents using a screen for play, learning or reading (in my opinion) can be just as positive an experience as reading a book or playing a board game as it is the collaborative aspect in these scenarios that is the beneficial experience.

The ‘screen time’ controls that come as part of the iOS update monitor usage in this way, and can even be programmed to limit it.  Let’s look more closely at them:


‘Screen time’ can be found in the settings menu on your iOS 12 enabled device.  Once activated, it automatically tracks usage and categorises it into ‘types’ of screen time – e.g. productivity, creativity, games, social media etc.  In the image below, I had only just enabled screen time for the purpose of this blog, so it is showing my screen time in seconds and uncategorised, but you will find many examples of more active screen time online.  Frankly, I have mine turned off as I know that I spend far too much time on Twitter and don’t want to see just how much!


Below the daily usage bar, there are four controls that can be activated.  In setting up screen time, you are asked if this is your device or your child’s.  If you select that it’s your child’s you will be automatically taken through each of these controls by default.

Downtime is just what you would imagine.  You get to choose times that the user is away from the screen.  The only things that the user will be able to use during this time are apps that you have set as being ‘always allowed’ e.g. the phone (in case of emergency for example) or the alarm/clock.  All other apps would be disabled during this time.

App limits even during enabled screen time, you can set a limit to apps.  If there’s a category of apps, for example games or social media, that you feel your child uses far to much, you can limit it to a set amount of time per day.  For example, I might feel that as I use twitter and facebook too much, I need to set a limit of one hour per day on social media.  If there are apps within the category that you don’t feel should be included in the limit, or you’d like to add other apps, simply click ‘edit apps’ after choosing and adding the category.  Here you can select and deselect the apps that you want/don’t want to include in the time limit.  This is such a powerful way of restricting access to apps that you want to limit.

Always allowed as noted previously, there are some apps that you may wish to always allow.  For example, you might always want to allow your child to make a phone call if they need to, or to access the camera or clock.  You can select/deselect these apps within this menu.

Content and Privacy Restrictions previously called ‘restrictions’ this section allows you to determine which apps and settings the user can change and edit.  Maybe you don’t want them having the ability to purchase apps – you can block that on here.  You can add content restrictions, e.g. no films aged 15 or 18, no explicit books.  As with all web filters, it is not perfect and there may be occasions where your child will come across inappropriate material.  This will always be the case so we do need to teach children to be good digital citizens, and how to deal with that if it does occur (by reporting it).  Again though, this full tool is a very powerful way to restrict and monitor screen time, and make the iPad a versatile tool for learning and entertainment, but not one that ‘takes over’ a child’s life.

Additional features you do also have the option to add a screen time passcode to secure all of these settings so that your child can’t change them.  The passcode can also be used to extend time if, say, for a reward one day you want to allow your child an extra 15 minutes on their games.  You can also share all of these features across all devices (associated with the apple ID) to save having to input the same data on each of your child(ren)’s devices.  You can also set it up for your family if your children have different apple IDs.

All in all, this change is very powerful and truly excellent.  I think it will help a lot of families control the ‘addiction’ that some people report their children as having.

Augmented Reality

Augmented reality has been with us for some time now, and can be experienced well through a whole host of applications such as Goggle Expeditions and Quiver.  I was actually using AR with P4 this week to let them look at aspects of Ancient Rome in more detail:

AR is continually getting better and better.  iOS 12 promises to integrate AR into many new apps and really build its profile.  It truly can be used well in education too.  Twinkl have recently released a free coding app for teaching basic coding skills.  The app is different to the many others as it uses AR for the game place – the game comes to life in front of you!  I have only just started using it and look forward to trying it out with the Tech Team to see what they think of it.

See my short clip about it in my tweet below:


AR ‘Measure’ app

I think that this application excited me more than any other part of the iOS12 update when I first saw it.  I had seen adverts for AR measuring apps on TV but hadn’t got round to purchasing one – fortunately, I now no longer need to as we have an AR measure app built in to our iOS12 devices!

Here’s a very quick clip of how it works:

In an educational context, measure is often something that can be tricky to teach, but this app can be very useful.  I would encourage a diversity of tools for teaching measure though and am not suggesting to ditch traditional measuring tools, such as rulers, as using and reading these is a skill.  The way I would see this tool being used would be for comparisons and gathering data quickly.  I also think it would be great to ‘test how good the app is’ by asking children to use the app to measure a surface, and then using a ruler to measure it and compare the results.


Voice memos

Voice memos have been around for a long time on iPhones, but until this update were clunky and you couldn’t really do anything with them.  That has all changed now.  Firstly, voice memos are no longer restricted to iPhones – you can access and create them on iPads and macs.  Secondly, it is so much easier to use and share your memos – even directly into apps such as notes.  Here’s a quick demonstration:

Whilst I used the app ‘notes’ in this tutorial, it works with loads of apps, including book creator!  Simply share your audio to book creator instead of notes, then, in book creator click on the + symbol within the book that you want to add the media, and select ‘shared’.  Choose the audio file that you want and then select whether you want it to appear as a button (clickable) or soundtrack (plays in the background).

I hope that this has been helpful and has given you an insight into some of the features within iOS12.  Please do also share with parents as I think it is vital that we equip parents with the tools to better protect their children online and monitor/limit non-beneficial screen time.

Have a great week!


National Coding Week Reflection

A slightly different post this week as I look back rather than forward.  I’m looking back on the fantastic National Coding Week that we’ve just had – 17th-21st September, 2018.  As you will know from my twitter feed and previous blogs, I love coding.  I love the skills that it can help learners to develop.  I love the fact that we are really starting to teach it properly, and we’re aiming to give our children the chance to build their digital futures.

I celebrated National Coding Week in three ways; first, I wrote a blog on ‘The Digital Revolution’ for the National Coding Week Website, which can be found here.  Second, I wrote a blog on ‘Using Technology to Visualise Learning and Tackle Misconceptions’ for Twinkl Scotland, which can be found here.  Finally I published a series of resources and teacher help-sheets on twitter for each day of National Coding Week.  You will be able to find the resources below.

I’m also putting some of the best examples that I’ve found on Twitter of coding in the classroom from #NationalCodingWeek.  Hopefully, this blog will inspire you not only to continue/start coding with your classes, but also will give you the opportunity to connect with other schools and practitioners that are starting coding with their classes.

Day 1 – A great way to start coding with Scratch

Monday’s challenge was an introduction to coding.  This lesson has been tried and tested hundreds of time, and even formed part of Dr Amanda Ford‘s thesis (my partner in crime for creating these resources).

You can find the full downloadable image and accompanying teacher cards here.

The idea of the maze game, is that it’s a fun and fairly simple game for children to create, and each game is very unique to the designer as ‘design’ and ‘creativity’ are probably the biggest parts of it.  It also teaches about ‘looping’ and ‘conditionals’ – two of the most common concepts in computer programming and thus skills that can be transferred into most other programs.


Day 2 – IDL: Learning music through code

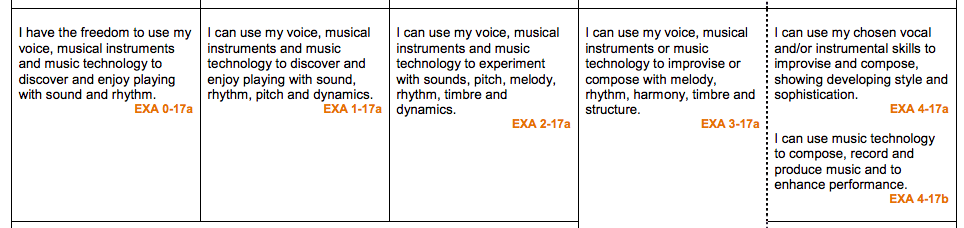
Tuesday was my first example of how coding can be taught across the curriculum.  Digital skills are officially becoming ‘core skills’ in the next update, and so will be a responsibility for all.  I have long believed that computer science should not be taught as a discrete subject, as the skills developed are transferrable to almost every aspect of the curriculum and life.  This set of resources were aimed at giving ideas for ways to teach aspects of music through computer science.  The featured resource was ‘Code your own musical instrument in scratch’, but I also published a breakdown of composition in Scratch and a ‘name that tune’ challenge card.  You can find all of the resources from day 2 here.


Day 3 – IDL: learning probability with code

Day three was my maths day (although, I did post an additional maths resource for #MathsWeekScotland on Twitter prior to coding week – you can find that resource here.) Something that I love doing in teaching maths is to use coding skills as an introduction into teaching probability.  For this lesson, we are asking children to program their own random number generator by create a dice that ‘rolls’ to a random number.  After the children have ‘coded’ the dice they then test out the randomness of each number using their developing knowledge of data handling, and also test their peers’ games.  Sure, I could have given them each a dice to do it, but I’ve found that this has been much more stimulating in the past and has allowed children to really want to test games and use their creative skills rather than just rolling a dice.  The resources from day 3 can be found here.


Day 4 – IDL: coding dialogue and animations

Whilst lots of my learners like creating their own games, many just want to allow their creativity to shine as they bring their stories and scripts to life.  You can do that in Scratch!  I used to love, as part of the children’s learning in literacy, to have the children write their own stories, establishing characterisation, and then bring scenes from their stories to life in Scratch.  The power of Scratch in creating animations is only limited by the children’s own imagination and their understanding of code – you literally can make anything happen, from characters teleporting, to animated talking, to importing your own drawings and bringing them to life.  Whilst they could have filmed each other acting out scenes, this can be limiting and also isn’t always inclusive as there are children who find that situation intimidating.  With scratch, everyone has a chance to create fantastic animations.  Day 4’s resource is a quick guide to creating a simple animation that includes dialogue.  The full resource can be found here.


Day 5 – extending learning in the maze.

Variables are a tricky concept to get to grips with.  Scratch does make them fairly easy to work with, however, learners need a lot of exposure to them in order to fully grasp how and when to use them.  By taking the maze game – a game that the children are already familiar with (from lesson one) we can extend the game and add challenge to it by using the variable ‘time’.  This is a great way to introduce the concept of a variable as ‘time’ (in addition to score) are the most commonly used ‘visible’ variables in gaming, and the children will be used to seeing them in the games that they play.

The full resource can be found here.


Your examples

There was so much amazing work going on across Scotland that it was hard to choose only a few examples to feature in this blog post.  You can see all of the tweets posted during the week by using #NationalCodingWeek.


I do hope that you’ve all enjoyed #NationalCodingWeek as much as I have!

Have a great week everyone, see you next week!

Donald

How can we teach digital skills with a very limited number of devices?

Even where schools have limited, or next to no access to ICT provisions, lots can still be achieved.  Whilst I would always recommend investing in additional technology it’s not always possible, so it’s good to make the most of what you already have.


Timetables

The best way to make full use of ICT provisions effectively, is to timetable it for good use.  Even for schools with masses of technology available to them, it’s not going to have any impact if it’s not used.

  • In-class computers: In my previous school, we had been given advice not to have an ICT suite, and to instead have 2/3 computers per class. The thought behind this was that children would have constant access to computers and thus skills could be developed as part of daily learning.  In reality however, computers were often just left, and ICT skills couldn’t ever really be taught as that would mean teaching only 2-6 children while the rest of the class were doing something else.  Fortunately, we did have a good space available and were able to create an ICT suite with 16 desktop computers.
    Space is a huge issue in some schools though, and those schools have to rely on class computers.  Where this is the case, timetabling for the use of the computers is essential.  Children should be in the routine of turning them on first thing in the morning and should be timetabled on them.  In my recent coding blog, I noted how for a time my children accessed ‘hour of code’ in pairs as part of a timetable.  Computer coding teaches children not only computer science but instructional writing, logical thinking, problem solving, aspects of maths (including angles, measure, directional language, coordinates etc), and many other skills, and should never be seen as children missing out on other areas of the curriculum.  In a week, one hour of a lesson – be it language, maths, R.E. or anything – is not going to impact on a child’s learning of that subject when they are instead developing vast amounts of skills through a course such as an Hour of Code course (code.org/learn).
    Sumdog is another fantastic tool that can be timetabled for during maths time – 5 maths lessons a week at normally an hour each.  This time easily allows for your children to be timetabled on to the class computers for 20 minutes individually to complete Sumdog challenges (www.sumdog.com).
    Often the importance of touch typing is underrated.  In our day and age, typing quickly and efficiently is just as important as being able to write legibly and quickly.  The skills developed in typing are the same as those obtained through writing.  For dyslexic children, cursive handwriting is very beneficial to their retention of words due to muscle memory so should not be underestimated; this is also true for touch typing. Two great touch-typing websites are BBC dance mat typing (p2-4) and typing.com.
    Class computers are of course also great for research tasks and for interactive finisher tasks.
    For younger children, Microsoft paint is fantastic for developing Mouse Control and practicing drawing and writing letters.  There are also many interactive games that can be left on the computers for children to explore.
  • Small ICT suite: Used well, an ICT suite of only 8 computers can be just as effective as one of 30 computers, again, it is all about timetabling it to be so. With a smaller number of computers, I would recommend fewer scheduled sessions (none less than one hour long).  I would recommend three main uses of the ICT suite.
    –ICT suite for developing digital literacy.  org has the most fantastic code course that your children can work through at their own pace.  Teachers can create a free account and provide their children with a login where they can work through the course at their own pace.  This can be done in school or at home.  I’d suggest, in a small ICT suite to have children doing paired-programming (working with a partner).  This is something that code.org are really big on, and most of their videos are tailored to it – one child is the ‘driver’ and in charge of operating the computer, whilst the other is the ‘navigator’ and in charge of spotting errors or better routes.  In a smaller suite of say 8 computers, this would only be about half the class; however, with effective timetabling, the other half could be doing an unplugged coding activity (I will blog more ideas about this soon) or an instructional writing or other task.  After half the lesson (30-45 minutes) your two groups could swap.  This is a very effective way of delivering high quality digital literacy sessions, and with an instructional teaching input at the start and plenary at the end can really deepen the children’s understanding of coding as a problem solving and literacy experience rather than something separate from their other learning.
    –ICT suite for developing numeracy.  I’ve already mentioned Sumdog.  Sumdog should always be done as an individual activity.  In a similar manner to code above, I’d have three maths stations in a small ICT suite with Sumdog as one of them and two other stations, with children rotating after 20-30 minutes.  Sumdog has been proven to raise attainment in numeracy and is included in the Scottish attainment challenge.
    –Other.  There are many other ways to utilise a small ICT suite, but again timetabling is key.  An unused ICT suite is a wasted learning opportunity as in this digital age children should be preparing themselves for a digital world of work.  Unused times to prepare for that world are wasted opportunities.
  • iPads – Where there are limited numbers of iPads (say 5) they can either be used as part of a timetabled learning experience, as with the ICT suite, or be used to enhance learning experiences. I’d strongly suggest the latter.  For this section, I will assume that there is no WiFi with the iPads.
    –Peer assessment and evaluation.  Use of the ‘camera’ to record video and/or photos can be a valuable self/peer assessment for the children, especially when used with apps such as clips and iMovie.  Let’s take P.E. for example, and the ‘Evaluating and Appreciating’ Outcomes HWB 0-24a to HWB 4-24a, children could use the iPads to film their partner doing say a gymnastics routine.  The children could then look at the footage and use it as evidence during the ‘feedback’.  The children could import it into clips and add text and arrows to highlight aspects of their feedback.  Again, the learning experience could be achieved without the iPad, but the use of it truly enhances that learning experience as the children are much more quickly able to recognise how they can improve their own performance.  In literacy, children can use the camera to take photos of parts of other children’s work and highlight why they think it was good, by using ‘mark-up’ to write on and highlight parts of the work without actually damaging or changing the original.
    –EXA.  So many aspects of the EXA experiences and outcomes can be better realised with the assistance of the iPad.  Creating short films in iMovie can bring to life children’s dramas and ideas.  Garageband (although its interface can be intimidating at first, it’s actually very simple to use – especially ‘live loops’ – I’ve had P2 using it in the past) is a fantastic tool for letting children compose and create their own music without having to worry about first learning musical notation.
  • Logins – I’d strongly recommend a whole school login and saving work into a class folder in ‘my documents’ rather than class logins – as these eat into time. In Mosspark, our Tech Team are timetabled to log on to the computers every morning as part of their duties so that they are ready for the children to use as soon as they go to class.  Children don’t log out of the computers.

Digital leaders

I have published a blog article recently about the power and importance of a digital leaders team and I can’t recommend them enough.  Not only can they support children, they can support teachers.  Whereas in the past, teachers would all come to me for advice on something that they were doing, and then it was a case of finding time for me to come in to them when I wasn’t in class; now, they can ask for a member of the team to come in and support them at any point – be it, show them how to work something, or work with some children.  Where my team don’t know how to do something, I support and then train the team in that area so that we are always learning.   A digital leaders team is truly invaluable!

ASN support groups

In Mosspark, we are being followed by Education Scotland this year as part of their ‘live narrative’ in our use of digital tools to raise attainment across the curriculum.  As part of this, we have daily Sumdog groups where targeted children have a daily 30-minute Sumdog session with a member of support staff, either from 9am-9:30am or from 1pm-1:30pm, and the ICT suite is not timetabled to classes during this time.  This daily Sumdog input has had a very positive effect on our young learners, and you will soon be able to access this information on the Education Scotland website.

We have also had a fantastic input from the ASL Technology service, with an especial focus on Ivona Mini-Reader (available on all GCC computers and most authority ones – just search for it in your start menu.) This program will read any computer based word-processed text (if you can highlight it and copy it, it can be read).  This means that our children can highlight any word/sentence/paragraph and the computer will read it to them, allowing them to access the same content as their peers without a member of staff working individually with them.  All they need is headphones.  The self-confidence of our children that use this program has improved dramatically, as there is no stigma now of someone having to read everything to them.

I am still looking into more ways to raise attainment in literacy this year through tech as my main focus and look forward to blogging about my findings towards the end of the year.


PLNs or Professional Learning Networks

Often the thing that holds schools back the most in the deployment and effective use of digital technologies is staff confidence and knowledge about what is available.  Many schools, including ours, are now encouraging their staff to use twitter as a PLN as part of their CPD.  I couldn’t recommend it highly enough as since being on twitter my own practice has improved so much, as I am continually inspired by colleagues from across the world and get ideas every time I go online.  There are of course many other PLNs including Facebook groups, but Twitter is the one that I get the most out of.


Sharing Learning on Social Media

Most schools do use Twitter and other sites now to share learning which is fantastic.  One thing I think schools could do better to allow parents easier access to their children’s work is to use hashtags.  In Mosspark, each class has a class hashtag (e.g. #MossparkP1a or #MossparkP7) so that parents can simply search for their child’s class to see what they’ve been learning rather than having to search through the school feed continually.  Note though, if you’re doing this, special characters can’t be used in a hashtag, so composite classes, such as P3/2 have to be tweeted as #MossparkP32.

We have also built into our WTA that teachers send at least one example of learning and photo per week to be tweeted so that all classes are represented on a weekly basis.

***

I hope that this has been helpful.

There are so many ways that technology can be used where there is limited provision, but I think the above is a good starting place for any school.

Donald

Save paper with digital exit tickets, assessments and more!

I love exit tickets and collecting feedback and data from plenaries.  What I didn’t love was the sheer volume of paper / photocopying that I used to use to do them.  Snap assessments to see how well my class had understood a topic, exit ticket post-its to give quick feedback about a lesson, plenaries to gauge understanding – SO MUCH PAPER!  Sure, there are ways to gather the same information without using loads of paper – thumbs for feedback for starters – but often I can’t track changes in understanding over a period of time for more than just a handful of children as it requires remembering who said what.

Fortunately, there are better ways to do these that require no paper (apart from initially printing plickers cards as you’ll see later), and better still, these methods save time as there is no marking involved – the computer collates the responses and data for you.

With such a win-win situation, I do wonder why more classes don’t use them.  Sure, for some of the ways suggested below you require multiple devices (sometimes one per child) and this can be tricky if not impossible to achieve; however, other ways require nothing more than one device which can be as simple as the teacher’s own phone!

Plickers

Despite being new to Plickers myself, it is definitely the app that I want to start with when looking at fantastic ways to go paperless when using exit tickets or giving plenaries.  It does even work for assessments.  Truthfully, their own description on their website goes a long way to explaining what Plickers is all about.  There is also a great video by EdTech Tidbits that explains about how to set up and use plickers (although, I do take exception to the ‘throwing away the cards’ comment after each use).

One of the things that I like most about Plickers, aside from the fact that you need only use a mobile phone to gather data, or a phone plus a device connected to a Smart Board if you are wanting the children to see a graph of responses, is the fact that it is a ‘safe’ learning environment.  Unless you specifically ask it to reveal student answers, the children can’t easily tell what their peers have answered.  This really minimises copying and allows the children to feel more ‘safe’ about showing an answer – they know that they won’t be judged.  Indeed, this is feedback that I have received from some of my current pupils.

I now use Plickers on an almost daily basis.  As I am currently covering Digital Literacy in NCCT, my set of Plickers cards live in the ICT suite, and all eleven of my classes have been set up to use plickers through my account.  This means that each child has a ‘number’ which is linked to one of the cards (all of the cards are the same for each class, so card 1 is the same as card 1 for any other class across the world).  My children have memorised their ‘number’ to make handing out the cards simple and quick when needed.  If I still had my own card though, I would definitely print and laminate the student cards at the beginning of the year and have the children keep them in their trays for quick access.

Normally I use plickers as a quick feedback tool – either for my own reflection on a lesson, or to very quickly gauge how well the children have understood concepts within their lesson.  More recently though, I have actually used Plickers in place of a PowerPoint when teaching about Internet Safety: the children were given questions to answer, after each of which we discussed all of the answers and worked together to come to an agreement about what the ‘correct answer’ was before revealing it.  I found this very powerful as it really engaged critical thinking and enabled children to argue their own responses.  I tweeted about this lesson here if you’d like to see more.

Data from your class’ responses is saved to your profile so that you can access it at any time, and after using the data for its purpose, or taking note of it, it is very simple to clear.

Kahoot

Truly one of my, and my class’, favourite tools.  Furthermore, with the iPad rollout across Glasgow City Council and similar initiatives for 1-1 device access within schools, this will almost certainly become a tool used on an almost daily basis by many classes.  Powerful and easy to use, this does require children to have their own devices in order to take part in quizzes / assessments etc, however, it can easily be done that children are timetabled to access a smaller number of devices and work their way through the assessment/quiz etc in a more flexible time period.

Kahoot offer a wide range of resources and videos to help you get started – their best page is here.  They also free development resources and a free Kahoot certification course, for staff to familiarise themselves better with the power of Kahoot.

To sign up (for free) and create your own resources, go to: create.kahoot.it
For students to play your quizzes / assessments, they can either go to kahoot.it on any device, or download the app, again for free, on any smartphone / tablet.

Microsoft/Google Forms

Microsoft Forms and Google Forms are exceptionally powerful and yet seldom used in the classrooms.  Many schools have started using forms as a quick way to gather results of surveys, for example the annual HGIOS survey for staff, parents and students mainly due to the fact that it saves time as no-one has to sit and sift through hundreds of forms in order to collate responses – the computer does it for you and gives you instantaneous feedback.  This is great as it does save vast amounts of paper, however, why have we not started looking at their potential for class assessments.  I won’t write much about this here, as I do plan on doing a blog about using Microsoft and Google forms in schools later this year; however, both tools are available through Glow and I would strongly urge you to look at them to see their full potential.

Other

There are many other applications, tools and websites out there that give you as much power and flexibility as the above, however not all of them are free.  Many educators will swear by Socrative, which is indeed a fantastic tool, however I have found that the above are just as powerful and what’s more, they’re completely free.  Socrative is free to use with one class, but as I have multiple classes it would cost me to use which is why I don’t – however, that’s not to say that it’s not worth it.

As with all tools, the important thing is to find one that works for you and in your setting.  I think the tool that will work in pretty much every setting is Plickers and if this blog has given you any inspiration this week, I hope that it is to use Plickers more.

Get in touch

As always, I welcome feedback on the blog and suggestions for future posts.  It would also be great to see what you’re doing in your classes, so do get in touch on twitter @mrfeistsclass and let me know what your class is up to.

Next week’s blog is all about using ICT in a setting where there is limited access to ICT.  Having taught in a setting with no ICT suite or device access, and only 1-2 computers per class – for a number of years at the start of my career, I know how frustrating it can be, so hopefully my blog will give you ideas about how to use the resources effectively in such a setting.


Have a great week,

Donald

Offline or ‘Unplugged’ Coding

Images used in this week’s post are from the Weblify Pinterest ‘coding quotes‘ board. You can also visit their website for more information.

Background and Benchmarks

For years, teachers have been teaching ‘coding skills’ without even realising it.  Teaching coding is not tricky, and if you want proof, just look at the Technologies Benchmarks – most of the digital literacy outcomes can be achieved without even using a computer.  Of course, it is always best to apply the skills that have been learned to ‘online’ coding activities, such as creating games in Scratch and completing code courses on code.org. If however, you are new to coding and are still trying to up-skill yourself in using computers and iPads, unplugged coding is a great way to begin.  For teachers that have been doing coding activities with your children online, and are confident teaching coding skills, unplugged activities are a fantastic way to reinforce learning and apply skills in a different situation.

Let us first look at the Technologies Benchmarks (below) that are most relevant to the ‘computing science’ element of digital literacy.  I have highlighted all benchmarks that can be met through offline coding activities.  Please note that I have only highlighted the ‘primary school’ benchmarks as these are the ones that I am familiar with, however, they should give secondary teachers (especially maths and English) some ideas.

What strikes me the most about this – aside from how many outcomes can be met through offline coding opportunities – is just how many links there are to other areas of the curriculum: even suggestions for learning across the curriculum including problem solving in P.E.

I will do a future post about digital learning across the curriculum, but, if this is your first time looking at the benchmarks for computing science it will hopefully show you just how much scope there is for cross curricular digital learning.

**Please note that there are also Digital Literacy and Cyber Security benchmarks within the technologies benchmarks pages.**

Unplugged Coding Ideas

Early Years

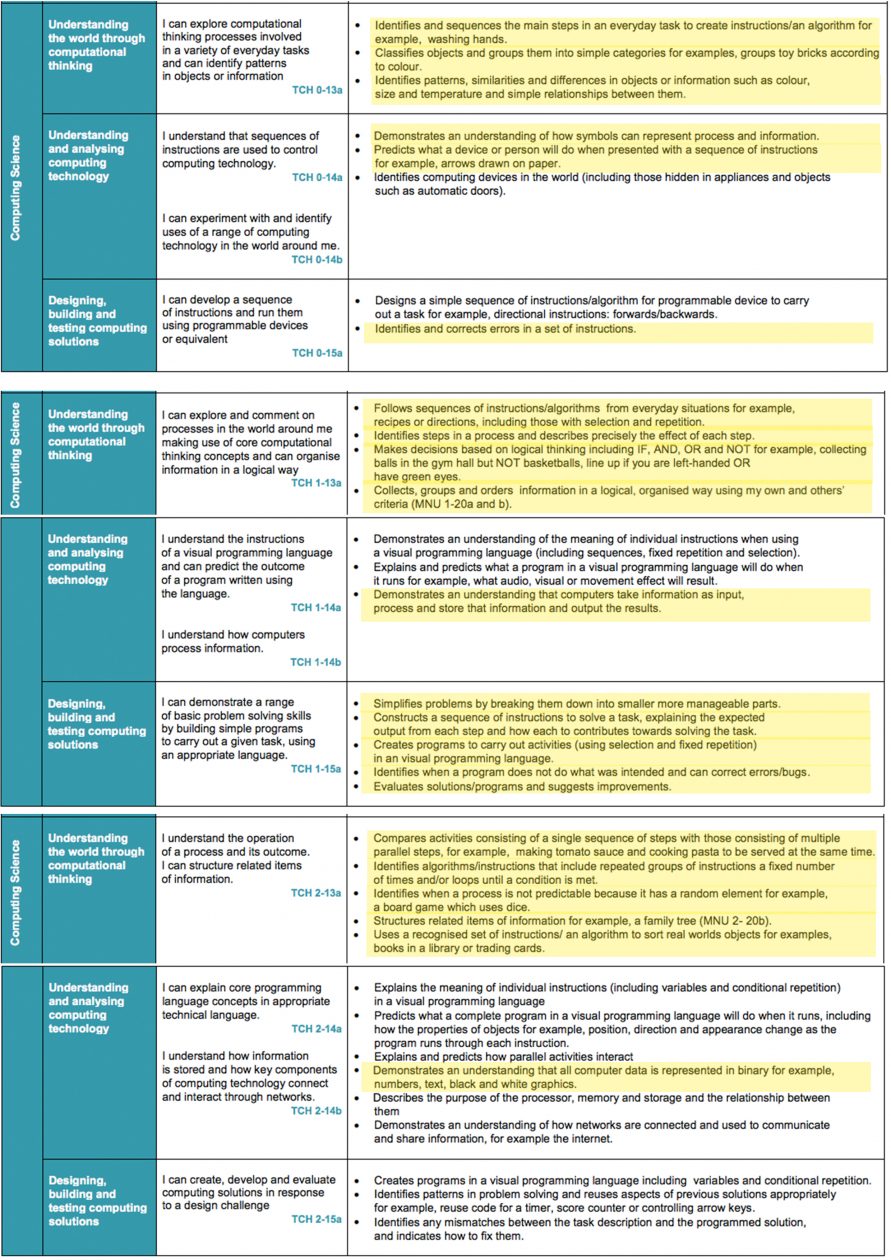
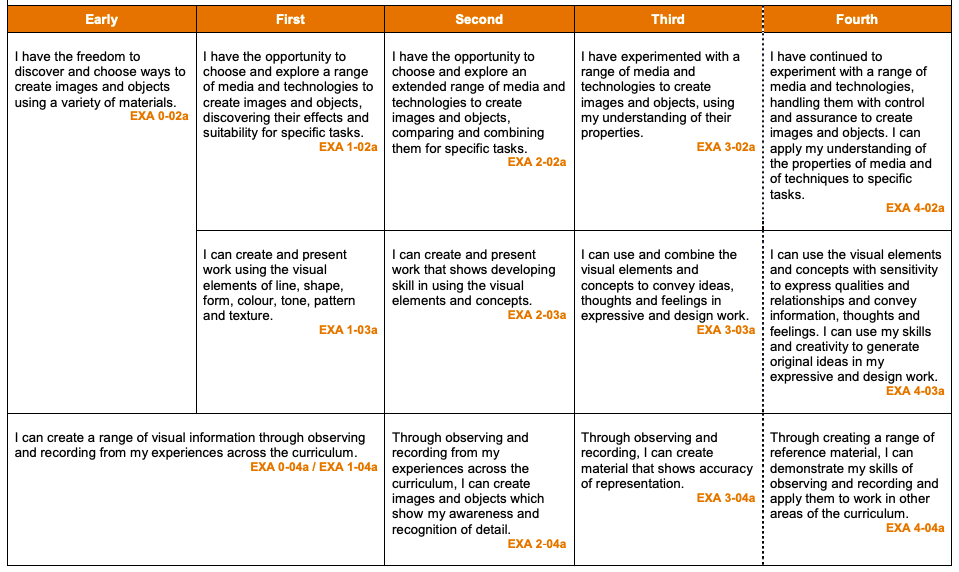
Many people see ‘coding’ as something that only older children / adults can accomplish.  This is simply not true.  Teaching computational thinking can start as early as you like and a lot sooner than you realise.  Even sorting shapes – an activity my sister has been doing with her son since he was just over a year old – is a form of computational thinking.  Looking at the benchmarks for early years, teaching coding is truly a vast and rich way for children to learn.

The very first benchmark makes this the most clear: “Identifies and sequences the main steps in an everyday task to create instructions/an algorithm for example, washing hands.”  We are continually using visual timetables with our infant children to reinforce learning and list a day’s activities.  We are using story boards to describe the sequence of a story.  All of these are computational thinking tasks.  All of these are coding.

Why not take it a step further and, using small diagrams, ask children to ‘program’ their friend to do something, or ‘code’ the teacher to perform a simple task.  It is a great fun learning experience that I have done with P1 many times in the past and plan to do with the nursery children this year in my establishment.

The ‘predicting’ benchmark is also very important, as this is the introduction of ‘debugging’.  Using floor spots is an excellent way to do this task.  Lay out the floor spots and put a teddy on one spot, and another object on a different spot.  Using arrows, the children have to get Teddy to the object.  Moreover, you could draw the arrows, and the children have to work out if teddy will get to the object using your arrows.

First Level

Whilst children in Early Years can achieve the majority of their benchmarks without touching a computer, it is important in first level that there is a good balance between on and offline coding activities.  Reinforcement of skills in different learning environments is vital in developing the logical thinking and problem solving elements required in computer programming.  Simply letting your children only do code courses online will not fully develop their thinking, in the same way that solely doing offline tasks will not let them experience the problem solving aspects of actually using a programming language to solve tasks and create games of their own.

Similar offline activities to the early years should be used, however, children should start to write their instructions down.  Writing instructions for ‘turning off a light’ for example, is a fantastic way of letting children understand how important it is for a computer to be told everything that it needs to know or it won’t operate.

Take the following example of a lesson I did with P4, for example.  In asking the children to code the teacher (me) to turn off the light.  They wrote “press it”.  I was sitting on my chair and read the instruction, so pressed my nose.  The child looked at me like I was insane!  Whilst funny, it was a good learning point for the class, as the next person told me to ‘stand up and walk across the room to the light switch and press it”.  You can then develop the task by placing obstacles in the way for the person to avoid.  You can introduce ‘if’ statements like “if table is in your way, move around table” to stop the teacher crashing into it.  The level of challenge is that which you set.  Differentiation is easy – even that some children may be using arrows / picture prompts, whilst others are writing theirs as a list of commands.

There are lots of offline resources (below) to use with all levels.  These are great for having physical evidence for tracking in addition to developing core skills.

Second Level

By second level, most of the coding experience should be ‘plugged in’, however, there is always time to develop offline coding alongside it.  Instructional writing is a big part of the literacy input in second level, and can be done well as a coding task.  Using printable scratch blocks to format writing in order that it starts to read as computer script is a great way to enable children to really think about what their programming language would look like on a computer.

The biggest problem that children have in second level, when creating their own games online, is debugging and problem solving.  Continually developing children’s problem solving skills and ability across the curriculum really does help with this.

Below are a wide array of resources for offline coding for all stages.  I would highly recommend checking them out.

Resources

  • I’ve put together some printable ScratchJr blocks / arrows for you to use with your children, as not only will they be useful for ‘coding activities’ such as the one above, but will help your children get familiar with ScratchJR itself.
  • Code.org has a fantastic course book that details both their online courses and also gives you a huge wealth of offline, unplugged lessons with full resources and lesson plans.  Available through this link.
  • CS Unplugged has a huge range of unplugged resources and information.  Available through this link.
  • There are some great resources and ideas available on Pinterest.
  • stem.org.uk also have some fantastic unplugged code resources.

Of course, there are many other places that you can go to for ideas and resources – a simple search into google for unplugged coding resources pulls up over 250’000 hits!  My favourites are the above, but mostly I love just letting the children program each other to do things – it’s fun, active and really gets them working together.

I hope that this post has been beneficial and has helped you to think of ways that you can get children to develop their computational thinking skills through every day tasks that benefit other areas of the curriculum.

See you next week!

Donald