Cascading Style Sheets (CSS) can be used to style web pages.
While HTML tells the browser what to display on a page, CSS tells the browser how to display it.
CSS rules can be added to an HTML file using the <style> tag, and/or it can be in a separate file included using a <link> tag. Either way this would be done in the header section of the HTML.
<!DOCTYPE html>
<html lang="en">
  <head>
    <style>
      ...
    </style>
    <script type="text/javascript" src="/script.js"></script>
    <meta charset="UTF-8">
    <meta author="Your name here">
    <title>Forms</title>
  </head>
  <body>
    ...
  </body>
</html>
This method is useful if you have certain rules only on a single page.
<!DOCTYPE html>
<html lang="en">
  <head>
    <link rel="stylesheet" href="/style.css">
    <script type="text/javascript" src="/script.js"></script>
    <meta charset="UTF-8">
    <meta author="Your name here">
    <title>Forms</title>
  </head>
  <body>
    ...
  </body>
</html>
This method is best where the styles are consistent across the whole website.
A CSS rule set consists of:
- a selector – points to the HTML element you want to style
- a declaration block – defines the properties and values of the style to be used
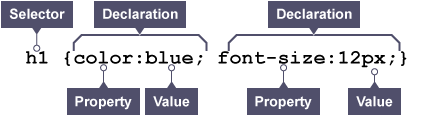
In the case above the selector shows that the style will be applied to all h1 tags.
The declaration block contains one or more declarations. These are separated by semicolons.
Each declaration includes a property name and a value. These are separated by a colon. The entire group of declarations is surrounded by curly brackets.
Style declarations
Whitespace in a declaration is ignored. Therefore, sometimes the declarations are shown on a single line like this:
h1 {color:blue;font-size:12px;}They can also appear on separate lines, so the same rule could appear as:
h1 {
  color: blue;
  font-size: 12px;
}
One property value pair per line is the most readable once you start applying complex styles. In either form, the heading would show on screen as blue text with a font size of 12.
Selectors
The selector is how you choose the HTML elements that are affected by the CSS properties. You can use:
- The HTML tag
- A class assigned to a tag
- An id assigned to a tag
- Nested HTML tags
- Pseudo classes
- Pseudo elements
HTML tag selectors
h1 {
  color: blue;
  font-size: 12px;
}
This means apply these CSS properties to all h1 elements in the page. Using a HTML tag as the selector is how you change the default appearance of the whole site.
Class selectors
<p class="intro">Some text to display.</p>.intro {
color: #ff0000;
padding: 10px 5px 10px 5px;
}
p.intro {
background-color: #000000;
}You use a period then the class name to apply a class based selection. A class selector applies the CSS properties to any elements with the matching class assigned. You can also use it in combination with a tag selector. In the above example any tag with an intro class has their color and padding change, but paragraphs with the intro class also have their background-color altered. Classes are useful ways to assign styles to different sections of a website.
ID selectors
<p id="userfeedback">Some text here.</p>#userfeedback {
color: #ff0000;
text-align: center;
}To use an ID based selector you use the hash symbol then the ID of the HTML element to match. Because IDs are unique, ID based selectors are used mainly for forms or menus where it has to behave differently from the rest of the site.
Nested selectors
<div><p>Some text here</p></div>div p {
background-color: #33cc33;
}You can use nested selectors to limit CSS properties to only affect tags that occur beneath other tags. In the above example we only want paragraphs that are within div tags to be altered, not all paragraphs.
Pseudo class selectors
a:hover {
  color: #ff3333;
}
To use a pseudo class you use a colon followed by the pseudo class name. A pseudo class is used to define a specific state of an element such as when a mouse is hovering over it or if a link has already been visited. Some of the more common pseudo classes:
- link (every link that hasn’t been visited)
- visited (every link that has been visited)
- hover (hovering the mouse of the element)
- active (every link to the current active page)
- first-child (the first HTML element within the tag that this is applied to)
- nth-child(n) (the nth HTML element within the tag that this is applied to)
- lang(language) (every element with a lang attribute matching the language passed into the selector)
- checked (every input that is checked)
- enabled (every input that is enabled)
Pseudo element selectors
h1::after {
 ...
}
To use them you use two colons followed by the pseudo element. Pseudo element selectors can style specific parts of the content such as:
- first-letter (Changes the style only for the first letter of the element)
- first-line (Changes the style only for the first line of the element)
- before (insert content before the element)
- after (insert content after the element)
