The requirements of the analysis and design phases are as follows:
- Produce a requirements list from the brief.
- Produce an outline design for the website.
- Create a navigational structure for the website.
- Create a resource list
- Create a test plan.
During the analysis phase, web developers will consider:
- end-user requirements
- functional requirements
End-user requirements
The term end-users describes the group of people most likely to use a website. Some websites might be designed with all people in mind while others might be focussed at a certain group. For example, a website designed for young school kids would use simple words and an easy to navigate layout.
Some of the more common end-user groups are:
- children
- customers or employees with specific requirements
- inexperienced users
- experienced users
- users who require additional features to aid accessibility such as screen readers
An end user might be part of more than one categories.
The tasks that end-users need to be able to carry out are known as the end-user requirements.
Functional requirements
Functional requirements for a website can be categorised as follows:
- processes that the website must be able to carry out
- interaction with databases/information that the website needs to have access to in order to function properly
A combination of both the end-user and functional requirements will be used to design the website. These requirements can also be used when evaluating the final product that you have made. Does it meet all of the requirements? If it doesn’t, is the website fit for purpose?
Example
A web developer is creating a website for a local garage. During the analysis phase they make a list of end-user and functional requirements.
End-user requirements
Speaking to the client at the garage provides the following end-user requirements.
They would like customers to be able to:
- navigate the site with ease
- view all the services available
- view all the vehicles they have for sale
- view details about any vehicle including a gallery of images and videos about it
- be able to print off a page with a single vehicle’s details on it along with contact information to easily contact the garage
- a map so that customers can visit the garage
Functional requirements
With this list of end-user requirements they can make a set of functional requirements that will drive the rest of the design process.
Functional requirements will specify areas of the site that require navigation and interaction.
- all pages to have a menu to link back to the home page, services page, vehicles page and a contact information page.
- contact information page to have a map showing the location of the garage
- vehicles page to list all vehicles available and each vehicle links to its own page
- each vehicle page shows all the information and list any photos or videos available for that vehicle.
- each vehicle page needs a print button that shows a stripped down version of the web page with just the vehicle details and contact information
- a services page listing all services available
Design
Hierarchy
Begin by making a hierarchy of the pages. At the top is the home page, this is what people will see when they just go to the domain name. The 1st level underneath this contains anything linked from the homepage, this will be items in the menu along with pages that are only linked from the home page.
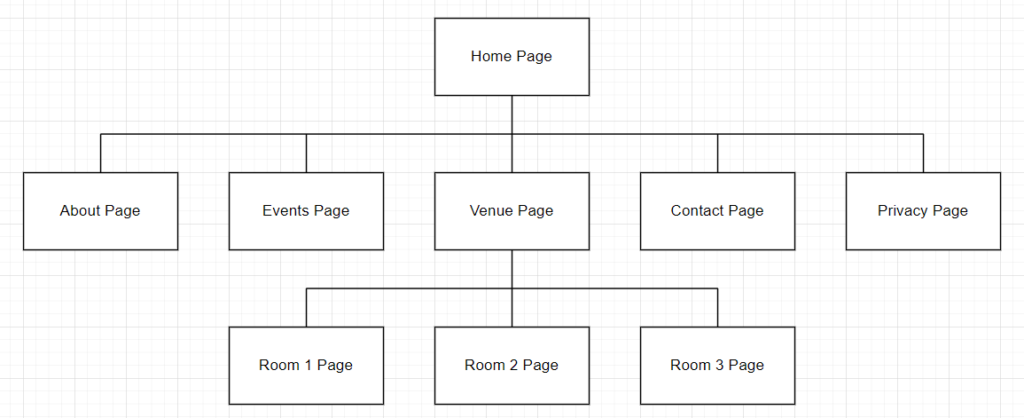
In the next level you can add pages that are both linked from a 1st level page and thematically grouped together. Often pages are linked from multiple places and your hierarchy tree would look more like a tangled hedge if you drew a line between each page. So just show where these files would be sorted if you were putting them in folders. Likewise every page will probably show the main menu and links in the footer to privacy policies and such like, but these can just be left as 1st level items in the diagram and not linked to every page on the site in the diagram even though the links will be on every page in the code.
Wireframes
Once you know the pages involved in the site you can begin designing the pages using wireframes.
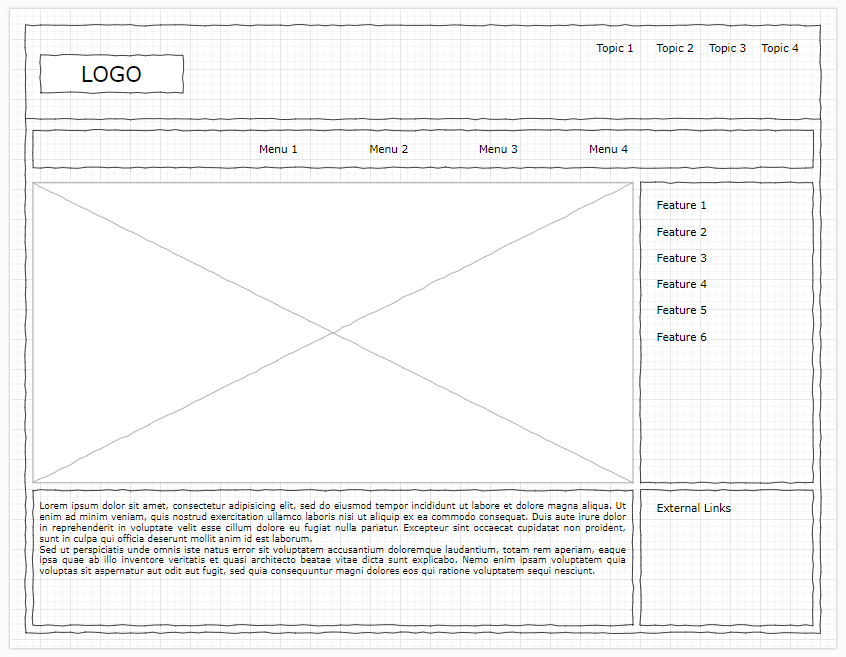
A wireframe is just a guide showing the position of the parts of a page. You can show where images or videos go with a box with a cross. Text can either be fake text or horizontal lines. You can go into more detail and use different colours to show what should be a link. If you have the details then you could even mark on the wireframe exactly where each link goes. If you are using forms you can mark what each input type is.
You can also state things like colours, background colours, image sizes, fonts to be used. Colours and fonts to be used should be confirmed with the client in the case that the company has a brand style guide that needs to be followed. If there is no brand guide to follow, then you can look for inspiration on sites that show complementary colour schemes.
The part you have to get right is the layout. Think of the wireframe as a very low resolution version of the site. You will use this wireframe to put all the HTML elements in the right location using both the HTML and CSS code.
Make a wireframe for each layout of page you need for your site. For example think of a news site. Each article page might follow the same layout, but the home page has a different one where it lists all the articles. If your site is responsive, so it looks different on smaller screens, you will need a wireframe to show how the page will look at any different sizes.
Resource list
Once you have the wireframes you can come up with a resource list. This is a list of all the content you will need for the site such as text and images. If you are making the site for a client then you will need to send them a list requesting all the resources that you have identified.
Test plan
The test plan is used to document the testing of all hyperlinks on the website to make sure that they all point to live web pages or other web resources.
The plan also allows you to formally record that any images or other multimedia elements are working correctly.
If your page has a form on it that uses validation then you will need to check that the validation is working correctly and that the form sends the data to the correct place.
The website should also be checked for performance to make sure that it loads within an acceptable time period and to investigate what might be preventing this if an error is recorded.
The plan should be carried out using three different combinations of hardware and software. This should include at least one mobile device.
Ideally the site should be checked in all of the major browsers: Google Chrome, Mozilla Firefox, Edge, Safari, Opera, and Internet Explorer. Some of these browsers are only available on certain hardware so it is understandable if it is impossible to test the website on all of them.
You need to test each page on the site, so make sure on your test plan form that you record the name of the page you are testing along with the usual date and test number.
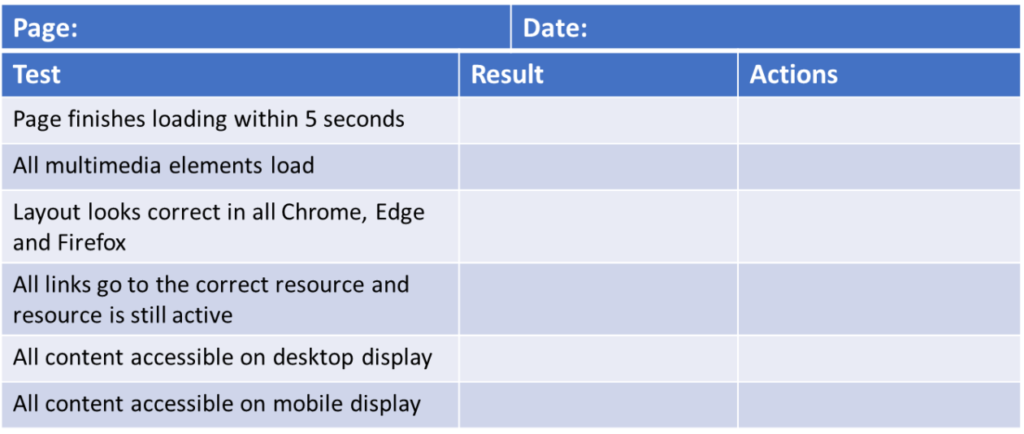
The test table could be as simple as the one above. For each page you just formally check that everything loads and looks correct in multiple browsers and resolutions.
Implementation
Now that you have the design done you can build the site using the HTML, CSS and Javascript code that you learned in the previous chapters.
Once the site is finished you can upload it to wherever the client is hosting the website.
Testing
Use your test plan to check that everything on each page of the site works as planned.
Evaluation
Does the site work? Is it fit for purpose? In other words, does it meet all the end-user and functional requirements that were identified in the analysis phase? If it doesn’t then you will need to revisit your design to address this.
