What if we had a different number system?

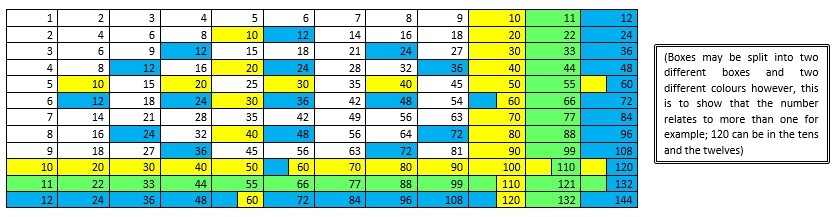
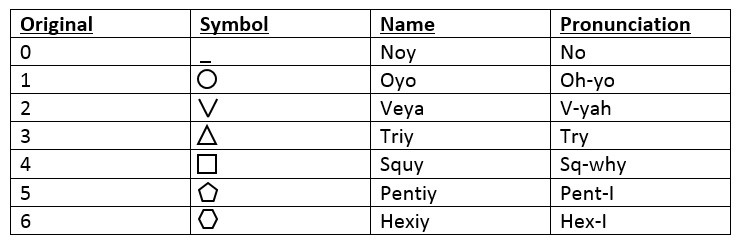
As a small group we were set the task to create our own number system. We had already looked into different ways and symbols used to represent numbers (Egyptians, Roman numerals, Ancient Indian numerals, the Munduruku tribe and many more). After taking inspiration from all of these different number systems we had decided to create one that had links to mathematics in another way. Below we can see our small chart which explains the original number in one column, the symbol in the next column, the name of the value in the next column and finally the pronunciation in the last column.

picture 1 picture 2

This activity was very interesting to complete and to see how well we could develop our own system without it being too difficult. Once we started we found that it was going to be very hard to drift away from our normal base 10 system and our recognisable numbers. However, after giving it another relationship to maths then this allowed for us not to get too mixed up.

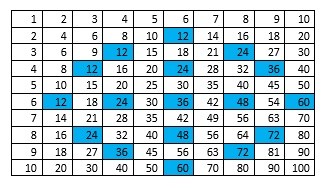
We could have continued this up to 10 or 12 however, if we keep it a 6 based system it would have a different method. For example once I had reached hexiy (6) I would go back to the start adding Oyo to the start of each number; Oyo-oyo (7), Oyo-veya (8) and so on. Once reaching Oyo-hexiy (12) you then would change the Oyo to a Veya; Veya-oyo (13), Veya-veya (14) etc. This method would continue all of the way up, working through each number (1-6) until we got to Hexiy-hexiy (42). What would happen here is that a new column would open up what could effectively mimic the hundreds column: Oyo-noy-oyo (43), Oyo-noy-veya (44).

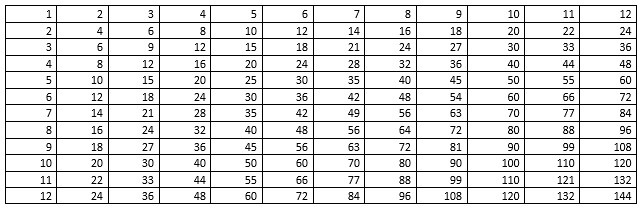
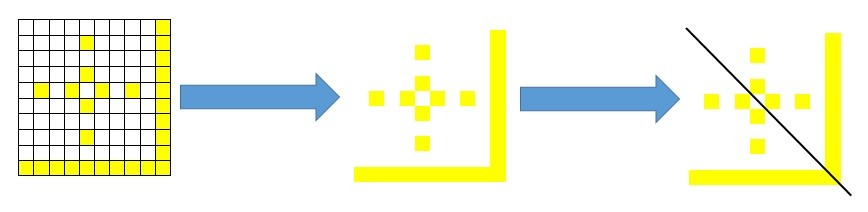
Without going into too much depth the way in which these numbers work would be through columns. The first column on the right acting as a units column then every time we reach a six the next column to the left increase by 1 while the ‘units’ column always goes back to 1. Then when we reach six within that column the next column increases by 1 while the previous column resets to 0. To work out how much a number is worth you calculate the columns through multiplying and addition. The columns below show the values and methods for calculating the value.

picture 3

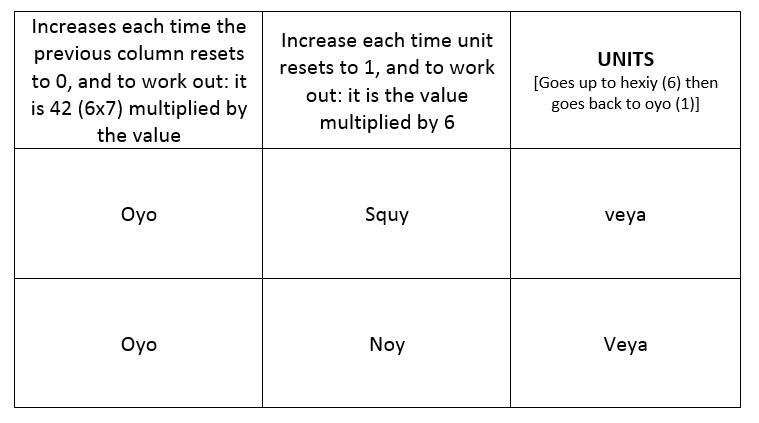
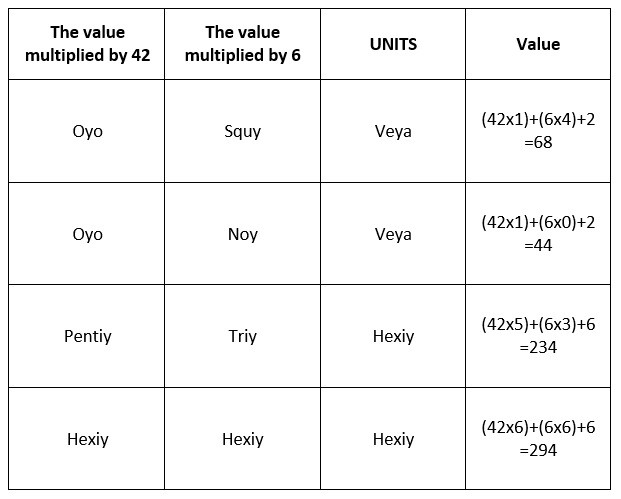
The way in which we work this out is to constantly increase the unit’s column and then reset to 1. Each time this happens we increase the following column by 1. To work out the total value of these first two columns we multiply the second column value by 6 and then we add this onto the unit’s value, which gives us our total value of the number. We then take this further and when the second column reaches the value of 6 it resets to 0 and we increase the third column by 1. By this point to work out the total value you would multiply the third column value by 42 to get one value. Then multiply the second column value by 6 and then add the unit’s value with the two values already calculated from the second and third columns to give us our overall value. This has been shown briefly in the last column of our table

picture 4

Although this may be quite complicated, and I must admit a calculator was needed to try and help with some of the calculations, I am very pleased that I have managed to devise a number system that I can explain how it works (although quite complicated).

Also this could be used in the classroom setting; we could get the children to try and make up their own, although this example is very complicated, number systems. You could have the children drawing their symbols out, creating different names or using physical objects to represent their number system. The process of discussing, planning, designing and then possibly making their number system.

Music + Maths = Creativity

Mathematics is very prominent in Music from rhythm all of the way up to musical intervals, it is almost hidden within music itself. This could be a very good opportunity to introduce cross curricular work and is very helpful to help children understand maths or on the other hand music.

We know there are four beats in the bar so we can encourage the children to count, whether that be aloud or in their heads. When it comes to time signature it is almost set out like a fraction. For example if there are three beats in the bar then it is;picture 1

This has many similarities to a fraction, however this set up tells that there are three beats in the bar and are made up of crotchets. Therefore making the music look a bit like this;­

picture 2

There is also some more maths hidden within this score and that is the note values. The crotchet notes, seen above, have a value of 1 beat. Below you can see a chart that labels all of the notes and their values.

picture 3

Children can creating music use their mathematical skills to accurately write music. Because if there were 4 beats in a bar and the children only had a minim and a crotchet the bar would not be complete. Through using maths they would be able to determine how many beats were left by adding the values together and taking them away from 4, leaving them with 1. Immediately they could just out in another crotchet (with a value of 1) or they could use their problem solving skills to discover if they can put any other notes in that may make the whole value of 1 beat.

In fact you could create a problem solving activity relating between music and maths whether it be an activity for discovering the missing notes, totalling the beats in the bar or even introducing the idea of a chorus and counting how many times it is repeated within a song.

Personally, I feel that when I look at the musical score of a piece of music I immediately switch into a maths mode to help the score make sense. Others may approach this differently as they may be confident in a musical sense whereas when I started reading sheet music it took a long time to understand. However, once I realised the connections to maths, for example the value of a one bar and being set the task to evaluate the value of the note missing, I quickly began to gain an easier understanding.

My Escher Based Design Process

As part of our task from our second lecture on this course, we had to explore the idea of shape and tessellation or look into creating an Escher based piece of art. I decided I would attempt the Escher based task, where you start with a shape that tessellates and you take bits/sections and move them to a different side of the shape to create an animal which then tessellates itself. I will show you step by step how I went about creating my final piece.

Firstly I chose to base my design around the hexagon. picture 1
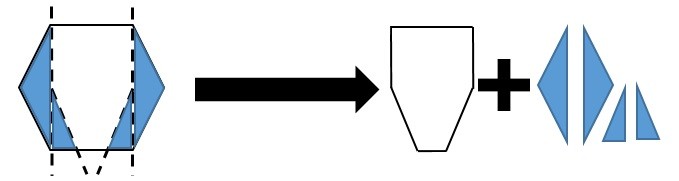
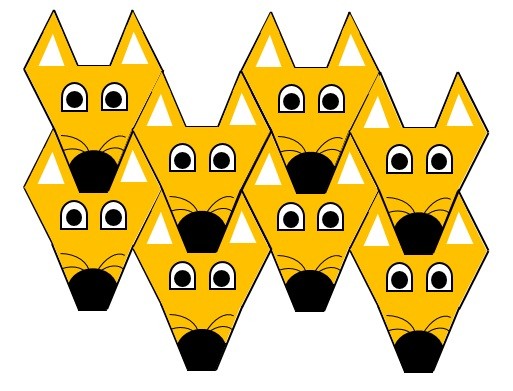
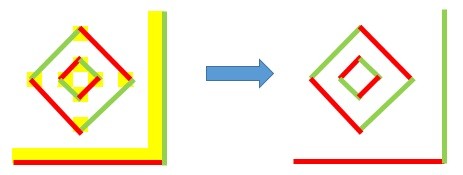
Then what you do is you begin to, in a sense, ‘nibble’ away sections of the hexagon that will be used to move later on to create the animal. In the picture below we can see the hexagon being cut up into five different sections, four of which are blue. The reason why they are blue is to show that these are the pieces that are being removed from the hexagon.picture 2After removing the four pieces, we are left with an irregular hexagon. That looks a like the picture number 1. I then started to move the four removed pieces around to see where they would fit and what animal they would make, until I decided on the set up of picture number 2. Showing the finalised joining of the shapes in number 3.picture 3Below you can see the new shape against the original hexagon (dashed line hexagon in red) that I started with.picture 4Here we can see the original shape and we can identify the areas that have been moved around. As a result of using a hexagon this means that our new shape will tessellate to create a very interesting picture but first we need to add the details of what animal this is.picture 5I decided to go for the design of a fox’s face and then tessellated this to create the final tessellation design below.picture 6

We can then go onto to change the colours of the foxes to make it relate more to Escher’s design. But the reason why this foxes face tessellates is because of the starting shape, a hexagon, has 360° when the shapes are joined together. This is shown in the picture below with the hexagons.picture 7

Below you can now see my finished design of the tessellation of a hexagon inspired by Escher.

final picture

I do feel this would be quite possible to take into the primary classroom and these steps are quite simple. It can be completed with real materials or, as I have done, with the computer and this will help enhance the children’s computing skills.

Duodecimal System And Symmetry Investigation

Below we can see the times table square going up to the number 12. After the lecture received today around the decimal place and number systems I became interested in how the 12 number system works. I wanted to investigate this further.

table 1

For starting I wanted to complete the times table grid first of all using the knowledge I already have. Then for changing the appropriate numbers into the corresponding symbols for the duodecimal system (changing 10, 11 and 12) I decided to highlight the certain numbers which relate to needing changed directly then adjusting the rest.table 2

Through doing this I began to see a pattern emerging from the duodecimal system within the regular decimal system. First I realised that the 11 times table is obviously not included within the decimal system. However, the 12 and 10 systems are shown repeatedly within the decimal system (times table).

table 3

By colour coding the boxes differently (10 being yellow and 12 being blue) I could identify the different patterns, which were appearing, more clearly. As you can see below I then focused in on the individual systems on two separate tables.

table 4

table 5


Looking at the 10’s diagram (on the left) we can see a pattern formed by the colours, taking away the numbers from the table we can see this more clearly.


Immediately, I could see that there is the possibility of symmetry. By adjusting the cells to 0.5cm by 0.5cm squares you can see the one line of symmetry within the pattern (the line of symmetry is symbolised by the black line.)

tabel 6tabel 7


The same occurs within the diagram of the 12’s system. Again if we take away the numbers and grid lines, looking at the pattern it is clear that there are more lines of symmetry than the 10’s system.


Resizing once again the table to squares of 0.5cm by 0.5cm. Here we have 4 lines of symmetry (identified by the black lines). However, unlike the last example this pattern has a rotational symmetry of 4.

tabel 8

We usually relate symmetry to solid shapes and so, looking at a decagon and a dodecagon this can represent a 10 base system and a 12 base system. We can see that a decagon has 10 lines of symmetry and the dodecagon has 12 lines of symmetry. The decagon has 10 lines of symmetry and the dodecagon has 12 lines of symmetry.

tabel 9

Comparing the patterns discovered from the base 10 and 12 systems we can see that there are some similarities. The base 12 pattern has, what could be, an irregular dodecagon outline. Looking at the diagram the red and green lines shows the connecting lines that form this shape.

tabel 10

This can also be explored within the pattern of the 10 based system. By connecting the diagram in a different way we can see that there are 10 different lines (shown in red and green) however, the lines are not connected entirely and so it cannot be expressed as a decagon.

tabel 11

It is possible that the reason behind these patterns, discovered from the 10 and 12 based systems, show elements of symmetry is because of the relationship with decagons and dodecagons. The 12 based system creates a pattern with clear lines of symmetry, which can be linked to the symmetrical shape that is the dodecagon. However, the shape created is not a regular dodecagon but an irregular dodecagon. Whereas the pattern from the 10 based system does not create a regular/irregular decagon. However, by connecting the points in a different way through using lines we can say that the pattern can be connected by 10 lines. This does have links to the decagon as it has 10 edges. Overall, I have explored the duodecimal system looking further into the 10 and 12 based systems to find the connection between the systems and symmetry as a result of using shape to understand this relationship.

The Beginning of My Mathematical Journey

For the first semester of University I have chosen to take the elective Discovering Mathematics. After taking the Science and Engineering module as an elective in my first year at University I decided I would like to explore the mathematical world even more and develop my understanding of why and how maths is significant and serves its place in the world. I also look to explore the development of different techniques and methods within this module.

I am looking forward to this module and, even more so, engaging with the mathematical world.

Transitioning From Old To New

Over the past week we have been looking into the new eportfolio format for the MA2 Education course. The new format at first seems to be quite daunting with links, pages, blogs and much more. Although at first this seems a lot of information to take in, with practice I feel I am becoming more confident in using this blog.

Last year I had an eportfolio which was completed in a different format. I would describe this as placing our posts into different folders/sections which I found to be quite tricky for locating the appropriate section for a piece of work. Whereas with the new format we can have our posts in one place, linking them to different aspects of the SPR by categorising them. I find this method to be slightly more organised to an extent, as I can look through my posts in order and can also look in to one SPR section and see all of the work that I have posted that meets this point.

For this year I am really looking forward to developing my knowledge about technology through using the blog. Through doing so I will be developing my eportfolio accordingly.